

All You Need to Know About FluentCRM’s Conditionals in Oxygen Builder

Summarize with


Last Updated:
Most WordPress users are familiar with page builders. If you want to create a webpage without any coding experience, you can get the job done with page builders like Elementor, Divi, Oxygen Builder, etc. They are beginner-friendly and flexible.
Why are we talking about page builders in this blog?
Because FluentCRM 2.0.2 includes a conditional section for Oxygen Builder(even in the free version!). And today, we’ll tell you how this changes the game for Oxygen Builder users!
Ready?
Let’s start!
What is a conditional section?
Whether you’re using WordPress’s default editor, Gutenberg, or a page builder like Oxygen Builder, you need to create and design your pages with content.
Your content usually stays within a section or block. And a conditional section lets you display or hide your content based on conditions.
Oxygen Builder’s conditional section
Before we get to how to use FluentCRM’s conditional section in Oxygen Builder, it would be better to mention that Oxygen Builder has a conditional functionality of its own.
The page builder offers a lot of advanced functionality, and the conditional feature is one of them. It lets you show or hide your content based on a wide range of conditions such as your user’s log-in state, post type, date, day of the week, and many more.
Why should you use conditional sections?
Here’s something you might be asking,
“Why would someone need a conditional section when web pages are meant to display content?’
Web pages are indeed meant to display content. But people also want to have complete control over what their web pages display. Whether you want to control your website’s content based on user behavior or simply want to personalize your audience’s experience, being able to condition content is just not optional.
Suppose you have a membership site; it’s pretty obvious that you’d want to hide some of your website’s content based on your user’s membership status. You can get this done with a conditional section.
Here’s an example where Oxygen Builder has shown us how to create a conditional section based on a user’s login state:
But the ability to show or hide content is not only beneficial for membership sites. Bloggers, marketers, e-commerce store owners – anyone can use a conditional section to improve user experience and offer the right content to the right audience!
Understanding FluentCRM’s Conditional section
FluentCRM is NOT a page builder. It is an email marketing automation plugin for WordPress that offers a wide variety of email marketing, segmentation, and marketing automation features.
Note the word segmentation, that’s what makes the conditional section feature work.
FluentCRM allows you to Tag your users based on various demographics and behavioral activities. This essentially means that you can create segments of leads who share similar characteristics. This can be anything, including their data, age group, browsing behavior, email behavior, and many more.
For example, you can launch an email campaign to thousands of subscribers and create segments of those who open your email and who don’t. This makes it really easy to understand who has seen your content and who hasn’t!
Now, if you want to display or hide your website’s future content based on this kind of behavioral activity, FluentCRM provides you with a conditional section to make it happen!
With the conditional section, you can easily define who sees what and who doesn’t!
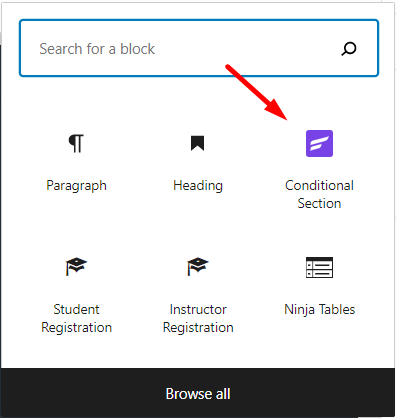
In the Gutenberg editor, this is available as a block. You can simply add the conditional section block and select the segment of your audience who’ll get to see the content of the conditioned section.
FluentCRM’s conditionals in Oxygen Builder
With Oxygen Builder, you don’t have blocks. Instead, you need to use elements to create a page. But because it has a conditional functionality to show or hide content, we were able to add FluentCRM conditions! In fact, we’ve added more conditions than what is available in the Gutenberg editor!
FluentCRM’s conditional function in Oxygen Builder will allow you to condition your content not only based on tags, but also on contact status or contact existence!
What does that mean?
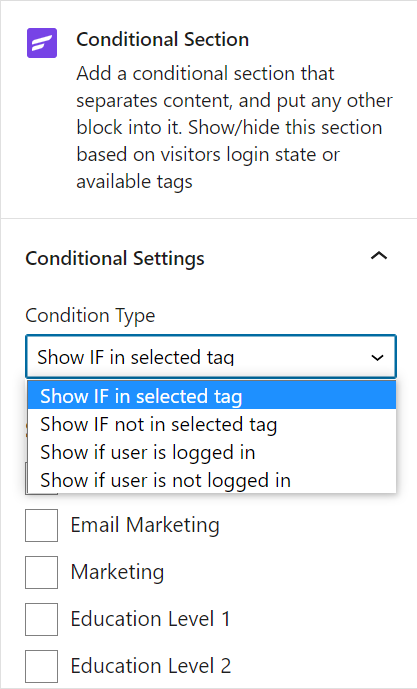
- The contact tag condition will work as it does in the Gutenberg editor. You can simply select the contact tags to show or hide content.
- The contact status condition will work based on the contact’s status in FluentCRM. Currently, three types of contact status are supported: Subscribed, Pending, & Unsubscribed.
- The contact exists condition works based on two conditions. You can show or hide your content if the contacts exist or not.
How to use FluentCRM conditionals in Oxygen Builder
By now, you know why you should use conditional content (or section) and how they work in FluentCRM and Oxygen Builder. But before you map out when you’d want to make use of this feature, it’s better to mention that FluentCRM’s conditions will only work in 2 scenarios.
- If the contacts are logged into your site.
- If the audience enters the website by clicking a link on your email.
Here’s how to set up FluentCRM conditionals in Oxygen Builder:
- Select the section you want to condition.
- Set condition type (you can choose any type between and/or) and click set conditions.
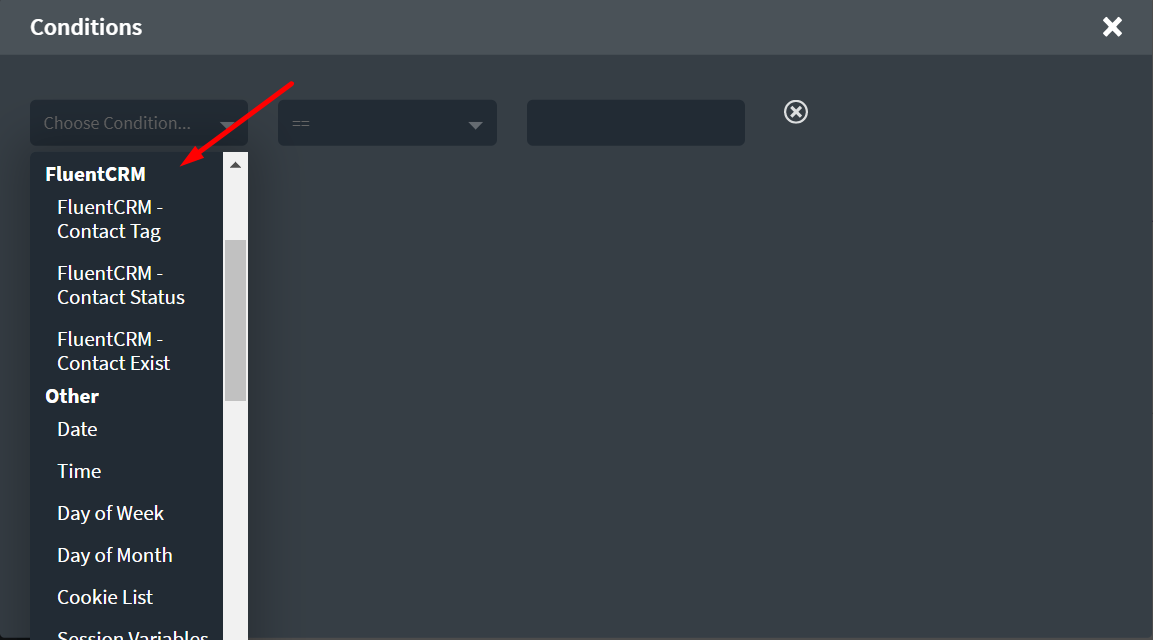
- Select FluentCRM condition type. You can choose any condition type between contact tags, contact status, and contact exists.
- Define the condition rule. For example, if you want to set the condition as “Display only when a contact has a specific tag, then you need to set an exist rule.”
- Select your contact tag(s), status, or yes/no if you’ve selected contact to exist as your condition type.
And that’s it! In a few steps, you can apply conditions to your content.
Concluding Remarks
Since the Oxygen Builder allows you to set multiple conditions, you can add both FluentCRM conditions and Oxygen Builder conditions to control your content. This will help you personalize your audience’s experience and optimize your website for conversion.
Oxygen Builder’s conditional feature can already work wonders for those who want more control over the content that displays on their site. And with FluentCRM’s conditions, it just got way better!
Shahjahan Jewel
Hello, this is Jewel, CEO & Head of Ideas at WPManageNinja. I am obsessed with WordPress since 2009. My aim is to be a user-centric developer first, and a serial entrepreneur second. You will find me discussing various tech issues and trying to come up with scalable solutions on different forums when I am not busy coding.

Leave a Reply