How to Build an Automated LearnDash Student Onboarding Email Sequence in FluentCRM

Summarize with


Last Updated:
What actually happens to a student the moment after they enroll in your course?
For most course creators, the honest answer is: not much. A confirmation email goes out, and then the student is on their own; motivated today, maybe distracted by tomorrow, and gone by next week if nobody reaches out.
The fix is a proper student onboarding email sequence. Automated emails go out and meet students where they are, on day one, day seven, or the day they finish the course.
To show you how it works, we’ll build one using two popular WordPress tools: LearnDash for delivering the course, and FluentCRM for automating the sequence around it.
TL;DR
- LearnDash sends one-time notifications (purchase, registration, invoice). It doesn’t follow up if a student stalls or disappears.
- FluentCRM connects natively to LearnDash and turns enrollment, lesson completion, and course completion into triggers for an ongoing onboarding sequence.
- A solid onboarding email sequence needs four pieces: a trigger, a series of timed emails, tags for segmentation, and conditional logic to branch based on student behavior.
- You can build the whole thing inside FluentCRM using Email Sequences + Automations.
- Once built, the same framework extends into re-engagement campaigns and course-recommendation funnels.
What is a Student Onboarding Email Sequence?
A student onboarding sequence is a series of timely, automated emails that are triggered based on what a student does (or doesn’t do) in your LearnDash course.
Instead of sending one static “welcome” email, it covers a complete journey:
- A welcome message gets sent right after enrollment.
- A course navigation guide follows a few days in.
- A progress check-in lands around the one-week mark.
- A conditional logic gate reacts differently depending on whether the student is engaged or has gone quiet.
The goal isn’t just to send more emails. It’s to build a personalized experience, catch students at the moment they’re most likely to need a nudge, and make sure that nudge is relevant to where they actually are in the course.
Remember, when students enrol, it is usually the highest-engagement moment. They’re motivated, curious, and ready to start.
An onboarding sequence protects that momentum instead of letting it fade the moment the confirmation email lands in their inbox.
Why LearnDash Alone isn’t Enough?
LearnDash is genuinely great at delivering the learning experience, and it comes with a solid set of built-in emails to match. It mostly covers four email types:
- Course Purchase Success
- Group Purchase Success
- New User Registration
- Purchase Invoice
These are expected transactional emails, and LearnDash handles receipts, confirmations, and registration details well.
But keeping students engaged is not what LearnDash is supposed to do. For example:
- A nudge for students who haven’t logged back in after enrolling
- Encouragement for students who complete a lesson or two and then slow down
- A follow-up for students who finish the course, celebrating the win and pointing them to what’s next
That’s what an onboarding sequence adds on top: while LearnDash’s emails confirm a moment, the onboarding sequence follows the student’s actual progress over days or weeks.
Worth noting: this isn’t about replacing LearnDash’s emails. Rather, LearnDash handles instant transactional messages, and FluentCRM handles everything related to student engagement.
What You’ll Need Before You Start Building the Student Onboarding Sequence
If you use the WordPress ecosystem for your business, you need to have an LMS platform to market your courses online and an email automation tool to automate the entire learning journey for students.
So, before building your student onboarding sequence, make sure you have:
- LearnDash: Installed and activated, with at least one course set up
- FluentCRM: Installed and activated
Then, move on to activate LearnDash integration from FluentCRM.
Go to FluentCRM > Settings > Integration Settings > LearnDash
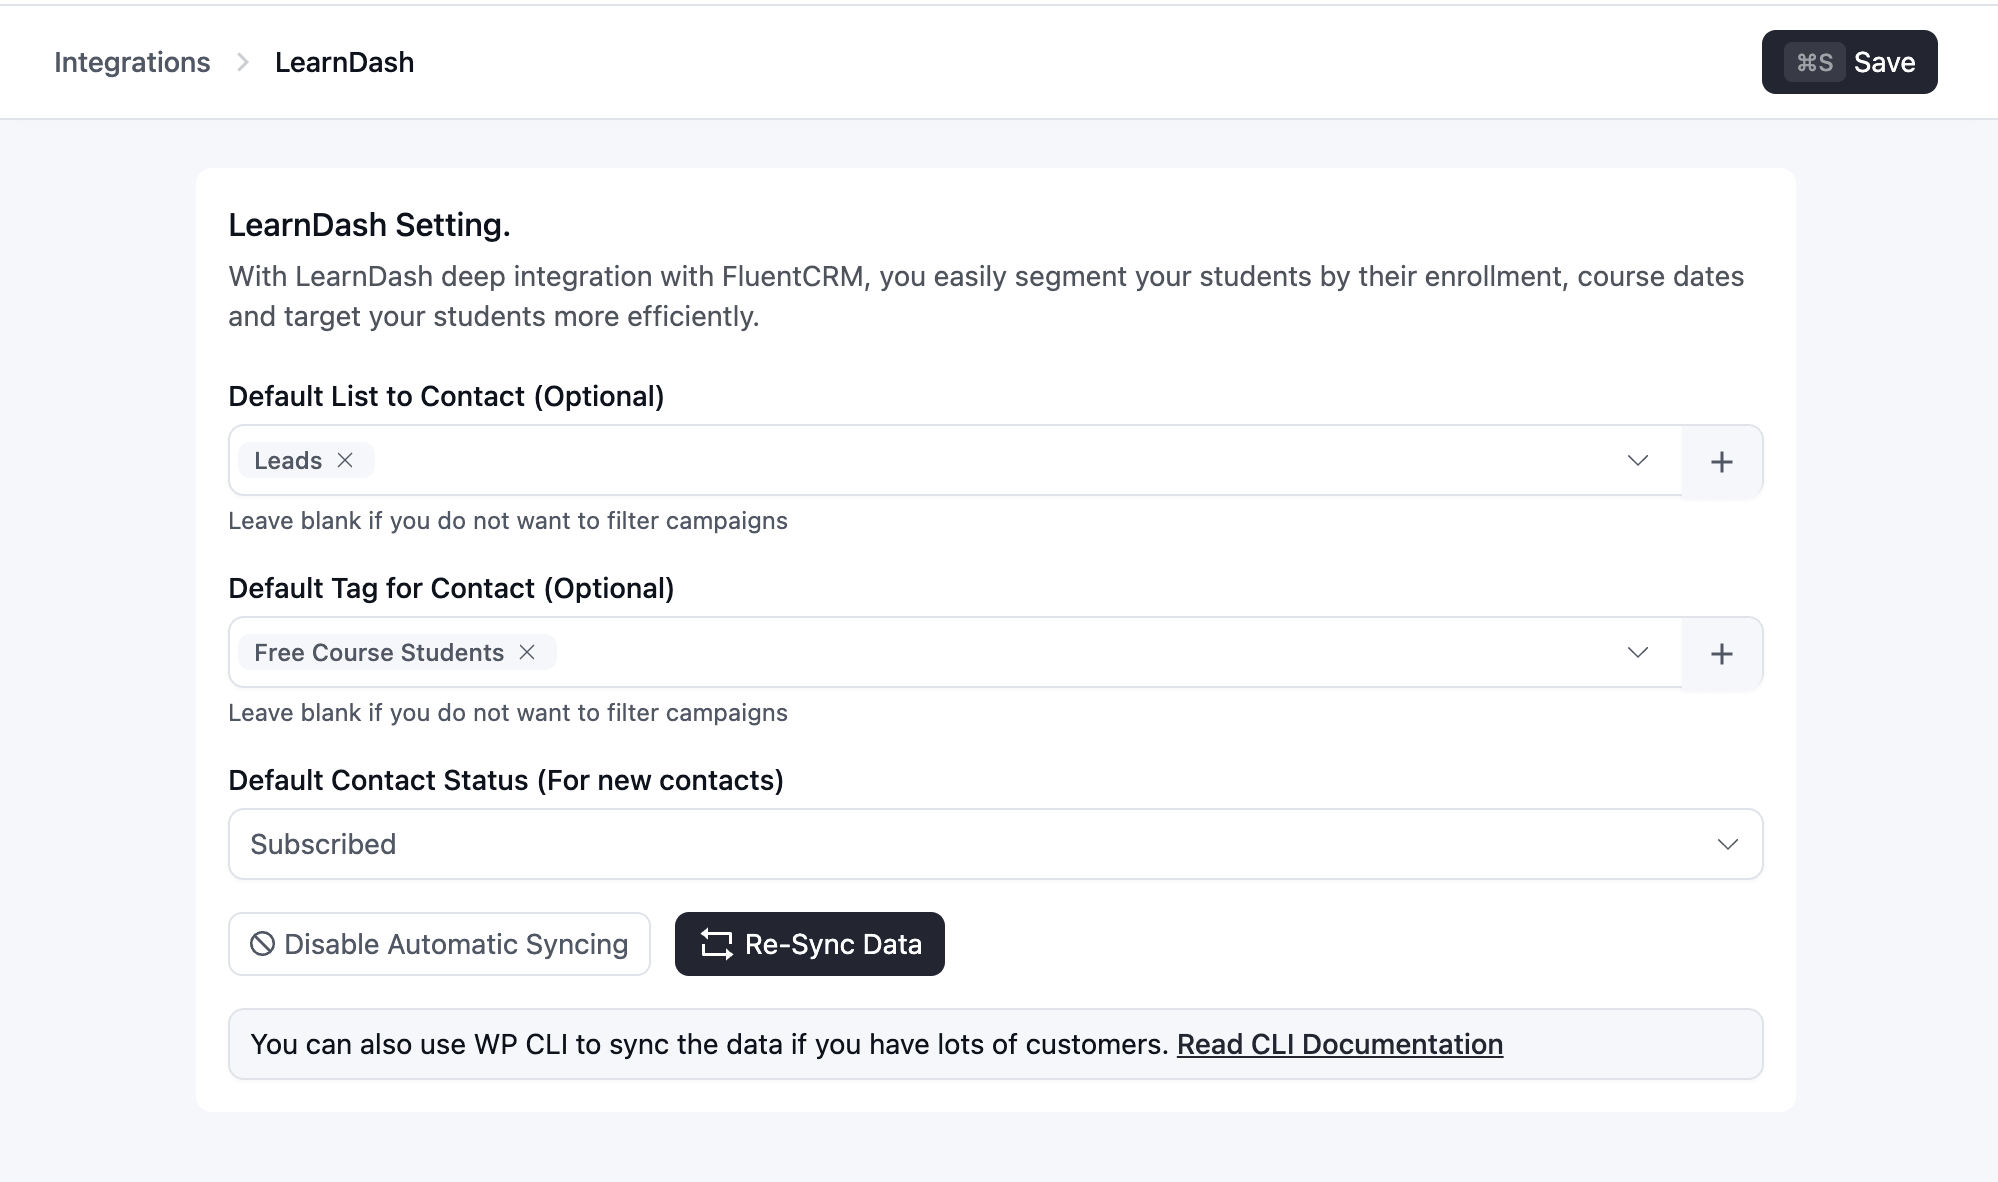
Set a default list, tag, and contact status for your students, then click Sync LearnDash Students to pull in your existing enrollees and auto-segment future ones.
Read the full walkthrough: LearnDash Integration with FluentCRM.
Once that’s connected, every enrollment, lesson completion, and course completion becomes something FluentCRM can see and act on.
Step-by-Step: Building an Automated Student Onboarding Sequence in FluentCRM
Every FluentCRM automation runs on four parts: triggers, segmentation, sequences, and conditional logic.
Here’s how those come together for a LearnDash onboarding sequence, from tagging to automation.
Step 1: Tag Students on Enrollment and Completion
Before writing a single email, you need to set up the tags that will let you segment students later.
Open LearnDash, select the course to onboard students for, go to its Settings tab, and under Course Access Settings, assign the desired tags you have built inside FluentCRM. You can apply tags on course enrollment and another on course completion.
You can add multiple tags here if you’re running more than one segmentation strategy.
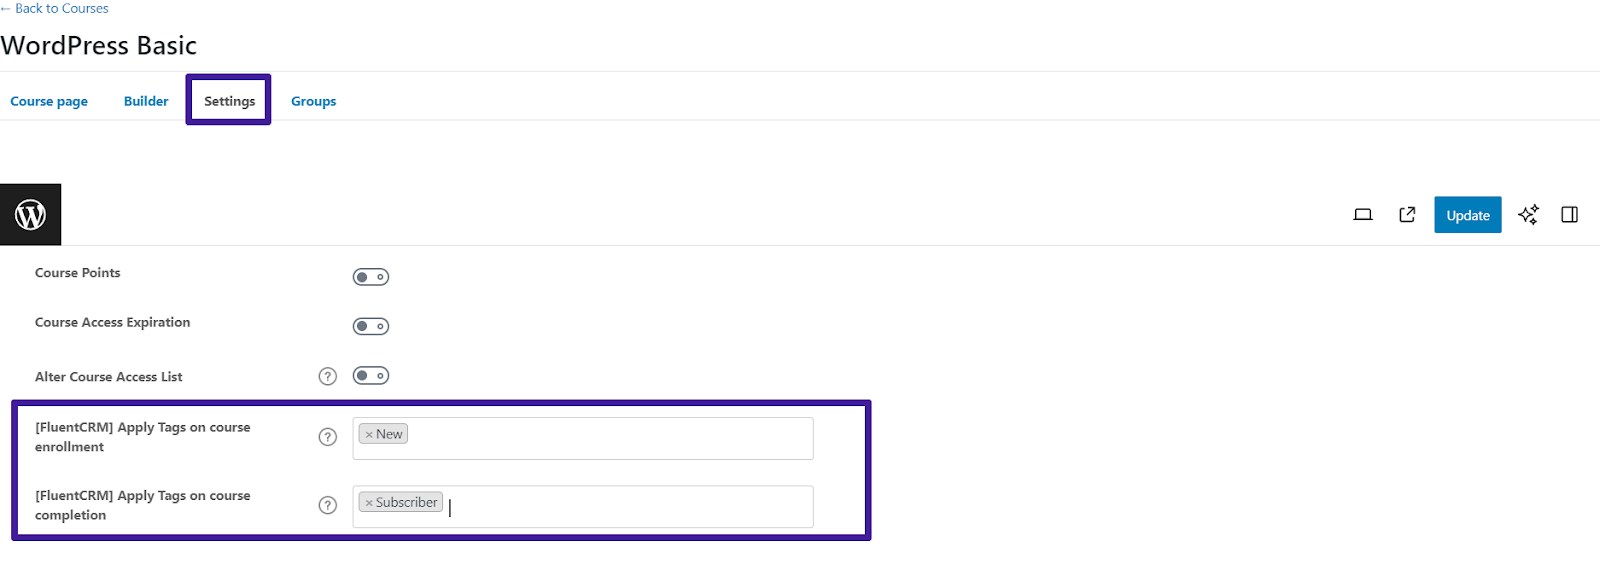
This single step is what makes the rest of the sequence possible.
Once these tags are triggered, FluentCRM knows exactly who’s new, who’s mid-course, and who’s finished, without any manual intervention.
Step 2: Build the Email Sequence
Now, it’s time to create the sequence emails.
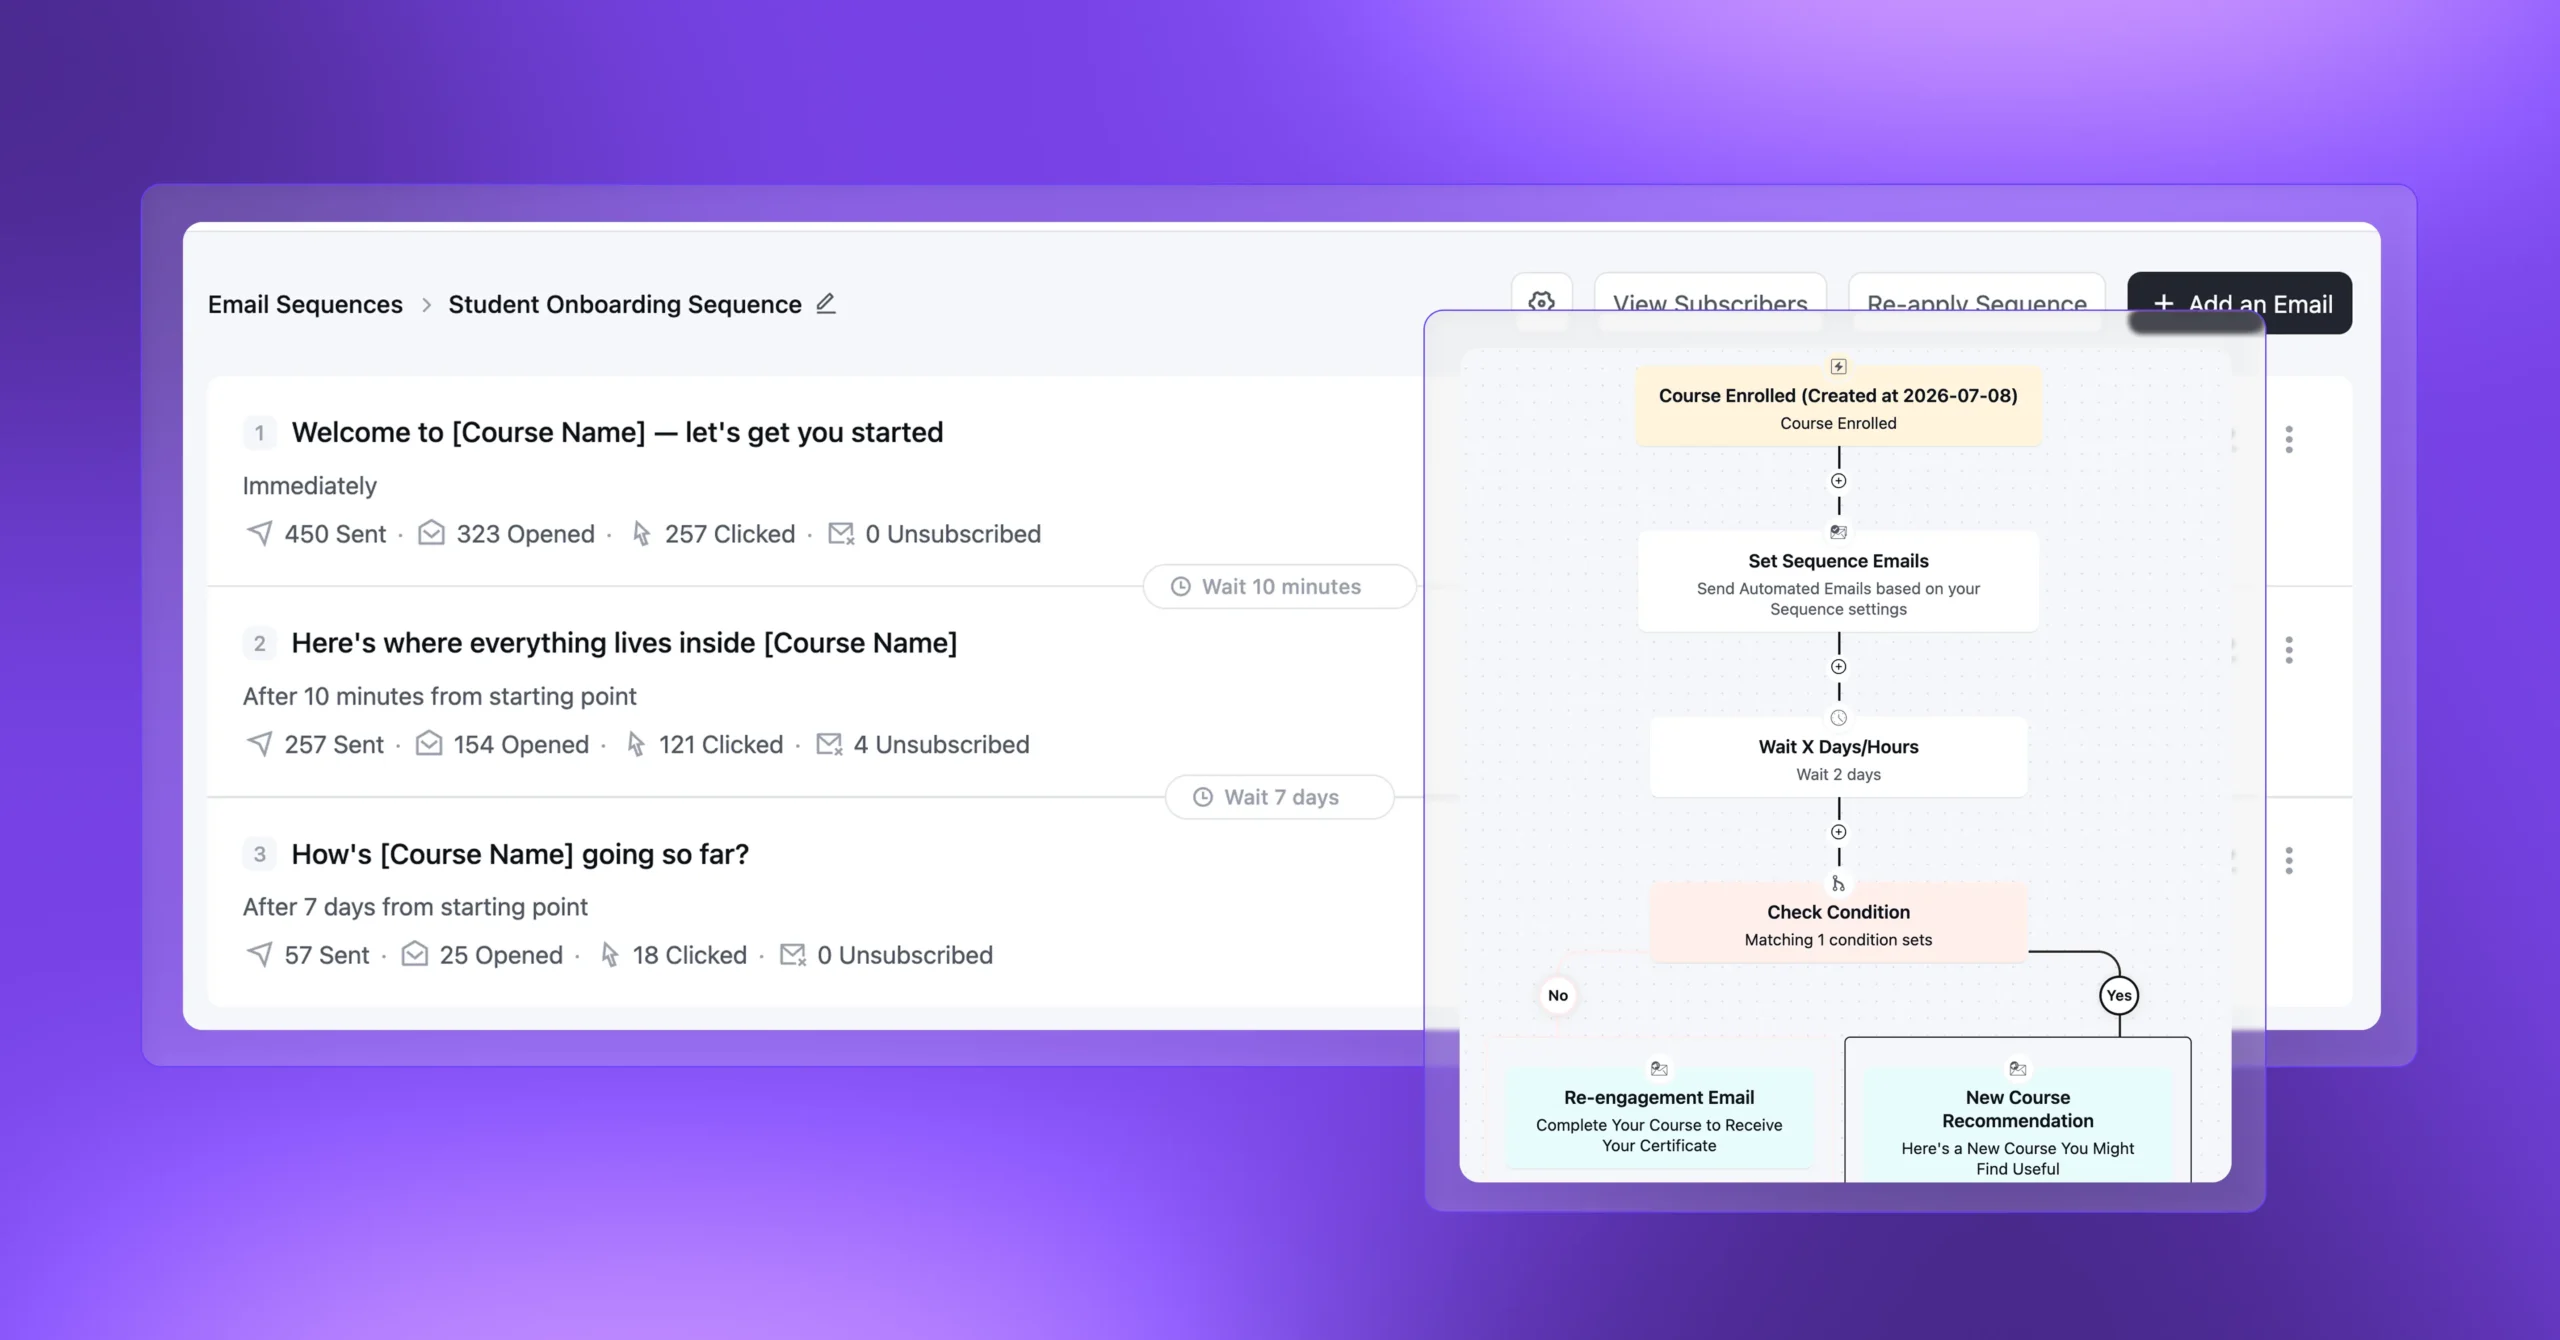
In FluentCRM, go to Emails > Email Sequences > Create New Sequence.
Give it a clear internal name, such as “Student Onboarding Sequence,” so it’s easy to find later.
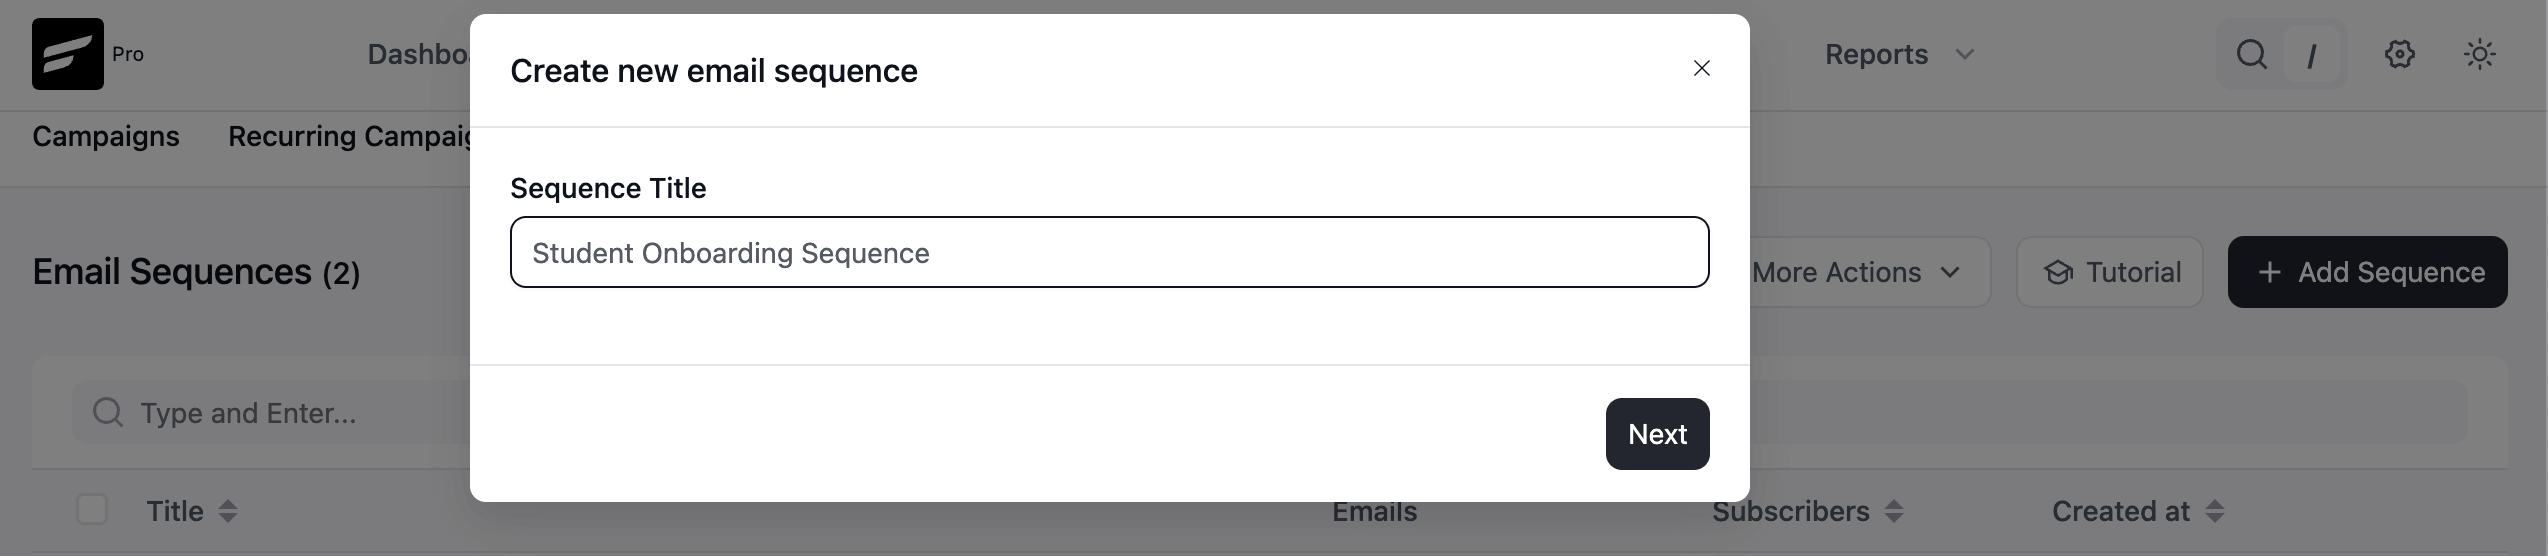
Inside the sequence builder, add craft emails individually with their own delay.
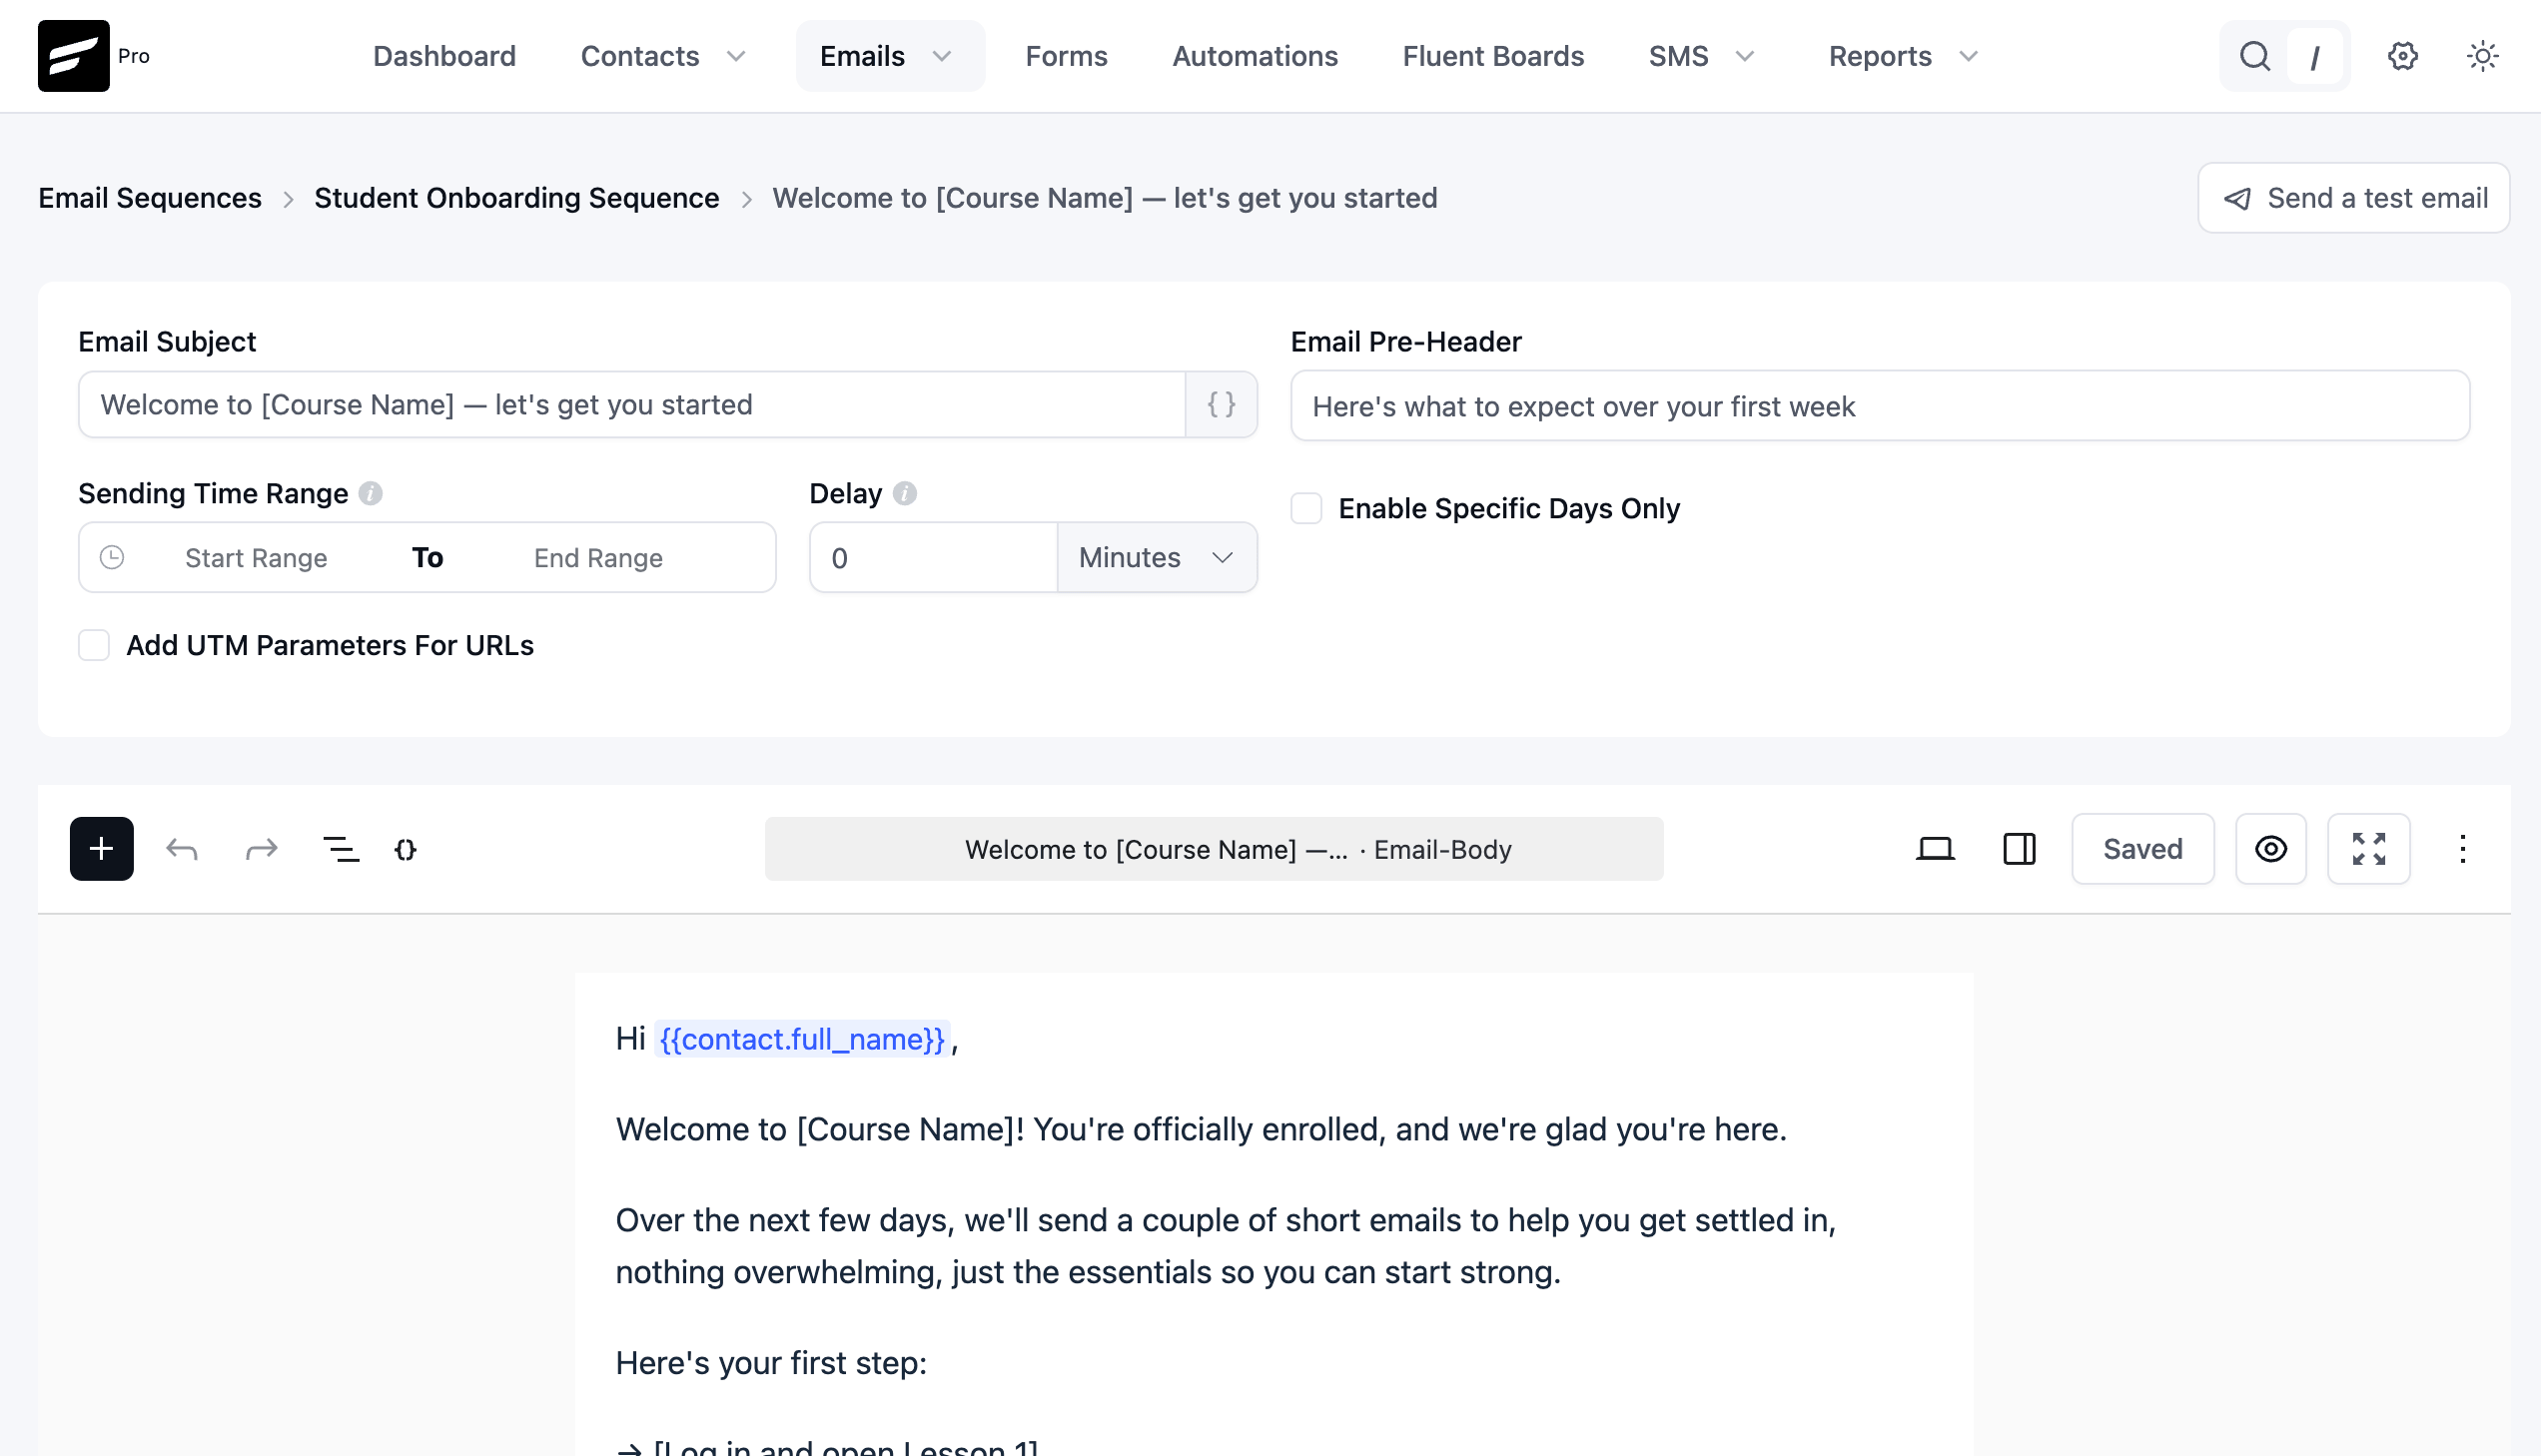
Once you figure out how to craft an email, you will be able to prepare the rest of the emails similarly.
An effective student onboarding email sequence structure looks like this:
- Welcome email: Sent immediately on enrollment
- Course Navigation Guide: Sent shortly after, often within 10 minutes, showing students where everything lives
- Progress Check-in: Sent around day 7, encouraging students to keep going
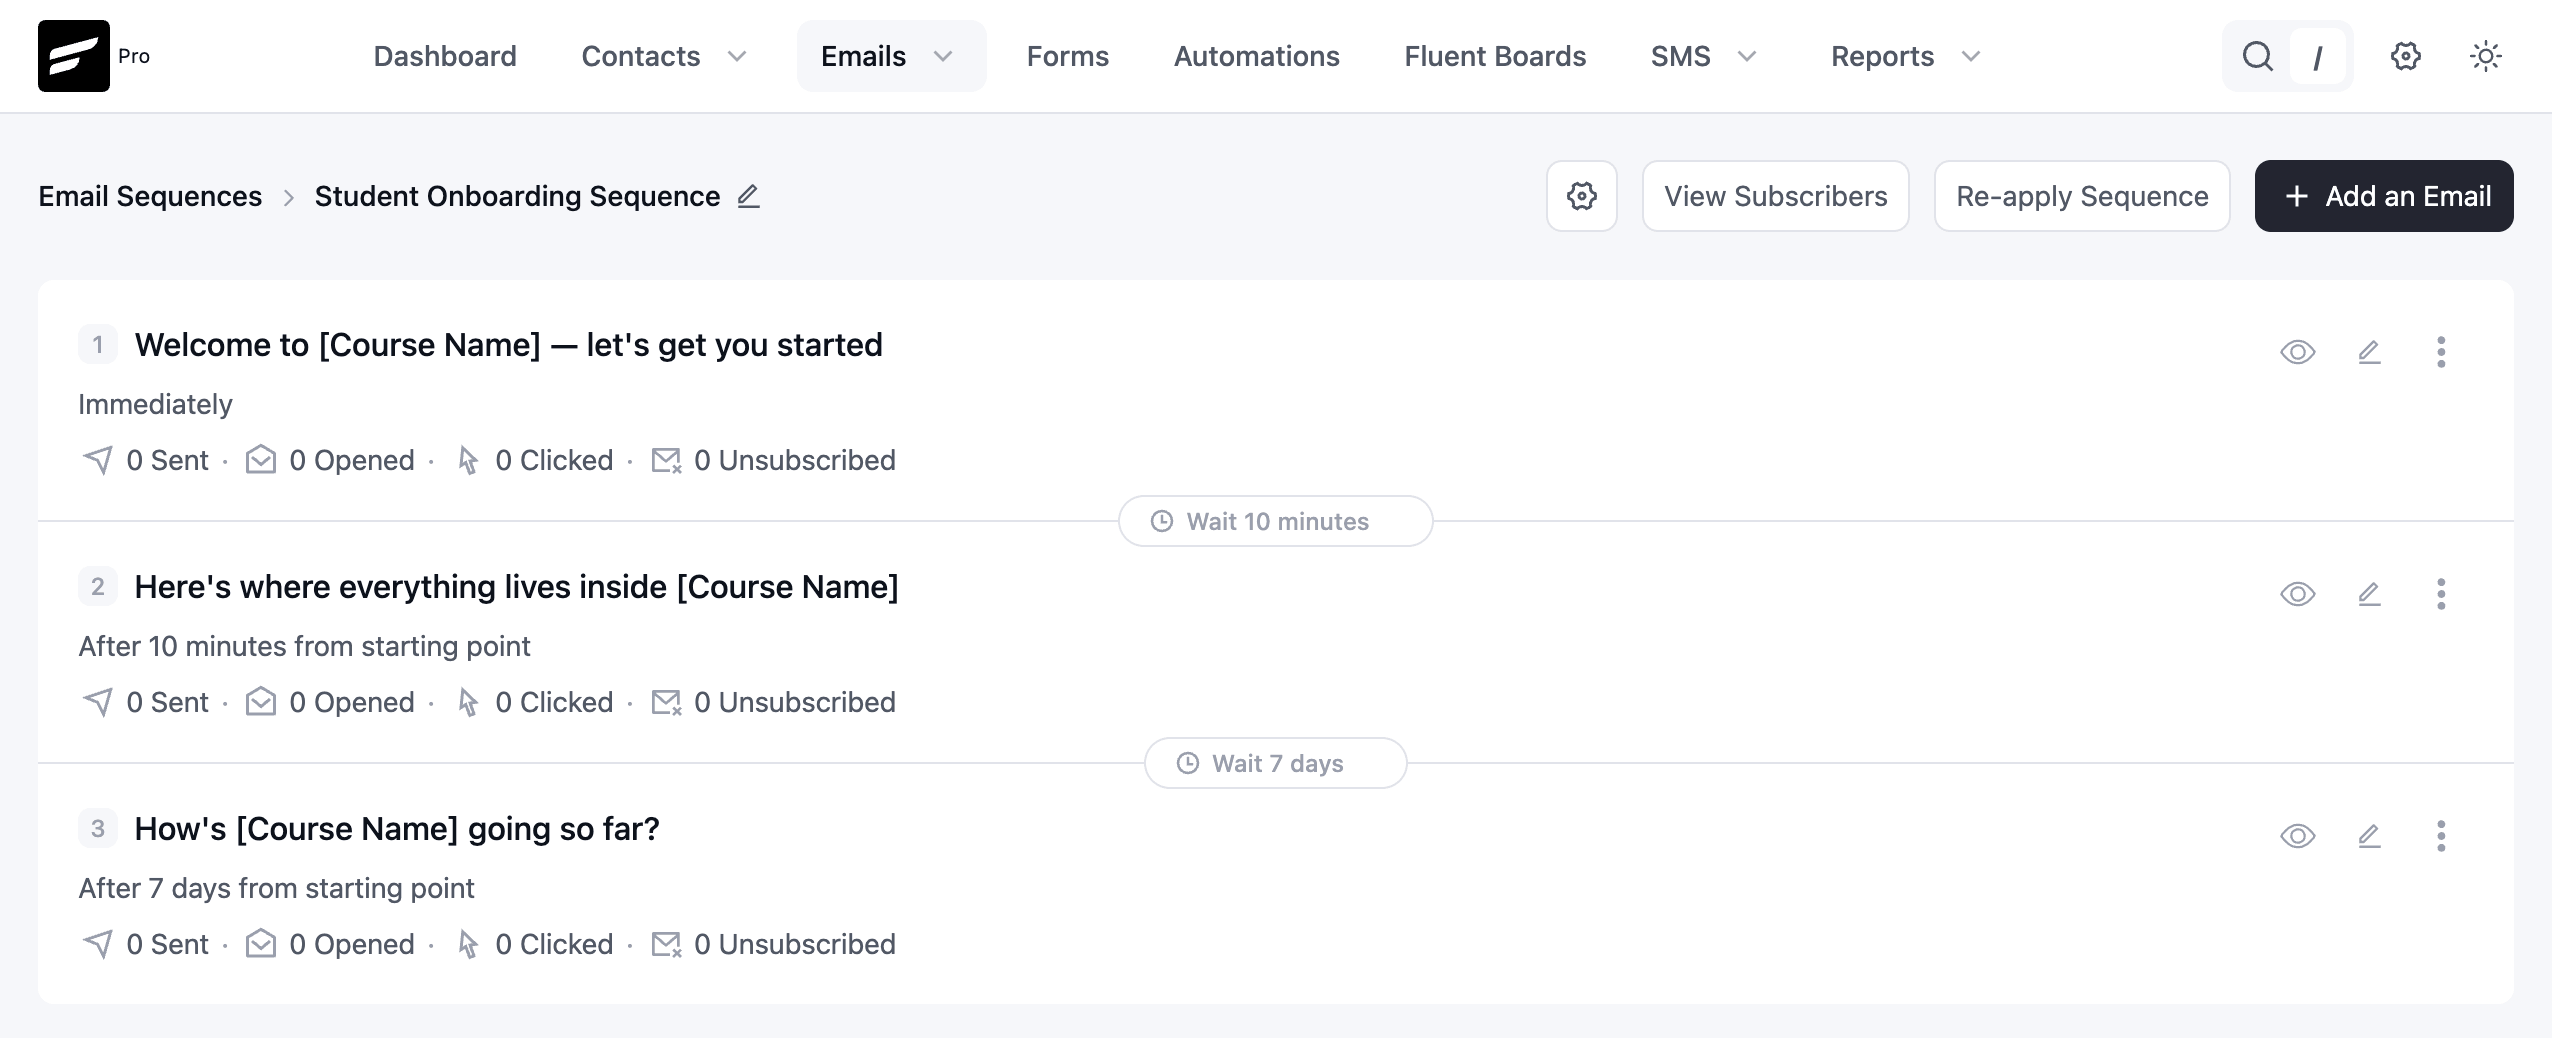
Step 3: Create the Automation and Set the Trigger
An email sequence doesn’t send itself; it needs an automation funnel to kick it off. You need to use FluentCRM automation to let the sequence start operating.
Go to Automation > New Automation, then select Course Enrolled from the LearnDash triggers.
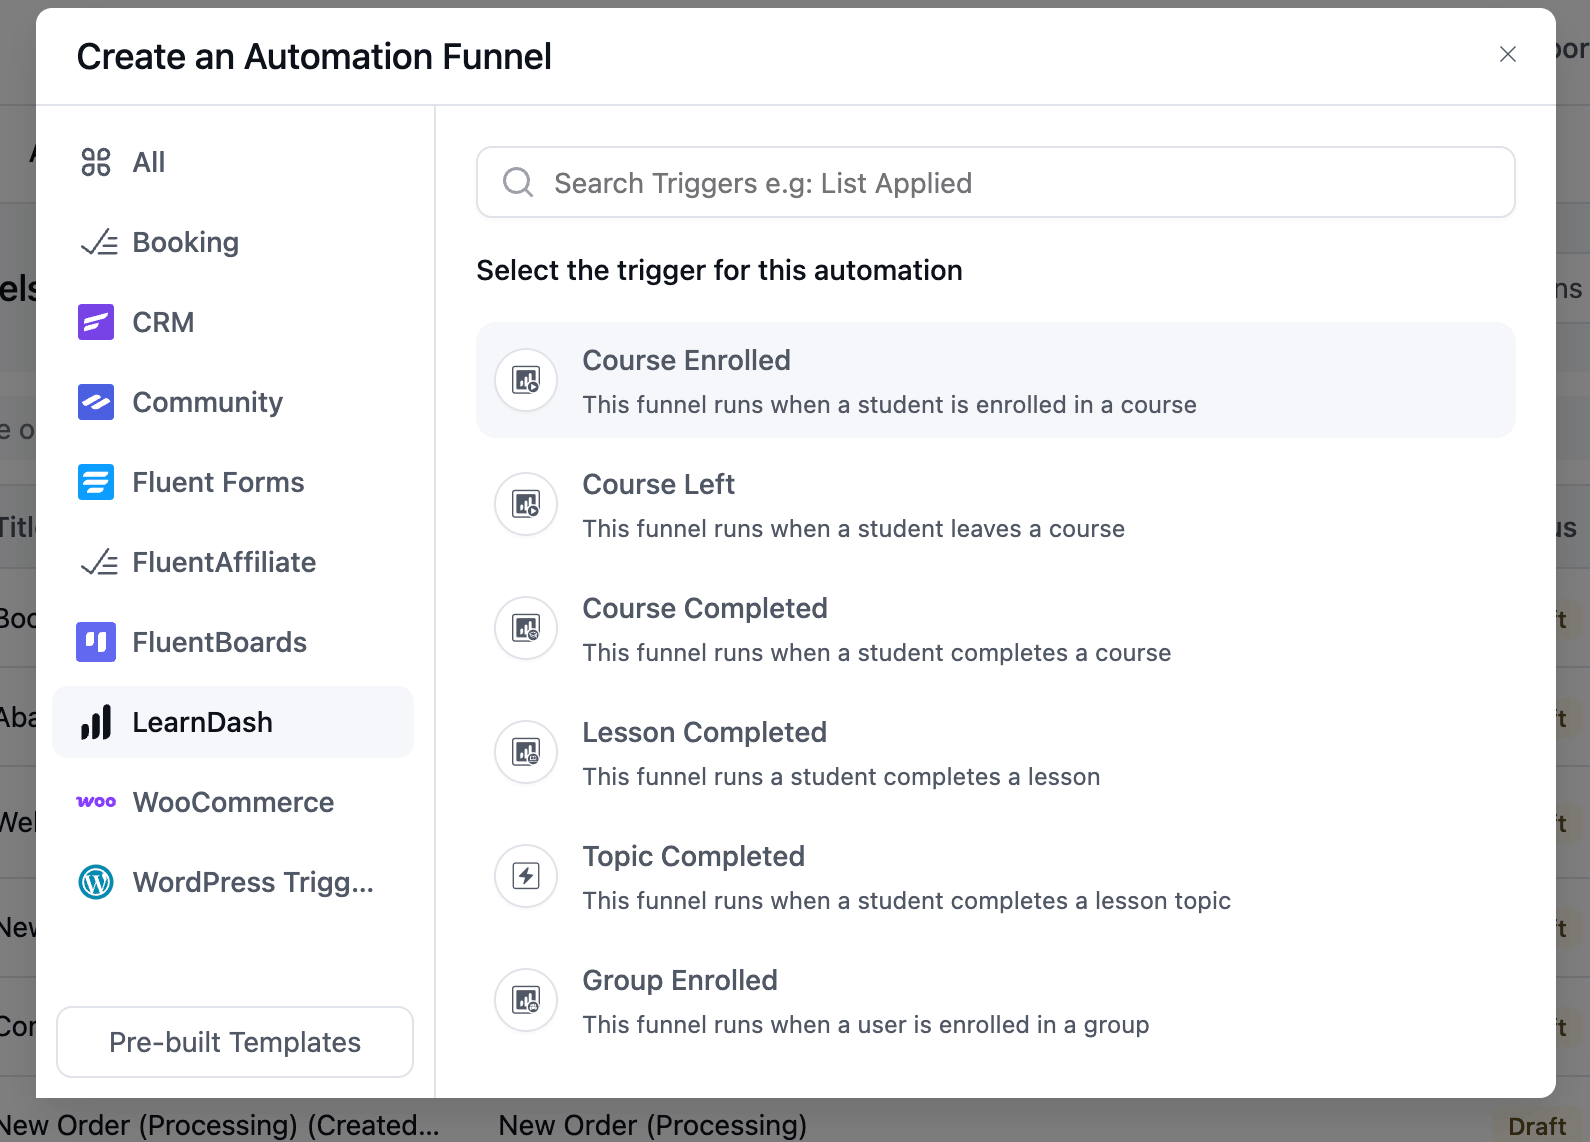
Configure the trigger:
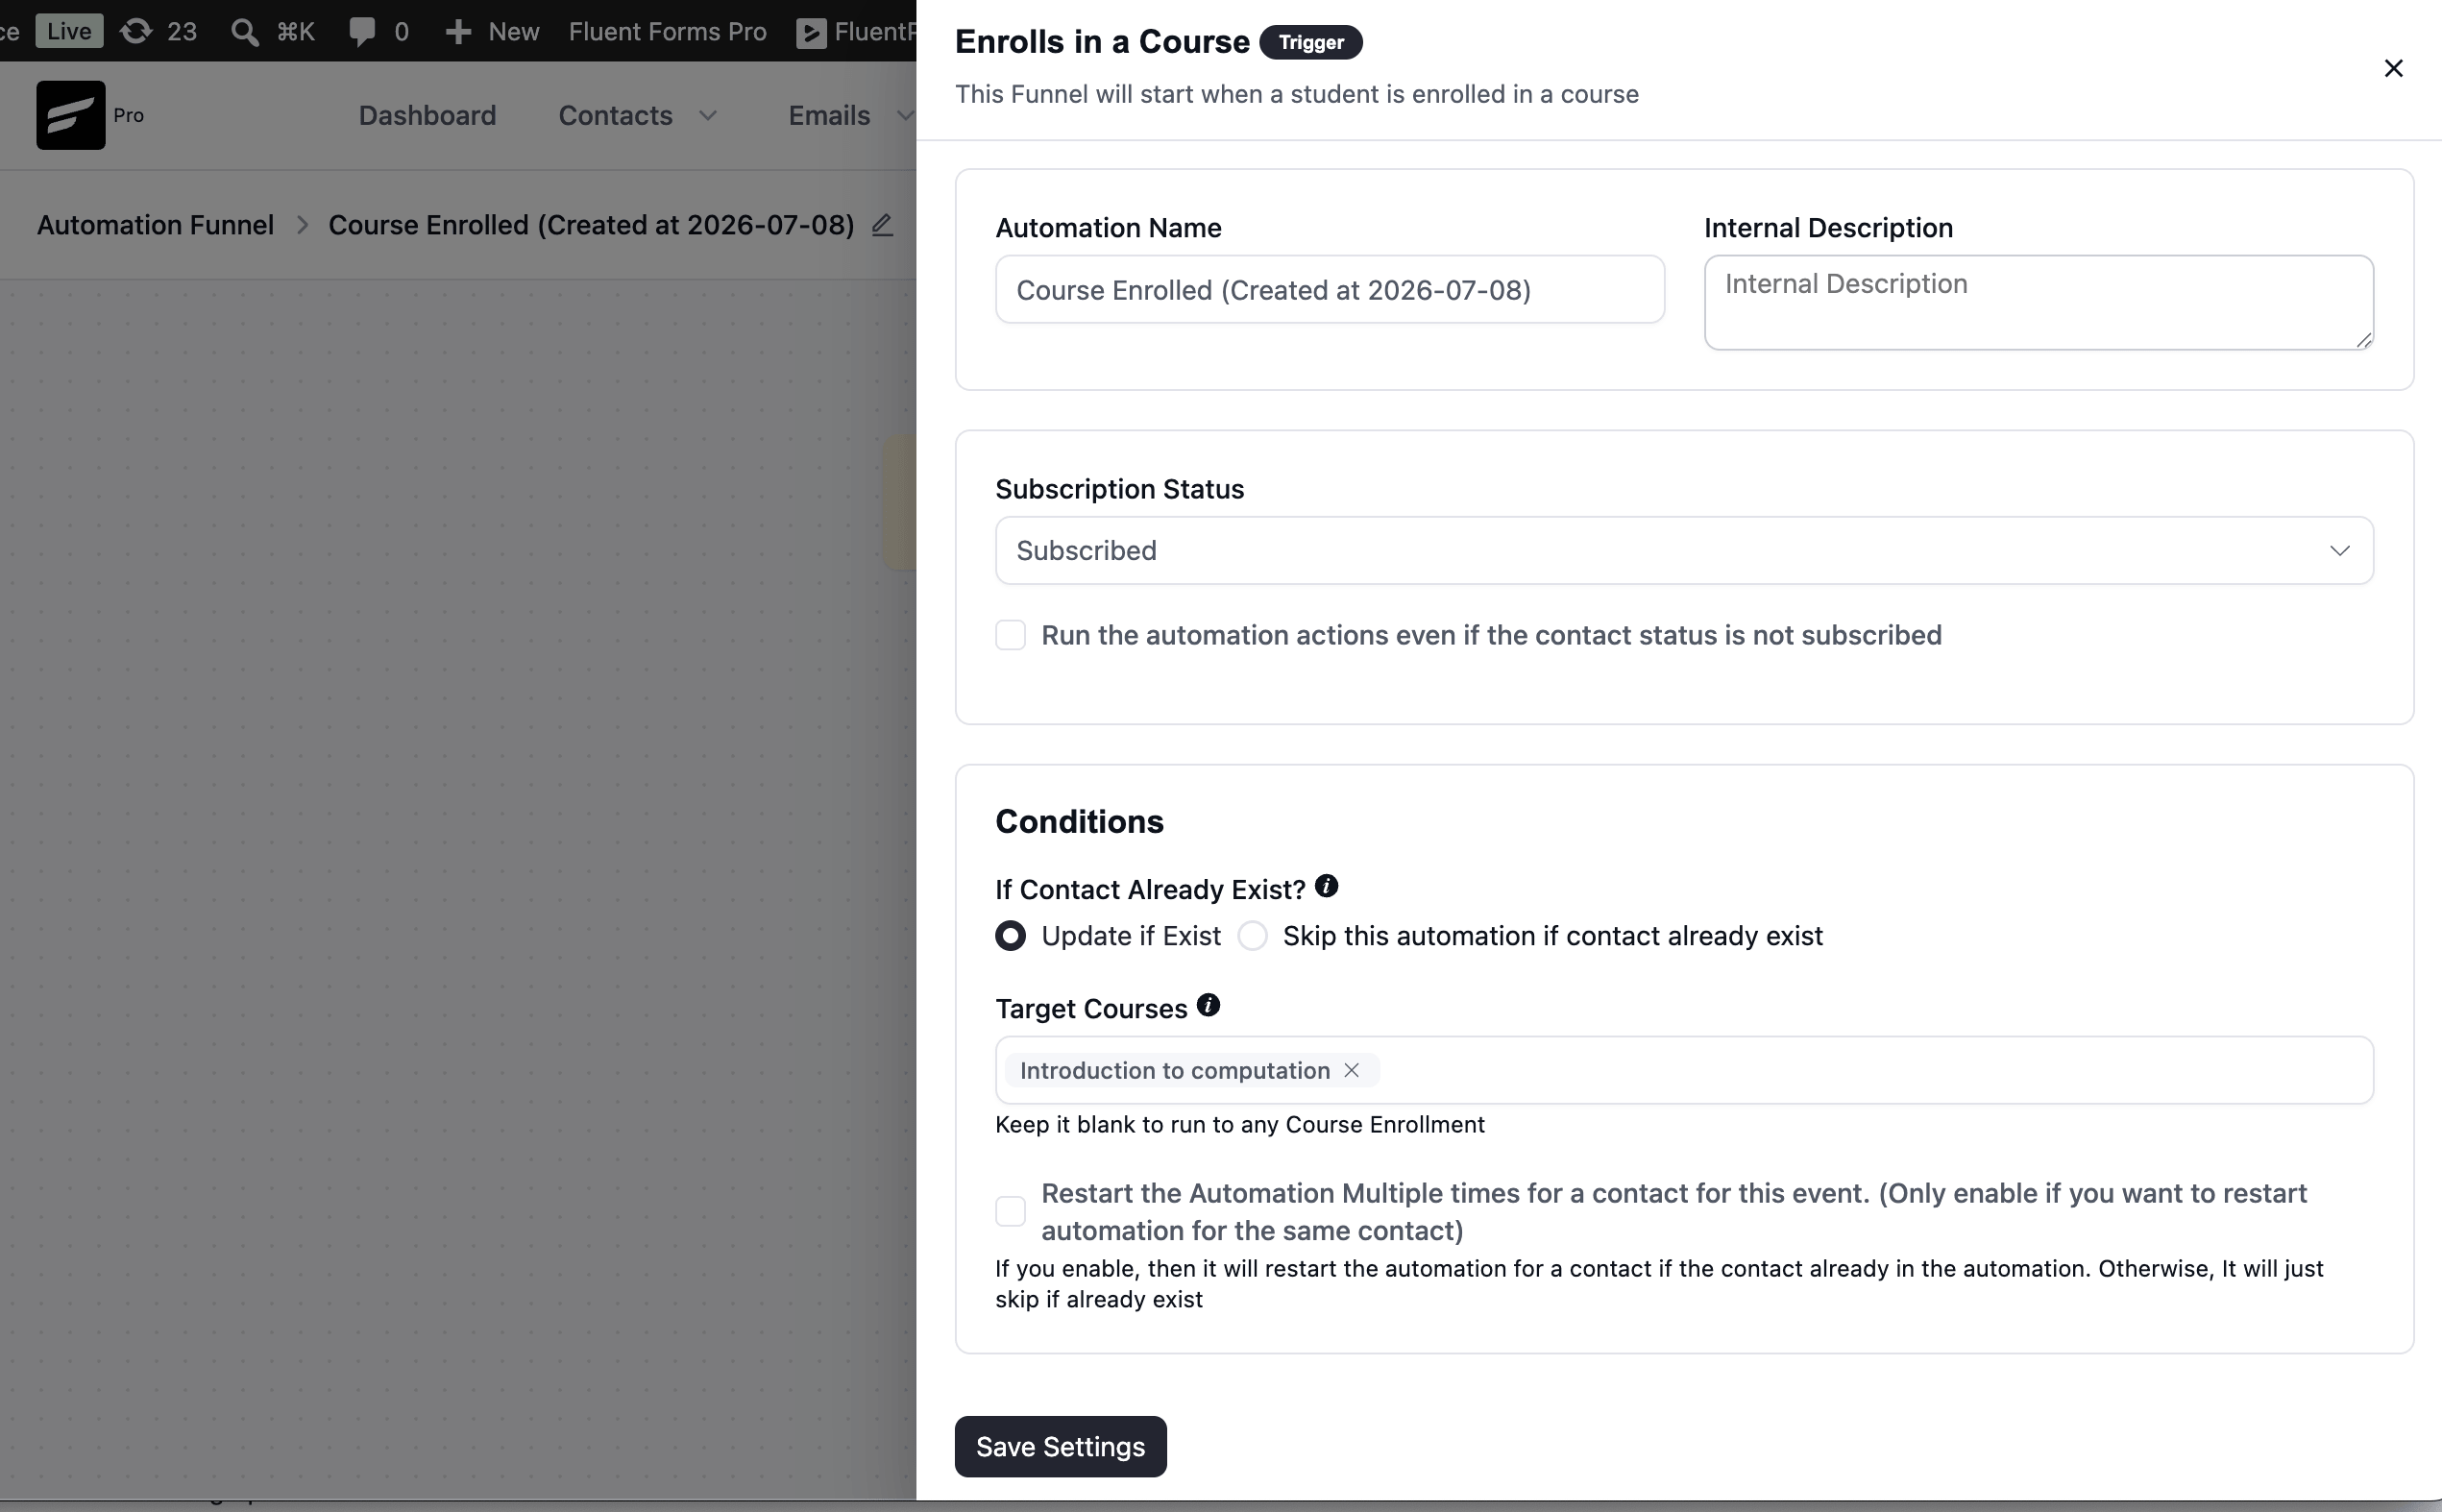
- Target Courses: Pick the specific course (or courses) this onboarding sequence applies to. Leave it blank to run for any enrollment.
- Subscription Status: Set what status a new student gets when they enter the funnel.
- If Contact Already Exists: Choose whether to re-run the automation or skip it for returning students.
Step 4: Attach the Email Sequence to the Trigger
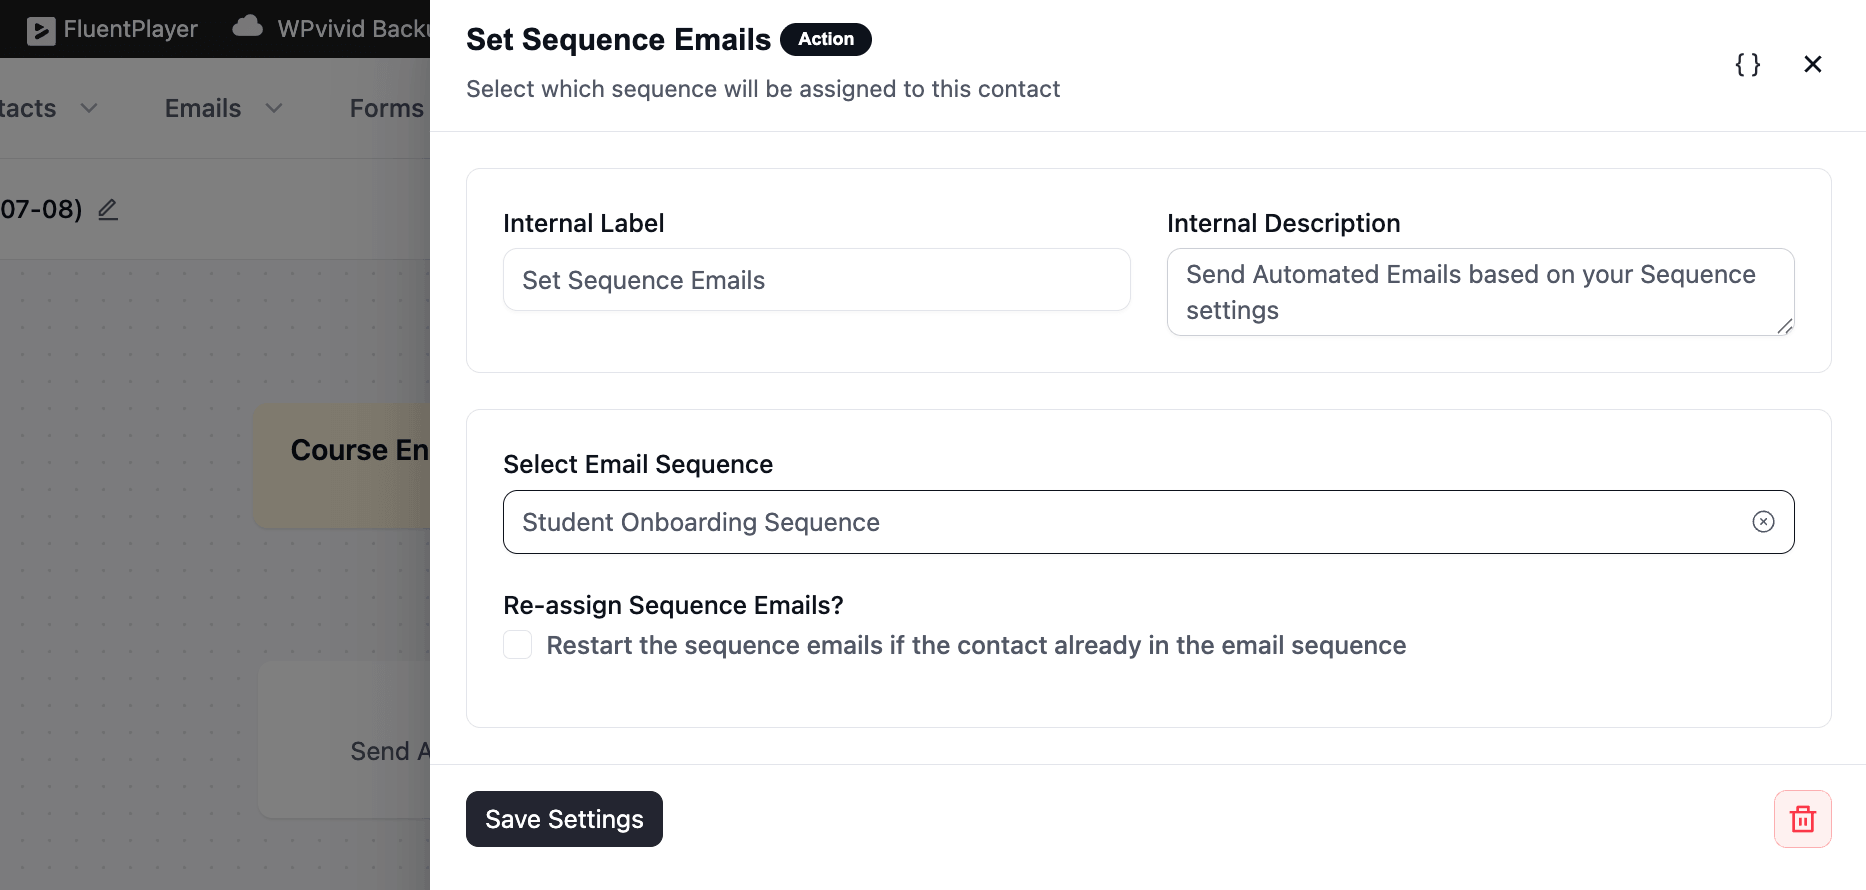
Once the trigger is set, choose the Set Sequence Emails action.
Select the email sequence you built previously. This single block hands off the timing and delivery of all your onboarding emails to the sequence, so your automation funnel stays clean and easy to read.
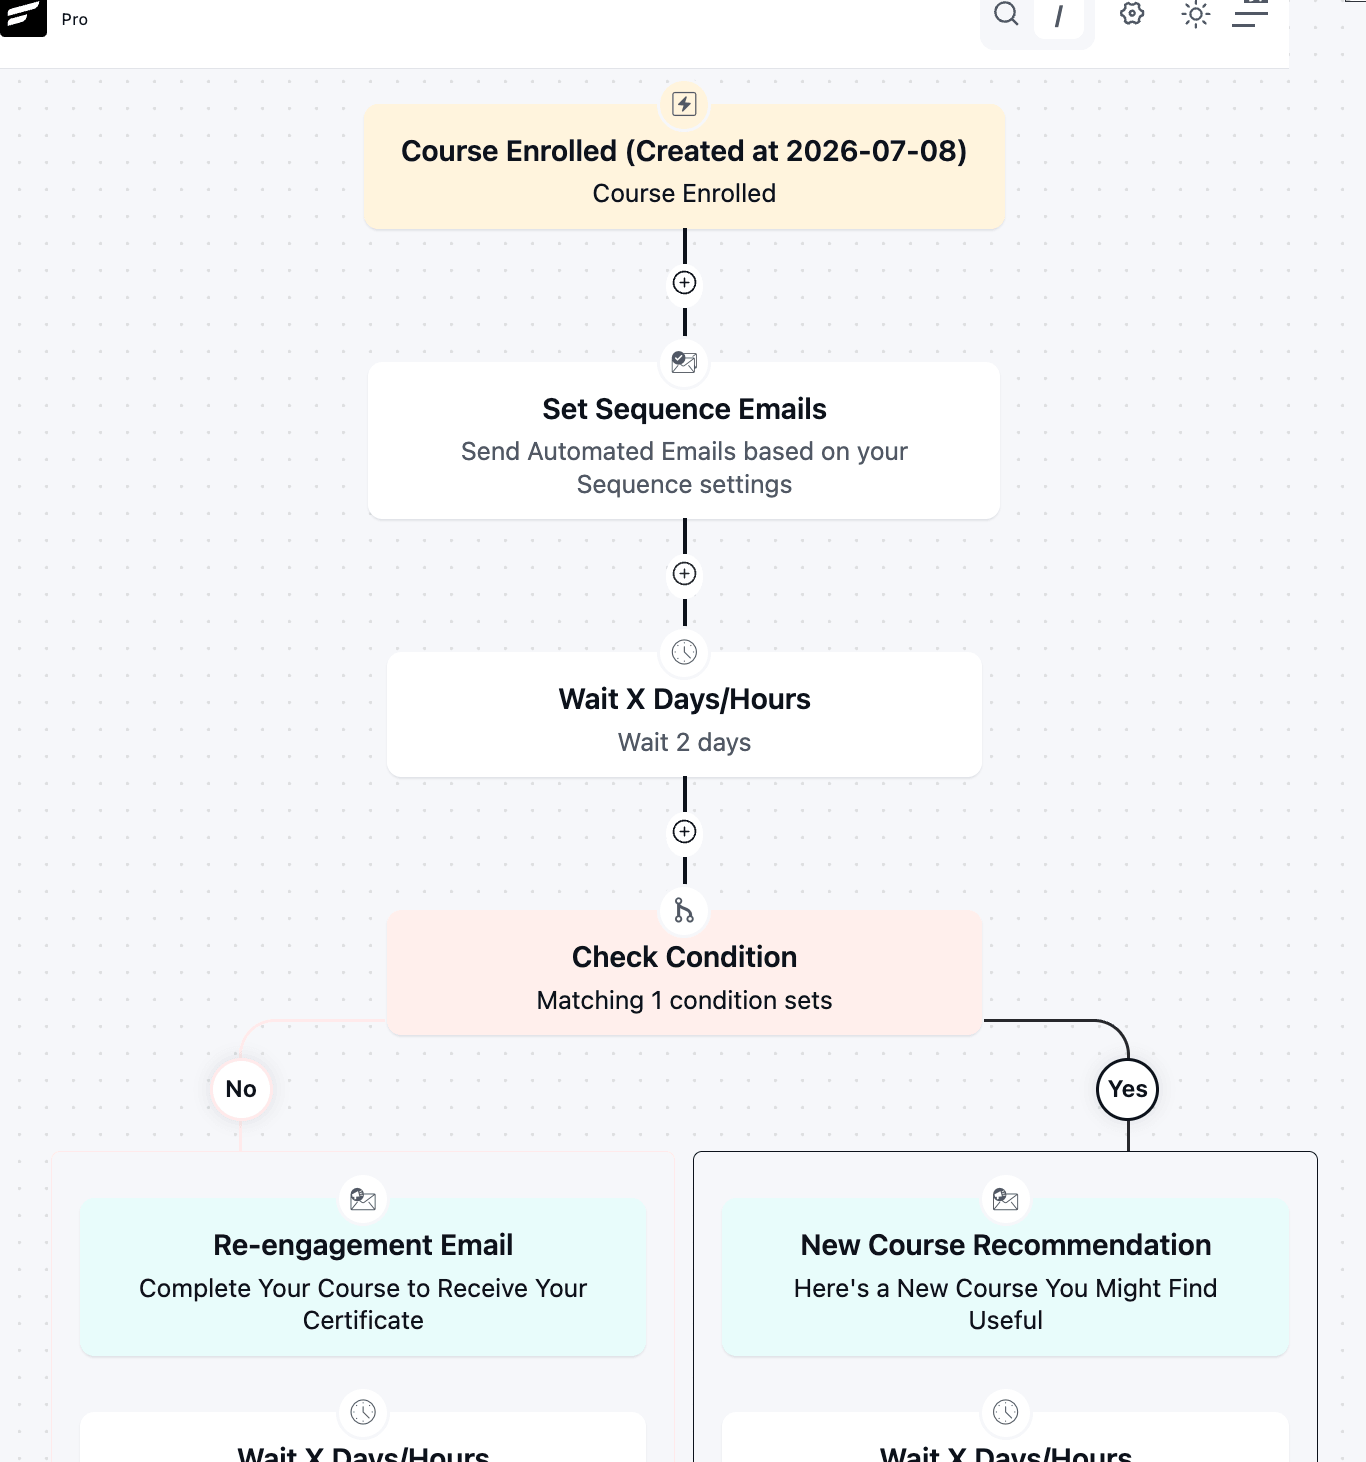
Step 5: Add Conditional Logic Based on Student Behavior
This is the step that turns a plain email sequence into a real onboarding sequence. Not every student moves through a course at the same pace, so the automation should react differently depending on what a student actually does.
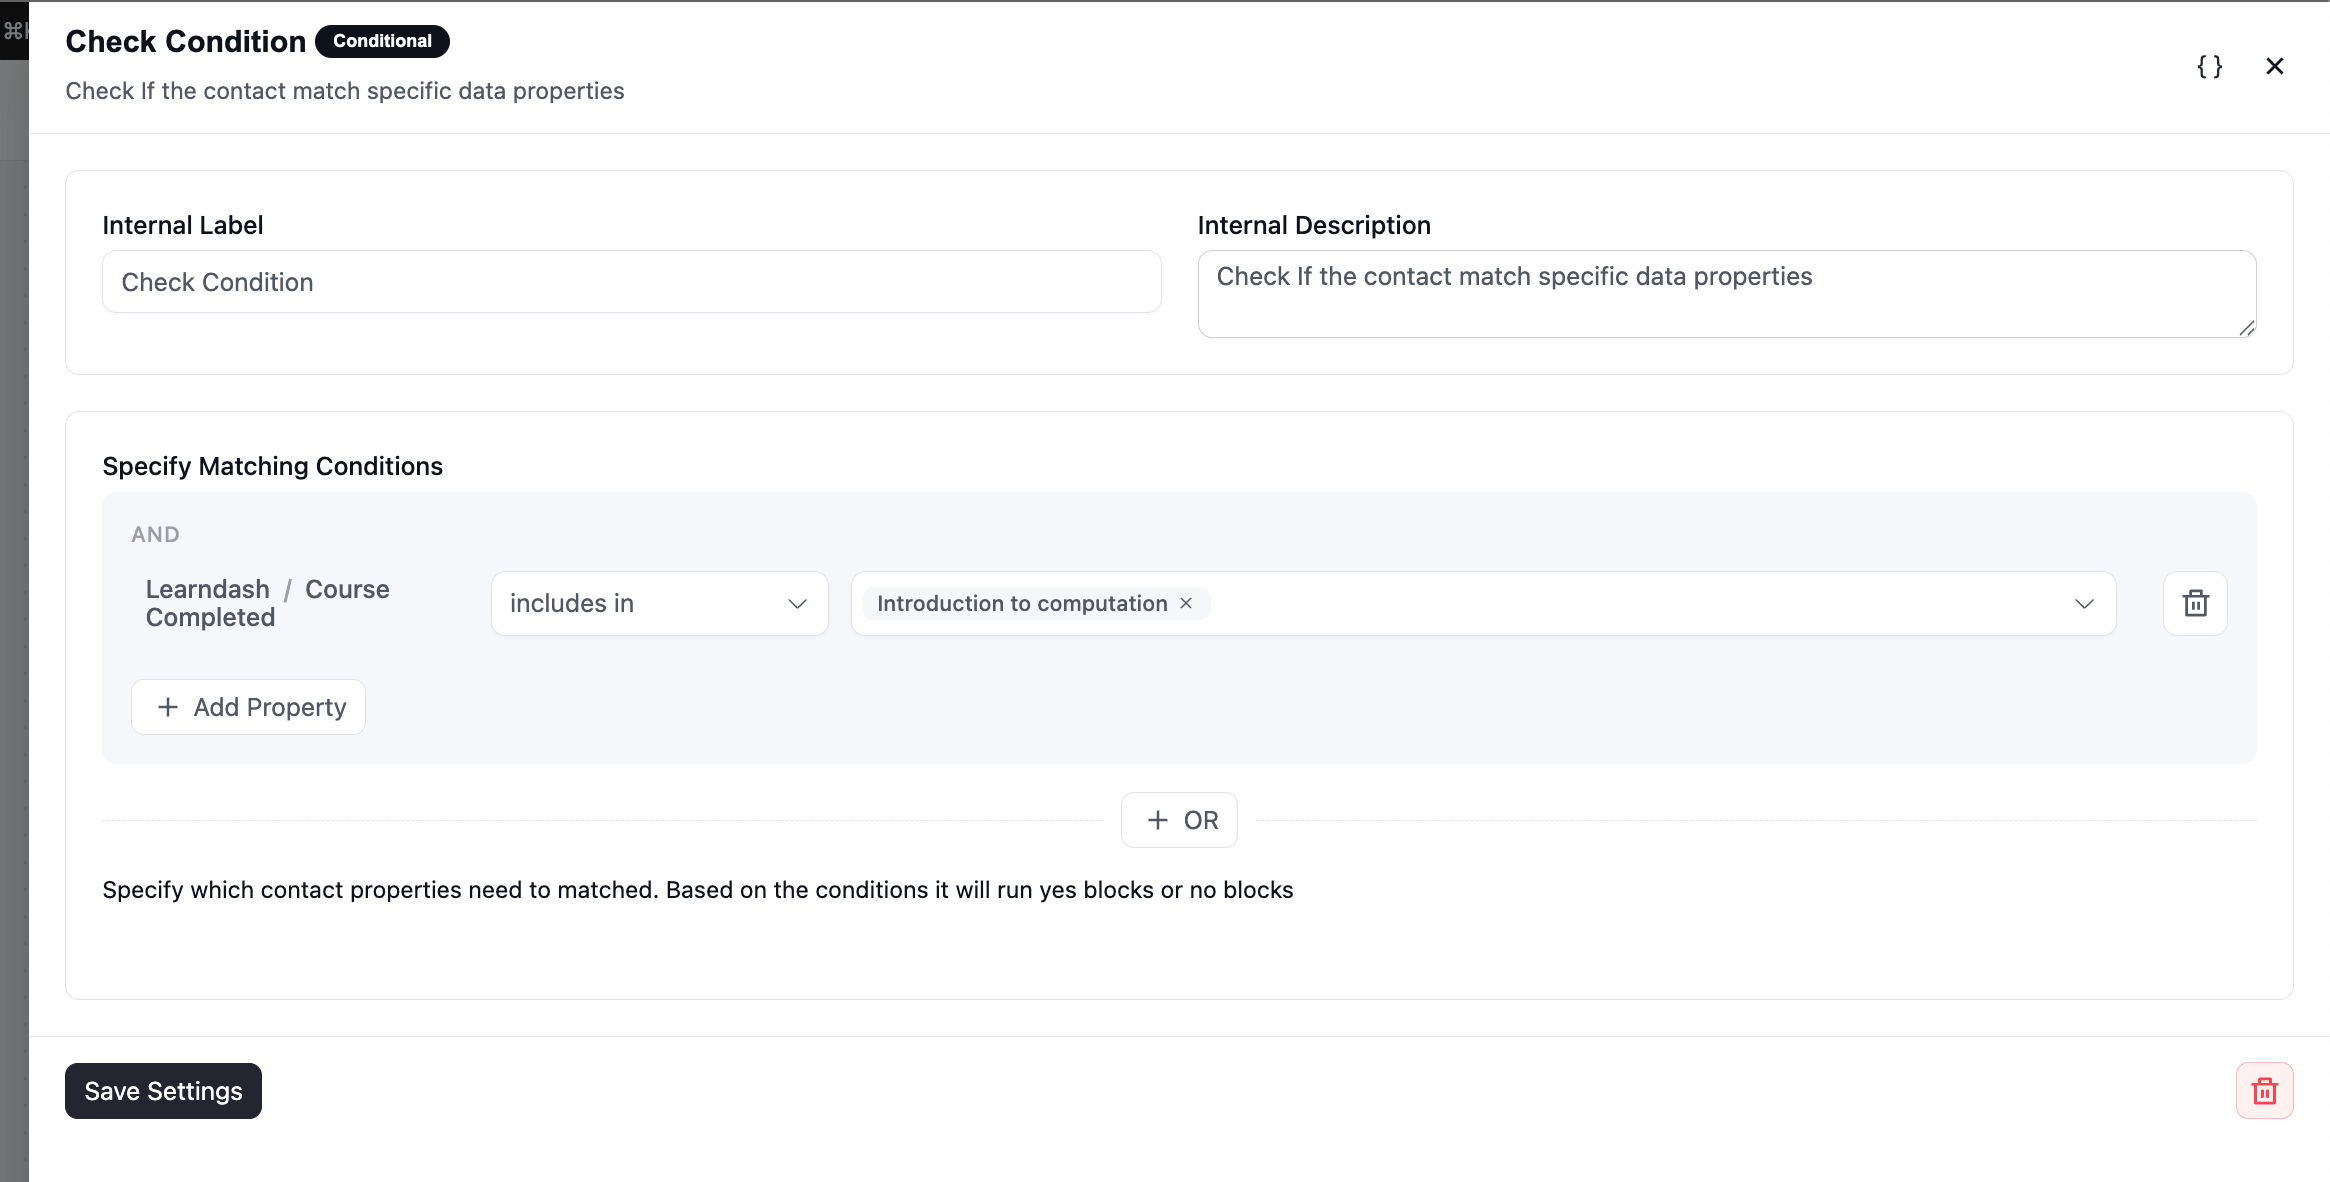
Add a Conditional block around the one-week mark to check the student’s progress. Apply the condition to check whether they completed the course or not:
- If the student has completed a lesson or topic, route them to a brand new course through a different branch
- If they haven’t logged in or completed anything, route them into a gentle re-engagement email instead.
Step 6: Test Before You Launch
Enroll a test account in the course and walk through the entire funnel yourself.
Confirm:
- The welcome email fires immediately.
- Delays land where you expect them
- The conditional branch correctly separates engaged students from inactive ones.
- Tags are being applied properly; check the contact’s profile in FluentCRM > Contacts to confirm.
Once it behaves the way you designed it, turn the automation on for all students.
A Sample Onboarding Sequence Timeline
If you’re not sure how to space things out, here’s a proven starting framework you can adapt:
| Day | Email Type | Goal |
|---|---|---|
| Day 0 (immediate) | Welcome email | Confirm enrollment, set expectations |
| Day 0 (~10 min later) | Course navigation guide | Help the student find lessons, resources, and support |
| Day 7 | Progress Check-in | Encourage continued engagement, branch based on activity |
| Day 10–14 | Encouragement or re-engagement email | Different message for active vs. inactive students |
| On Completion | Completion workflow | Certification info, next-course recommendation, community invite |
*These are demo instructions; you can set up however you prefer. But we suggest sending the welcome email within minutes of enrollment while motivation is highest, don’t stack more than one email per day, and always give students a clear exit point once completed.
Extending the Sequence: Turning Engagement into Student Management
Although the core onboarding sequence typically runs for the first two weeks, the lists and tags you set up in Step 1 can be reused for multiple workflows.
Those list and tags automatically segments students by email activity and course activity. Let’s showcase some additional use cases of acting on those same student segments:
- Course Completion Funnel: Use the “Course Completed” trigger to automatically deliver certification instructions, recommend an advanced course, or invite the student to your community.
- Re-engagement Funnel: Combine the “Course Left” trigger with a delay and a check-in email to win back students who stopped mid-course.
- Upsell to Advanced courses: If a student enrolled through a free or entry-level course, the “Course Completed” trigger can automatically send a targeted offer for the paid or advanced version while their interest is still fresh.
So connecting LearnDash to FluentCRM is not only about sending nicer emails on autopilot. It’s about turning raw LMS activity into structured student data you can act on, the same way you’d manage leads or customers anywhere else in your business.
Read More: How to Organize Contacts Using Lists, Tags & Custom Fields in FluentCRM.
Let the Email Sequence Do the Work
Once you build your student onboarding sequence and add it to your automation funnel, you stop being the one deciding who needs a nudge today.
The sequence checks that for you and reaches out at the right moment, on its own, so every enrollment gets the same attention without any extra work on your end.
That’s the real payoff: a course that keeps guiding students long after the “you’re enrolled” email, running quietly in the background while you focus on everything else.
Tanzil Ebad Efti
Content Writer & Strategist
Words are my favorite playground. As a Creative Writer at WPManageNinja, I don’t just produce content; I tell stories. By mixing fiction and metaphors with real-life examples, I turn my writing into a creative journey that’s easy for readers to digest and relate to.
Table of Content
Related Articles and Topics
-
How to Build a Course Certificate Automation Funnel in FluentCRM [+Setup Guide]
A student clicks “Finish Course,” the progress bar hits 100%, and a small message appears:…
-
How to Recover Inactive LearnDash Learners to Improve Student Engagement Using FluentCRM
Imagine a student who blazed through the first three lessons in two days, then went…