
Learndash is one of the most popular LMS plugins for WordPress. If you have created an eLearning course platform on WordPress using Learndash, FluentCRM can help you automate your course marketing with activity monitoring, contact segmentation, email marketing, and many more.
Follow these simple guides to learn how to integrate Learn Dash with FluentCRM.
*Tutorial: Learndash email marketing automation with FluentCRM
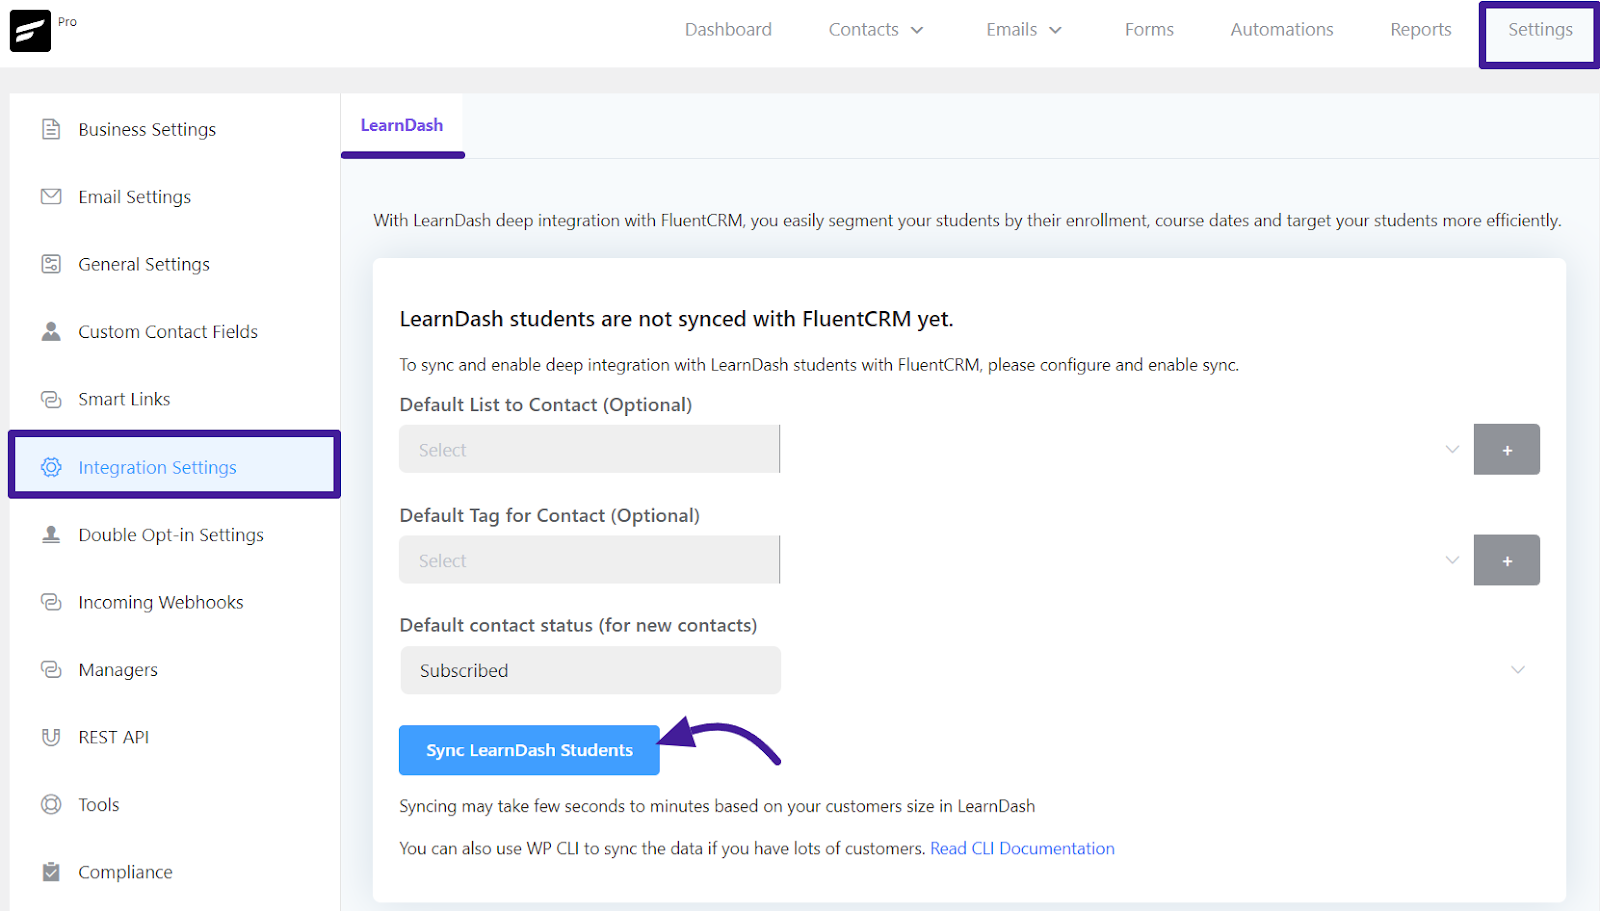
Integration Settings #
To enable the integration and sync your LearnDash with FluentCRM, navigate to the Settings and select Integration Settings from the left sidebar, then choose LearnDash. Here, you’ll find options to set a default list, tag, and contact status for LearnDash students in FluentCRM, allowing you to segment your contacts effectively.
After configuring these settings using the dropdown menus, click on Sync LearnDash Students to update existing student data and automatically segment future LearnDash students based on the specified tags, lists, and contact status.
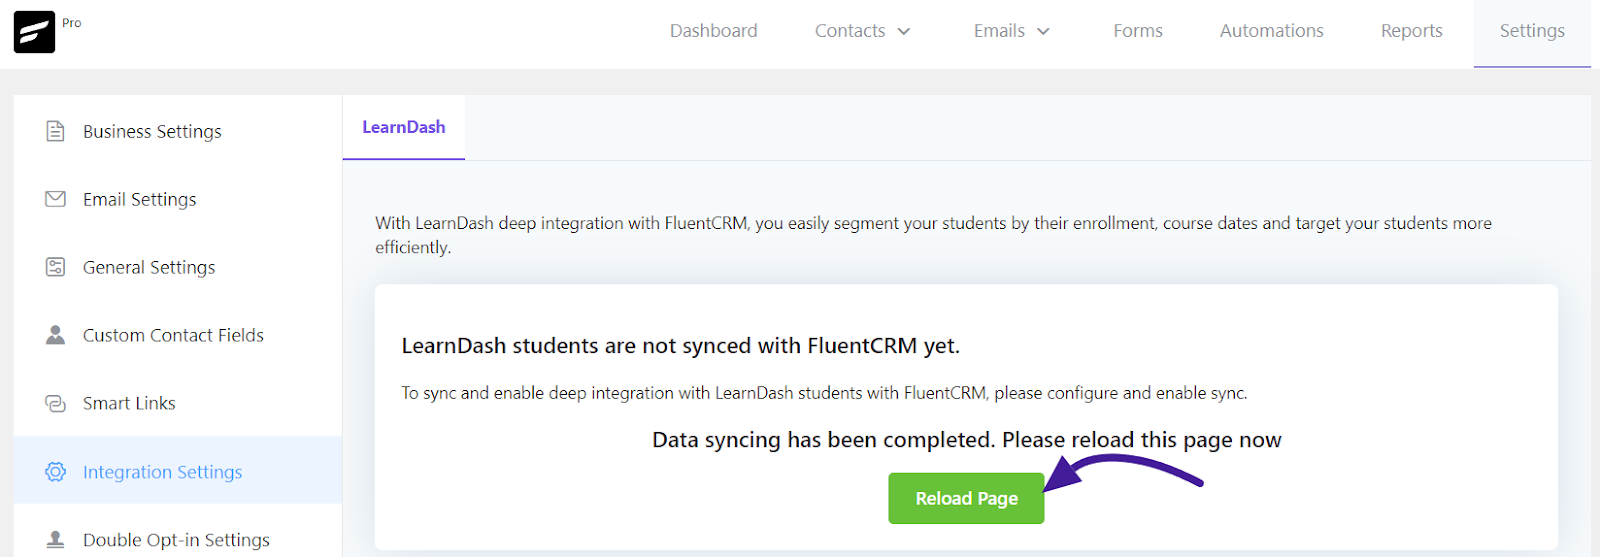
Your data syncing has been completed and you will see a button Reload Page for reloading the page.
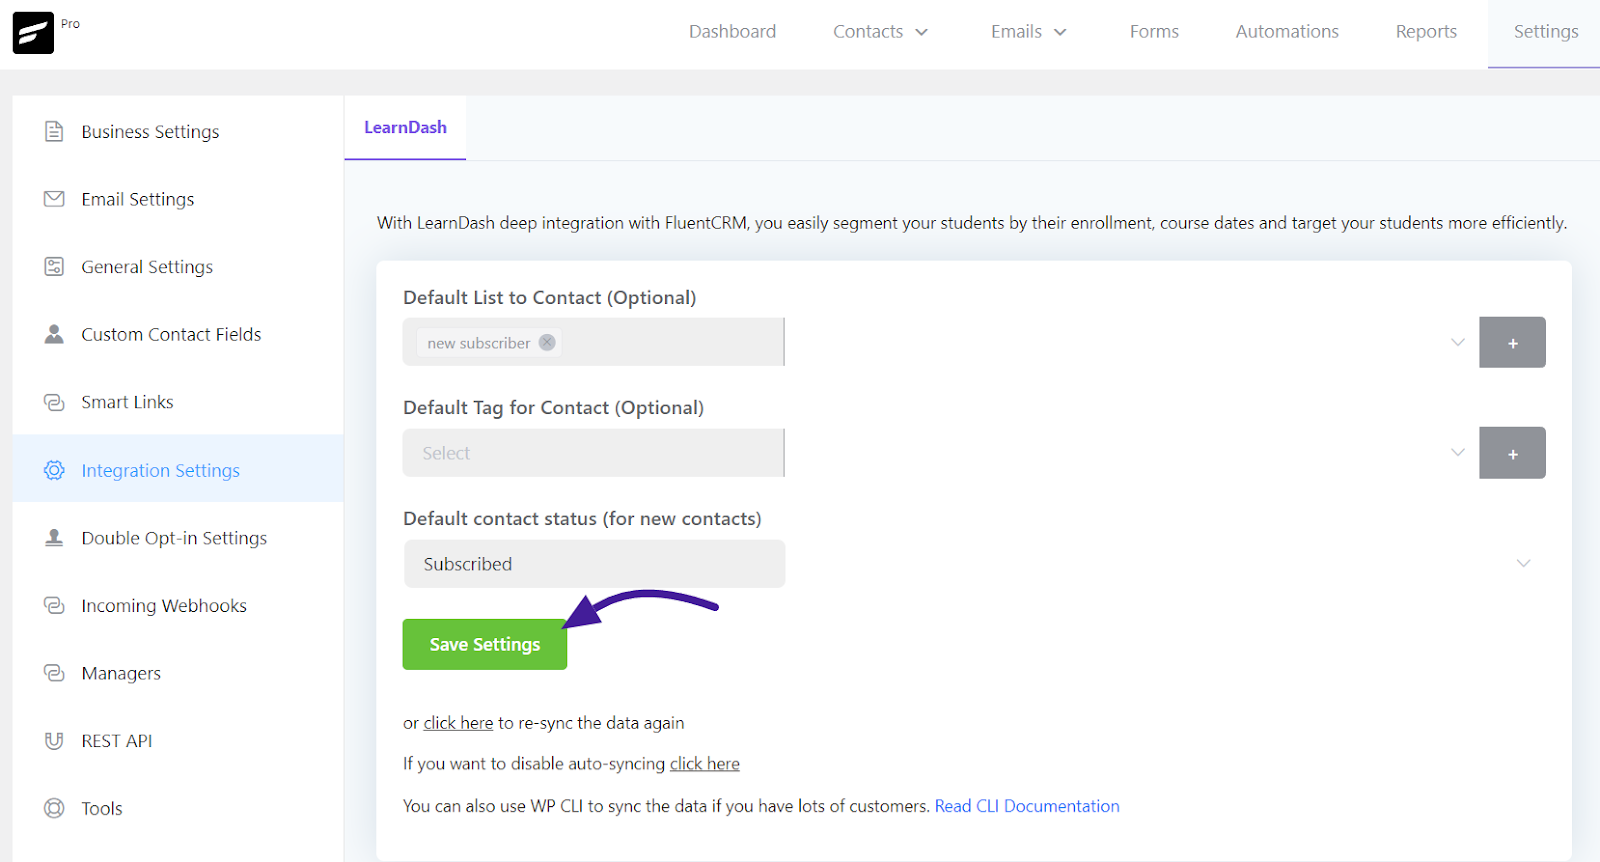
To save your settings click the Save Settings button. Also, you can re-sync data again or disable auto-syncing data here.
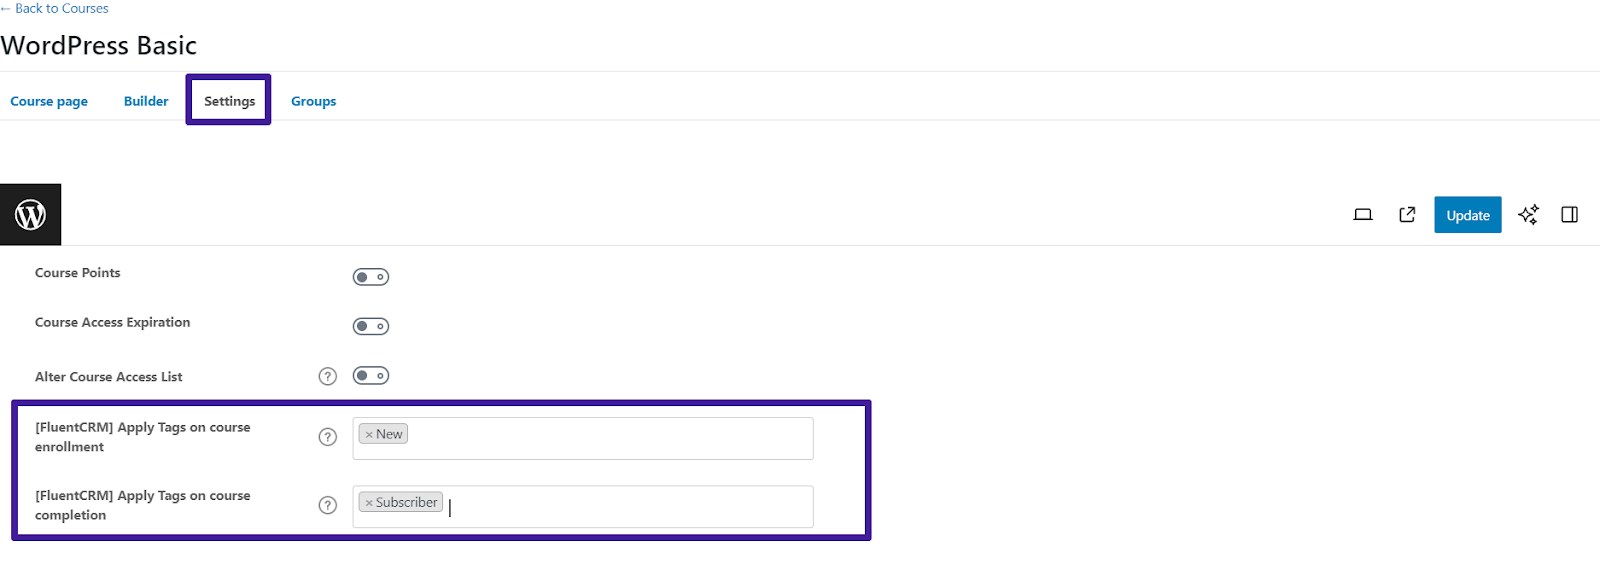
Tag Settings in Learndash #
To capture and apply tags based on course enrollment and completion, go to edit your LearnDash course and switch to the Settings tab. In the Course Access Settings section, select the tags you want to apply when course enrollments and completions occur. You can apply multiple tags in these sections.
Marketing Automation #
FluentCRM also lets you automate a wide range of tasks such as sending behavioral emails, email sequences, contact property updates, and many more.
FluentCRM’s email marketing automation includes four major elements. These are:
FluentCRM’s email marketing automation includes four major elements. These are:
Triggers: Triggers are essential for initiating email marketing automation. They can be behavior-based, or time-based. Learn more about FluentCRM’s Triggers.
Action Blocks: The actions that will be done throughout the funnel for example sending an email, adding the user to a list, etc. Learn everything about FluentCRM Action Blocks.
Goals: Goals or Benchmarking Action is the behavior of the users for example whether they purchased a product, clicked on a link, etc. Learn everything about FluentCRM Goals Blocks.
Conditionals: Conditionals will let you set multiple paths based on if/else conditions. Learn more about FluentCRM Conditionals.
LearnDash Automation #
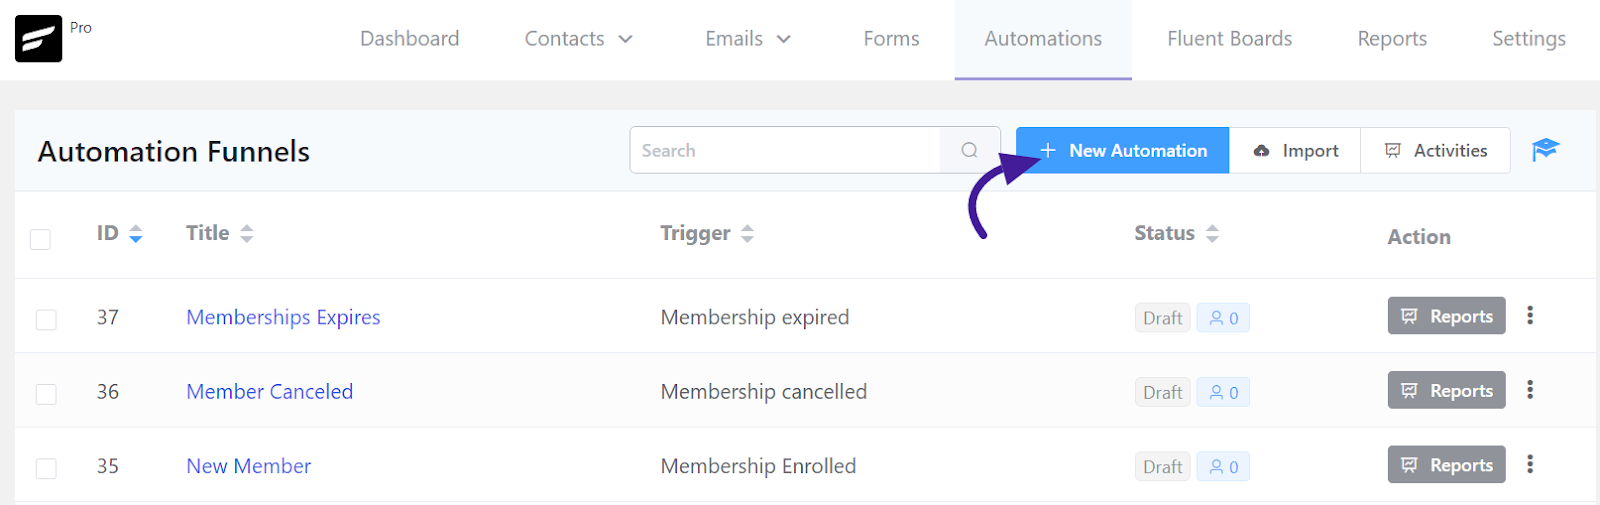
First, from your FluentCRM dashboard & go to the Automation option. Then click on the Create a New Automation button to add an automation funnel.
You will notice a pop-up window appear. Add a suitable Internal Label and choose the trigger that will initiate an automation funnel. You can choose on from available Learndash Triggers then click the Continue button.
- Course Enrolled: When someone enrolls in a Learndash course, you can use this to start an automation funnel.
- Course Left: This will let you trigger an automation funnel when someone leaves the Learndash course.
- Course Completed: This will let you trigger an automation funnel when someone completes a Learndash course.
- Lesson Completed: This will let you trigger an automation funnel when someone Completes a lesson in a Learndash course.
- Topic Completed: This will let you trigger an automation funnel when someone completes a topic in a Learndash course lesson.
- Group Enrollment: This will let you trigger an automation funnel when someone enrolls in a group in Learndash.
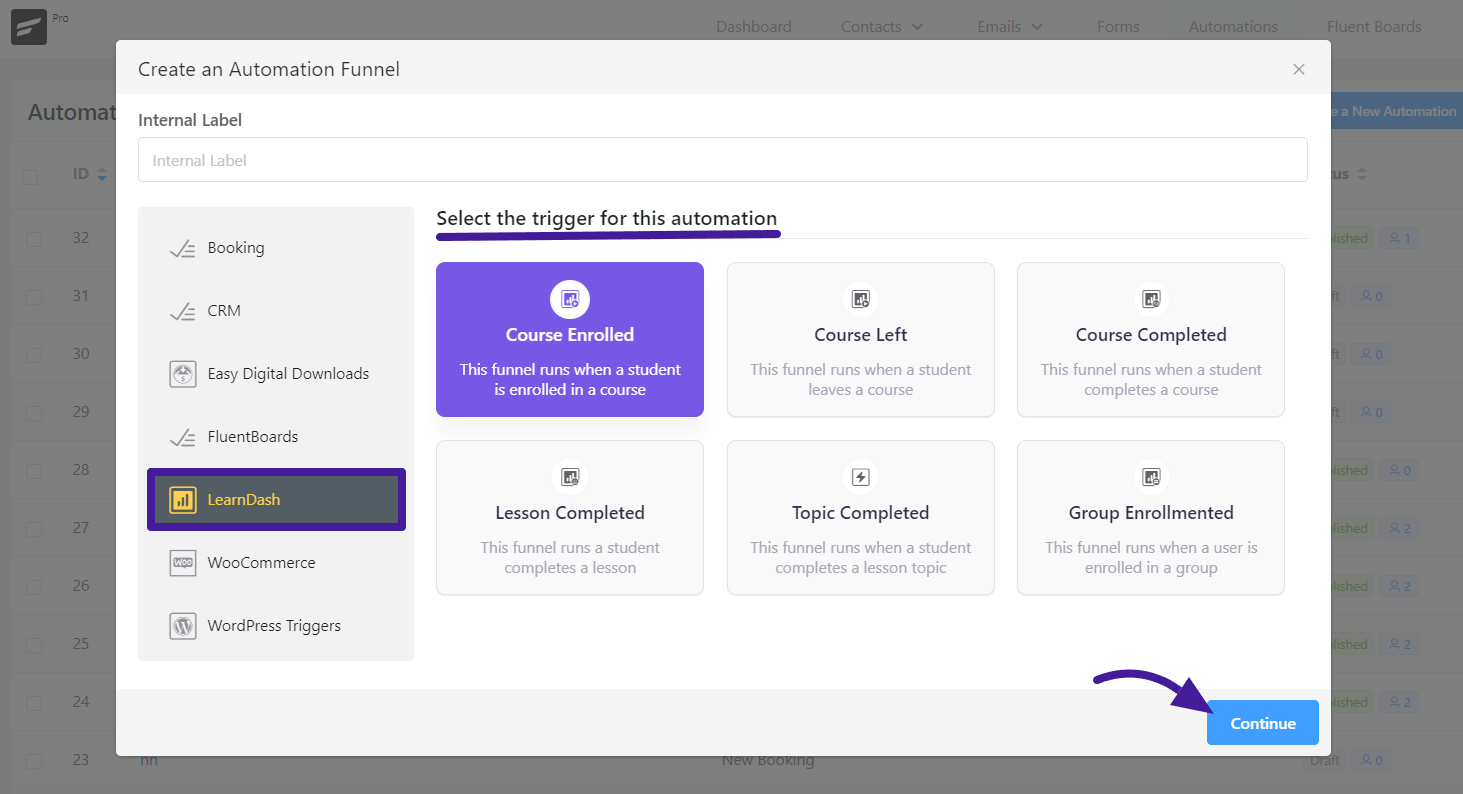
Apart from these triggers, FluentCRM also comes with lots of other triggers. To see the full list of triggers and learn how to configure them, please check this documentation.
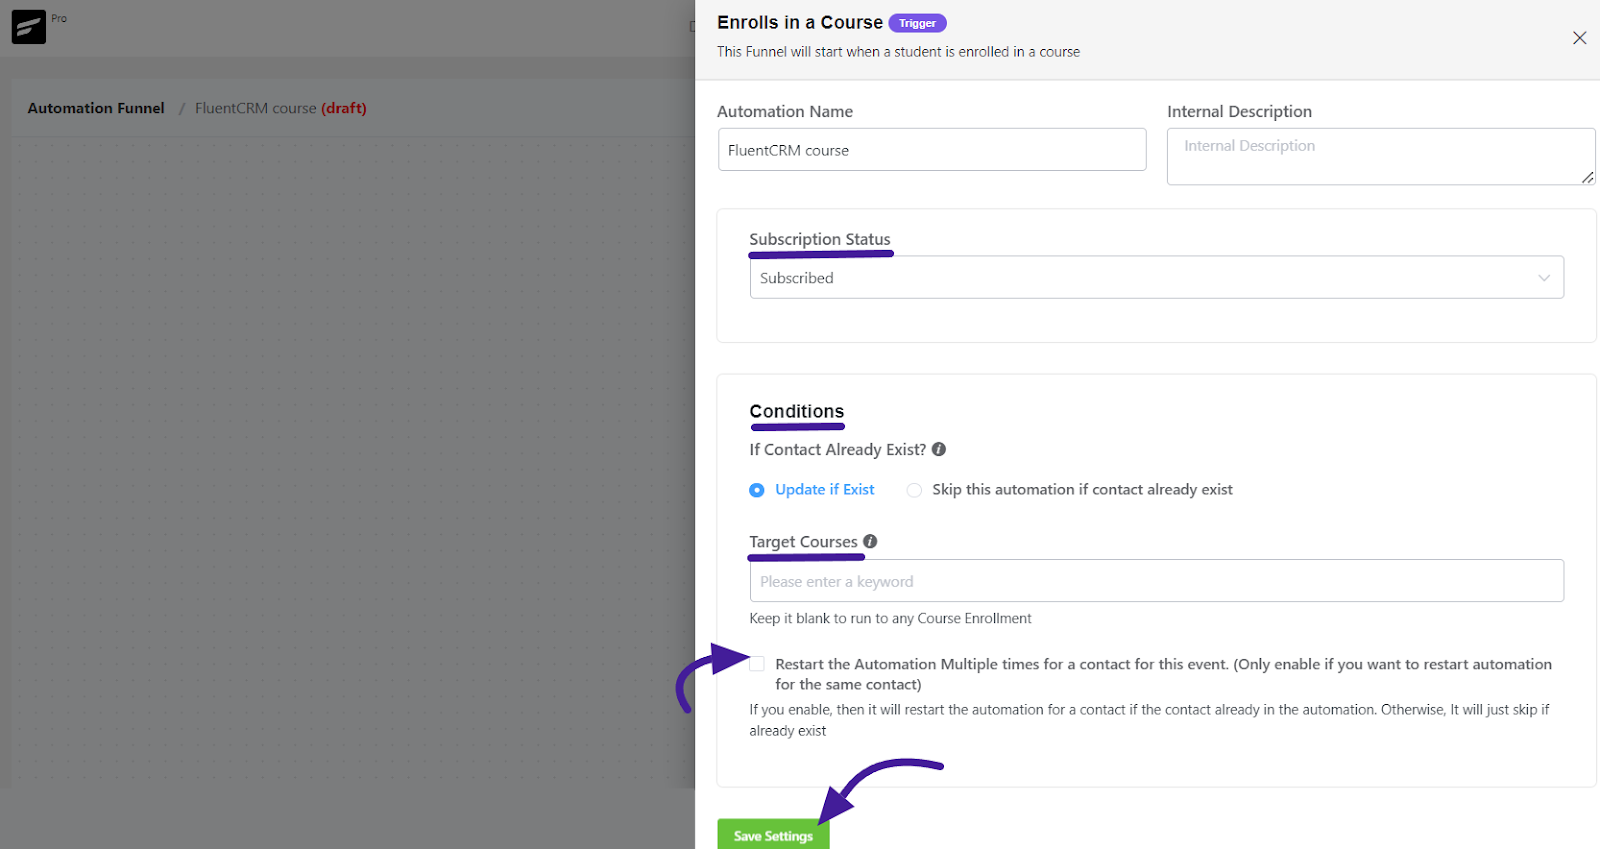
When you select a trigger and click Continue, a pop-up box will appear with some options to set up the trigger. You can set your Automation Name and Internal Description of your Automation here.
Also, you can change your Subscription Status and conditions, and select the specific courses to run this Automation with the Target Courses field.
If you enable the Restart the Automation Multiple Times option for this event, it will restart the automation for a contact already in an automation.
Once you’re done setting up the trigger click on the Save Settings button, now you can use Actions, Goals, and Conditionals to design your marketing automation Funnel.
Action Blocks #
These Action Blocks allow FluentCRM users to automate their LearnDash course management, such as enrolling or removing students from courses and groups based on specific triggers or conditions defined within FluentCRM’s automation workflows.
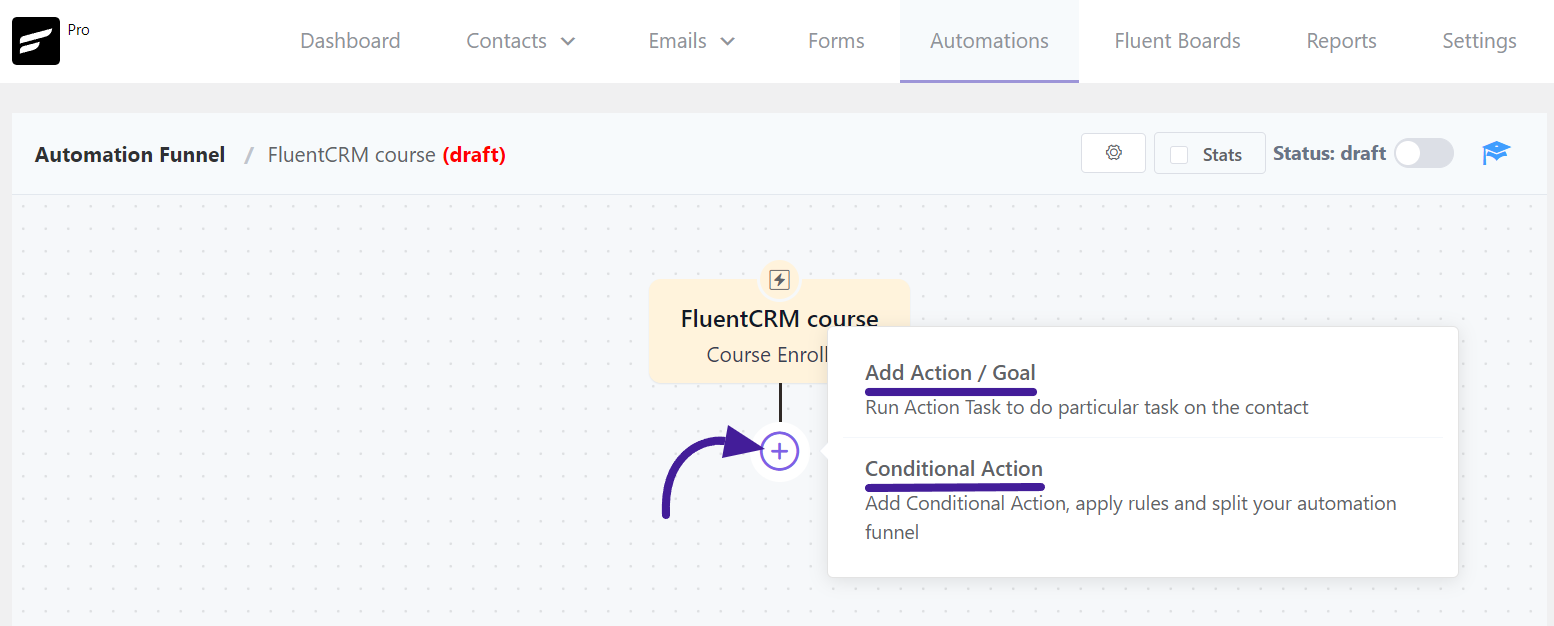
Click on the plus icon on the Automation Funnel page and the Add Action/Goal option will come click on it.
Then you will notice a pop-up with a set of Action blocks to choose from. If you scroll down, you will see four dedicated action blocks available for LearnDash.
From here, you can choose any type of action block. Please check our funnel action blocks documentation to learn how to use funnel action blocks.
Enroll To Course: This action enrolls the contact into a specific LearnDash course.
Remove From Course: This action removes the contact from a particular LearnDash course.
Enroll To Group: This action enrolls the contact into a certain LearnDash group.
Remove From Group: This action removes the contact from a specific LearnDash group.

Goals/Trigger Blocks (Benchmark) #
Goals/Trigger blocks are goal or trigger items that your user might do. They let you measure these steps and automate the funnel based on goal completion.
Click on the plus icon(+) to open the pop-up for selecting the Add Action/Goals. For Learndash, you can choose List Applied goal.
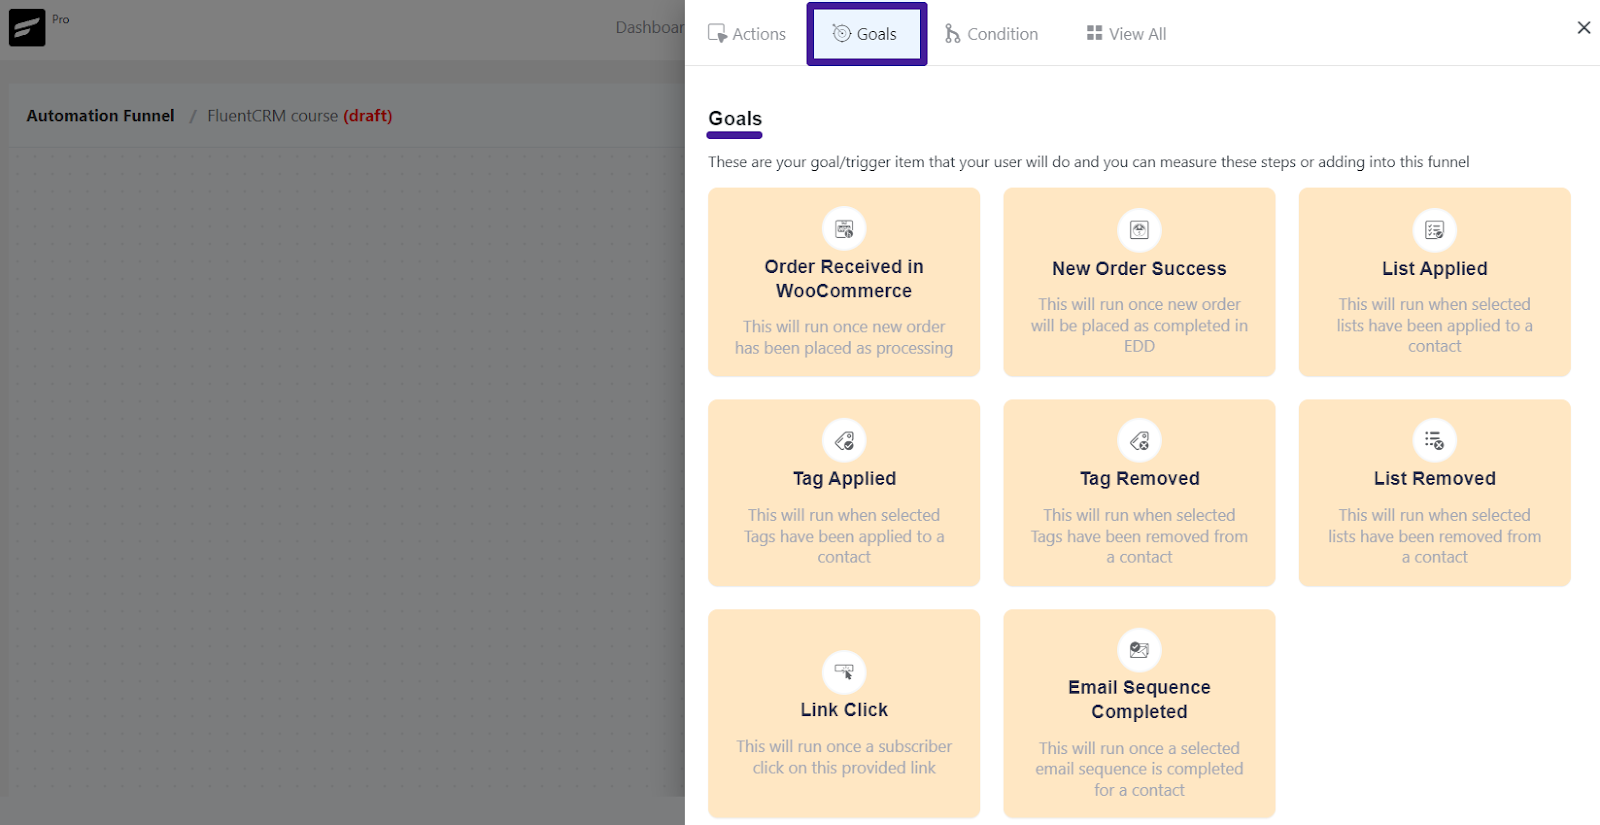
This trigger block will run once a list is applied to a contact within the automation funnel. In this block, you can add an internal label, specify the list for which the goal applies, when it will run, and Benchmark Type.
Click Save Settings when you’re done. You can use other goals or benchmarks
Conditionals #
Conditionals are conditional logic. If you want to automate different activities based on If/Else conditions, you can choose a conditional block. For Learndash, FluentCRM allows you to automate different activities based on two conditionals. Click on the plus icon(+) from the Automation Funnel page to open the pop-up for selecting the Conditional Action.
Specify Matching Conditions: With this, you can add different action blocks based on your preference, click on the Add button to see the conditions options.
Then make sure to click the Save Settings button.
If you want to use other conditionals please check out this documentation.
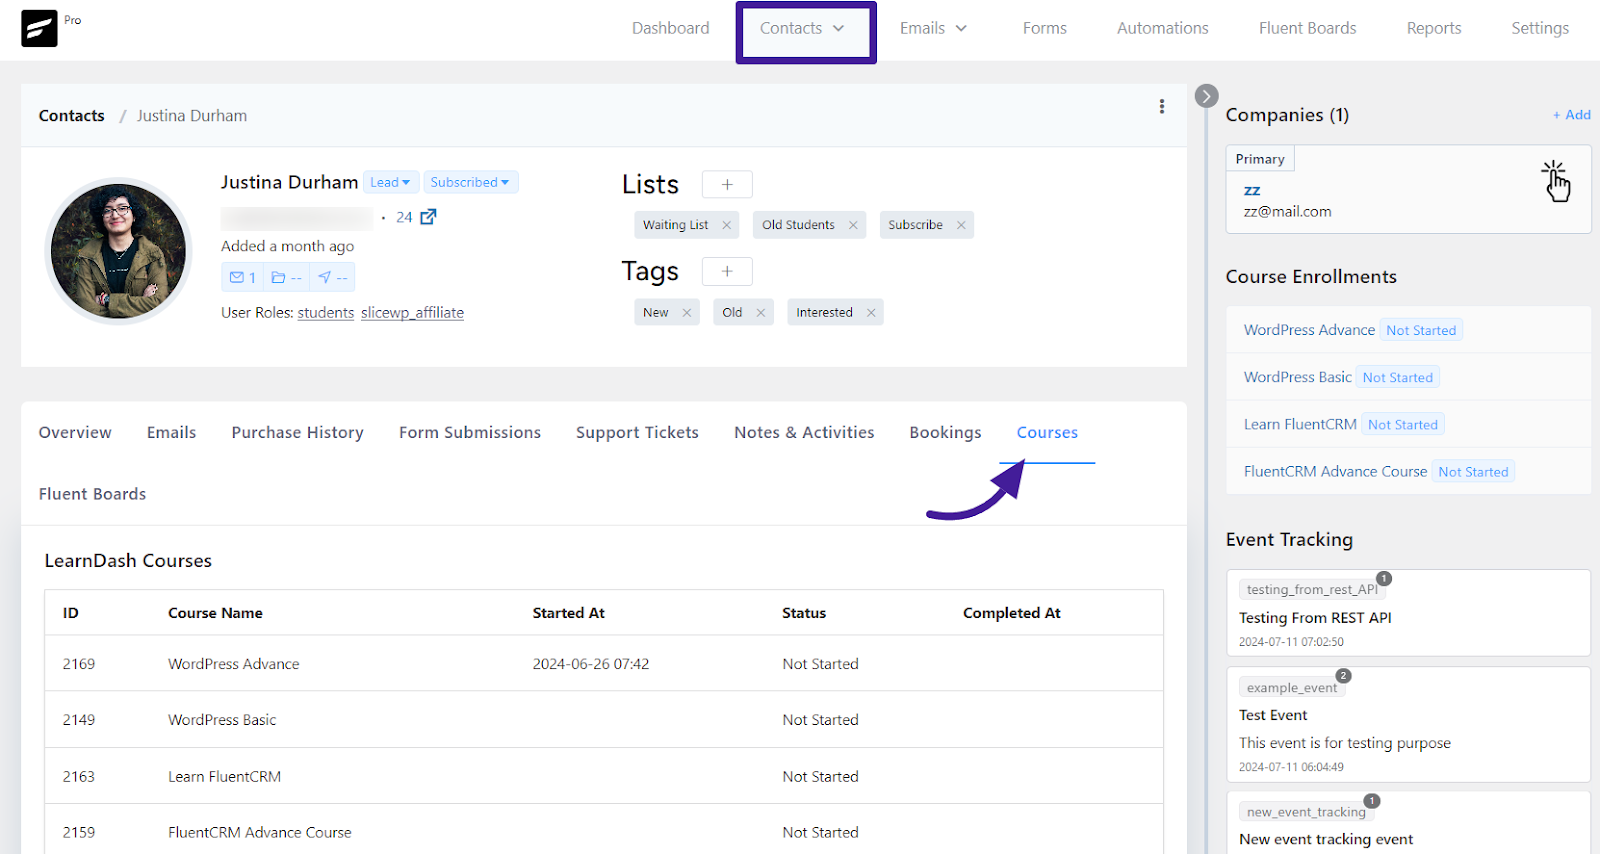
Once you’ve completed these steps, you’ll see a report of your course enrollment contacts, similar to the screenshot below.
Advanced Filtering Option #
Advanced filtering allows you to use a variety of essential data points, including the latest enrollment date, beginning enrollment data, courses enrolled, enrolled categories, and enrollment tags. This makes it simple to send hyper-targeted emails and implement automation.
Now, you may filter your course data. To perform filtering, navigate to your FluentCRM contact area and click the Advanced filter button. Next, select the Add button to begin filtering data.
Here you can add multiple filters by clicking the +OR icon. Also, you can delete your advanced data filter by clicking the delete icon on the left sidebar.
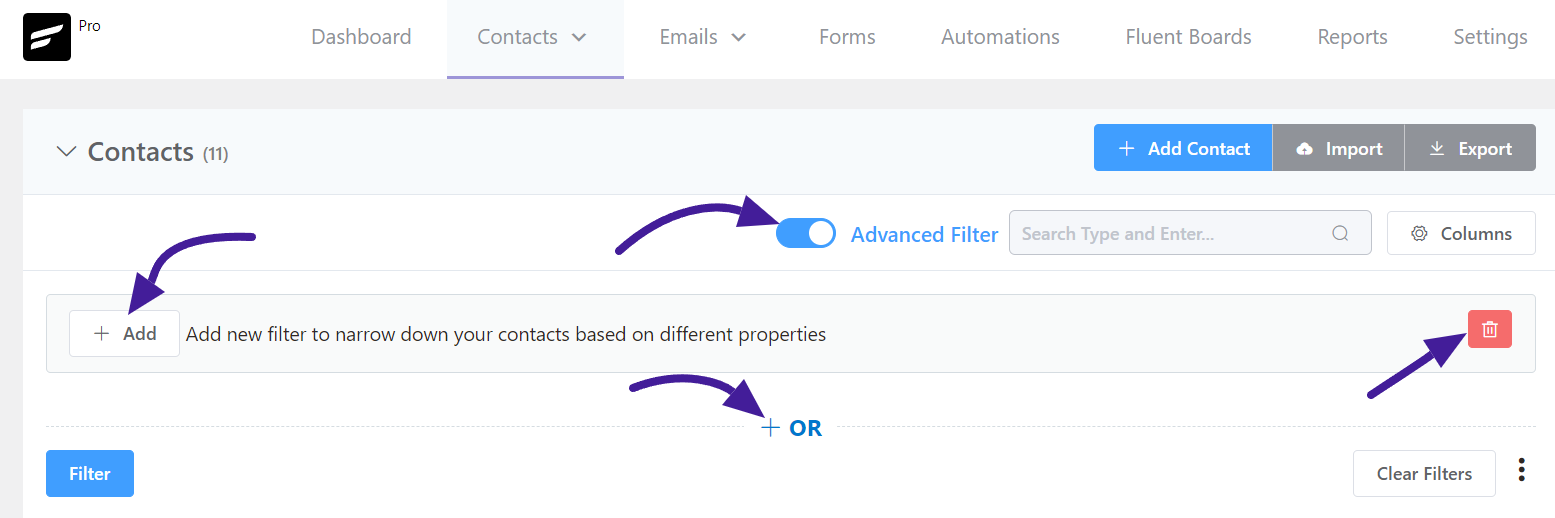
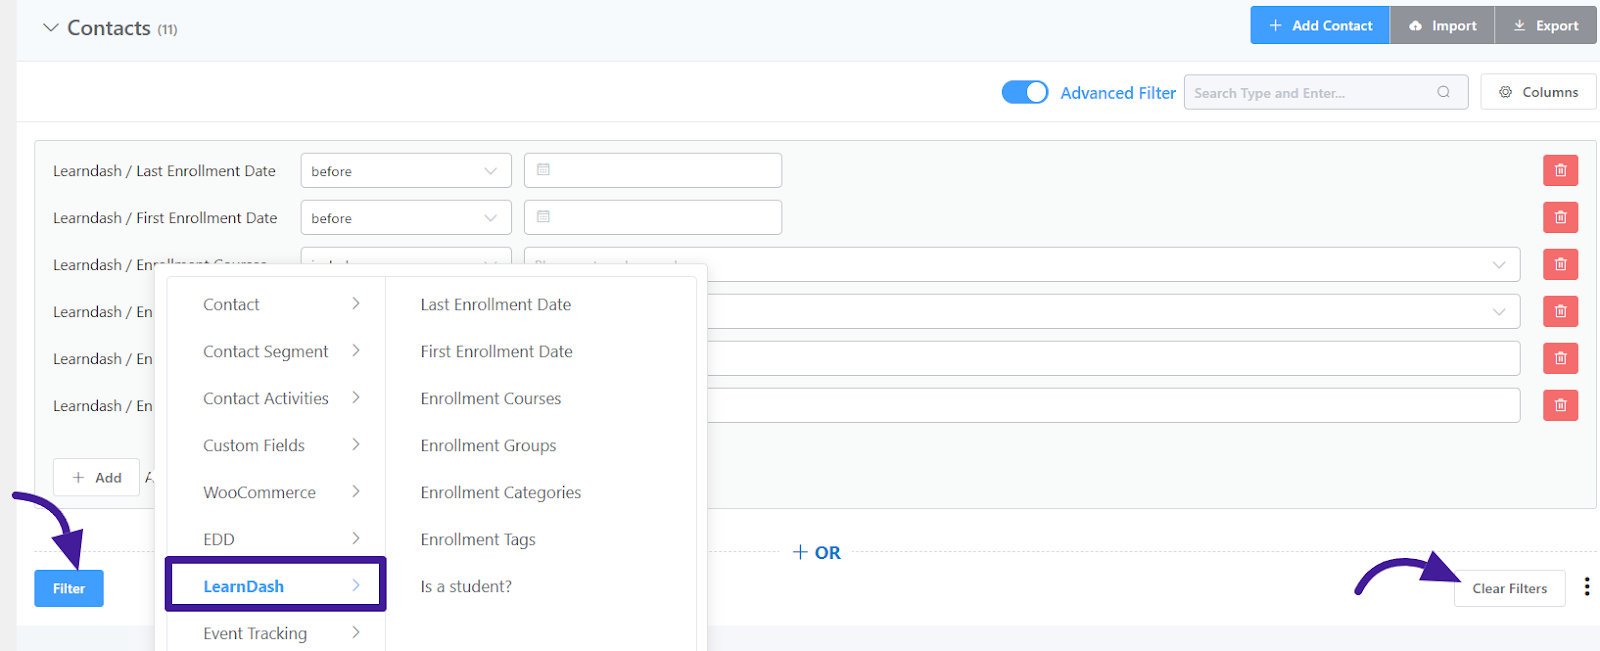
You must choose Learndash for data filtering. Then click the Filter option. You can also clear your data filter by clicking the Clear Filter button on the left sidebar.
- Last Enrollment Date
- First Enrollment Date
- Enrollment Course
- Enrollment Group
- Enrollment Categories
- Enrollment Tags
- Is a Student?
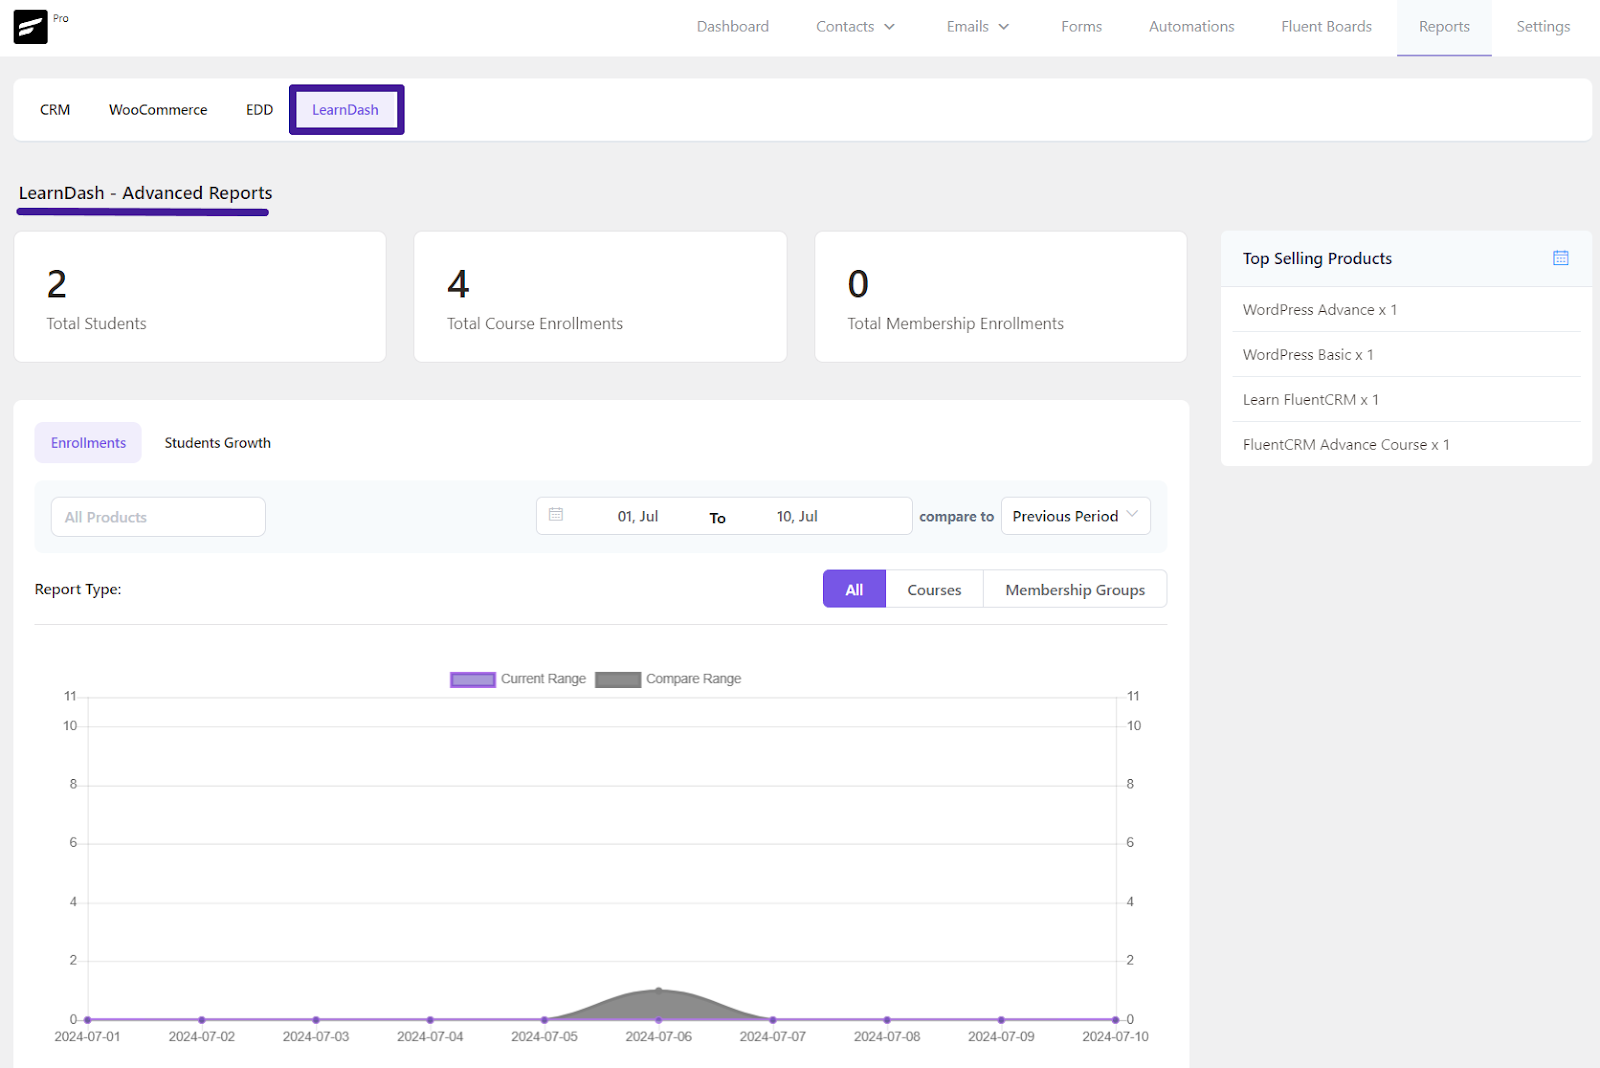
Advanced Reports #
To access your course enrollment report, navigate to the FluentCRM dashboard and click Reports from the top menu. Then, select the LearnDash option to see full information about your enrolled contacts and courses.
To learn more about the advanced report of LearnDash read this Documentation.
If you have any further questions about this guide, please don’t hesitate to contact us.
*Tutorial: Learndash email marketing automation with FluentCRM


Can we add LearnDash blocks to the email? Currently ,the blocks available in Email are extremely limited when compared to those available in WordPress post composer. Is it possible to get all the blocks and add to email.
My simple use cases: User has completed course A. An automatic email suggesting course B and C is sent. Course B and C thumbnails and descriptions are added to email using LearnDash Course grid block.
New blog posts added, a weekly digest is sent. For this,currently i am using RSS feed block. Would prefer a better block which produces a more visually pleasing result.
Can I insert LearnDash shortcodes in the FluentCRM emails?
Hi there, this isn’t possible yet. But we will add these in the future.
Is there any update to this? It’s not very helpful to be able to trigger weekly emails based on new course availability, but then not to be able to highlight those courses in the same email.
Hi, are you talking about something like a learndash course block?