

Email Authentication 101: A Complete Guide to SPF, DKIM, DMARC, & Other Info You Need to Know

Summarize with


Last Updated:
Imagine a world where inboxes welcome your messages with open arms, not suspicion. Tough to imagine right?
To solve this problem, we bring you this guide to unlock the secret of email authentication – your weapon against spam filters.
In the era of the digital world, email marketing is compulsory, but to complete this ‘must’ task, you have to reach the customer’s inbox. Now, to achieve the mission, authenticating email is just as important as writing proper mail, if not more.
So, without further adieu, let’s start the training!
What is Email Authentication?
Email authentication, or email validation, is the process of verifying the sender and ensuring the authenticity of an email. To write it more simply – Email verification is the process used to verify that an email message originally comes from the sender it claims to be from.
A common scenario could be – scammers often mimic various trusted entities like Banks, Amazon through address forgery and phishing, authenticating emails improves email security by preventing such scenarios.
Authentication methods use protocols like SPF, DKIM, and DMARC to verify email origins via Domain Name System (DNS) records. Using an Email Service Provider (ESP) can simplify this process, as ESPs manage these technical aspects, improving email deliverability and reducing spam risks.
Neglecting authentication can lead to your emails being marked as fake, so it’s important to implement these protocols.
But exactly how important it is to authenticate your emails? Learn in the next segment!
Why is Email Authentication Important?
In the digital era of email marketing, landing an email successfully in the receiver’s mailbox is no less than going to war. And, when you’re sending emails from WordPress, without proper authentication, you might face an email sending issue!
Yes, that important email verification is.
To understand its importance further, read the points listed below-
- Improve Deliverability: Authenticated emails are less likely to be filtered as spam by mail servers, ensuring higher inbox placement.
- Enhance Security: Applies SPF, DKIM, and DMARC protocols to verify the sender’s domain, preventing email spoofing and phishing.
- Protect Brand Reputation: Maintains domain integrity by ensuring that only authorized emails are sent. This safeguards the business’s reputation.
- Increase Recipient’s Trust: Validated email which boosts recipient confidence and engagement rates.
- Ensure Compliance: Meets regulatory requirements and industry standards for secure email communication.
- Optimize Marketing Efficiency: Increases the success rate of email campaigns by ensuring legitimate emails reach the target audience.
Now that you know exactly how important authenticating email is, how about taking an educational tour to learn ‘how an email authentication system works’?
How Mail Authentication System Works
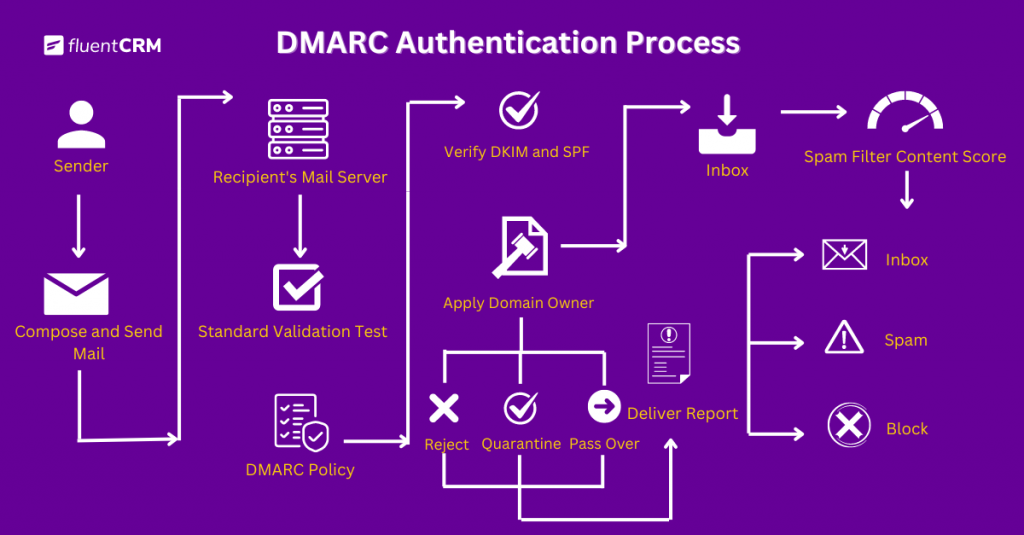
To answer ‘How mail authentication system works’ in simple terms – Email authentication uses DNS records to verify your sender identity.
Some DNS (Domain Name System) records help the receiving server confirm which hosts are allowed to send emails from your domain, while others use public keys and electronic signatures to verify the sender’s identity. You choose the policy and record types that suit your needs.
Here’s how it works:
- First, a business sets a policy to manage how emails from its domain are authenticated
- Then the email sender configures their mail servers to implement this policy
- The recipient’s server checks the incoming email against the business’s authentication policy
- Based on the authentication result, the recipient’s server either delivers emails to the inbox, marks them as spam, or entirely rejects emails
By following proper email verification protocols, you signal to mailbox providers that your emails are legitimate. This improves your chances of reaching the inbox instead of the spam folder.
Now that you know the basics of email authentication, let’s take a deeper dive!
Email Authentication Methods
As we already know – an email authentication method refers to any technical standard enabling domain-based email verification. These methods, like SPF, DKIM, DMARC, and BIMI, work with the main email-sending protocol, SMTP.
While SMTP is great for sending emails, it lacks built-in security, so verification methods step in to fill the gap. For big email providers like Gmail and Yahoo, SPF, DKIM, and DMARC must be set up.
The methods in detail are given below:
Sender Policy Framework (SPF)
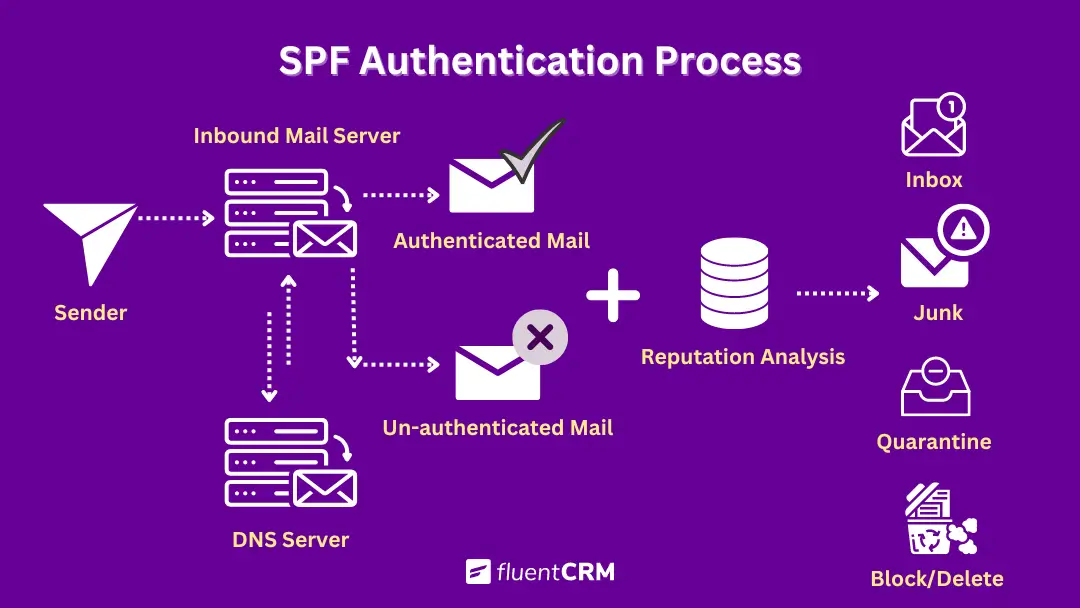
SPF (Sender Policy Framework) is like a security guard with a VIP list for your emails. It tells email servers which sources are allowed to send emails on behalf of your domain. Think of it as a digital bouncer: if you’re not on the list, you might not get into the party (or worse, end up in the spam folder!)
This method lets the sender’s domain specify which email servers can send emails on its behalf, using information stored in the domain’s DNS settings. When an email is sent, the recipient’s server checks the SPF record to verify authenticity and decide whether to accept, reject, or mark the email as spam.
Here’s how it works:
- You create an SPF record in your domain’s DNS settings, specifying the servers allowed to send emails to your domain.
- When you send an email, the recipient’s server checks if it originated from one of the approved servers listed in your SPF record.
- If the server is approved, your email will get a green light and have a higher chance of reaching the recipient’s inbox.
But remember, SPF isn’t foolproof. Sometimes forwarded emails or emails sent through third-party services can cause SPF failures.
While SPF is a great first step in authenticating emails, it’s necessary to understand its limitations and use it alongside other authentication methods like DKIM and DMARC for better email security.
How to Set Up SPF Record on Your Server
To set up an SPF record on your server, follow these steps:
- Check Your Current SPF Record: Use tools like MxToolbox or Google Admin Toolbox. Enter your domain (e.g., potato.co) to see your current SPF record or find out if you don’t have one.
- Add the SPF Record: The exact steps depend on your domain host, but generally, you’ll need to paste a properly structured line of text in the correct place in your domain’s console.
For example, if you use Google Apps to send emails, your SPF record might look like this:
v=spf1 include:_spf.google.com ~all- Understand the SPF Record Parts: In any SPF record there has to be three parts. If we were to take a look at the previous example of the SPF record, then this concept will be more clear. The detailed explanation of the example is given below:
v=spf1: Identifies the record as SPF

include:_spf.google.com: Authorizes Google's mail servers

~all: Tags emails from unauthorized servers as soft fail (they can be flagged as spam)- Include Other Services: If you use multiple email services (e.g., for newsletters or support), you’ll need to include those as well. The line will be longer and vary depending on your host. For instance, with Potatotohost, the line will differ.
Following these steps will help ensure your emails are properly authenticated and delivered.
DomainKeys Identified Mail (DKIM)
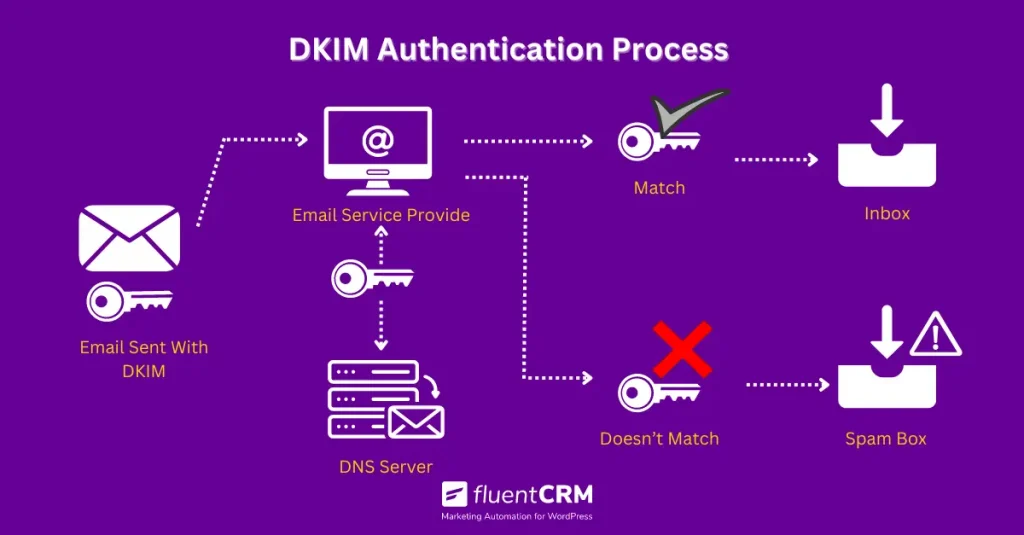
DKIM, or DomainKeys Identified Mail, is like the secret agent of your emails, ensuring they’re not impostors but genuine messages from you. It works by matching a private key with a public key to verify that the email came from the rightful owner of the domain it claims to be from. Think of it as a digital signature, like signing a letter with your unique mark.
Here’s how it works:
- When you send an email, DKIM adds a special signature to it, kind of like a secret code that only the right people can decipher.
- When your email reaches its destination, the receiving mail server checks this signature against a public key stored in your domain’s DNS records. If they match, it’s like unlocking a hidden vault—it confirms your email’s authenticity.
This process helps mailbox providers to keep track of your domain’s reputation, making sure your emails are seen as trustworthy.
It’s important to note that DKIM alignment is maintained even while forwarding a message.
There’s more to DKIM than meets the eye. You can customize it to fit your needs, like choosing which parts of your message to sign against and even upgrading to stronger encryption for added security.
How to Set Up DKIM Record on Your Server
- Generate the Public Key: Log in to your email provider’s admin console to generate the DKIM public key. Steps vary by provider.
For Google Apps Users; DKIM signatures are off by default; enable them manually in the Google Admin console
- Add the DKIM Record: Once you have the public key, take the generated TXT record and paste it into your DNS records in the correct location.
- Enable Email Signing: Finally, turn on email signing in your email provider’s settings to start sending emails with your DKIM signature.
Following these steps will ensure your emails are properly authenticated with DKIM.
Domain-based Message Authentication, Reporting, and Conformance (DMARC)
Like any other authentication systems, SPF and DKIM can fail too. In that case, as a safety net email service provider check another protocol, which is DMARC.
DMARC (Domain-based Message Authentication, Reporting, and Conformance) is an email security protocol that protects domains from unauthorized use and enhances email deliverability. It builds upon SPF and DKIM mechanisms, allowing domain owners to specify policies for handling emails that fail verification checks.
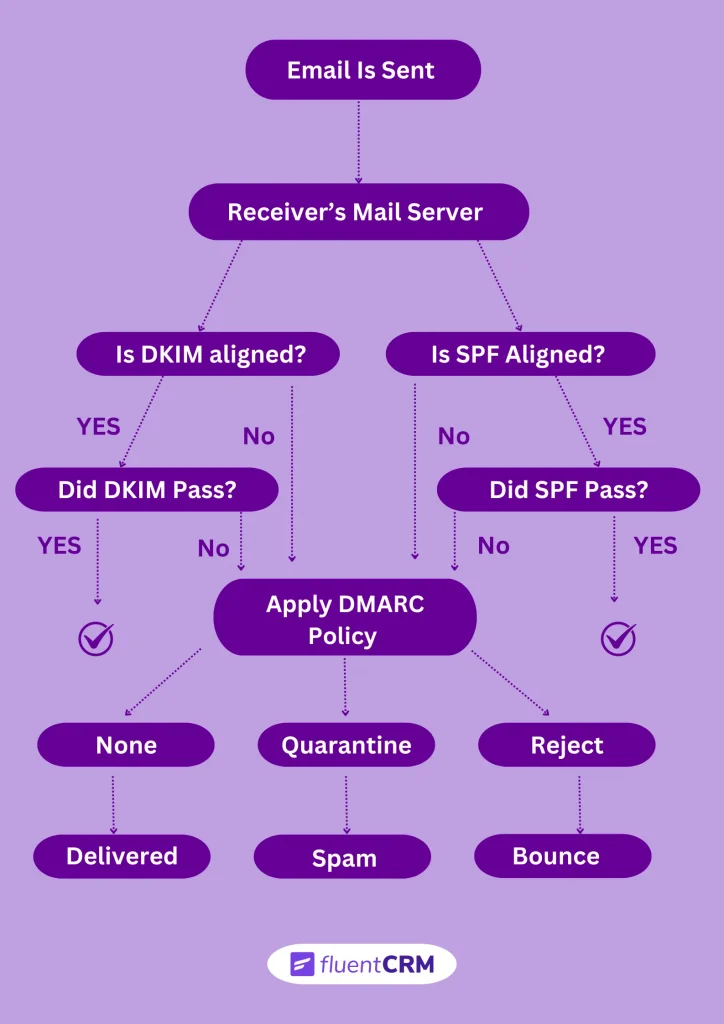
When an email is sent, DMARC verifies its authenticity by checking SPF and DKIM alignment. There are four things DMARC checks.
The steps are:
- DKIM Pass: Validates the signature in the email header against the public key in the DNS.
- DKIM Alignment: Ensures the parent domain matches the Header From the domain.
- SPF Pass: Verifies if the IP address is authorized to send emails for the domain.
- SPF Alignment: Confirms alignment between the Envelope From and Header From domains.
If an email fails both SPF and DKIM checks, DMARC determines the action based on the domain owner’s policy, such as delivering, quarantining, or rejecting the email. In that case, usually, the mail doesn’t pass DMARC.
How to Set Up DMARC
To set up DMARC on your server, follow the listed steps:
- Create a TXT Record: Log in to your DNS hosting provider and create a new TXT record. You’ll need to fill out three fields: Host/Name, Record Type, and Value.
Select Record Type: Choose "TXT" from the drop-down menu for the record type.- Add Host Value: Input the host value for DMARC, such as _dmarc.example.com or _dmarc.subdomain.example.com.
- Add Value Information: Include the tag-value pairs in the value field. V tav value is always equal to DMARC1, and p tag can be:
• p=none
• p=quarantine
• p=reject

Ex:   Start with v=DMARC1; p=none.
Note: Always set p=none to avoid accidental quarantining or rejection of emails. Optionally, add the “rua” tag for detailed reporting.
- Save the Record: Save the record and verify it using a DMARC record checker to ensure it’s correctly set up.
These are very brief instructions to set up SPF, DKIM and DMARC.
To learn more in detail: What are DMARC, SPF, and DKIM?
New Google and Yahoo Rules Updated in 2024
If you weren’t aware, since February 2024, both Google and Yahoo introduced new rules for sending emails. These rules are applicable for both ‘all senders’ and ‘bulk senders’. Now these rules are non-negotiable if you send more than 5000+ emails per day.
The updated rules are:
- Ensure email security with authentication protocols (DKIM, SPF, DMARC).
- Offer a simple unsubscribe experience with a single-click option.
- Maintain a spam reputation with a low spam complaint rate (below 0.3%).
These are not anything new for email marketers. But the more you know the better.
To understand the full guidelines, read Google and Yahoo’s New Email Deliverability Rules.
How to Authenticate Email in a Few Steps
No soldier goes into war without wearing a bulletproof vest and guns, so why would you send mail without authentication?
In the fiercely competitive digital marketplace, each email faces challenges similar to a battlefield for survival.
Now, let’s get your emails prepared for the battle by learning how to authenticate emails:
- Use Consistent Sender Addresses: Try using the same sender addresses and friendly names in your emails. Changing them often makes recipients unsure if the email is from a trusted source. Also, don’t use domains that are similar to your main brand’s domain, as this can make recipients more vulnerable to phishing.
For example: If your domain name is: potato.com, sending mail from the domain potatomails.com is not a good idea.
- Authenticate IP addresses with SPF: SPF, or Sender Policy Framework, verifies if the sender’s IP address matches the approved list for sending emails from that domain. It’s part of the domain’s DNS and contains the authorized IP addresses. Without SPF, the receiver’s mail server won’t know if they should let the mail in or not. It’s a must-do.
- Configure DKIM Signatures for Emails: By configuring DKIM signatures, you’re adding an extra layer of protection to your emails. These signatures are like unique fingerprints that verify the integrity of your messages. Setting up DKIM may seem technical, but it’s a straightforward process that significantly improves the trustworthiness of your emails.
- Protect Domains with DMARC Authentication: DMARC adds a shield around your brand’s emails, ensuring they’re genuine and trusted by recipients. adds an extra layer of security by allowing domain owners to specify how email servers should handle messages that fail authentication. It helps prevent domain spoofing and enhances email deliverability by ensuring only legitimate emails reach recipients’ inboxes.
- Prepare for BIMI: BIMI, or the Brand Indicators for Message Identification BIMI (Brand Indicators for Message Identification) improves email validation by displaying brand logos alongside emails in recipients’ inboxes. It improves brand recognition, builds trust with recipients, and helps combat phishing attacks by providing visual authentication cues for legitimate emails.
So, let’s take a look at a few ‘must not do’ lists and protect your emails from getting wounded in the marketing war!
A Few ‘Must Not Do’ for Authenticating Email
Imagine you have followed all the steps to authenticate your emails. But that won’t do you any good unless you know what not to do.
Now that you know how to authenticate your mail, you might wanna know about a few steps you should avoid.
Those few steps are:
- Don’t buy email lists from other companies
- Don’t send bulk emails at inconsistent rates
- Don’t send emails to people who didn’t sign up, as they might mark them as spam
- Don’t mix different content types in one email, like adding promotions to sales receipts in emails
- Don’t impersonate another domain or sender without permission, as this can get your emails marked as spam
- Don’t label your internal messages as spam, as it can damage your domain’s reputation and future emails might be marked as spam
- Avoid pre-checked opt-in forms that automatically subscribe users. Check local regulations, as some regions restrict automatic opt-ins
- Never increase email sending volume abruptly. You can use tools like Postmaster Tools to track deliverability
- Never send emails without checking if all your domains are included in the SPF record
If you follow the ‘must avoid’ rule and avoid doing them, then you are good to go!
What Benefit Will You Get by Email Authentication?
Previously we explained some advantages you get from making sure your emails are authentic. Those benefits are vital for doing well in email marketing.
Now, let’s look at a few additional great things you’ll get from doing it:
- Validates Data Accuracy: Validating a mailing list will show you how good your data is. If there aren’t many unavailable addresses, you’ll know you’re doing well.
- Reduces Email Bounces: Email bounce rates don’t only result in losing customers, but also a decrease in email sender reputation. And bounce rate will directly impact your business. You don’t want that.
- Improves Customer Engagement: Email verification comes with a benefit which is credibility. The more credible your brand is, the better communication you’ll have with your customers.
- Increases Campaign ROI: Email authentication helps to get your mail only to the targeted few customers. the better the authentication, the fewer emails you’ll need to send. This will help you get a better email marketing ROI.
- Saves from Fine: Any ESP, expects you to avoid high bounce rates and complaints. Frequent issues may lead to getting charged for the damage. Email verification maintains a clean list and keeps hard bounces to a minimum.
- Keeps Email List Updated: Email verification ensures an up-to-date email list and makes sure all addresses are valid and can receive emails. This boosts your delivery rates, saves your penny and time, and most importantly, keeps your campaigns on track!
Be Armored for the Email Marketing War Through Email Authentication
In the battlefield of email marketing, email authentication serves as your armor, shielding your campaigns from deliverability issues and spam filters. By embracing techniques like SPF, DKIM, and DMARC, you’re equipped to ensure your emails reach the right targets securely!
Remember, authentication isn’t just a defense — it’s a strategic advantage. It,
- Safeguards your brand reputation
- Enhances customer trust
- Maximizes your marketing efforts
With authentication as your ally, you’re not only protecting your campaigns but also empowering them to reach new heights of success.
So, as you navigate the challenges of email marketing, prioritize email authentication to stay ahead in the war for inbox attention. By fortifying your email strategy with authentication, you’re prepared to conquer the battlefield and emerge victorious.
What’s the wait for? Take charge of your email marketing campaigns today by authenticating emails and leading your brand to success!
Samira Farzana
Once set out on literary voyages, I now explore the complexities of content creation. What remains constant? A fascination with unraveling the “why” and “how,” and a knack for finding joy in quiet exploration, with a book as my guide- But when it’s not a book, it’s films and anime.
Table of Content
Related Articles and Topics
-

How to Create a Newsletter Archive on WordPress within 5 Minutes!
You send a newsletter to your subscribers, once they reach their inboxes and read it…
-
New Gutenberg Editor: The Email Builder WordPress Users Always Wanted in FluentCRM
If you’re a WordPress user, isn’t it satisfying to write in Gutenberg? You click the…

Leave a Reply