
How to Create and Add Gated Content to Your WordPress Site


“Returning visitors convert 73.72% more than first-time visitors.” – Barilliance
If new visitors are the waves your business needs for growth, returning visitors are the ones that help your business flourish. And one of the most effective ways to bring them back is through gated content.
Gated content helps you—
- Capture email addresses
- Grow your email list
- Tailor personalized communications
- Build long-term relationships
Many WordPress site owners effectively use gated content to drive email sign-ups and membership registrations. In this guide, we’ll show you how to create and add gated content to your WordPress site using plugins, forms, and landing pages.
But before you start gating your posts, let’s understand what gated content really is.
What is Gated Content and How it Works
Gated content refers to exclusive content accessible only once a visitor takes a specific action. It typically requires users to submit an email address, sign up for a membership, or complete a form.
In WordPress, gated content is often delivered through landing pages, lead capture forms, or membership plugins. Examples include eBooks, online courses, PDFs, product demos, and resources valuable enough for visitors to exchange their contact information for access.
When you use content gating strategically, it can greatly increase lead generation. It also helps build relationships through email marketing automation.
Is it Worth Gating Content?
Gated content works best when there’s a fair exchange: your audience gives their information in return for something truly valuable.
When done right, it can fuel your email list, improve lead quality, and strengthen customer relationships. But when used without strategy, it can also limit your reach and slow down growth.
| Benefits | Drawbacks |
|---|---|
| Gain audience information: By requiring visitors to share their email or name, you gain insights that help personalize future communication and campaigns. | Might scare off new visitors: First-time visitors may hesitate to share their information before they trust your brand. Gated content may scare them off, as people do not feel comfortable sharing their personal information with a brand they don’t trust. |
| Understand audience better: Every sign-up reveals what your audience finds useful, helping you create more targeted, relevant content. This makes lead nurturing more convenient. | Bad for SEO: Since search engines can’t access gated pages and people show little to no interest in linking to gated content, they add little to your organic visibility. |
| Build trusting relationships: People only share personal details with brands they trust. Gated content often becomes a pillar for building a trusting relationship in which your audience sees your brand as an authoritative one. | You will reach a limited audience: Gated assets are harder to promote on social media or through SEO, limiting their potential exposure. |
| Streamline sales process: Leads who opt in for gated assets like eBooks or product demos are often warmer and closer to a purchase decision. |
While gated content may help collect qualified leads, it can also create friction for first-time visitors or hurt user experience if overused. The key is balance: gate only your most valuable content and align it with the visitor’s stage in the customer journey. Use it to deepen engagement, not to block access.
Prerequisites for Adding Gated Content to WordPress
Creating gated content on your WordPress site is easy with the right content restriction plugins. Many plugins let you restrict access to posts, pages, or downloads with just a few clicks.
But the challenge isn’t in setting it all up; it’s knowing how to use your gated content strategy effectively. And here’s how to get started:
Build Your Website’s Following
Gated content works best when you already have steady traffic and a trusted audience. Without that foundation, you’ll end up locking away content that could’ve built awareness instead.
So before gating content, we recommend growing your website traffic through the following methods:
- Publish Valuable Content: Use blog posts, tutorials, or videos regularly. These can be used to attract consistent search traffic, referrals, and AI mentions and generate leads through content marketing.
- Leverage Social Media: Platforms like Facebook, X (Twitter), and LinkedIn can drive steady visitors back to your site. If you’re happy to go the extra mile, plugins like FluentCommunity can help you create full-blown communities.
- Start email marketing early: Build a list with free, ungated content and connect with your audience regularly. This helps turn them into a warm audience you can upsell with gated offers. If you’re new to this, check out our beginner’s guide to email marketing.
- Invest in SEO: Organic search remains one of the best long-term traffic sources. Optimize your site and blog posts using Google’s SEO Starter Guide.
Growing traffic takes time, but the returns are well worth the effort. Once you’ve built a loyal reader base, gating valuable content can help you convert that audience into qualified leads and customers.
Decide Which Content to Gate
Deciding what to gate is probably the most challenging task of any gated content strategy. But there’s only one golden rule:
Only gate content that delivers exceptional value, something users can’t find elsewhere. Ideally, it should offer 10x more value compared to your regular content.
Consider how your content fits within your marketing funnel; Top-of-funnel content (like blog posts) should stay open to attract visitors. On the other hand, middle or bottom-funnel content can be gated to capture qualified leads and increase your conversion rate.
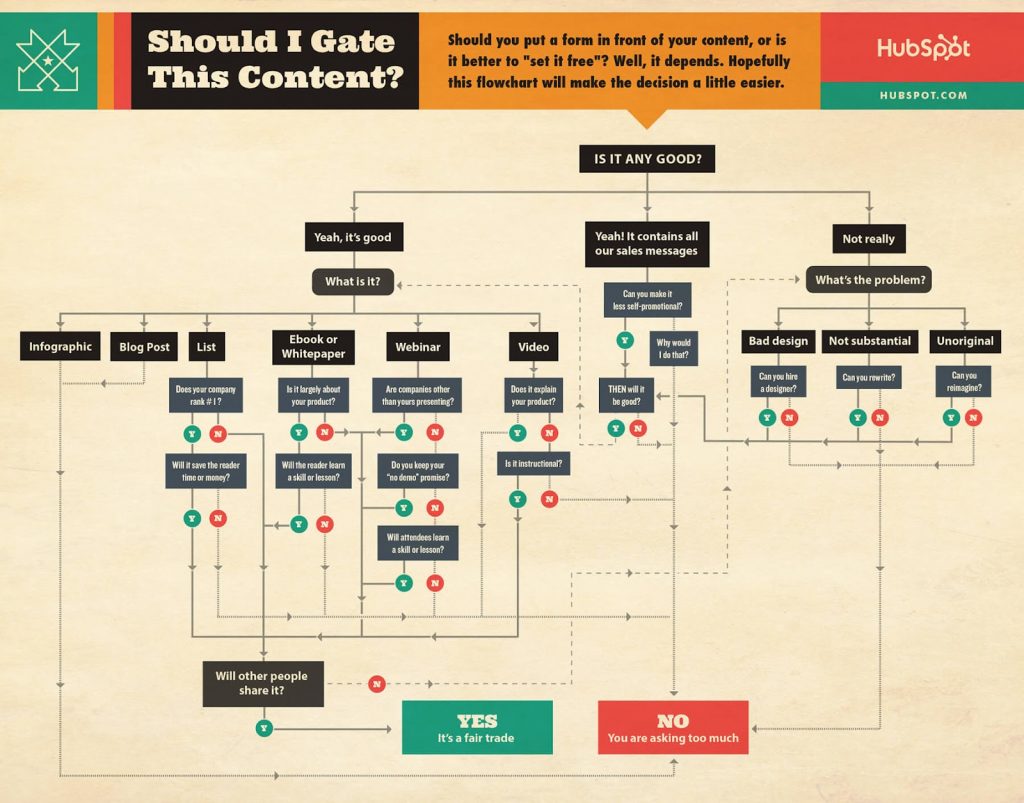
If you’re unsure whether to gate your content or not, take a look at this HubSpot diagram below:
Here are some content types that work best as lead magnets:
- Exclusive blog posts or in-depth guides: Share insights or strategies not available publicly.
- Ebooks or whitepapers: Great for showcasing expertise and collecting high-intent leads.
- Free tools and downloadable resources: Calculators, checklists, or plugins that solve a specific user problem.
- Templates: Ready-to-use assets such as content calendars, landing page templates, or email workflows.
- Webinars and workshops: Live or recorded sessions that offer deep, actionable learning.
- Online courses or video training: Perfect for educating your audience and driving user engagement.
Ensure your gated resource genuinely helps your audience achieve something valuable. When users feel rewarded, they’re far more likely to share their information with you!
Design a Gated Content Landing Page
A well-designed gated content landing page can make or break your lead generation campaign. It should grab attention, build trust, and drive action.
Here’s how to optimize it for better conversions:
- Craft a clear Headline and CTA: Communicate value instantly. Using action phrases like “Get Instant Access” instead of “Submit” gives you a better chance of conversion.
- Show social proof: Add testimonials, reviews, or stats to boost the credibility and trust of your gated content.
- Use urgency triggers: A countdown timer or limited-time offer can increase conversions by creating FOMO.
- Keep forms short: Limit to 2–3 fields (name, email, maybe one more). Fewer fields generally equals more signups.
- Enable social login: 73% of users prefer signing up with Google. Enabling social login converts more by allowing faster signups.
- Make it mobile-friendly: Ensure a responsive, mobile-friendly design so users can access gated content from any device.
- Test and refine: Use A/B testing and heatmaps to see what converts best: headlines, CTAs, layouts, or visuals.
Hide Your Gated Content from Search Engines
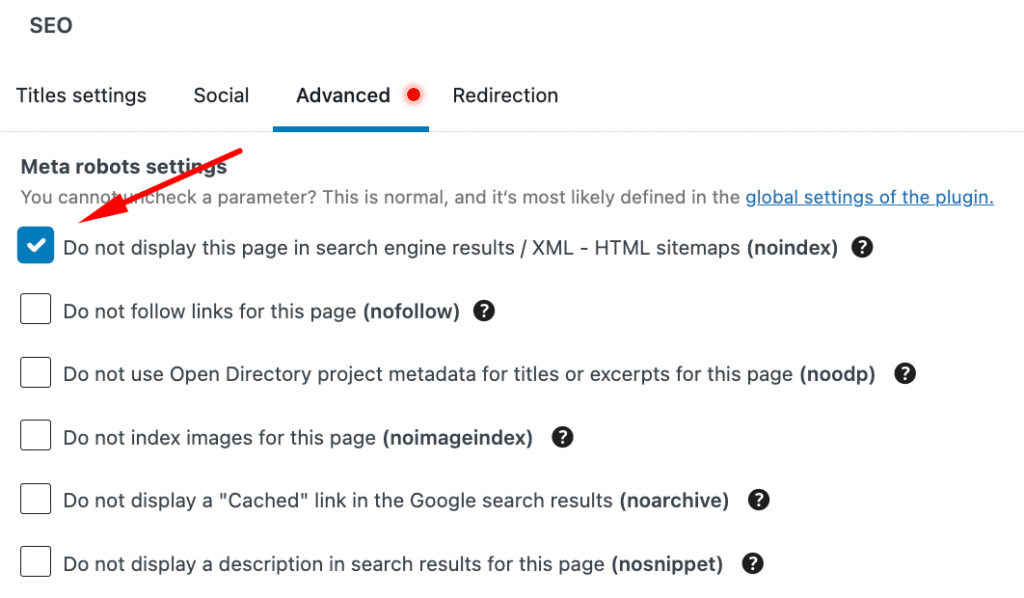
Even with a content restriction plugin, search engines can still index your gated pages. As a result, unregistered users can still find those pages. To keep your gated content private and protect your lead magnets, it’s best to hide those pages from search results.
The traditional way is to edit your robots.txt file and request search engines not to index specific URLs. However, an easier approach is to use an SEO plugin to avoid indexing those pages or posts.
For example, the SEOPress metabox feature allows you to set search visibility right where you’re editing your page or post.
How to Gate Content with Opt-in Forms in WordPress
The simplest method for building an email list is using an opt-in form plugin. They let you create lead capture forms that users fill out before accessing your content. The ideal use case for this method is offering content upgrades, templates, or downloadable resources in exchange for contact details.
To pull this off, you can use a plugin like Fluent Forms. This plugin is so feature-rich that it offers advanced features like conditional logic and conversational forms in its free version (Yes, you see it right)!
Here’s how to create your gated content with opt-in forms:
Create a Lead Capture Form
To start off, create a new form to collect user data such as Name, Email Address, and optional fields like company or website. With Fluent Forms, you can do this easily by dragging and dropping the contact fields you need.
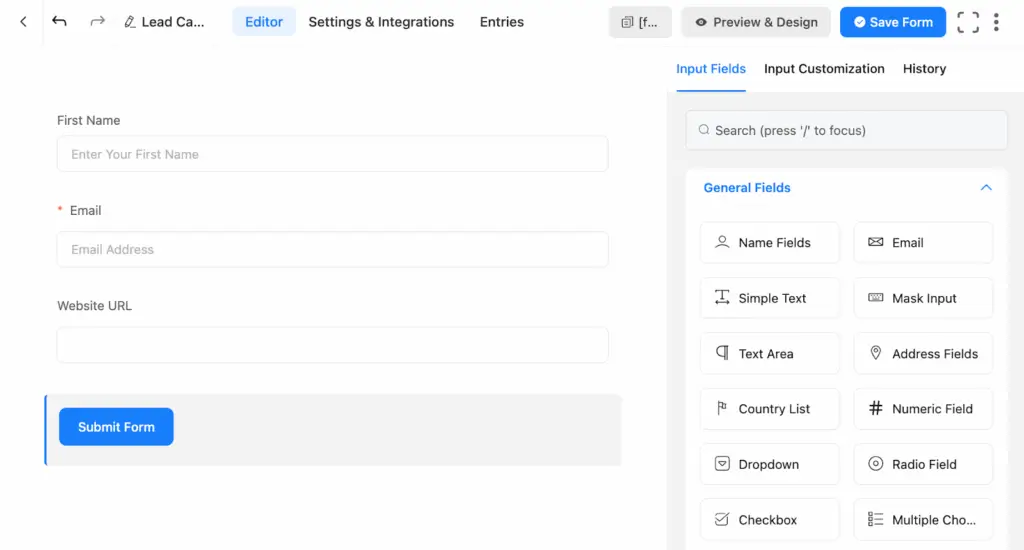
A hubspot study shows that every additional field can reduce conversion rates slightly. So keep it short and add a CTA button that clearly communicates value right away.
After creating the form, it’s also wise to show a confirmation message that the form submission has been received and that the user will receive the gated content via email.
For that, you can go to Settings and Integrations and set up your confirmation message.
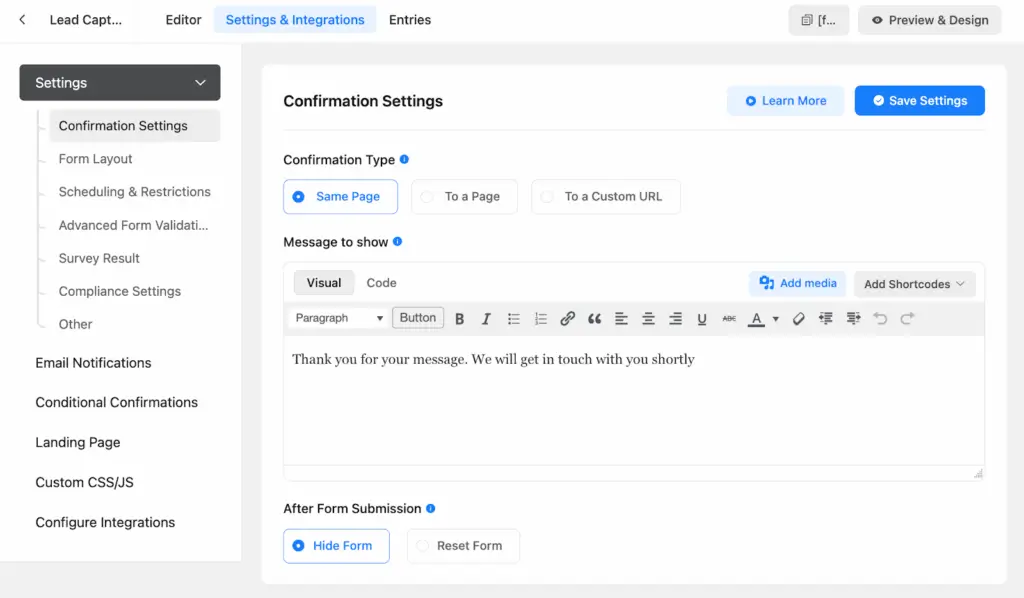
It’s also possible to dictate many other things— like what happens after the form submission, or redirect the user to an entirely different page to keep them in the loop.
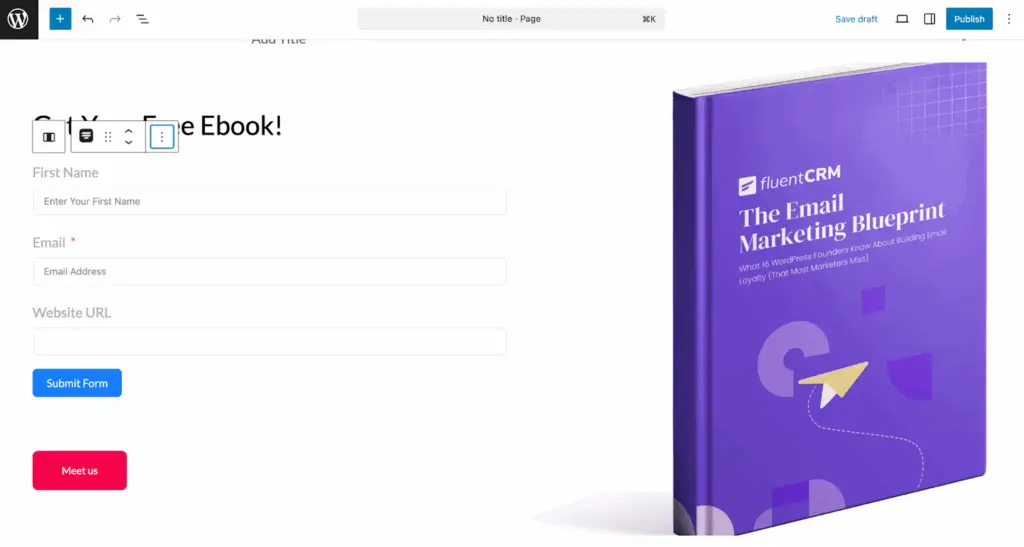
Embed the Form on Your Landing Page
After creating the form itself, you can embed the form directly within a post, sidebar, or landing page. For this, go to your Page and select your form using the Fluent Forms Block.
Set Up Content Delivery
The simplest way to deliver your gated content is to upload your content to WordPress and deliver it via an email automation tool like FluentCRM.
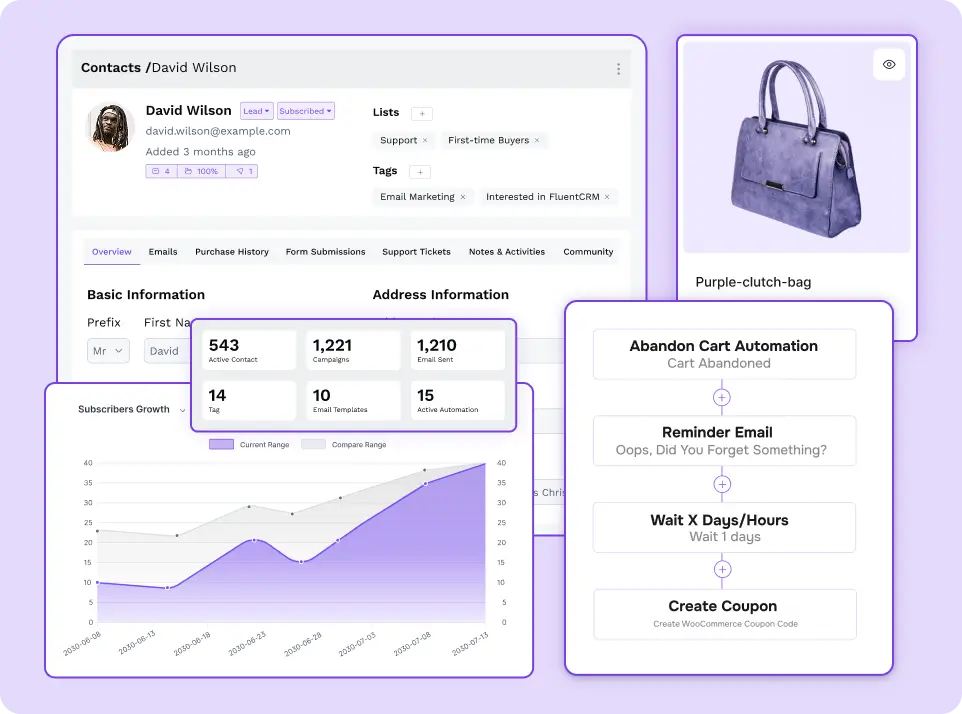
FluentCRM is the best self-hosted email marketing tool for WordPress to grow your leads and customers, send campaigns, and automate user journeys —all within WordPress. It’s a powerful tool that’s also affordable, with limitless capabilities!
Let’s get back to delivering your gated content—
You can upload your content easily by going to Media > Add Media File.
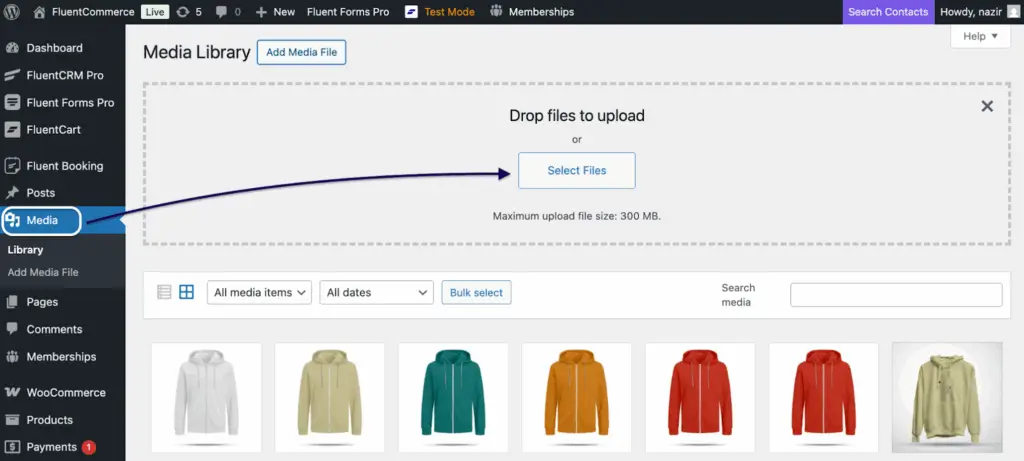
Once uploaded, have the download URL copied to your clipboard so you can deliver it efficiently via email.
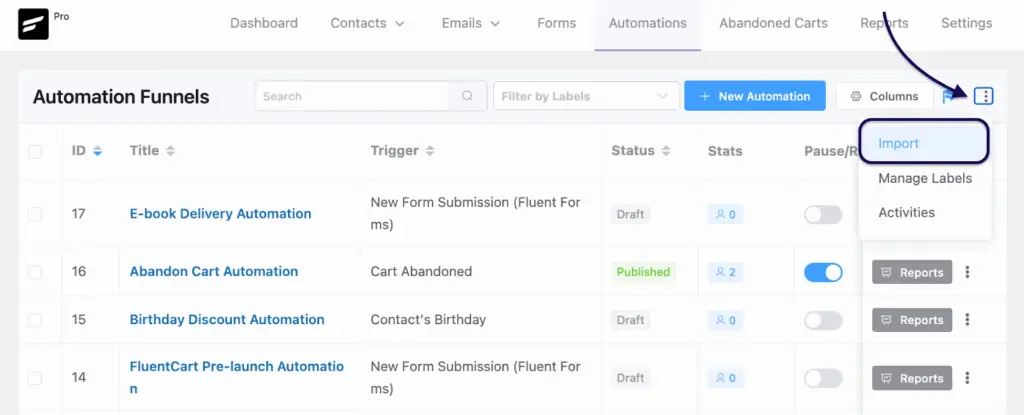
Then go to FluentCRM > Automations to create your lead magnet automation. FluentCRM offers some automation templates to help you get started. But in this case, you can import our ready-made lead magnet automation template by clicking the three dots in the corner and clicking Import.
Next steps are as simple as choosing your lead magnet form and mapping your contact information, like name and email address.
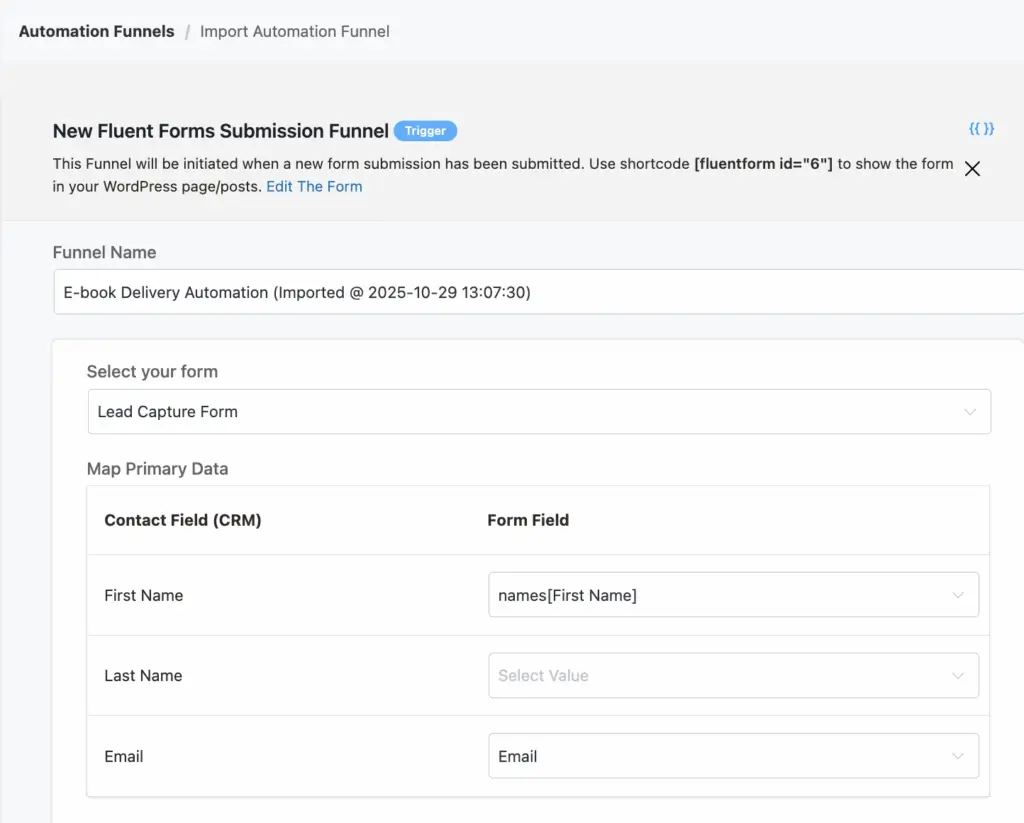
Once imported, you can customize other aspects of the automation, including various settings and the email itself. Your final automation will look something like this:

How to Gate Content with Membership Plugins in WordPress
If your goal is to offer exclusive resources, online courses, or premium articles, membership plugins can do the job. They let you create membership levels, restrict access to content, and even monetize them through payment gateways like Stripe or PayPal!
Note: Memberships generally require user registrations. So, before creating a membership-based gated content, make sure to enable user registrations on WordPress by going to your site’s Settings > General and enabling Anyone can register.
Let’s start by taking a look at some of the popular membership plugins:
3 Excellent Membership Plugins for Creating Gated Content on WordPress
Membership plugins are a saturated market in the WordPress space, and thus, the competition is pretty high. However, a few plugins simply stand out from the rest because of the standout features they offer.
Below are a few plugins we think are great. FluentCRM integrates with these plugins automatically. So, you’ll have no problem driving email sign-ups and memberships using one of these plugins.
MemberPress

MemberPress is one of the most popular WordPress membership and user role permission plugins, with over 300,000+ active installations. It has a simple and effective user interface. You can create membership levels and restrict content access based on user role permissions.
You can make your entire website private, give multiple user roles, clone roles, and use login form widgets using MemberPress. Furthermore, MemberPress allows you to create role-based hierarchies and set dashboard access based on user roles. It’s also possible to set view permission for specific content blocks.
Paid Memberships Pro

Paid Memberships Pro is another top membership plugin designed with creators in mind. It allows you to create and sell memberships through Stripe, PayPal, and many other payment gateways.
The plugin supports recurring payments. It also supports custom trials, variable pricing, donations, discount codes, content restriction, drip content, and content personalization. It integrates well with LMS and email marketing tools.
Restrict Content Pro

As the name suggests, Restrict Content Pro is a powerful content restriction plugin that gives you full control over who gets to see your content and who doesn’t. It allows for creating unlimited membership levels and selling them on a free, trial, premium, or recurring subscription basis.
With the intuitive interface, you can easily manage, monitor, and control memberships. You can also control viewership of specific sections of your pages and posts using Restrict Content Pro. Furthermore, users can self-manage their memberships. And, of course, it integrates with many LMS and email marketing tools!
Create a Membership Level
Among the above options, Paid Memberships Pro is one of our favorites.
To gate content using Paid Memberships Pro—
Get the free version by clicking this link and install the ZIP file on your WordPress dashboard.
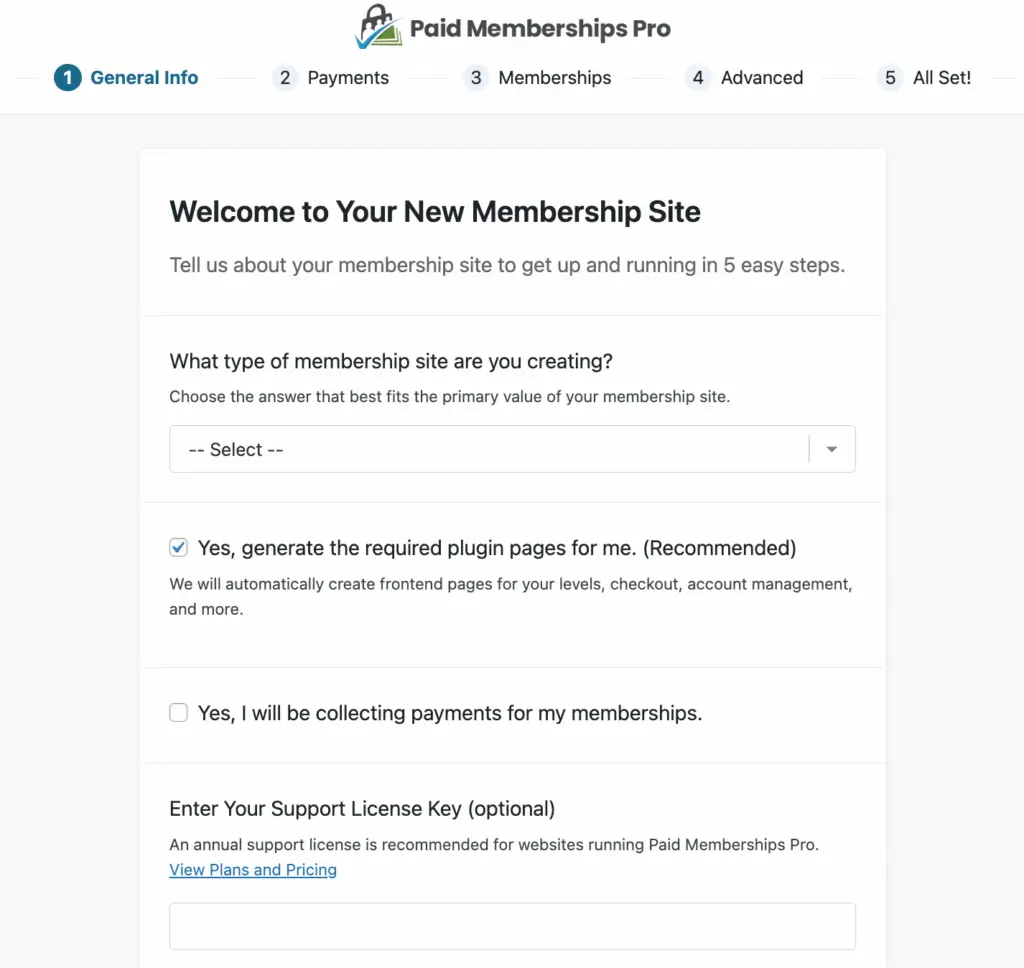
After installation, you can access Paid Memberships Pro from your right sidebar and go through its simple setup wizard. This is also where you can create membership levels for your website.
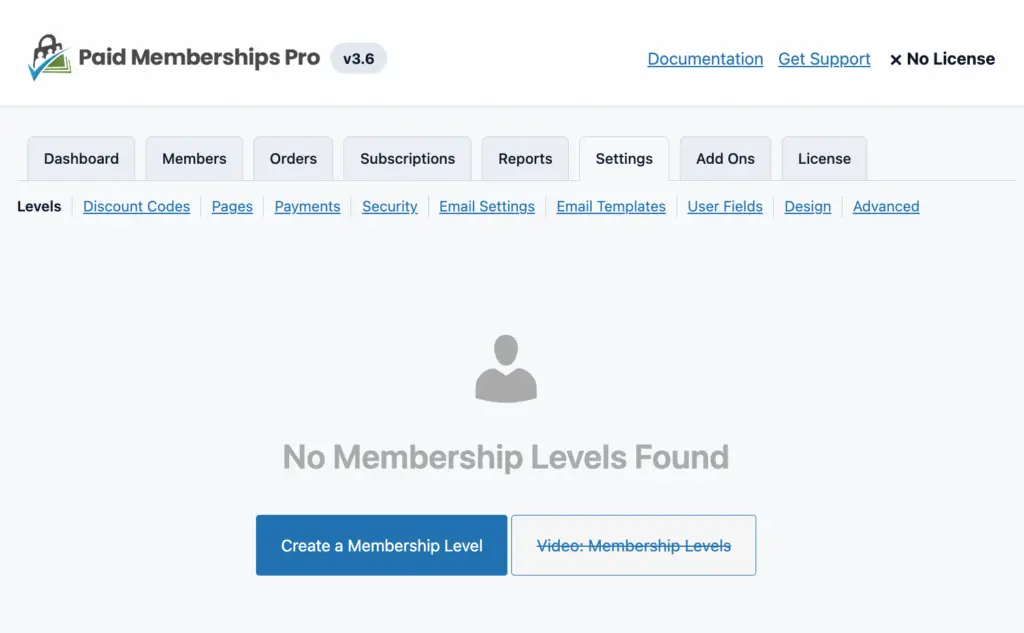
If you don’t intend to create a membership level through the setup wizard, you can create one by going to Memberships and then clicking Settings > Create a Membership Level.
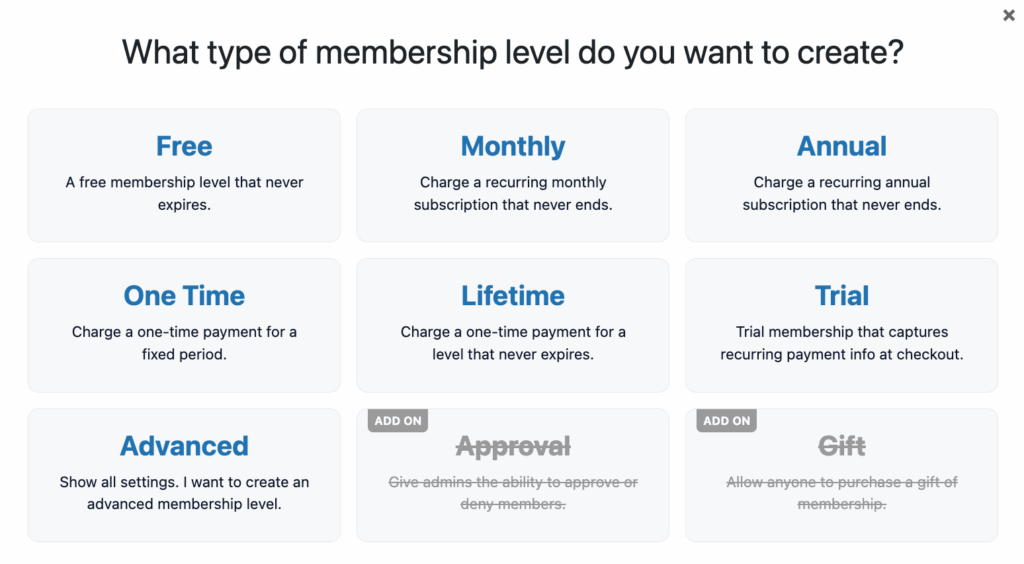
You can create unlimited membership levels (Free, Pro, Premium) based on how you want to structure your gated content.
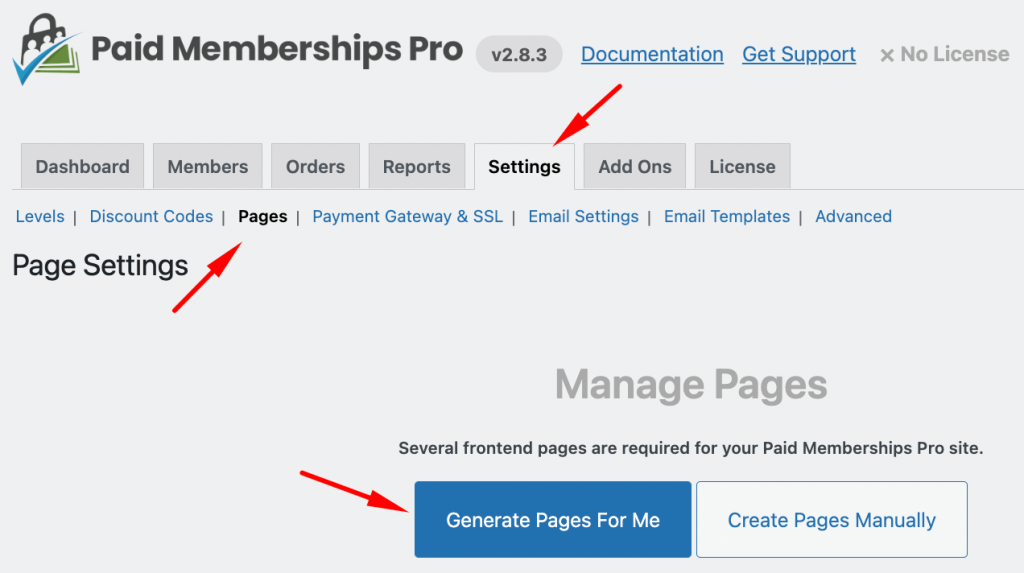
Set Up Membership Pages
Once you’ve created your membership levels, you can generate membership pages (e.g., Membership Account, Checkout, Confirmation) from Settings > Pages. This allows people to register on your website before getting access to your content.
You can also manually create and configure pages on your own:
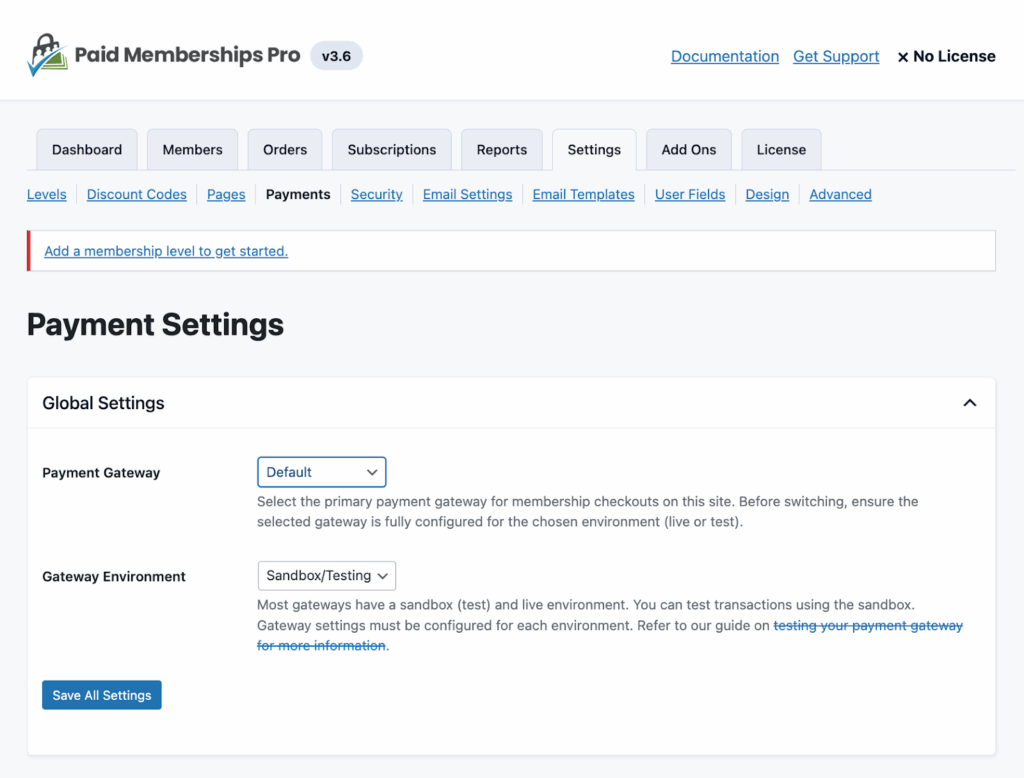
Configure Payment Gateways (Optional)
If you want to sell membership access, open Settings > Payments and choose your preferred processor (Stripe, PayPal, etc.). This lets you offer premium memberships, free trials, or one-time paid access, perfect for monetizing online courses or downloadable content.
Restrict Access to Gated Content
With everything set up, you’re now ready to gate your content. For that, when creating a post or page, scroll to the Content Restriction meta box and select which membership levels can access it. Only registered or paying members will be able to view the gated sections.
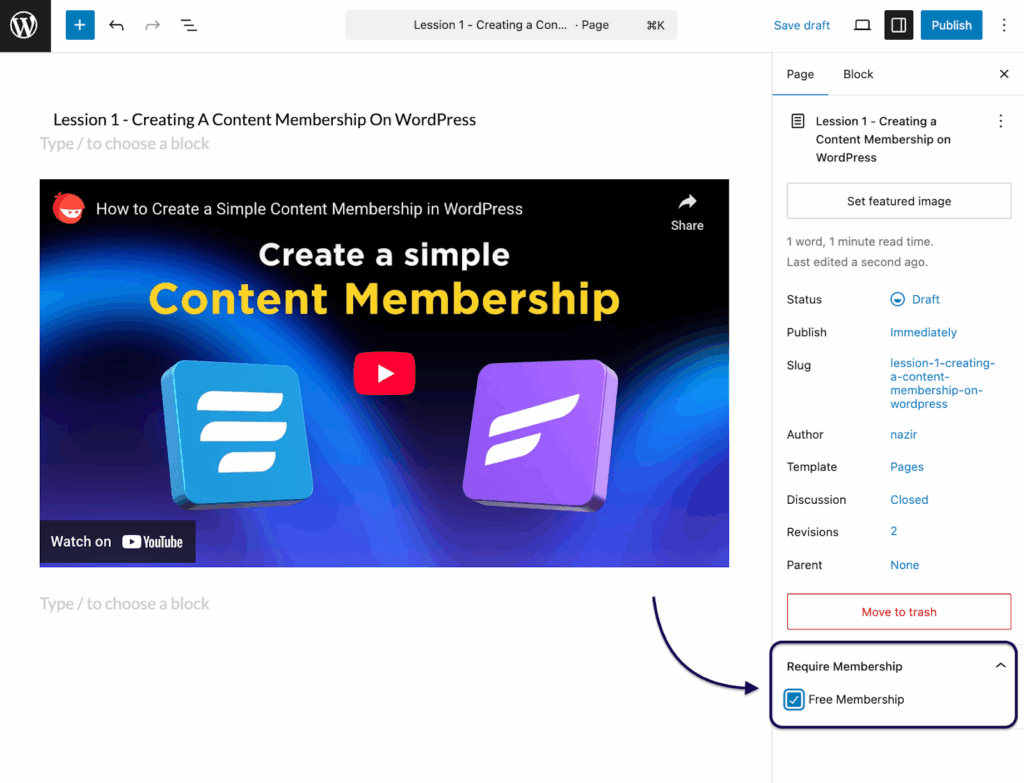
And that’s it! You’ve successfully added a membership-based content gate to your WordPress site.
Sell/Upsell/Cross-sell Memberships (Optional)
Whether you’re offering a free membership or a paid one, you’ll probably want to offer more to your audience. And that’s where FluentCRM can also help you out by setting up a membership upsell automation.
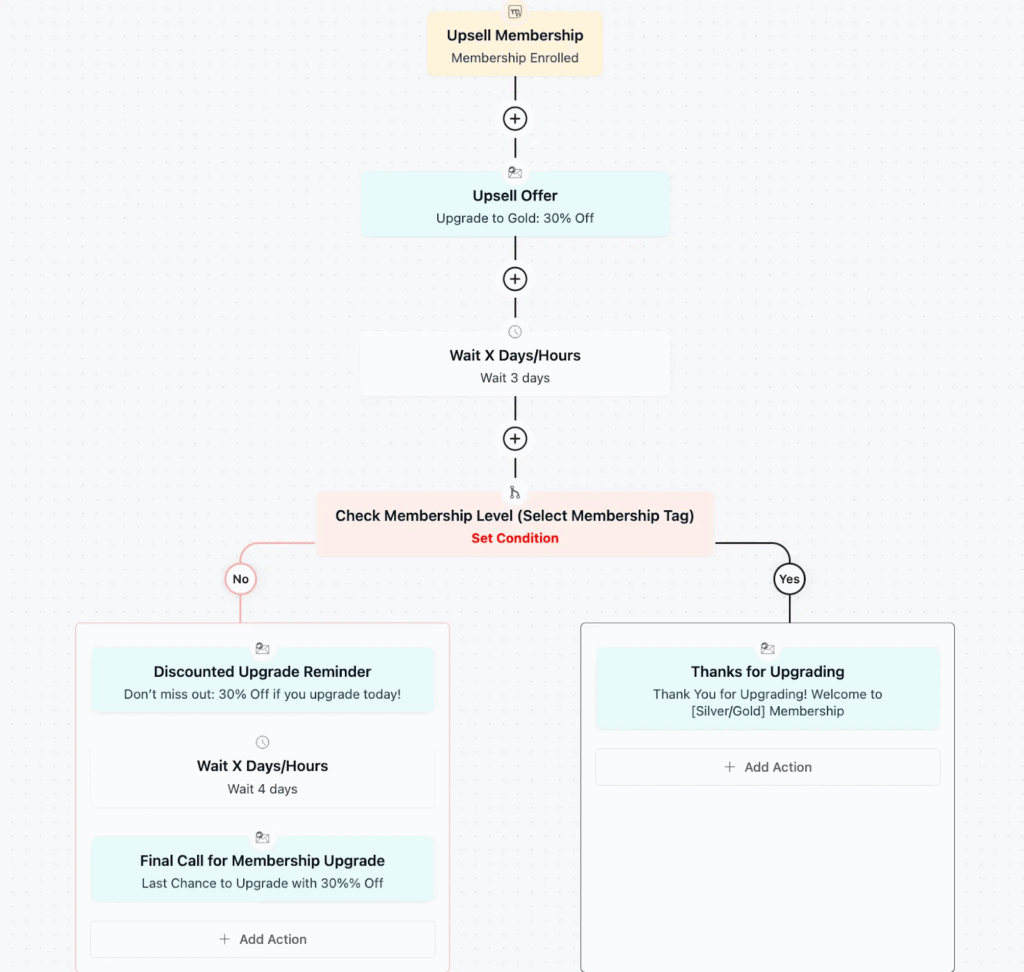
As you can see, the automation funnel above starts when someone joins a membership and then gradually upsells improved memberships. It also ensures maximum conversion by personalizing messages and sending timely reminders. And of course, you can always tweak the automation depending on your requirements!
How to Use Content-block to Gate Content on WordPress
Let’s be honest, forms, memberships, and other content-gating methods can feel overwhelming at times. Setting up forms or memberships, embedding forms to pages or creating membership pages, restricting content access, or setting up content delivery…there’s so much to do!
If you’d rather keep things simple, content locking might be the easiest way to go.
Instead of adding a bunch of plugins to restrict your entire page or creating multiple membership levels, content-blocking lets you gate specific parts of your content.
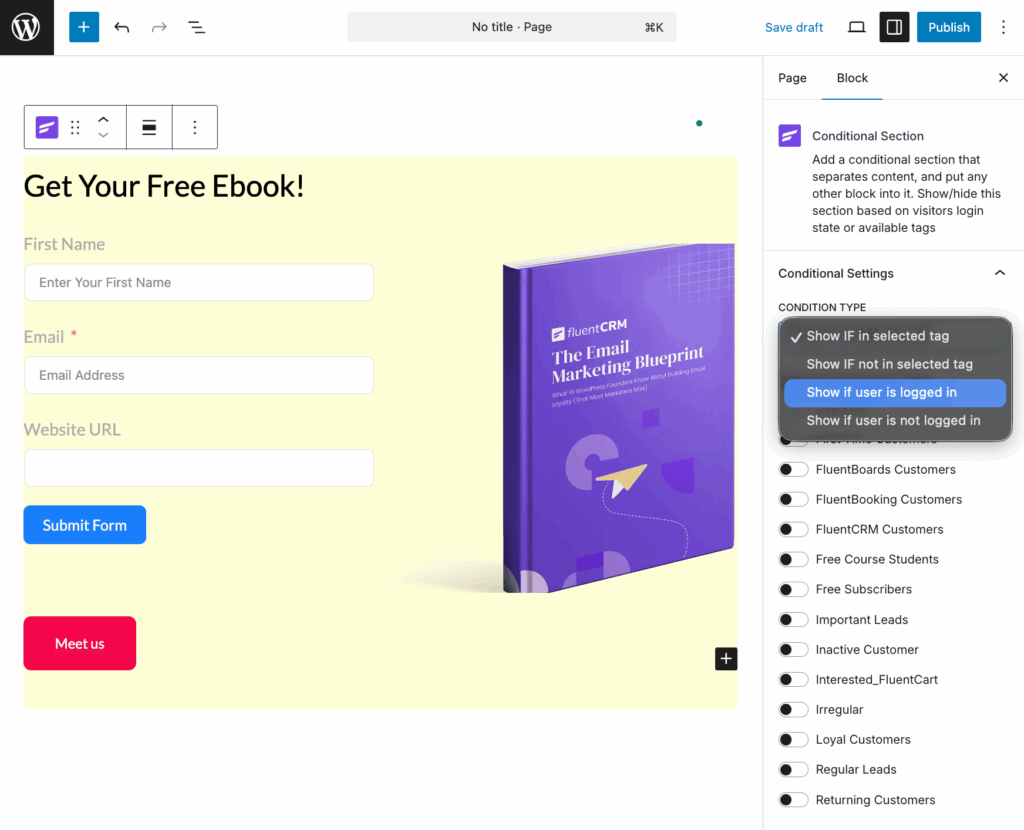
FluentCRM offers you an easy way to achieve this with the conditional block. With this feature, you’ll be able to restrict your content based on your users’ login status or tags.
To do this, simply open any page or post on your website and add the Conditional Section block. Then choose your conditions to display or hide the content.
If you want to enable user logins securely on WordPress, you can use our 100% free plugin FluentAuth. It’s a very tiny plugin with massive offerings and secures your website in the simplest ways possible!
Generate More Leads with Gated Content
Gated content can give your lead generation strategy a noticeable boost if implemented properly. However, it’s wise to consider what content you’re gating and when you’re offering the gated content. We hope this article helped you create and add gated content to your WordPress website. If you still have questions, don’t forget to drop them in the comments section!
Frequently Asked Questions
Gated content is a controversial strategy. So it’s pretty obvious that you’ll have a few questions in mind before implementing them. So here are some frequently asked questions and their answers—

Nazir Himel
Product Marketing Lead
Hey! I’m an inbound marketing specialist focused on email marketing automation. I love turning complex features into clear, user-centric messaging and when I’m not shaping product stories, I’m experimenting with content frameworks, conversion journeys, and helping others communicate value without sounding salesy!
Table of Content
Related Articles and Topics
-
How to Send Automated Payment Reminder Using FluentCRM
Late payments are rarely dramatic. People forget, get busy, miss a date, or mean to…
-

How to Create an Email Newsletter in 11 Simple Steps [From Zero to Conversion]
Long gone are the mornings, when businesses sent newspaper ads, and magazine spreads bundled with…

Leave a Reply