Email Safelist: How to Ask Your Recipients to Safelist Your Email Address
As an email marketer, getting your emails to the recipient’s inbox is undoubtedly an important job, but not an easy one. Due to strict spam filtering and email marketing regulations such as the CAN-SPAM Act and GDPR, reaching your recipient’s inbox is one of the most difficult jobs.
Even if you’re doing everything to prevent emails from going to spam, there is a good chance that your emails will go to spam. In such cases, it’s ideal to ask the recipients to safelist your email address. Along with that, you can also tell them how they can do it.
If you don’t know how to do that, we’re here to help. This article explains all about email safelist and how to safelist email in various email clients.
Read this article carefully to learn how to request your recipients to whitelist your email address for maximum email deliverability.
What is an email safelist?
An email safelist, also known as an email whitelist, is a list of people who were granted additional permission to send emails. This is not just an email subscription or a double opt-in confirmation. It’s a consciously given permission by an email user to a sender whose emails are very important to them.
By adding an email address, domain, or a set of IP addresses to your safelist, recipients can tell their email client that they recognize the sender and trust the message they are sending.
Why add an email to the email safelist?

Whenever you send an email to someone, it has to pass through several spam filters. Email clients have developed spam filtering to monitor every email to keep the recipient’s inbox free of spam and unwanted messages.
However, in their mission to keep the inbox safe, they often mistakenly mark important messages as spam and route them to the spam folder. Asking your email subscribers to safelist your email address can come in handy in this case.
An email safelist or whitelist is useful for both the sender and the recipient. Though both of them have different purposes, their ultimate objective is the same; to increase deliverability.
The importance of email safelists from the perspective of recipients –
- Keep cybercrime, phishing emails, and malware viruses out of your inbox
- Reduce the number of spam emails
- Important messages are rerouted directly to your inbox
- Never miss a generous offer or deal from your preferred sender
- You won’t have to waste time looking through the junk folder for important messages
The importance of email safelist from the perspective of senders –
- Reach safely to the recipient’s inbox without triggering the spam filter
- Gain your clients’ trust
- Communicate with your clients regularly
- Increase the email deliverability rate
- Reach out to the customer’s door on time with special offers and deals
- Whitelisting vs. blacklisting
Although the goal of whitelisting and blacklisting is the same(preventing spamming and hacking), they are two distinct approaches to email categorization.
Whitelisting focuses on which emails must be delivered to your inbox. In contrast, blacklisting focuses on which emails must be prevented from being delivered.
Whitelisting allows only a subset of emails to reach you, whereas blacklisting allows the vast majority of emails to reach you.
How to safelist an email address
It’s quite usual that many of your marketing emails have already been routed to the junk or spam folder. Unfortunately, there’s not too much you can do about them.
However, you can prevent future issues by asking and teaching your recipients to safelist your email address. Let’s get to how to safelist an email address!
How to safelist an email in Gmail
Step 1: Open an email from your desired sender.
Step 2: Go to the three dots option and select the Filter messages like this option. It will open a conditional form in front of you.
Step 3: Click the Create filter button below, and you will get a lot of options.
Step 4: Select the Never send it to Spam option and click the create filter
We’re done! This sender will every time get to your inbox from now.
How to safelist an email in Outlook
Step 1: Click and open an email mailed from the email address that you want to label as safe.
Step 2: Click on the three dots option on the right side. This will open many options for you.
Step 3: Select the Add to Safe Sender option.
Step 4: Add the email address to your safelist by pressing the Ok button.
Email sent from that address will no longer go to your spam folder.
How to safelist an email in Yahoo
Step 1: Select and open an email sent from the email address you want to add to your email safelist.
Step 2: Select the three dots option beside the Spam option.
Step 3: Select the Add Sender to Contacts option, which will take you to a similar page as below.
Step 4: Fill in the necessary field and click the Save button.
Hurray! This sender is now included in your contact list, and he can reach your inbox without any trouble.
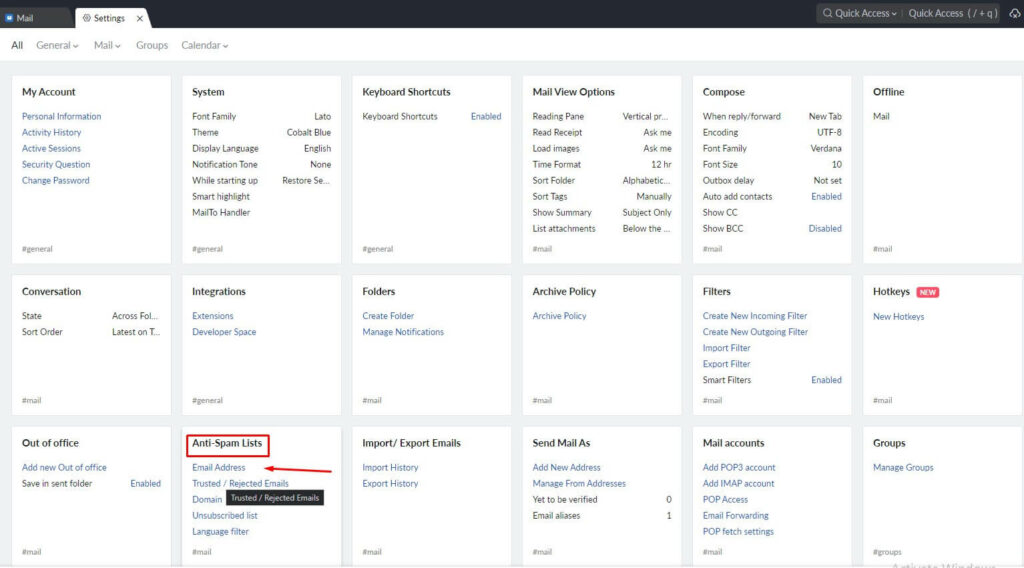
How to safelist an email in Zoho
Step 1: Select the Settings option. This will take you to a new page.

Step 2: Scroll down to the Anti-Spam lists. Click on the Email Address option to add an email address to the safelist. Choose the Domain option if you want to enlist a domain.

Step 3: Enter the email address or domain in the Add new Allowlist email field.
Step 4: Click the plus icon and successfully add it to your email safelist.
Wow! Didn’t it only take a couple of minutes?
How to safelist an email in AOL
Step 1: Go to your inbox and open an email from the sender you want to add to your email safelist.
Step 2: Click on the sender name, which will open a pop-up window like below.
Step 3: Fill in the necessary information like First name, Last name, and Phone number.
Step 4: Select the Add Contact option and end the procedure successfully.
Well done! You won’t miss any emails from that sender anymore.
How to safelist an email in Apple iPhone email-sender
Step 1: Go to your inbox. Open the email app if you are checking your email from a mobile.
Step 2: Open an email.
Step 3: Select the Form Address.
Step 4: Click the arrow next to the form address.
Step 5: Select the Create New Contact option.
Step 6: Time to press Done.
How to safelist an email in Mozilla Thunderbird
Step 1: Go to your inbox.
Step 2: Select and open an email that you want to whitelist.
Step 3: Select the from address, which will open various options in front of you.
Step 4: Select the Add to Address Book option to add this sender to your contact list and ensure a trouble-free email receiving.
Great! You’ve cracked your issue successfully.
How to safelist an email in GMX
Step 1: Scroll down to the bottom and select the Settings option in the bottom left corner.
Step 2: Select the Allowlist option.
Step 3: Put the email address or domain you want to include in your safe sender list.
Step 4: Click the Save button to end the process successfully.
No more wasting time searching through the spam box for important messages!
Wrapping Up
There’s nothing more frustrating for an email marketer than getting their emails marked as spam. Unfortunately, the email filters will still send some legitimate emails to the spam box despite your best efforts.
By asking your users to safelist your email address, you’ll not only prevent these ‘false positives,’ but also boost your email deliverability as it’s a positive signal for email clients. So go ahead and ask your subscribers to whitelist you and maximize your email deliverability!
Nader Chowdhury
Hi! My name is Nader Ahmed Chowdhury, and I enjoy writing about WordPress and email marketing. Starting with sharing random musings on social media 10-12 years ago, I’m now a digital marketing strategist for FluentCRM and WPManageNinja. And what do I do when I’m not blogging? Well, you may still find me writing something pointless on social media!


Leave a Reply