
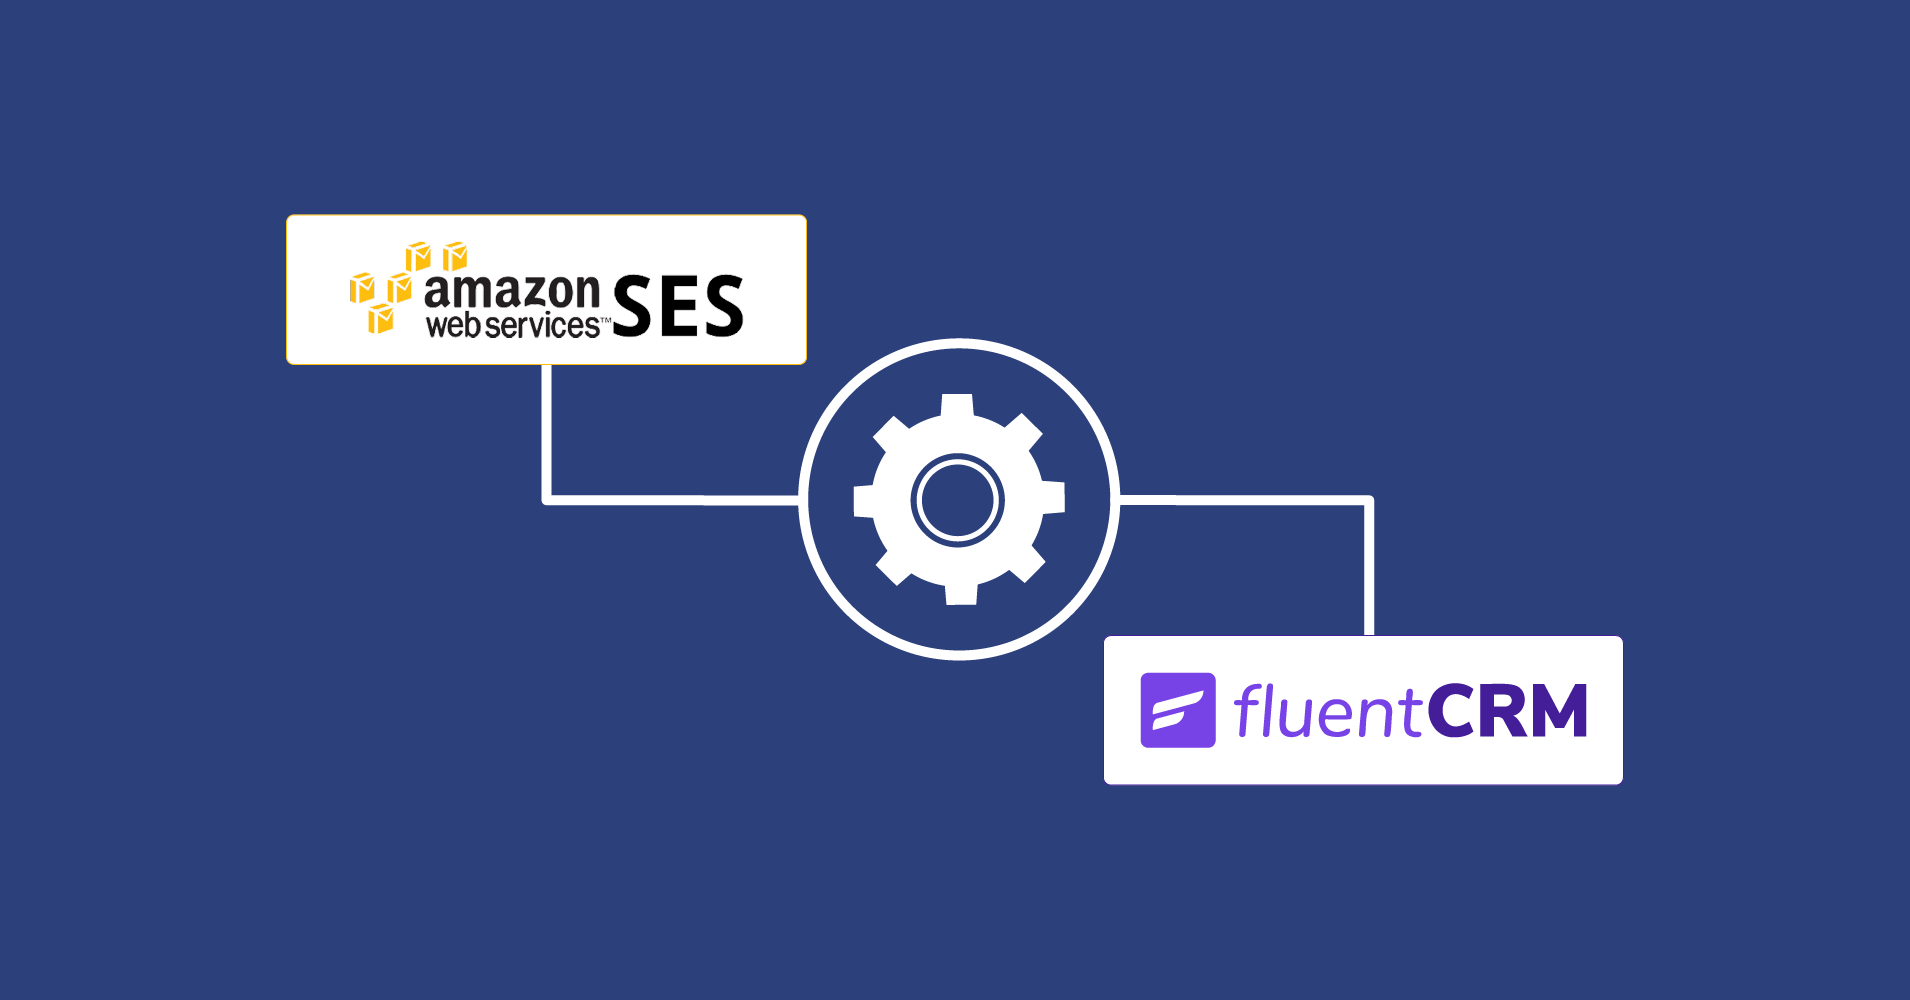
How to Set Up Amazon SES for Sending Emails with FluentCRM


Amazon SES is one of the world’s most reliable and affordable transactional email service providers. Along with excellent email deliverability, you’ll get to send 10000 emails for just $0.10!
That sums it up. Since WordPress isn’t reliable for sending emails, it is recommended to use a good email sending service to prevent WordPress emails from going to spam. If you’re also using FluentCRM, using Amazon SES is a no-brainer!
However, setting up Amazon SES for sending WordPress isn’t as easy as it may seem. The documentation is almost all over the place, and beginners might find configuring Amazon SES with FluentCRM pretty daunting.
Thus, we decided to create a complete setup guide to send FluentCRM emails using Amazon SES.
So without further ado, let’s integrate Amazon SES with WordPress in a few steps!
Setting up Amazon SES for sending marketing emails
In order to set up Amazon SES for sending emails through FluentCRM or any WordPress email marketing plugin, you need to configure a few things. This includes signing up for Amazon AWS, creating API credentials, verifying your domain, and moving out of the sandbox mode. Here’s how you can do that:
1. Sign up for Amazon AWS
The first step is to sign up for Amazon AWS. For this, you can simply go to Amazon AWS sign-up portal and complete the signup process.
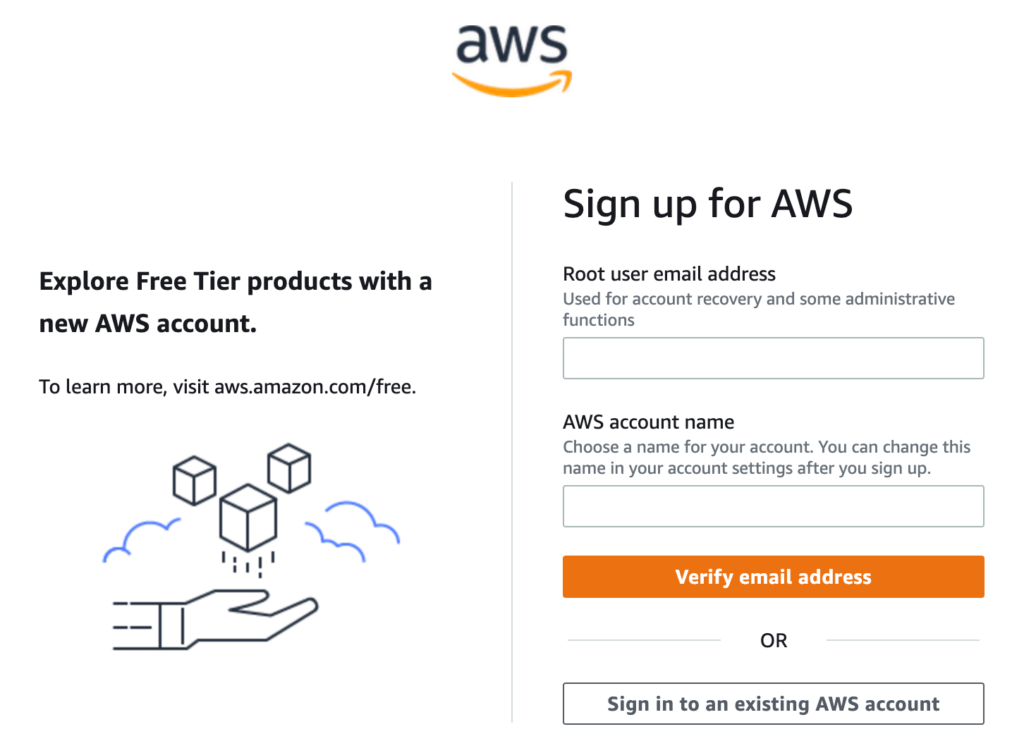
This simple sign-up process may require you to provide your billing details. But don’t worry; you won’t be billed until you’ve used any of Amazon’s web services.
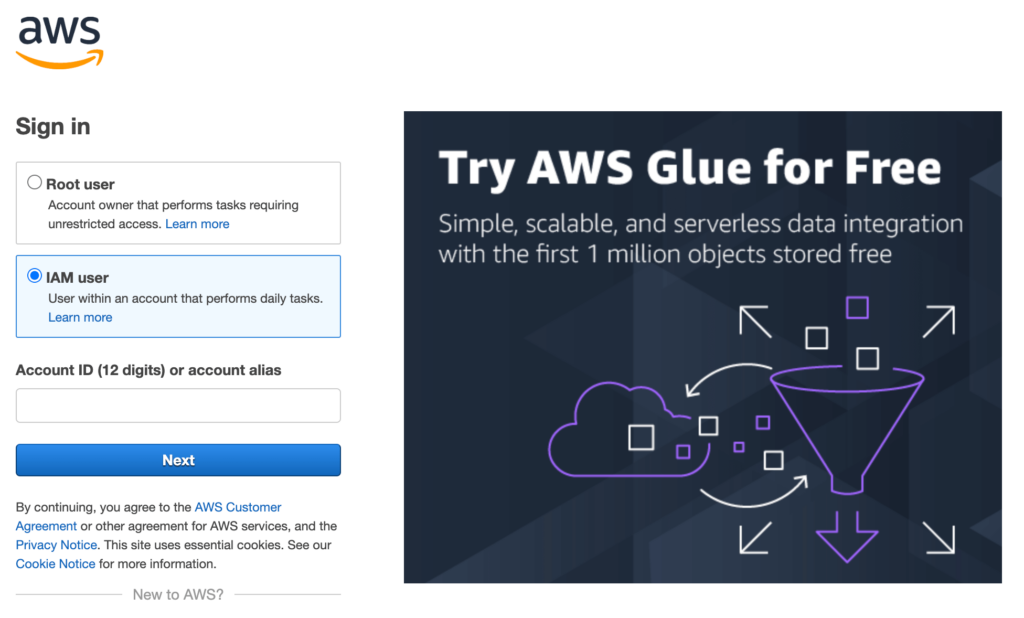
2. Create API credentials
Next, you have to create API credentials for integrating WordPress with Amazon AWS. In order to get API credentials, go to AWS management console and log in as an IAM user.
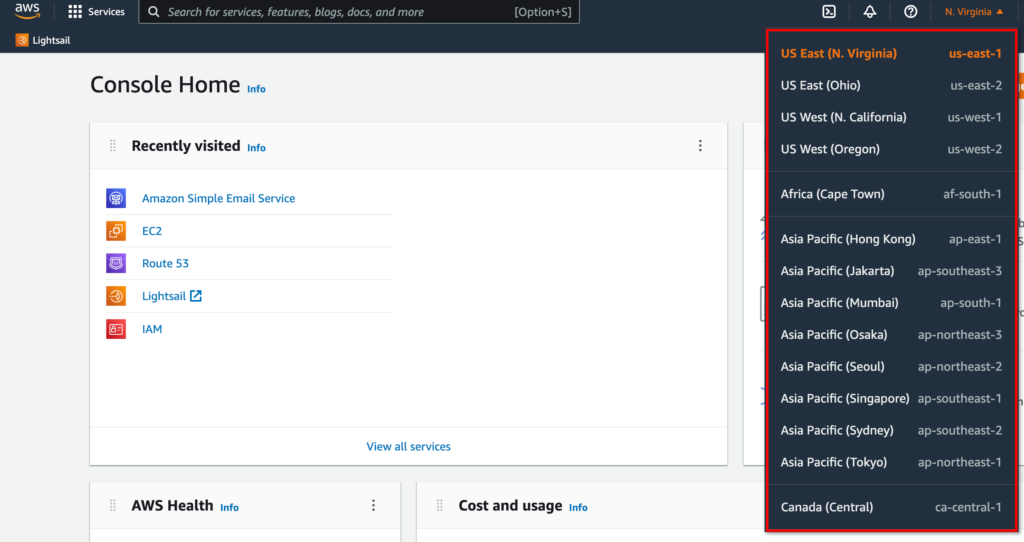
Once you’re in, switch to a region nearest to you or nearest to your users. Amazon has servers almost everywhere. So selecting one shouldn’t be difficult.
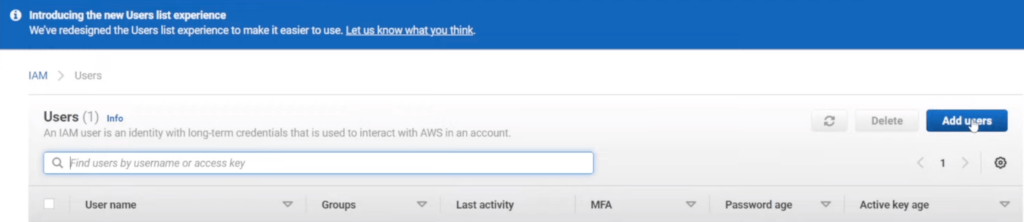
Then, search for IAM and select Users.
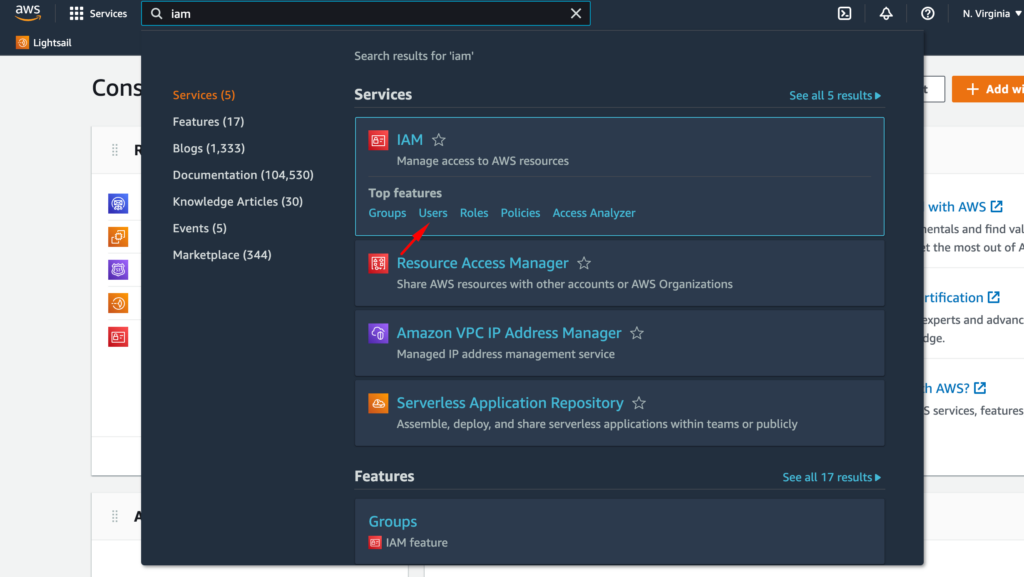
Then select Users from the left sidebar and click on Add Users.
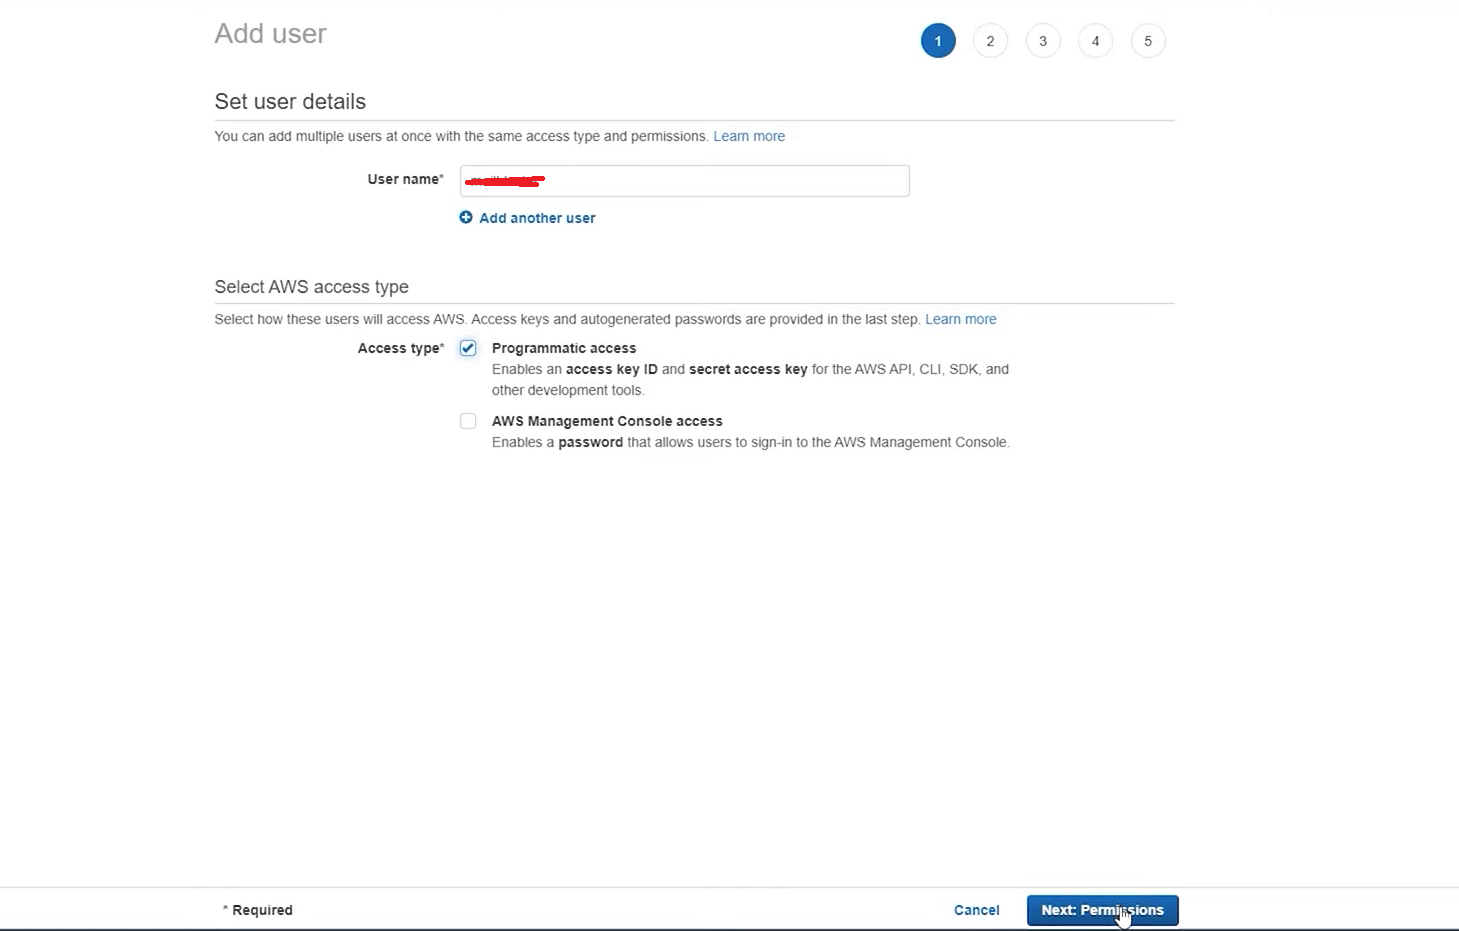
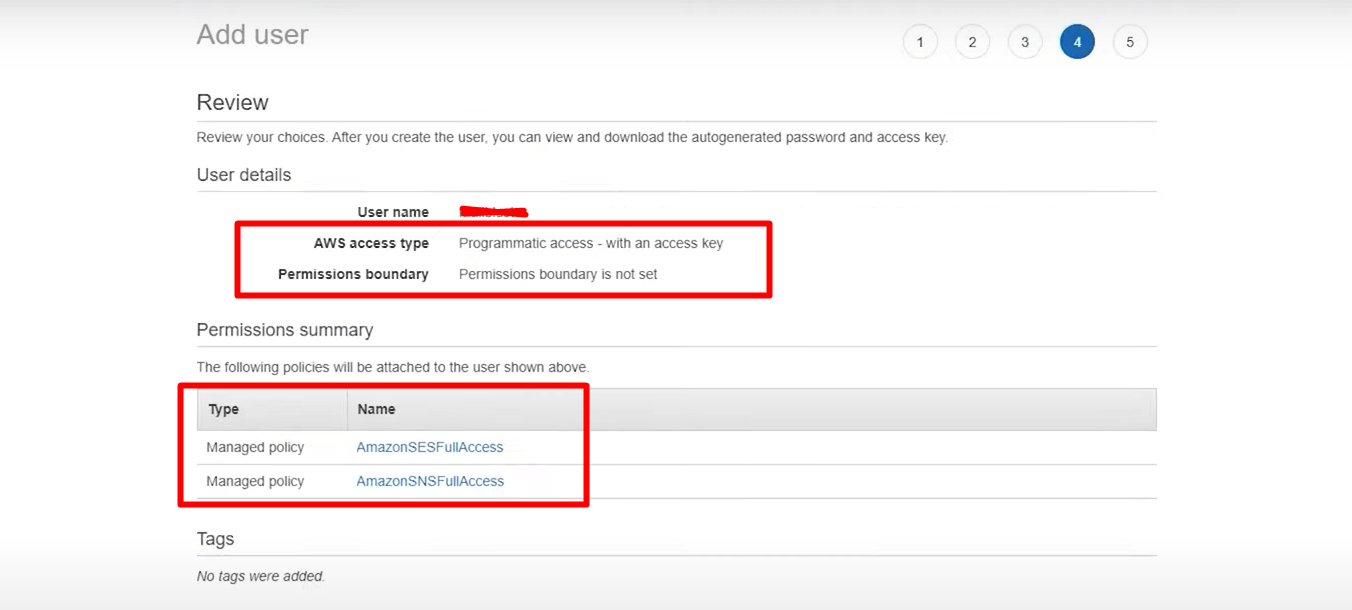
Give a Username and select the access type as Programmatic Access and click the Next button.
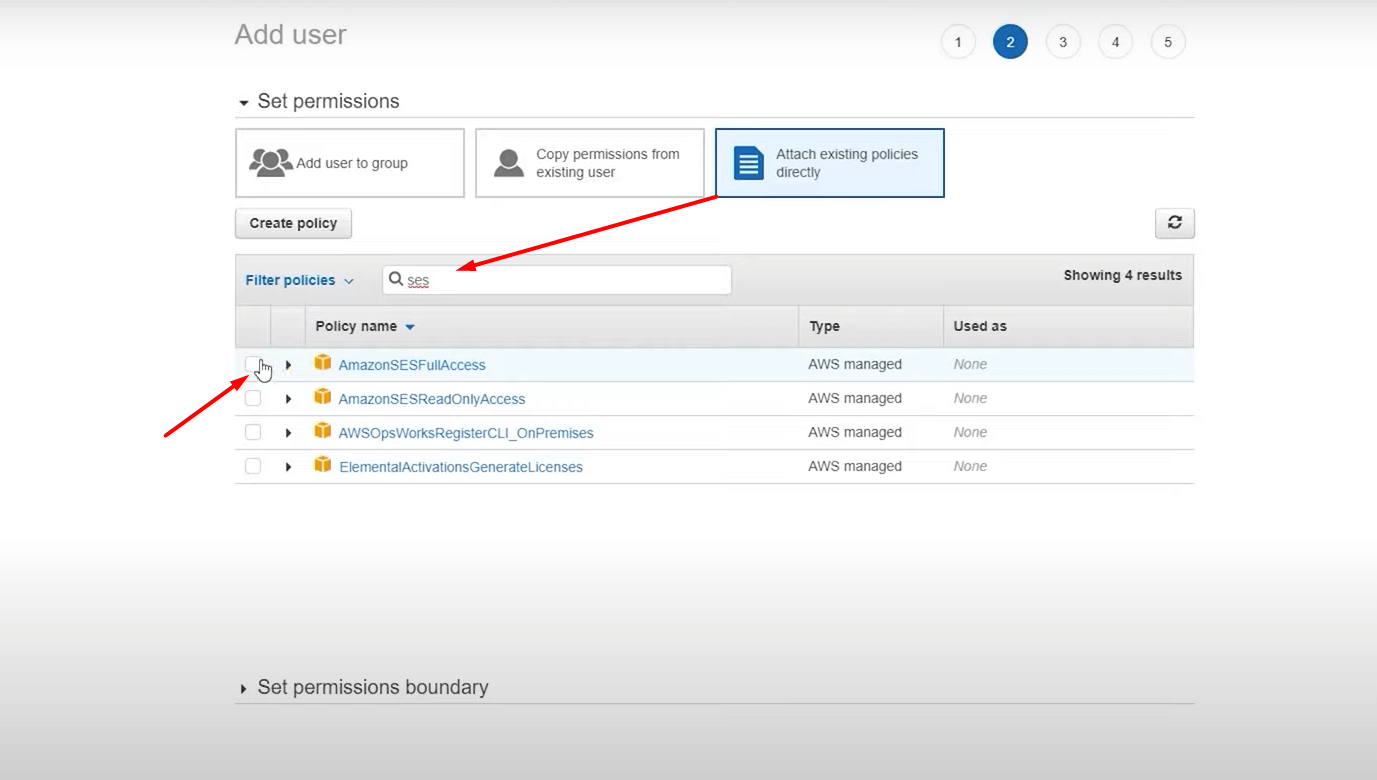
Now select the Attach Existing Policy tab. You’ll find AmazonSESFullAccess and AmazonSNSFullAccess by searching for SES and SNS. Check those and proceed to the next step.
This step is for adding tags, and it’s completely optional. So we’ll skip that for now. Click the Review button to check if you’ve followed everything correctly.
Note that you must provide Programmatic Access and allow permissions for AmazonSESFullAccess and AmazonSNSFullAccess, as shown in the screenshot below.
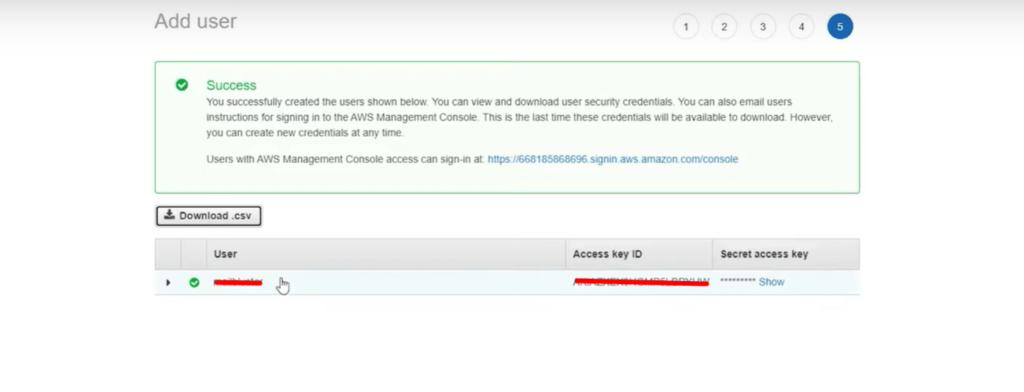
If everything looks ok, click Create User Button, and your access key and secret keys will be shown. Copy those details, and you can also download them in a CSV file if you want.
Note: You will never find these credentials again. So you must copy these while you’re in this stage.
3. Verify your domain with Amazon SES
The next step is to verify your domain with Amazon SES. This is especially important if you want to send emails from your custom domain or business email.
Note: It is recommended to use a custom email address for sending marketing emails. Sending emails from personal email addresses may cause them to go to spam. If you’re not sure how to create a custom domain email address, check out this article.
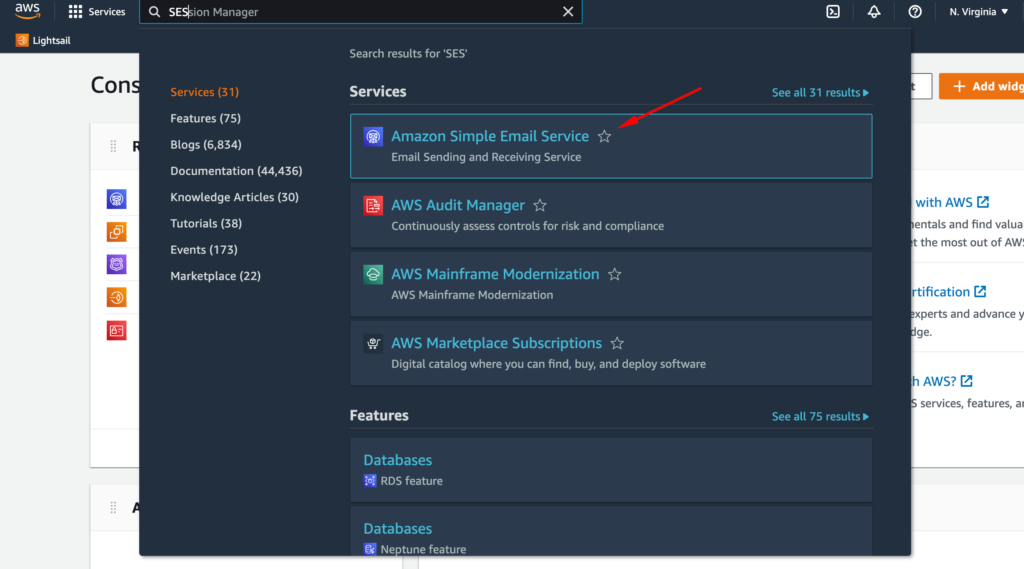
To verify your domain, search for SES from your AWS management console and click Amazon Simple Email Service.
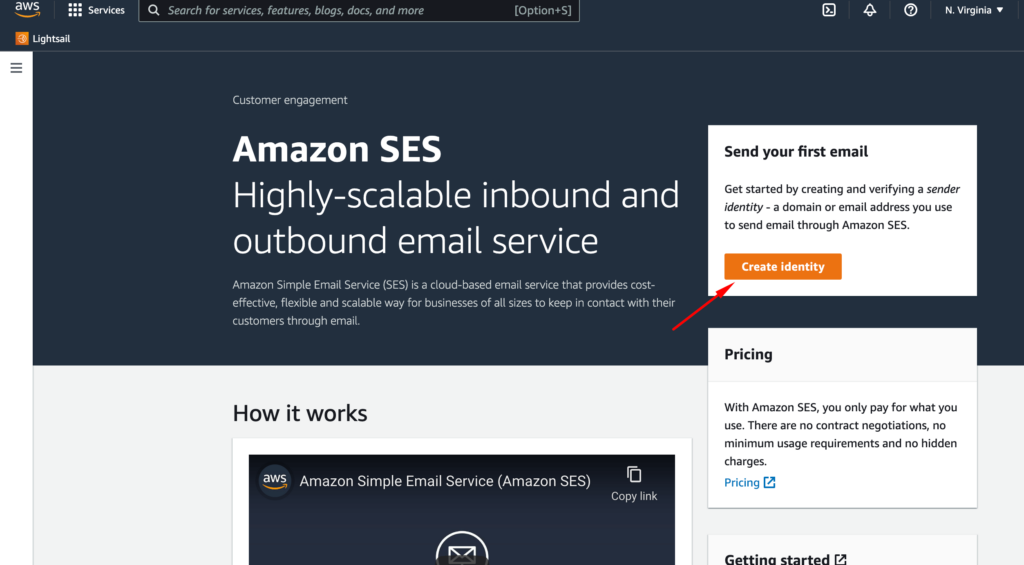
From the Amazon SES dashboard, click Create Identity.
Once you’re in the domain verification panel, click Domain and enter your domain URL. Finally, click Create Identity to generate the DKIM settings(necessary to verify your domain with Amazon SES).
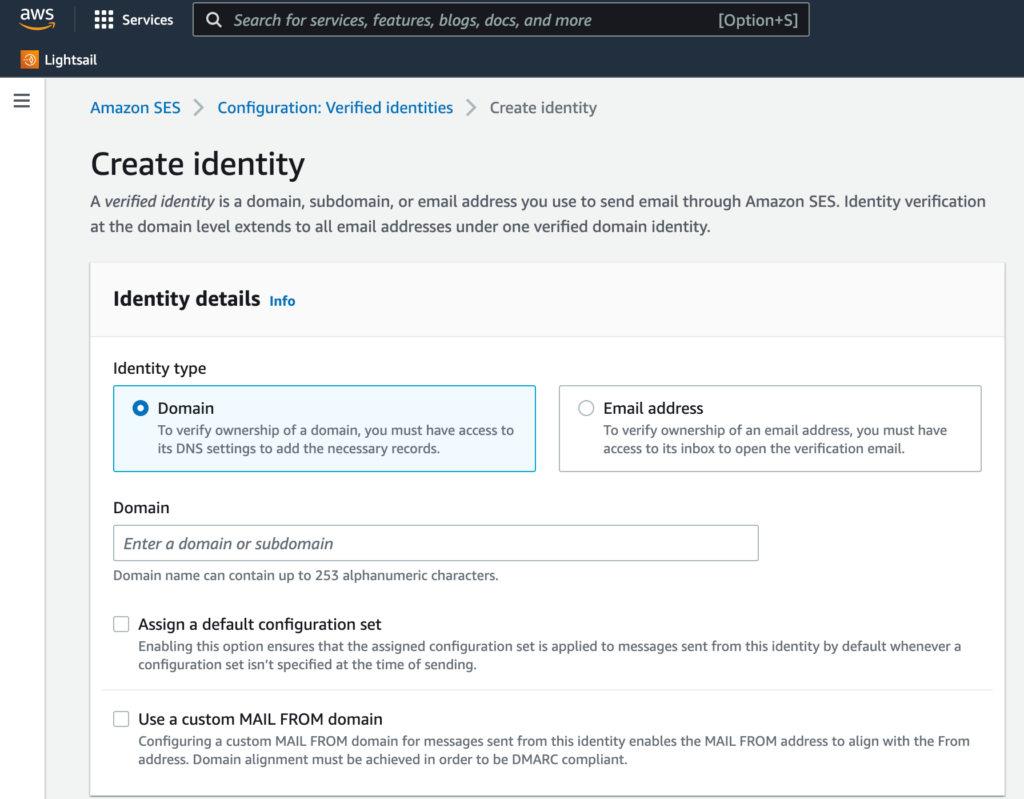
Once you have the DKIM settings, go to your domain’s DNS management and configure those values accordingly. Depending on your domain server, it might take a few minutes or hours for Amazon SES to verify your domain.
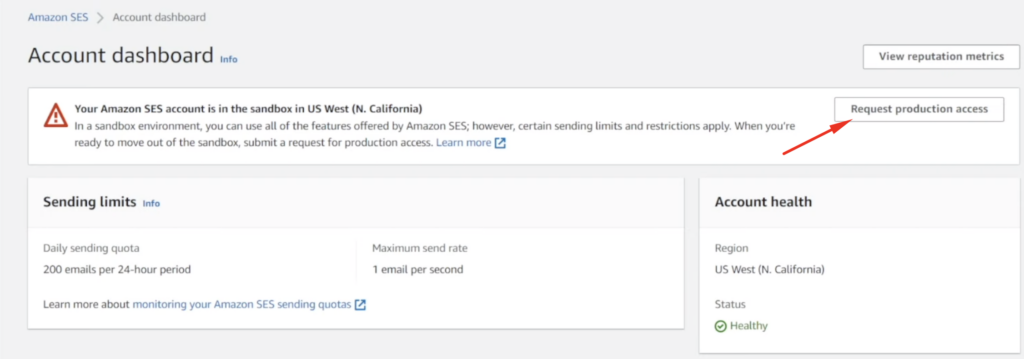
4. Moving out of sandbox mode
Even after you’re done with all the necessary steps, you may notice that your email sending limit is set to 200 emails per day and only one email per second. This is called Amazon SES sandbox mode. All accounts are initially sandboxed because Amazon wants to prevent spamming and misuse of their SES service.
If you want to send more marketing or transactional emails, you need to submit a request to move out of the Amazon SES sandbox. To do so, go to your Amazon SES console and select Request Production access.
This brings up the production request form where you need to select what type of emails you want to send, your website URL and your use case. We recommend selecting Transactional as the type of emails you want to send.
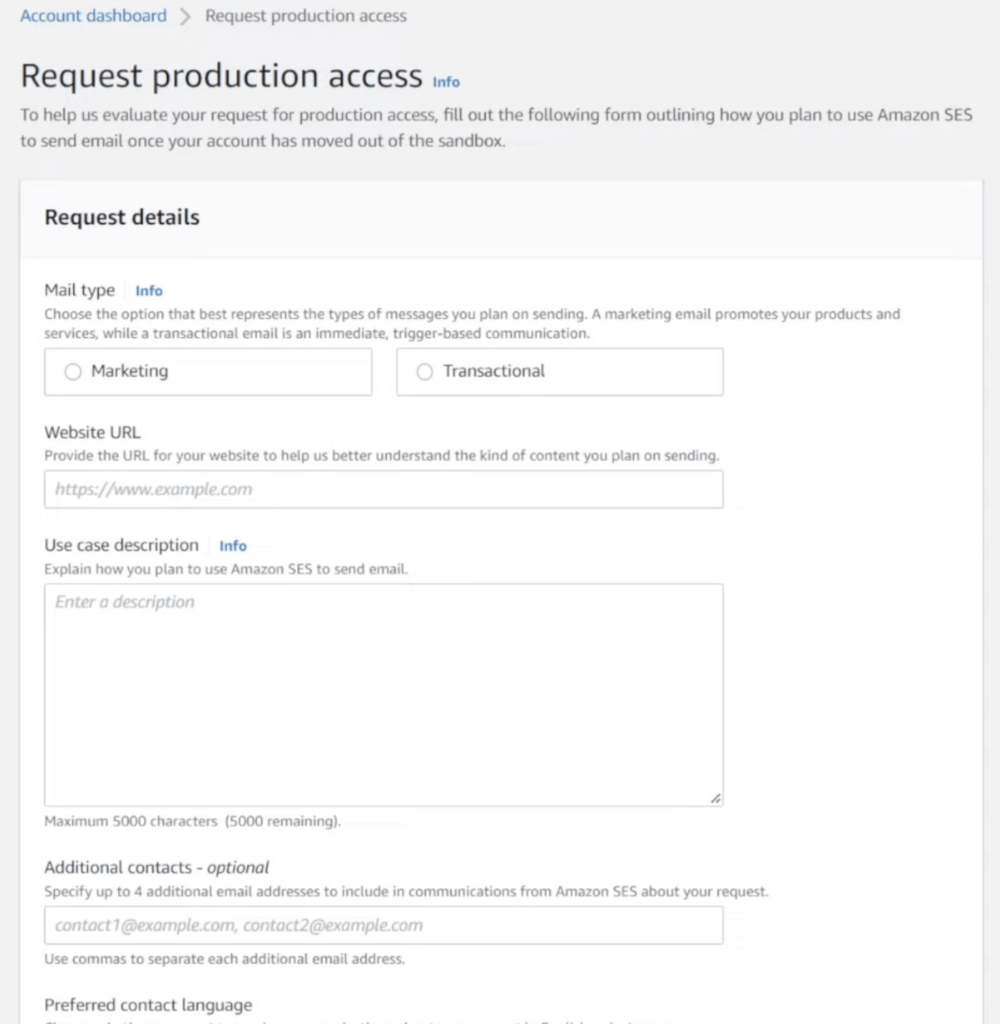
Note that you must clearly explain how you intend to use Amazon SES. So you need to be honest and answer the following questions:
- Main usage purpose (transactional and marketing)
- Origin of the Email addresses in your list (opt-in forms..etc) mention your website’s URL. Your website should include: a privacy policy page, a visible opt-in form with a privacy note, contact us page, preferably with your business contact info. It doesn’t matter if the domain/website is new or old, just needs to be legit-looking with some content.
- Usage in detail (describe in detail and numbers what are you going to do)
- Handling unsubscriptions (link in the footer, mailing app auto unsubscription..etc)
- How are you going to maintain the list (how do you clean and manage your list)
- Handling bounce and complaint (mention Amazon SNS and describe in detail how it is connected to your mailing app)
- Understanding the terms of service (I have read and understand the terms…etc)
*Tip: You can send a message like the following:
Hello AWS Team,
My website URL is: [Your Website URL]. I have been collecting the email addresses of people through subscriptions. Those email addresses are authentic and verified. For a long time, I have been using other email service providers. But now, I would like to use Amazon SES.
In order to send emails through Amazon SES, I will use an email sending application named FluentCRM (https://fluentcrm.com/). This application can effectively handle bounce, complaints, and unsubscriptions.
I hope you will approve my request for Amazon SES production access in the region mentioned above.
Let me know if you have any queries.
Cheers!
Provide the rest of the details per your business preference and click Submit for review.
Once you submit this request, one of Amazon AWS support agents will review everything, and if you’re qualified, they will set a new sending quota and increase the number of emails you can send per second. In most cases, it takes 48 hours or more.
Setting up FluentSMTP with Amazon SES
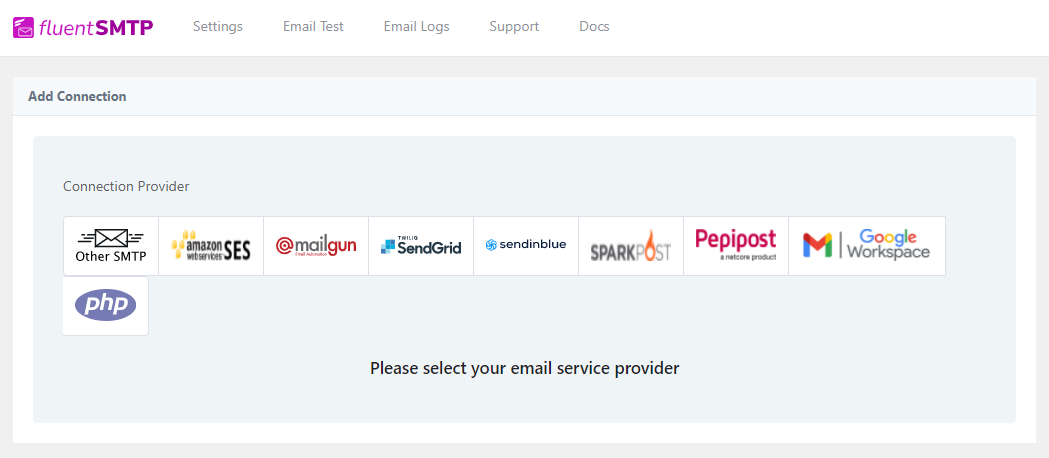
Most SMTP plugins either do not offer Amazon SES SMTP connection for free, or their email sending speed is slow. That’s why we have created a free plugin named FluentSMTP. It offers a wide range of features, including a free SMTP connection with Amazon SES, Gmail/Google Workspace, MailGun, SendGrid, Sendinblue, SparkPost, and PepiPost.
Moreover, you can use multiple connections simultaneously and view email sending logs within your WordPress dashboard.
To get started with setting up FluentSMTP with Amazon SES:
- Install and activate FluentSMTP on your WordPress dashboard.
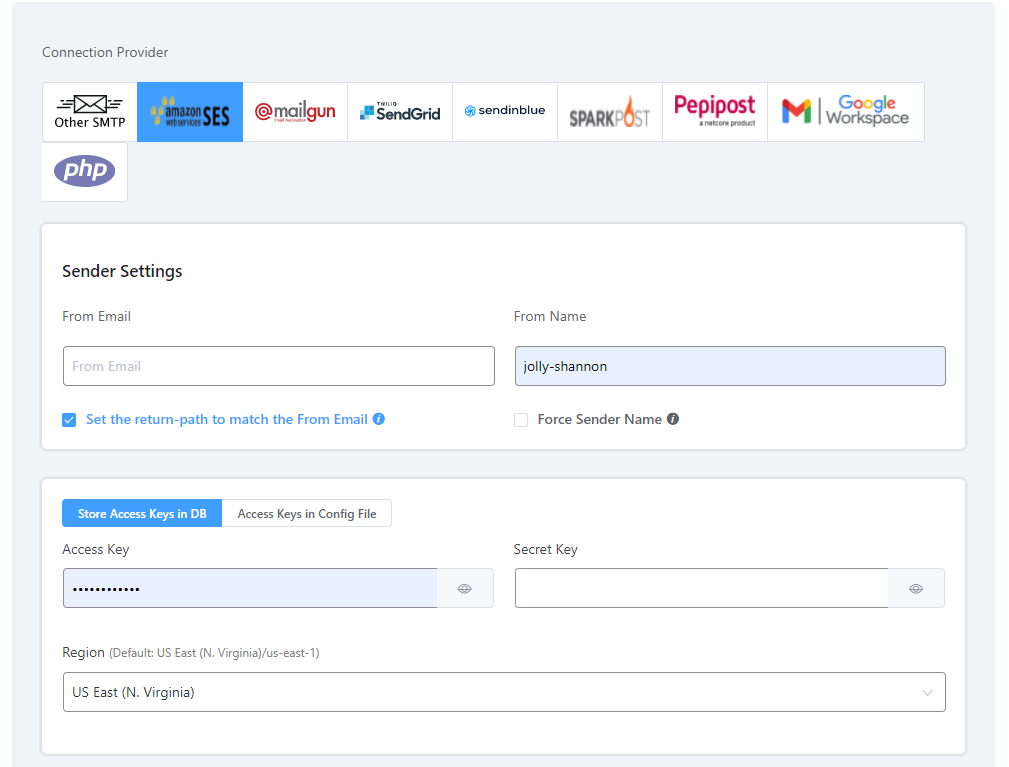
- Hover over to Settings>FluentSMTP, and you should see a few options, including Amazon SES. Select Amazon SES.
- Once you select Amazon SES, you’ll need to provide a few details.
In the From Address field, provide a domain email address you verified in Amazon SES. You can set a From name if you want.
For the Access Key and Secret Key fields, provide the API credentials you’ve acquired from Amazon SES and select the appropriate region. Click Save Connection Settings when done.
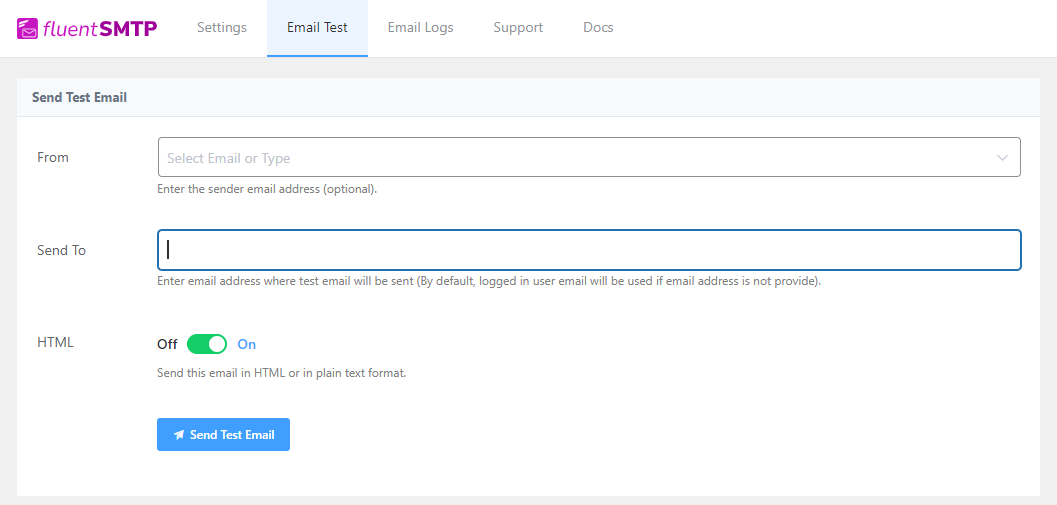
- Finally, test if your connection is working properly by going to the Email Test tab.
Simply send a test email to any email address, and if you see a success message, you’ve successfully configured FluentSMTP with Amazon SES. This also means you’ve configured Amazon SES with WordPress!
Setting up FluentCRM to send emails through Amazon SES
Finally, you need to configure FluentCRM to send emails via Amazon SES. This is a straightforward process.
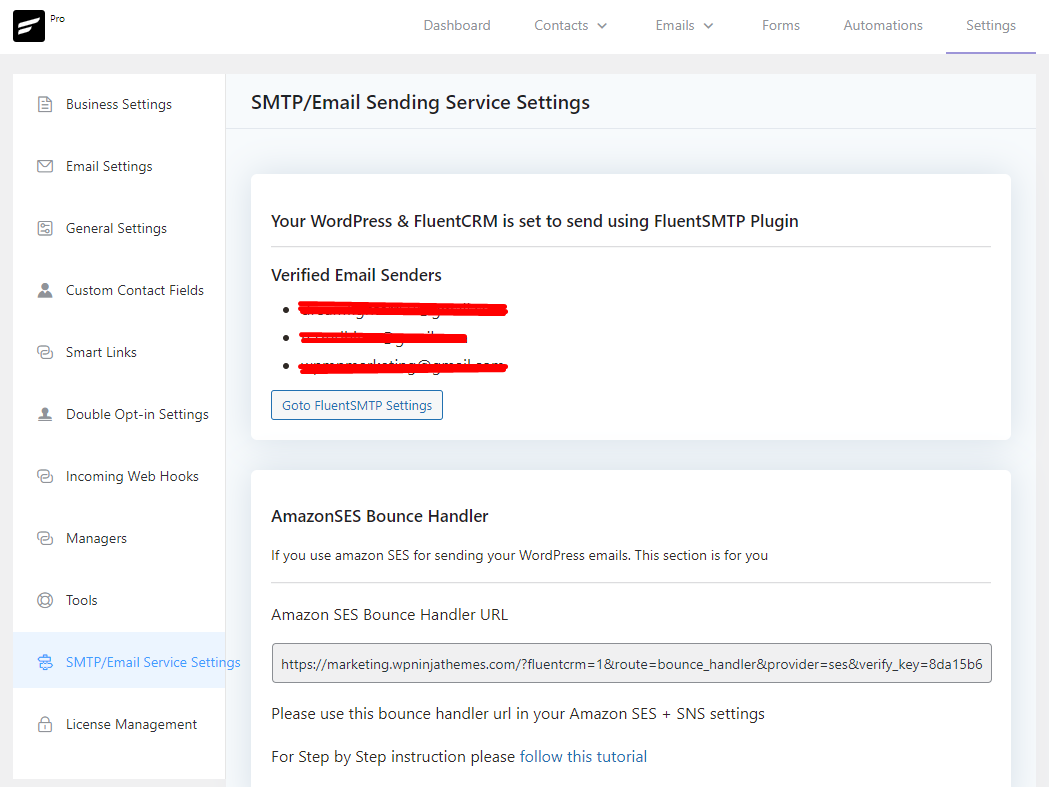
- Just go to your FluentCRM dashboard and Switch to Settings. Then go to SMTP/Email Service Settings and check if your email is listed as a verified sender. If you’ve done everything correctly, they should appear here.
- Here, if everything seems fine, go to Email Settings and select your verified email address in the From Email Address field.
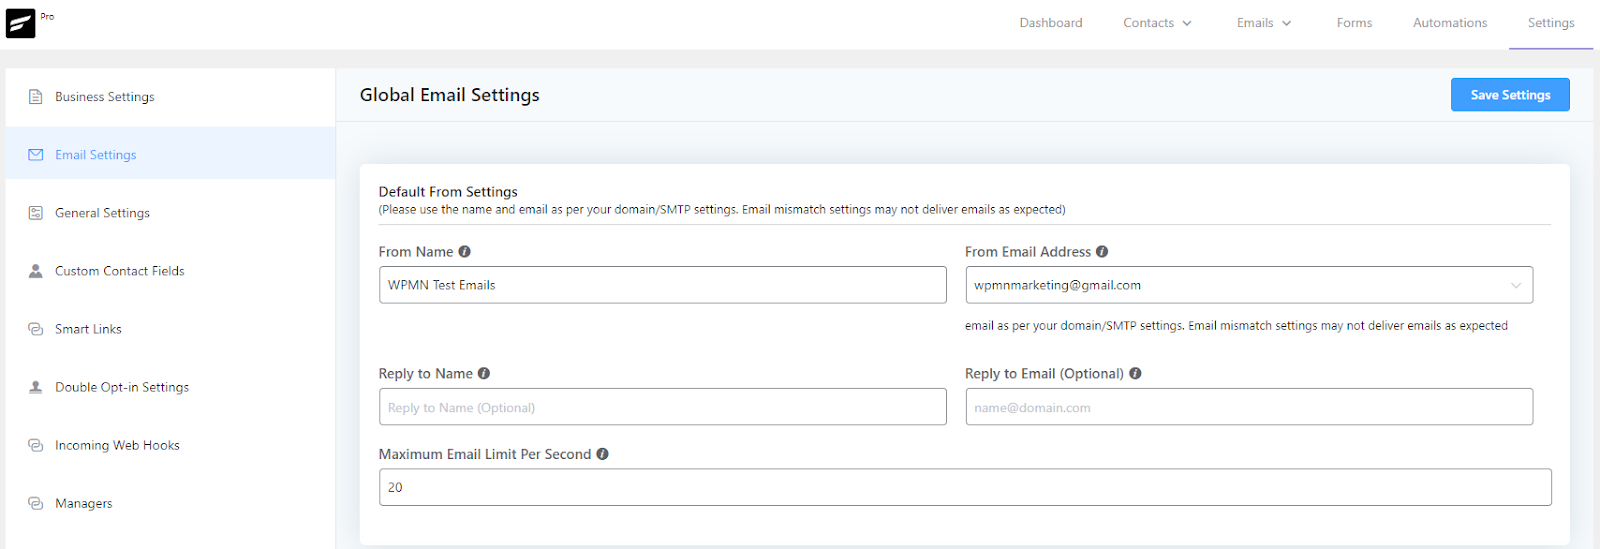
- Done!
Wrapping up
Setting up Amazon SES with WordPress is a relatively easy process. And once you’ve integrated Amazon SES with WordPress, it’s even easier to integrate with FluentCRM. With the combination of Amazon SES, FluentCRM, and FluentSMTP, you will never face WordPress or marketing email sending issues anymore.
Want to configure Amazon SES bounce handler with FluentCRM?
– check out our documentation!
We hope this article helped you set up an Amazon SES email sending service with FluentCRM. If not, let us know your issues in the comment section. For more tutorials like these, subscribe to our blog and follow us on Twitter.

Nazir Himel
Product Marketing Lead
Hey! I’m an inbound marketing specialist focused on email marketing automation. I love turning complex features into clear, user-centric messaging and when I’m not shaping product stories, I’m experimenting with content frameworks, conversion journeys, and helping others communicate value without sounding salesy!
Table of Content
Related Articles and Topics
-

How to Create and Add Gated Content to Your WordPress Site
“Returning visitors convert 73.72% more than first-time visitors.” – Barilliance If new visitors are the…
-

How to Create an Email Newsletter in 11 Simple Steps [From Zero to Conversion]
Long gone are the mornings, when businesses sent newspaper ads, and magazine spreads bundled with…
Comments
-
This is outdated again…. The part with giving “programmatic access” doesn´t look like that anymore and the entire option doesn´t exist anymore… if I check the option to give user access to aws everything looks differen and is called differently…
-
Hi Jan, Thanks for the heads up. We’ll update the article soon. 🙂
-
-
Hi,
Can I use Google suite/workspace as email provider? It would seem a lot easier.Kind regards,
Frank -
Left a comment yesterday, but it seems disappeared…
The Amazon SES has a new dashboard/UI. Hence, this tutorial needs to be updated. It’s very hard to follow the steps when the screenshots don’t match with the actual dashboard/UI.
-
Hey Marc, thanks for the heads up! We’ve updated the post with screenshots from the new Amazon SES UI. I hope it helps!
-
-
The Amazon SES dashboard/UI has changed, so this tutorial does not make sense anymore. Please update…
-
In addition to using FluentCRM + Amazon SES for all outbound sequential emails, can I use it for our daily “standard” Inbox/Outbox email to individuals with attachments etc? i.e. replace Thunderbird or Outlook etc? Thank you!
-
Hi,
I have the same issue, I was refused as well. I answered the questions as best as I could but was refused, this is the message I received,
Amazon SES has denied your request for production access. You may no longer request access from the Amazon SES console.
I don’t know what the exact problem was with my answers, as all I got in the reply email was,
We reviewed your request and determined that your use of Amazon SES could have a negative impact on our service. We are denying this request to prevent other Amazon SES customers from experiencing interruptions in service.
For security purposes, we are unable to provide specific details.Now what, all I needed was to send emails to customers who sign up for an account after purchasing something from my site or subscribe to a type of blog/newsletter, where do I go from here?
-
Hi,
I spent over 1 hour implementing this tutorial and here is the result:Production access request denied
Amazon SES has denied your request for production access. You may no longer request access from the Amazon SES console. For details about why your request was denied or to file an appeal, see case ID xxxxxxxxxxx in the AWS Support Center.Back to start without knowing what provider to use; what a waste of time.
-
Hi Chris,
This kind of issue happens if the domain is already blocked for spamming. You might want to try configuring with a different domain and then try to get your actual domain approved.-
Hi,
I doubt this is the issue as the domain used is pretty new. Another example of amazon treating people with disregard. Any user here having managed this setup with success?
-
-
-
Amazon is asking more questions after following the above steps. What is the best way to respond to these questions. I don’t know the right verbiage to use. Thank you.
Please tell us the following:
– What is the nature of your business and How do you plan on using Amazon SES?:
– How do you handle bounces and complaints?
– Describe your Opt-out process in detail and provide the Opt-in link of your site:
– Estimated monthly volume:
– Samples/ Template of your email:
– Please provide the sample of the email you plan to send to the customer ?
-
Hi Olivia,
Just be honest. If you’ve used the template we’ve shared, it’s likely that you’ve already answered most of their questions. Now they want to know other details such as Opt-in link, number of emails, email template samples, etc. For the opt-in link, just copy and paste the link from FluentCRM’s email settings and mention how many emails you’d send per month. I believe they will approve your request quickly.
-

Leave a Reply