
A Beginners Guide to Learndash Email Marketing Automation with FluentCRM

Summarize with


Learndash is one of the most advanced plugins for building eLearning projects on WordPress. This plugin lets you build online courses from scratch by adding lessons, topics, quizzes, groups, and so on.
Once you’re done preparing your courses using Learndash, you’ll surely want to promote them to drive sales. And that’s where email marketing comes in.
Email marketing is the most simple yet effective channel for finding and reaching out to your prospects. And in this article, we’ll demonstrate everything you need to get started with Learndash email marketing automation.
Follow this blog to make your online course website a highly profitable one, crowded with thousands of students – in an automated way!
*Note: This tutorial is only to give you an insight into how you can set up an email marketing automation strategy for an online course website you’ve developed using Learndash. If you have an email marketing strategy of your own, you’ll have to figure out the automation yourself. Feel free to ask any questions in the comment section!
Email Marketing Automation for Learndash Courses
When you’re into email marketing automation, the possibilities are limitless. It lets you promote and grow your online courses in several ways – beginning with collecting leads and segmenting your contacts database.
Once you’re done with the initials, you can send out email campaigns, set up email sequences, automation funnels, etc., for selling your online courses.
Imagine a Learndash email marketing strategy that allows you to:
- Collect leads via free offers
- Make your leads join a free course
- And sell paid courses to them!
Sounds fascinating. Right?
But before you can do all that, you’ll need an email marketing automation tool. And for that, we’ll use FluentCRM.
Of course, you can have other tools in mind. Many email marketing automation tools can pull this off, and we wouldn’t discourage you from using them. However, we would like to mention why FluentCRM is a good choice.
FluentCRM is like most other email marketing automation tools that allow you to build an automated email marketing workflow – but with a twist. Unlike other tools, it is a native WordPress plugin!
It can talk to the Learndash plugin installed on your website without requiring an API or Zapier connection and centralize your student’s data. Once you’ve collected your student’s email address, you can create automated email marketing funnels to grow your business. With FluentCRM, you’ll be paying a minimal annual fee while owning and managing all your data. That said, FluentCRM is a quality tool to have in your arsenal.
Now let’s get back to our original discussion.
The Strategy
Below you can see that we have created two courses on our website using Learndash:
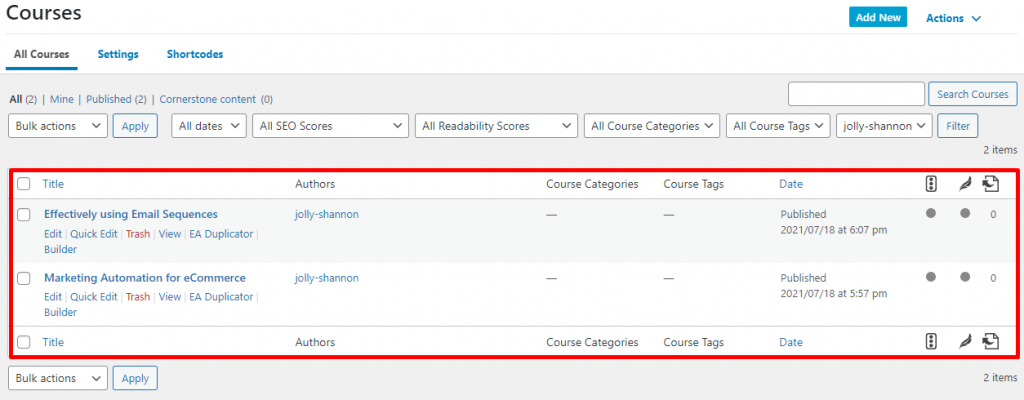
- Marketing Automation for e-commerce
- Effectively using Email Sequences
Notice that both of these courses are linked to each other and aimed towards audiences who are interested in email marketing.
In the case of the first course, Marketing Automation for e-commerce, we’re keeping it free and open for everyone. The second course covers a paid course aimed at a very specific purpose, Effectively using Email Sequences. Our goal is to lure the audience into buying the paid course.
Once we have a goal in mind, we can begin to implement our strategy.
So first, ensure you have FluentCRM Pro installed and correctly configured for email sending. Once we’re done with the configuration, FluentCRM will automatically integrate with Learndash, and we’re all set to implement our email marketing strategy.
Now we’ll look into various ways of promoting our Learndash courses.
Lead Generation for Learndash Course
Lead generation is an integral part of any marketing strategy. If you want to keep your business growing, and if you want to get more students to enroll in your courses, you need to turn your website into a lead-generating machine.
Now, there are many ways you can generate leads for your Learndash course. You can use lead generation strategies such as:
- Blogging
- Social media marketing
- Event meetups
- Discount offers, etc.
All these are pretty simple to implement, and they always work. However, they aren’t that effective. Online courses are a different kettle of fish, and you need to come up with strategies that convert most. That involves making an offer your audience simply can’t resist!
We’ve found two lead generation strategies to be superior – both of which involve offering freebies. Who’d deny goodies they get for free, right?
Giving Away Freebies
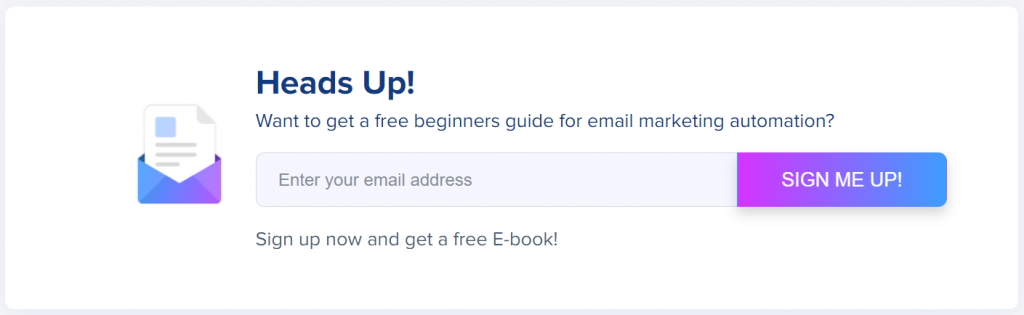
Our first lead generation strategy is a freebie giveaway. In order to convert our blog readers or course visitors into email subscribers, we’d like to provide them with a free guide such as an ebook. The ebook can be something that will add value to their life and generate interest in our other courses.
The simplest way to do this is to ask them whether they would like to get a free ebook in exchange for their email address.
Simply go to the Forms tab on your FluentCRM dashboard and hit the Create a New Form button to create a form.
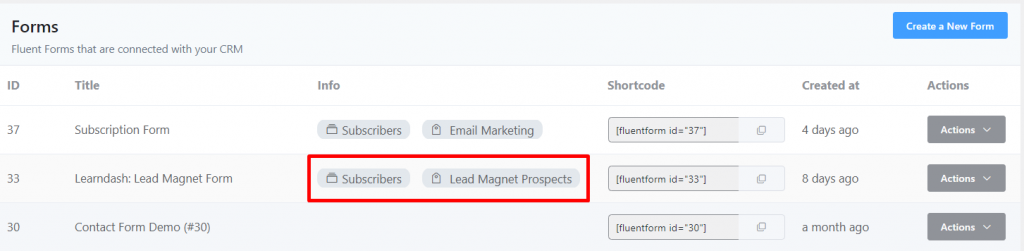
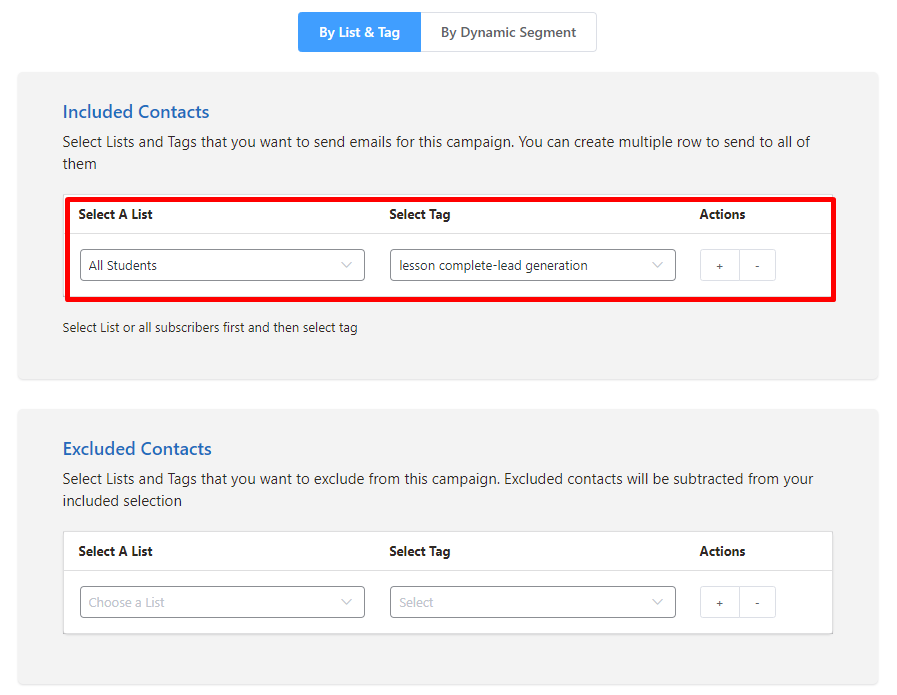
Below you can see that we have created ours and assigned the relevant Lists and Tags, so our audience gets segmented along the way. You can also hover over the Actions button to Preview or Edit the form.
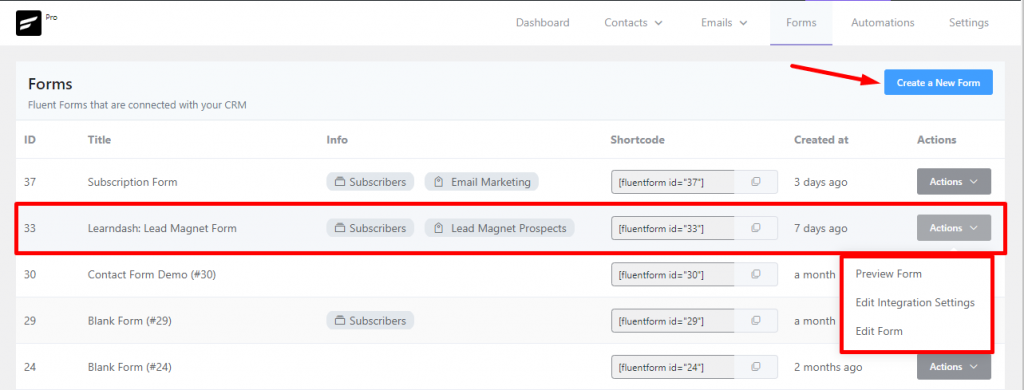
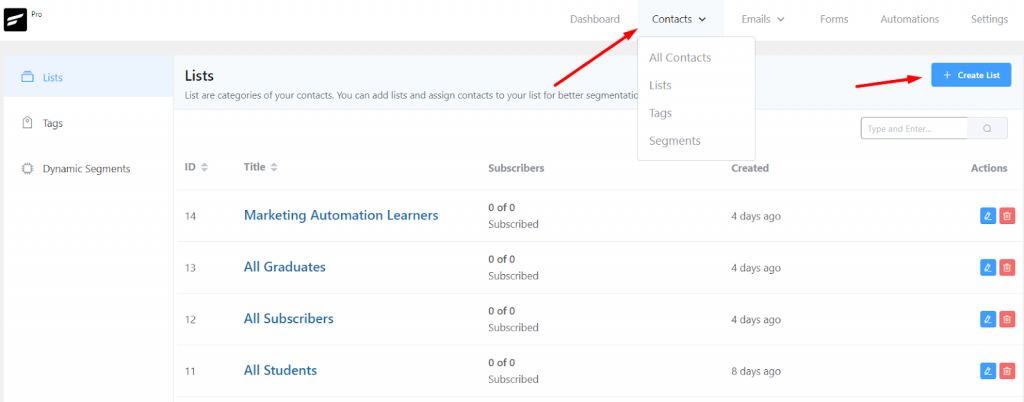
Note that if you want a List or Tag to appear in the dropdown, you need to create them from the Contacts tab.
FluentCRM also lets you do various modifications to the form integration, such as form field mapping, conditional logic, input value-based tagging (dynamic tagging), and many more. Since we’re not doing anything too fancy, we’ll skip them for now.
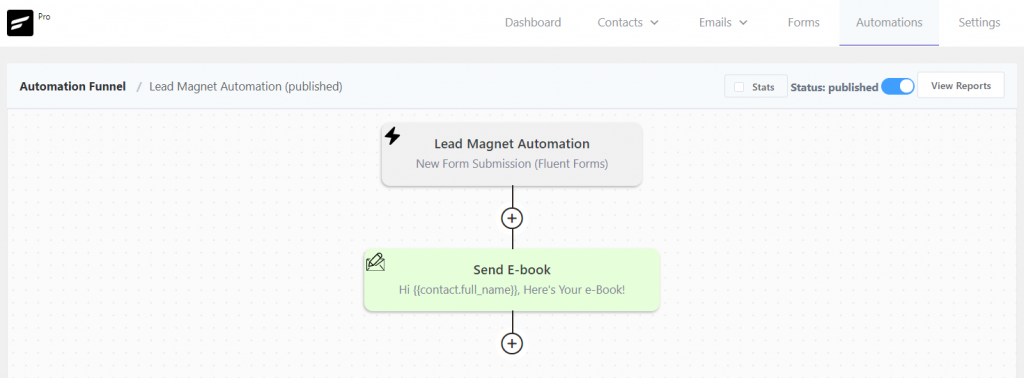
To send our ebook via email, we can simply head over to the Automations and create an automation using a New Form Submission Trigger that sends the user an email containing the link to their ebook.
Offering Free Courses
Remember when we said one of our courses is free? Yes, we like the idea of offering a course for free. That way, we can convert more of our audience into email subscribers. There’s no reason for someone to not join a free course they are interested in. And that makes free courses a must-have lead generation strategy.
In this case, we’re offering our Marketing automation for e-commerce for free so that we can sell our second course, Effectively Using Email Sequence.
Learndash makes it easy to make any course free. However, in order to turn your audience into your email subscriber, you need to ask them to register on your website. So make sure to enable this from Setting>Course Access Settings.
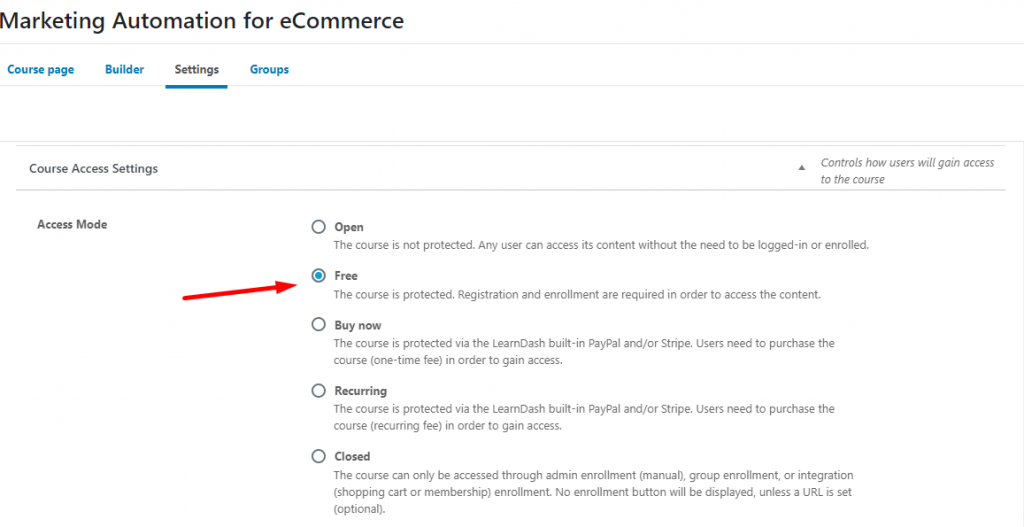
Enabling this setting allows you to force the interested audience into becoming registered users on WordPress. And to take those user’s data into FluentCRM, you can create a tag in FluentCRM and apply tags when they enroll in your course. It’s as easy as selecting them from a dropdown menu!
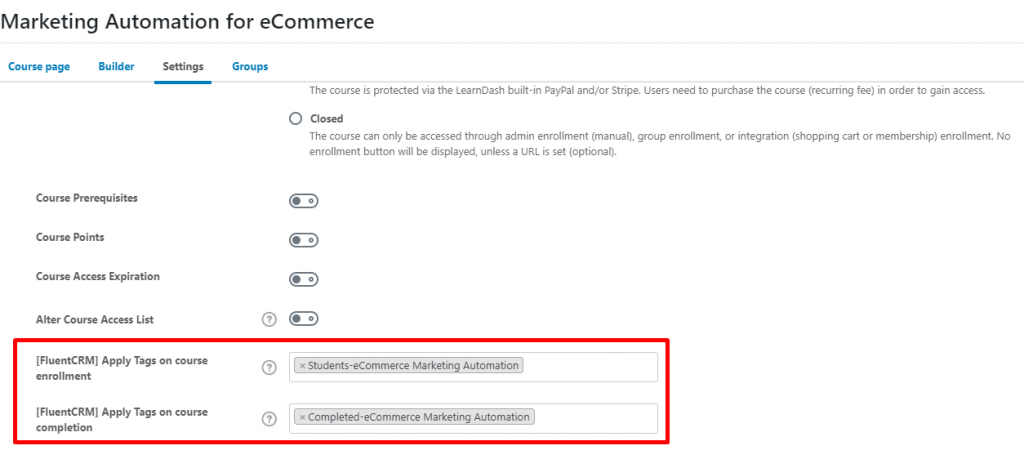
You should also set a tag on course completion so that you can better segment your students. Once you’ve done that, whenever someone joins your course, they will be automatically added to FluentCRM’s contact database.
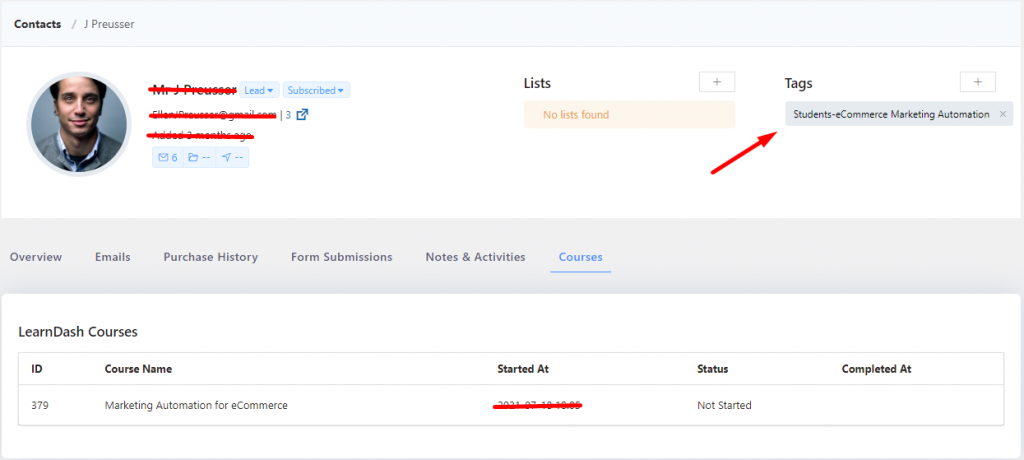
FluentCRM automatically synchronizes with WordPress and generates detailed student profiles. With a little tweak, you can also gather comprehensive student profiles using FluentCRM!
These were our two simple yet effective tactics for lead generation. However, you can also check out other tips to collect email lists and build your email subscriber base faster.
Learndash Student Segmentation
The success of your email marketing strategy depends on how successful you are at sending the right email to the right person at the right time. Contact list segmentation helps you determine whether someone is the right person to reach out to with your email.
Not only that, it helps you lay the foundation for your entire email marketing strategy. With that being said, it’s safe to say contact segmentation is one of the most vital email personalization techniques.
So how do we do that?
Simple, we’ll identify each of our subscribers and Learndash students based on lists and tags! Ideally, we would like to assign lists and tags to students based on their course enrollments, course completion, and lesson completion.
Let’s begin with identifying the subscribers!
Categorizing the Subscribers
Any contact is an email subscriber unless they unsubscribe or their email address comes back as a bounced email. However, our email marketing strategy is based on Learndash courses. So there’s a chance of mixing up students with non-students.
The best way to take care of this is to specify the lists and tags when creating a form in FluentCRM.
But if you want, you can always edit the associated lists and tags via Actions>Edit Integration Settings.
Segmenting Learndash Students
Student segmentation goes beyond the regular segmentation we’ve achieved through our lead magnet form.
We already have two courses. And within those courses, we have a few lessons. Therefore, the ideal segmentation for us would be based on our student’s course enrollments, course completions, and lesson completion.
Segmenting Based on Specific Course Enrollments and Course Completion
Before we put all our students on one big list, we want to identify our students based on their individual course enrollments and course completions.
This will help us in two ways. First, we can sort our contact list by individual course enrollments if we decide to send an email campaign. And second, we can create automation funnels for students in specific courses.
But the fun part about using FluentCRM’s segmentation feature is, that we’ve already created these segments when we added tags for course enrollments and course completions inside a course!
In the image below, you can see which tags will be given to contacts when they enroll and complete our free course.

We’ve done the same for our paid course. So as it stands, we have four tags for our two courses.
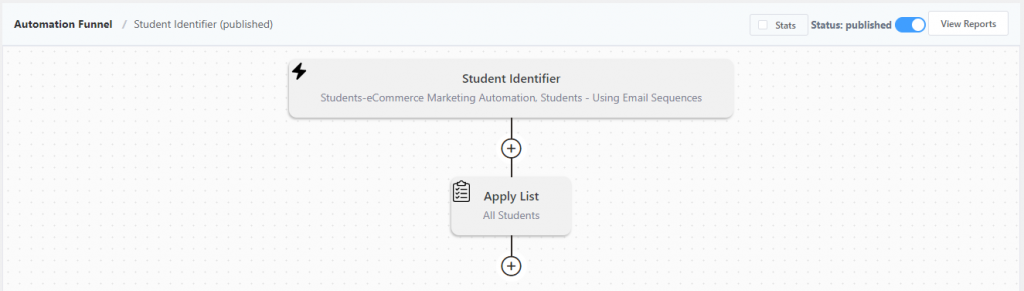
Identifying All Students
As we’ve mentioned, we’d want to have one big list of all our students.
Giving tags upon course enrollment also enables us to identify all our students. For that, we can simply create a tag-based automation funnel and put them into our list of All Students.
Student Activity-based Segmentation
Our student’s activity-based segmentation can be based on activities such as lessons or topic completion. For such hyper-segmentation, FluentCRM gives you the following triggers:
- Lesson Completed
- Topic Completed
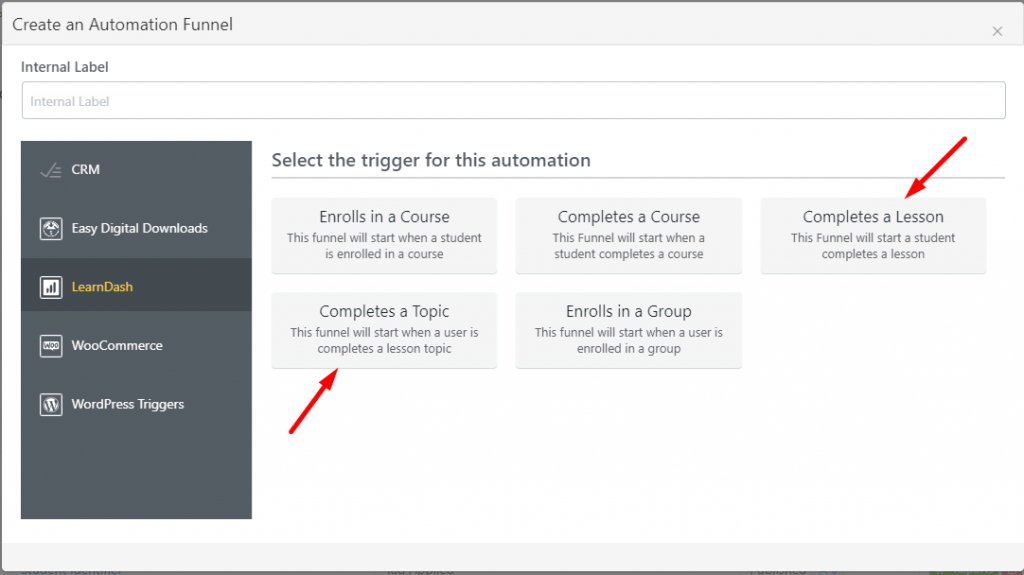
These triggers let us identify our students who completed a lesson or topic. We can choose any of these triggers and give appropriate tags to the students if we like.
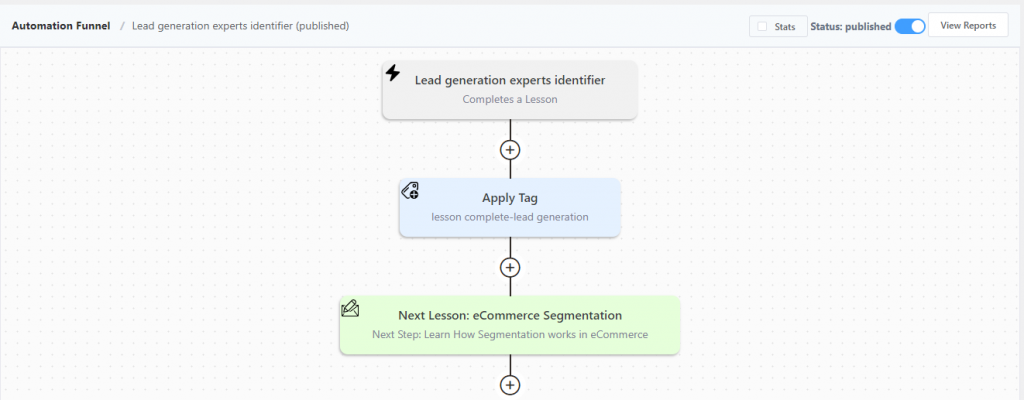
This is a way to hyper-segment our students based on lesson and topic completions. However, we’re only using such complex segmentation methods because we want to reach out to our students with relevant educational content whenever they finish a lesson or topic.
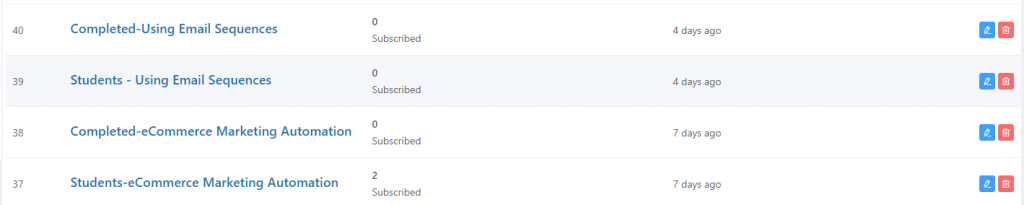
If you’re not sure how our segmented contact database looks, you can check the breakdown image below:
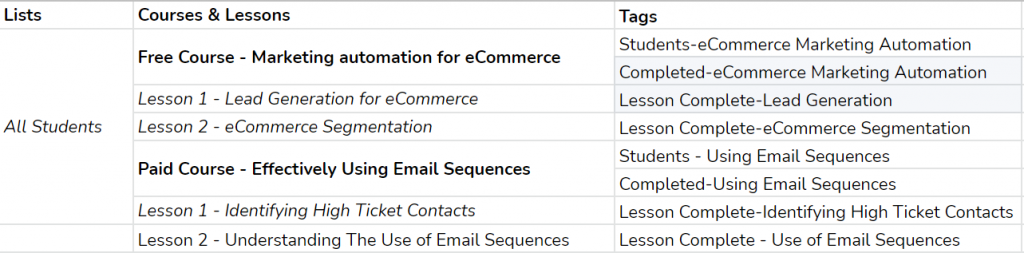
A good question to ask is, how is this going to help our entire email marketing strategy?
The straightforward answer to this is flexibility. With such a well-segmented contact database, you can quickly sort out a specific contact group from thousands of other contacts.
Let’s take an email campaign, for example. Suppose we want to reach out to someone who has completed a specific lesson (e.g., Lead Generation). In that case, we can select the tag we’ve assigned upon the lesson completion.
Easy!
Creating the Automation Funnel
This is where the magic happens. We’ve done all the perquisites for selling our courses in an automated manner, and now it’s time to create our Email sequences and automation funnels.
Lead Magnet Automation
Remember that we already have a lead magnet automation funnel in place? This was the first automation funnel we created for sending an ebook when someone signed up using a free giveaway on our website.

However, our actual goal with that automation is to convince the user to join our free course. That way, we’ll develop a healthy relationship with the lead to convince them to become paying customers.
So how can we achieve this?
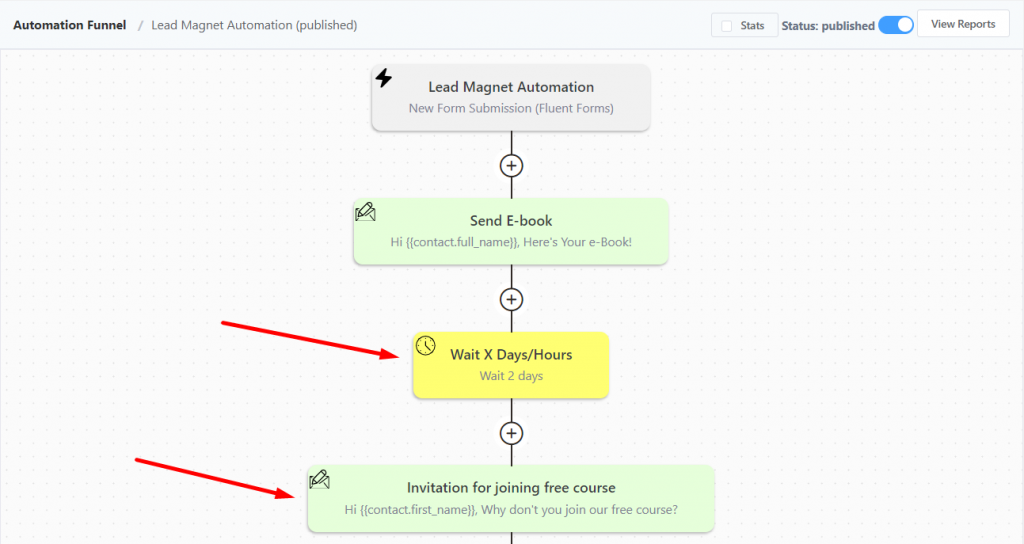
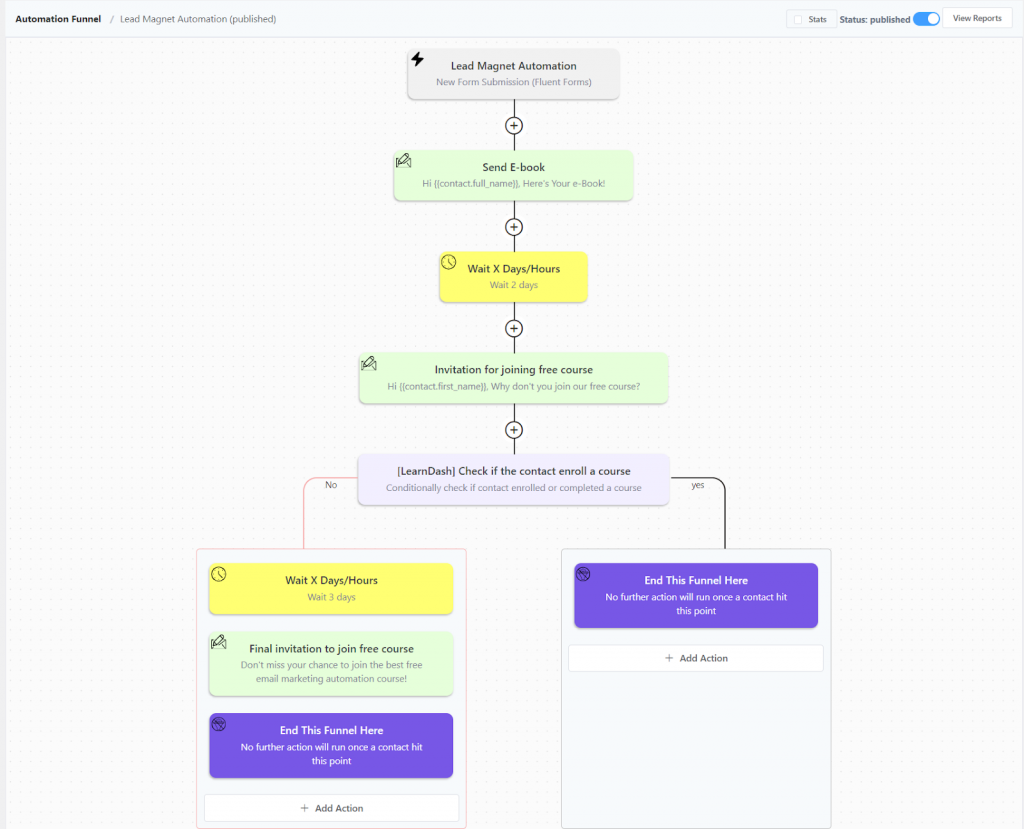
Once someone has downloaded our free ebook, we want to give them some time to process the content of the book, and then we’ll send them an invitation to join our free course. We can do this by adding a delay and a custom email block.
The next step?
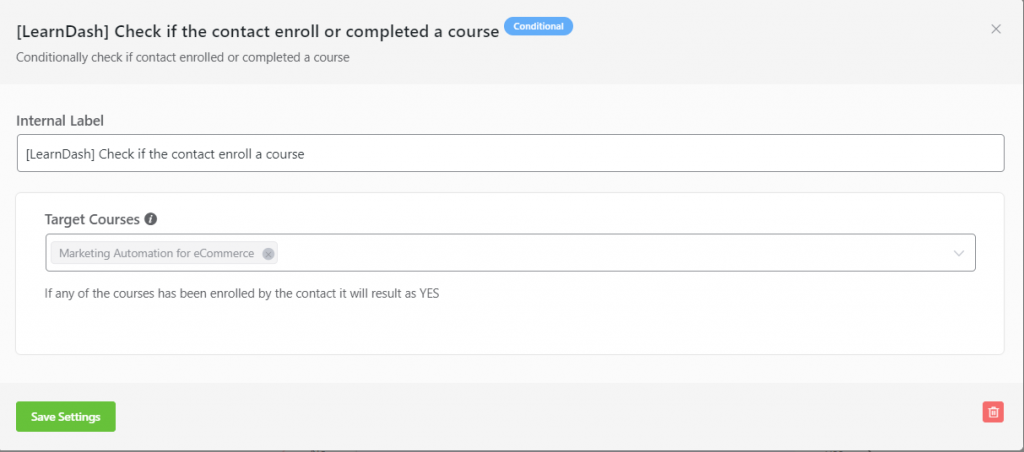
People usually don’t say no to a free course. But if they still don’t join our free course, we want to make sure we follow up one last time. Hence, we’ll bring in a Conditional that allows us to check and set branches based on whether someone joined a course or not.

This allows us to select the course enrollment we want to check – for someone who’s already in our automation funnel. So we’ll go ahead and save the settings after choosing our free course.
Once we have multiple branches, we can set different actions. If our subscribers have joined the free course, we will stop the automation. And if they don’t, we’ll send them a follow-up email after three days.
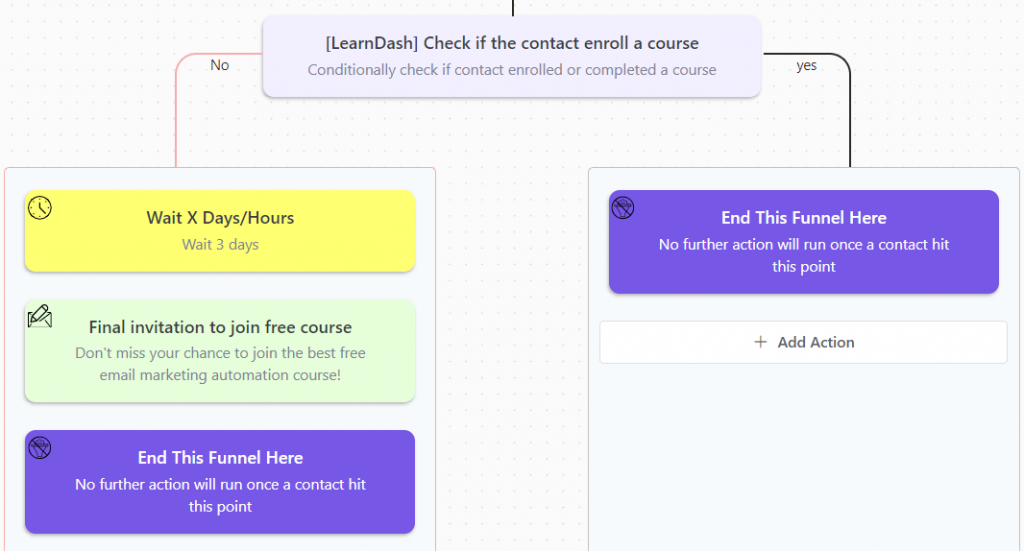
We also don’t want our subscribers to feel overwhelmed by too many emails. Hence, we’ll stop the automation after we’ve sent our final email.
That sums up our lead magnet funnel. And our final automation looks like this:
Lead Conversion Funnel
The next automation we want to have is a lead conversion funnel. This is the funnel that will convert our free course students into paying students. Hence, the lead conversion funnel!
If you remember, we decided to apply tags to contacts based on lesson completions and course completions. Now is the time to use those as Triggers and Goals.
How?
Our segmentation strategy assigns the Students-e-commerce Marketing Automation tag to contacts when they join our free course. We also assigned tags based on lesson completions. As we mentioned, applying these gives us complete control over our automation!
FluentCRM lets you initiate automation funnels when someone receives a tag. And this makes it really easy to start an automation when someone joins a course!
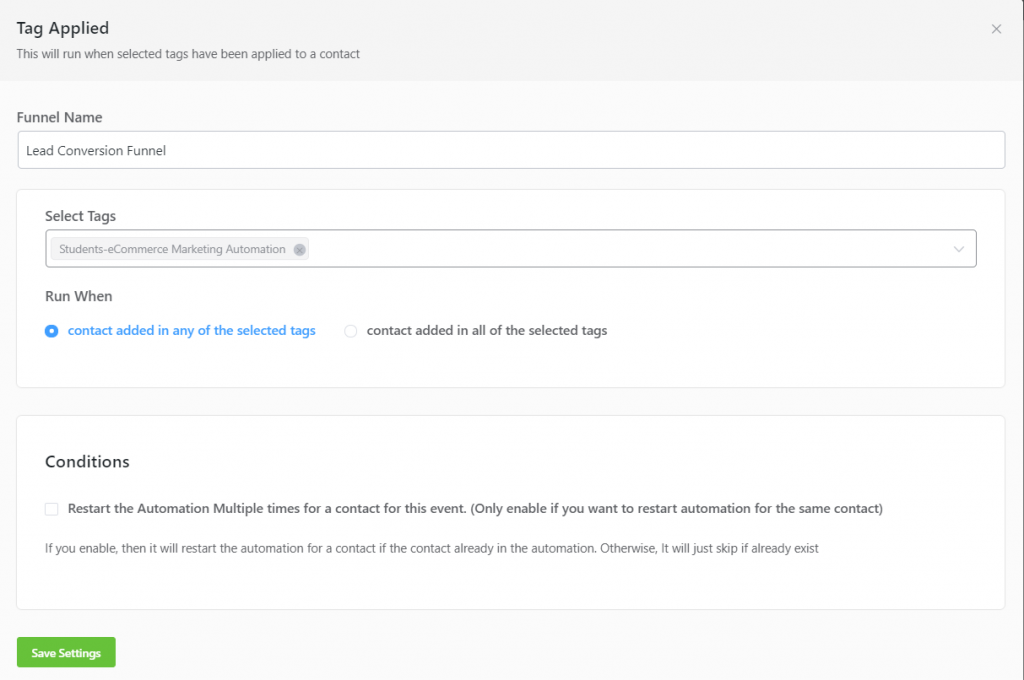
But before sending a paid course invitation email to the students on a free course, it’s wise to wait until they have finished a lesson. That’s when FluentCRM’s Goals come into play. Using the goals, we can easily check whether someone has completed a lesson or note.
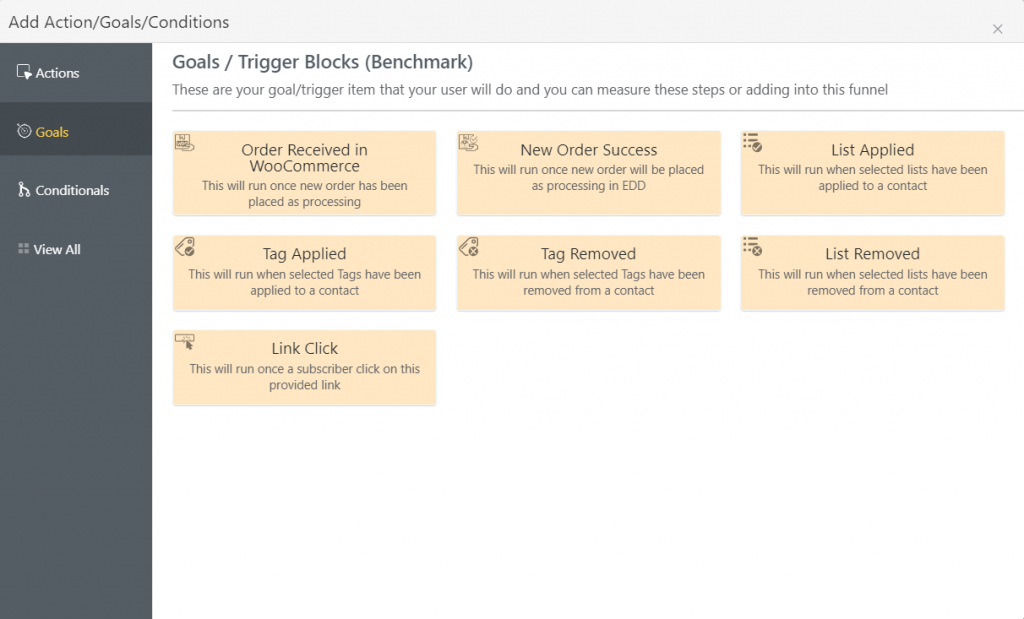
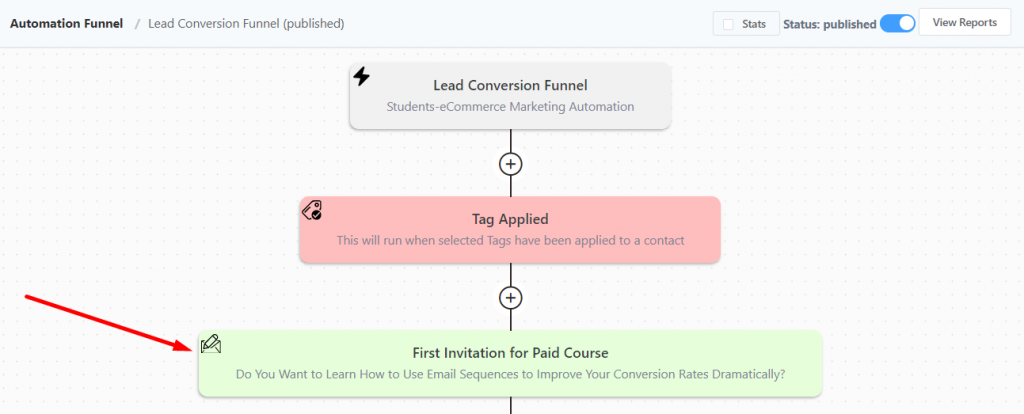
For the lead conversion funnel, we want to ensure that the user has completed at least one lesson from the free course we offered. And for that, we can add a Tag Applied goal to check if the user actually completed a lesson. For example, below, we have checked whether someone has a tag we’ve set for a completed lesson.

We also marked this as an essential goal so that only students with that tag qualify for our next email. Once our subscribers complete a lesson in our free course, we can simply add a custom email to the funnel to invite them to join our paid course.
And like earlier, we can check and automate emails based on whether someone has enrolled in our paid course or not:
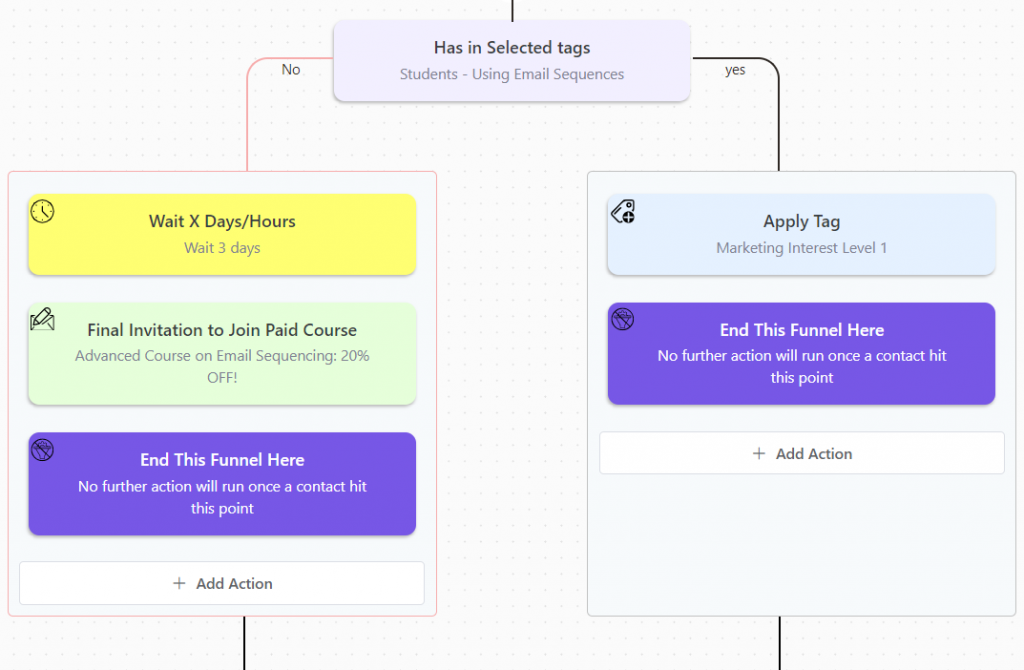
Again, this follows the same rule; we are checking whether someone has a tag for enrolling in our paid course or not and sending our last follow-up email with a discount. The only change we’ve made is that – we added a tag to identify students who became paid customers through our marketing emails.
Wondering why?
Because someone who became a paying customer through inbound marketing is always likely to make another purchase!
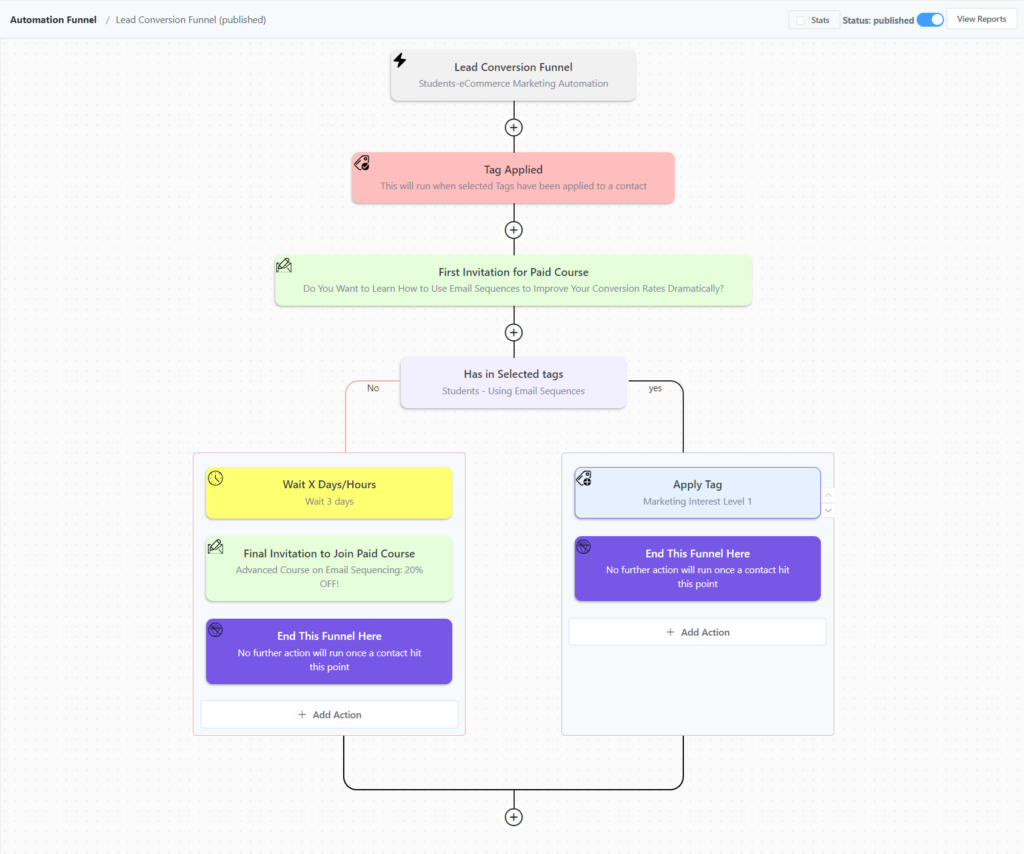
Here’s what our lead conversion funnel looks like:
What’s Next?
Every email marketing strategy is different. While we’re offering many freebies for building an email list, you might not want to market your Learndash courses this way.
So, the best way to figure out a Learndash email marketing automation strategy is to think of an email marketing strategy that aligns with your business and determine your goal with the automation funnel.
Once you’ve done that, you can implement your own automated email marketing strategy that generates leads, builds excellent relationships, and moves them through funnels for selling and upselling your courses.
We hope you enjoyed reading our article. We wish you all the success with your email marketing strategy. If you liked the article, subscribe to our blog and follow us on Twitter.
Cheers!

Nazir Himel
Product Marketing Lead
Hey! I’m an inbound marketing specialist focused on email marketing automation. I love turning complex features into clear, user-centric messaging and when I’m not shaping product stories, I’m experimenting with content frameworks, conversion journeys, and helping others communicate value without sounding salesy!
Table of Content
Related Articles and Topics
-

How to Build an Automated LearnDash Student Onboarding Email Sequence in FluentCRM
What actually happens to a student the moment after they enroll in your course? For…
-
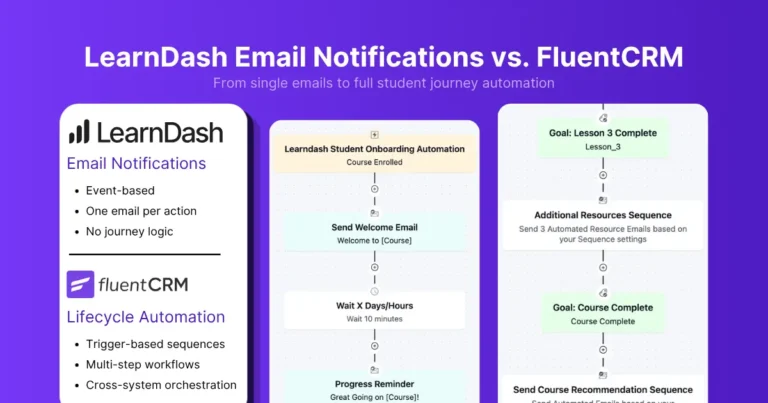
LearnDash Email Notifications vs. FluentCRM Email Automation: Workflows Beyond Notifications
A student enrolls in your course. LearnDash sends a purchase confirmation email. Maybe a registration…

Leave a Reply