FluentCRM provides several Actions, especially for Email Marketing, to automatically send emails to users. Once automation is triggered, you can add the desired Action/s to handle advanced, repetitive, or routine tasks. This article will provide detailed information about all Email Actions in FluentCRM Automation.
Remember, to use all the Email Actions except “Send Custom Email action”, you need to have FluentCRM Pro Plugin installed and activated on your WordPress Site.
All Email Actions #
To learn how you can use all the Email Actions in your FluentCRM, follow the steps with screenshots below –
First, go to the Automation section from the FluentCRM Navbar, and open your desired Automation by clicking on its title. Or, create a new one by clicking the + New Automation.
To learn the process of creating a new automation funnel, read this Documentation.
For example, I opened the Tag Applied automation funnel to explain all the Actions in CRM.

Now, click the Plus Icon, or just hover over it and click the Add Action / Goal option to get all the Email Actions.

Now, a pop-up page will appear with all the Email Action Blocks of FluentCRM to choose from.
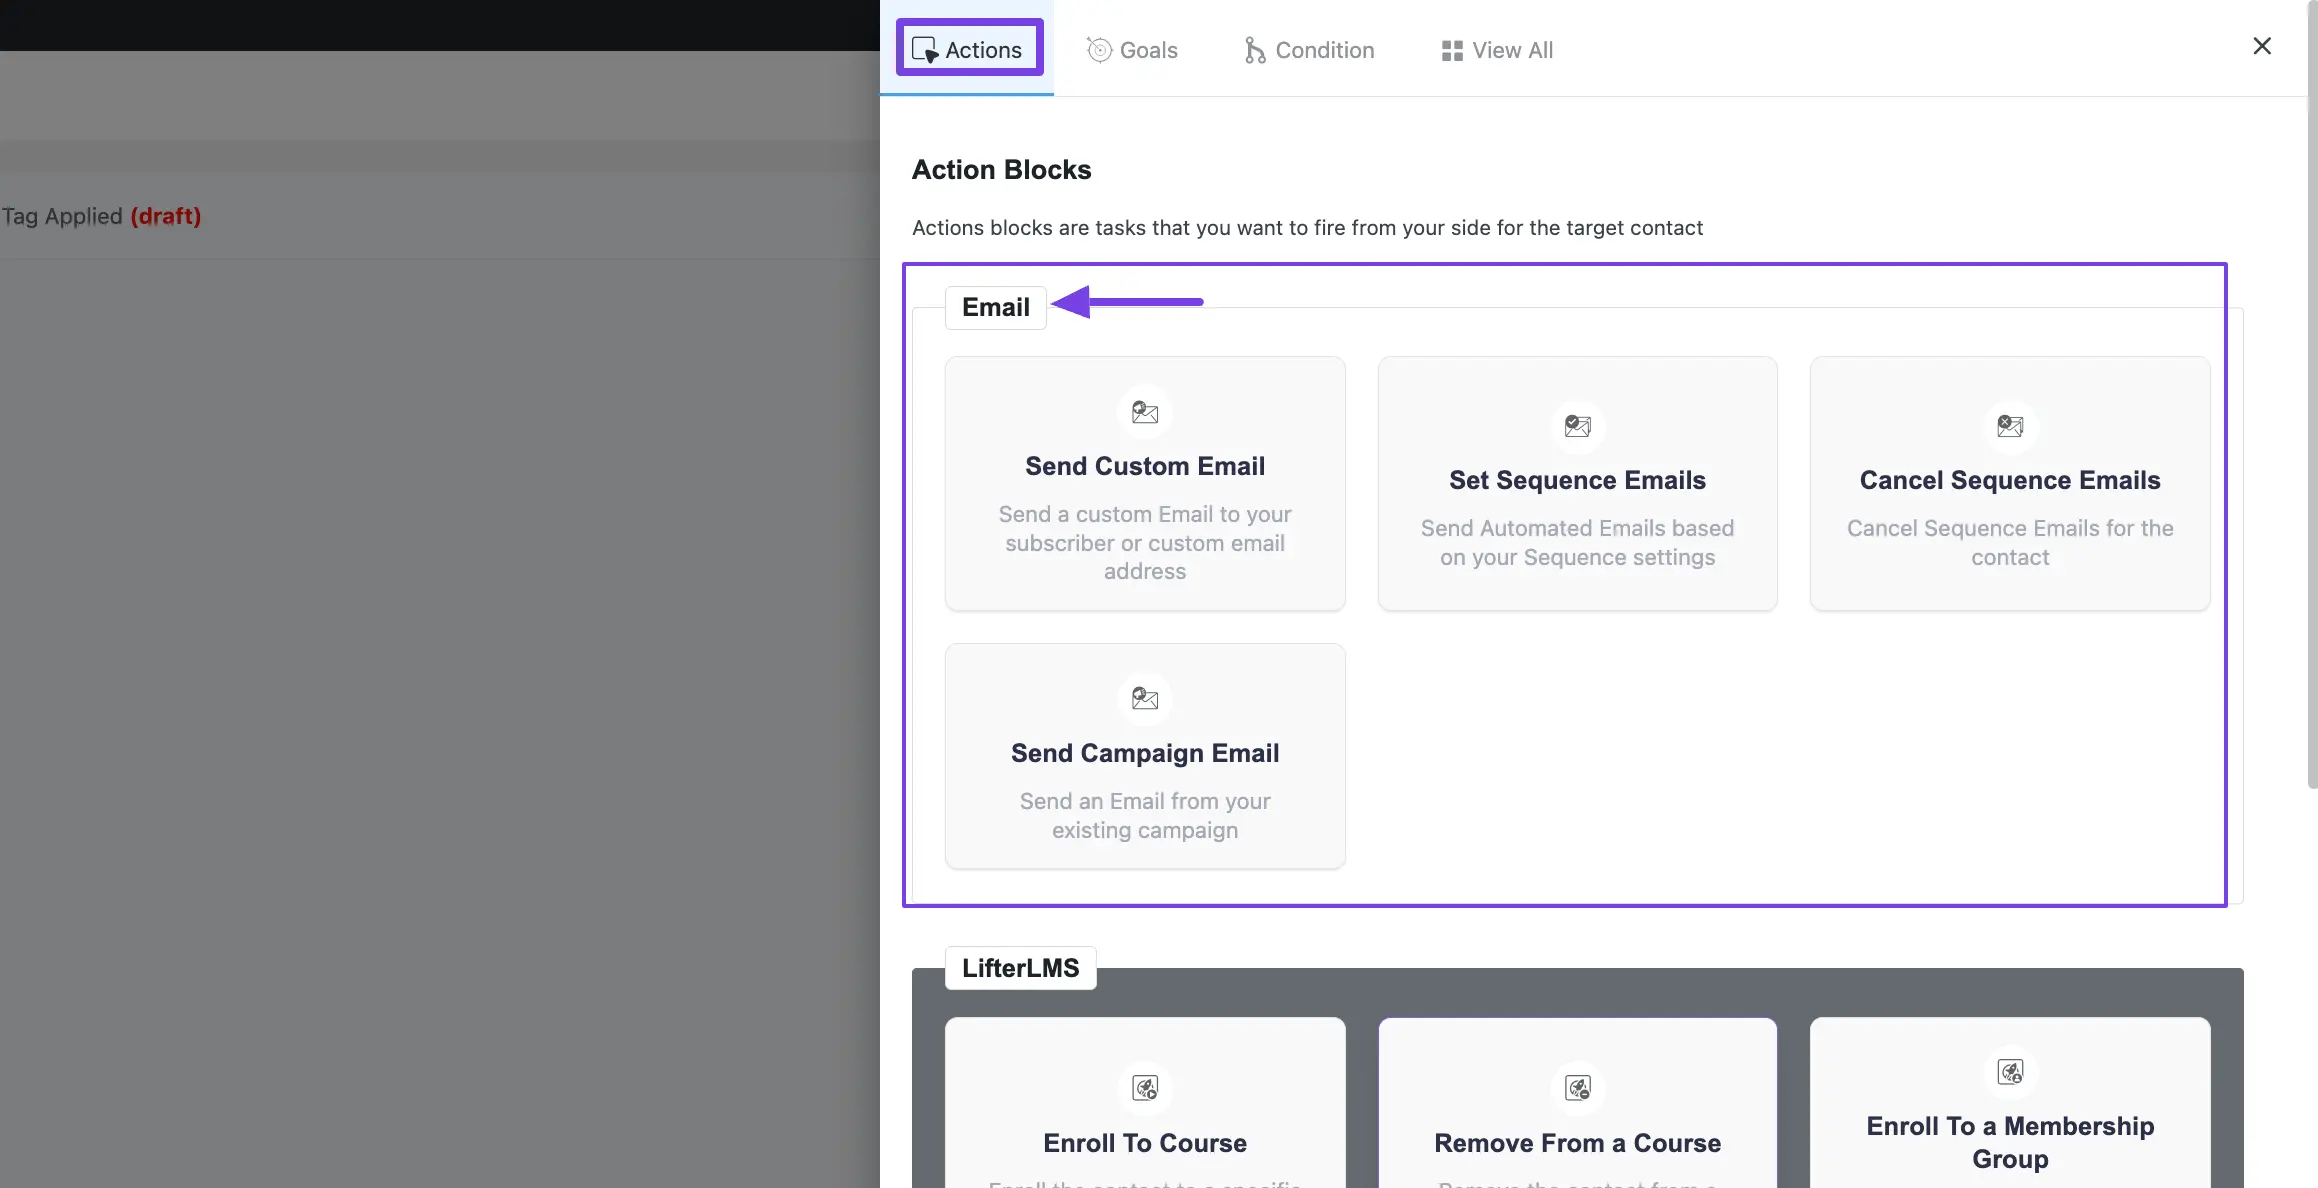
A detailed explanation of the Actions mentioned above is given below –
1. Send Custom Email #
This action lets you send a Custom Email to your Subscriber/Custom Email Address for the contacts within the automation funnel. After selecting this Action, a tab will appear on the right-hand side with options to set up your action.
Once you complete the setup, click the Save Settings button to save all your changes.
You can also Delete the action by clicking the Trash Icon if needed.
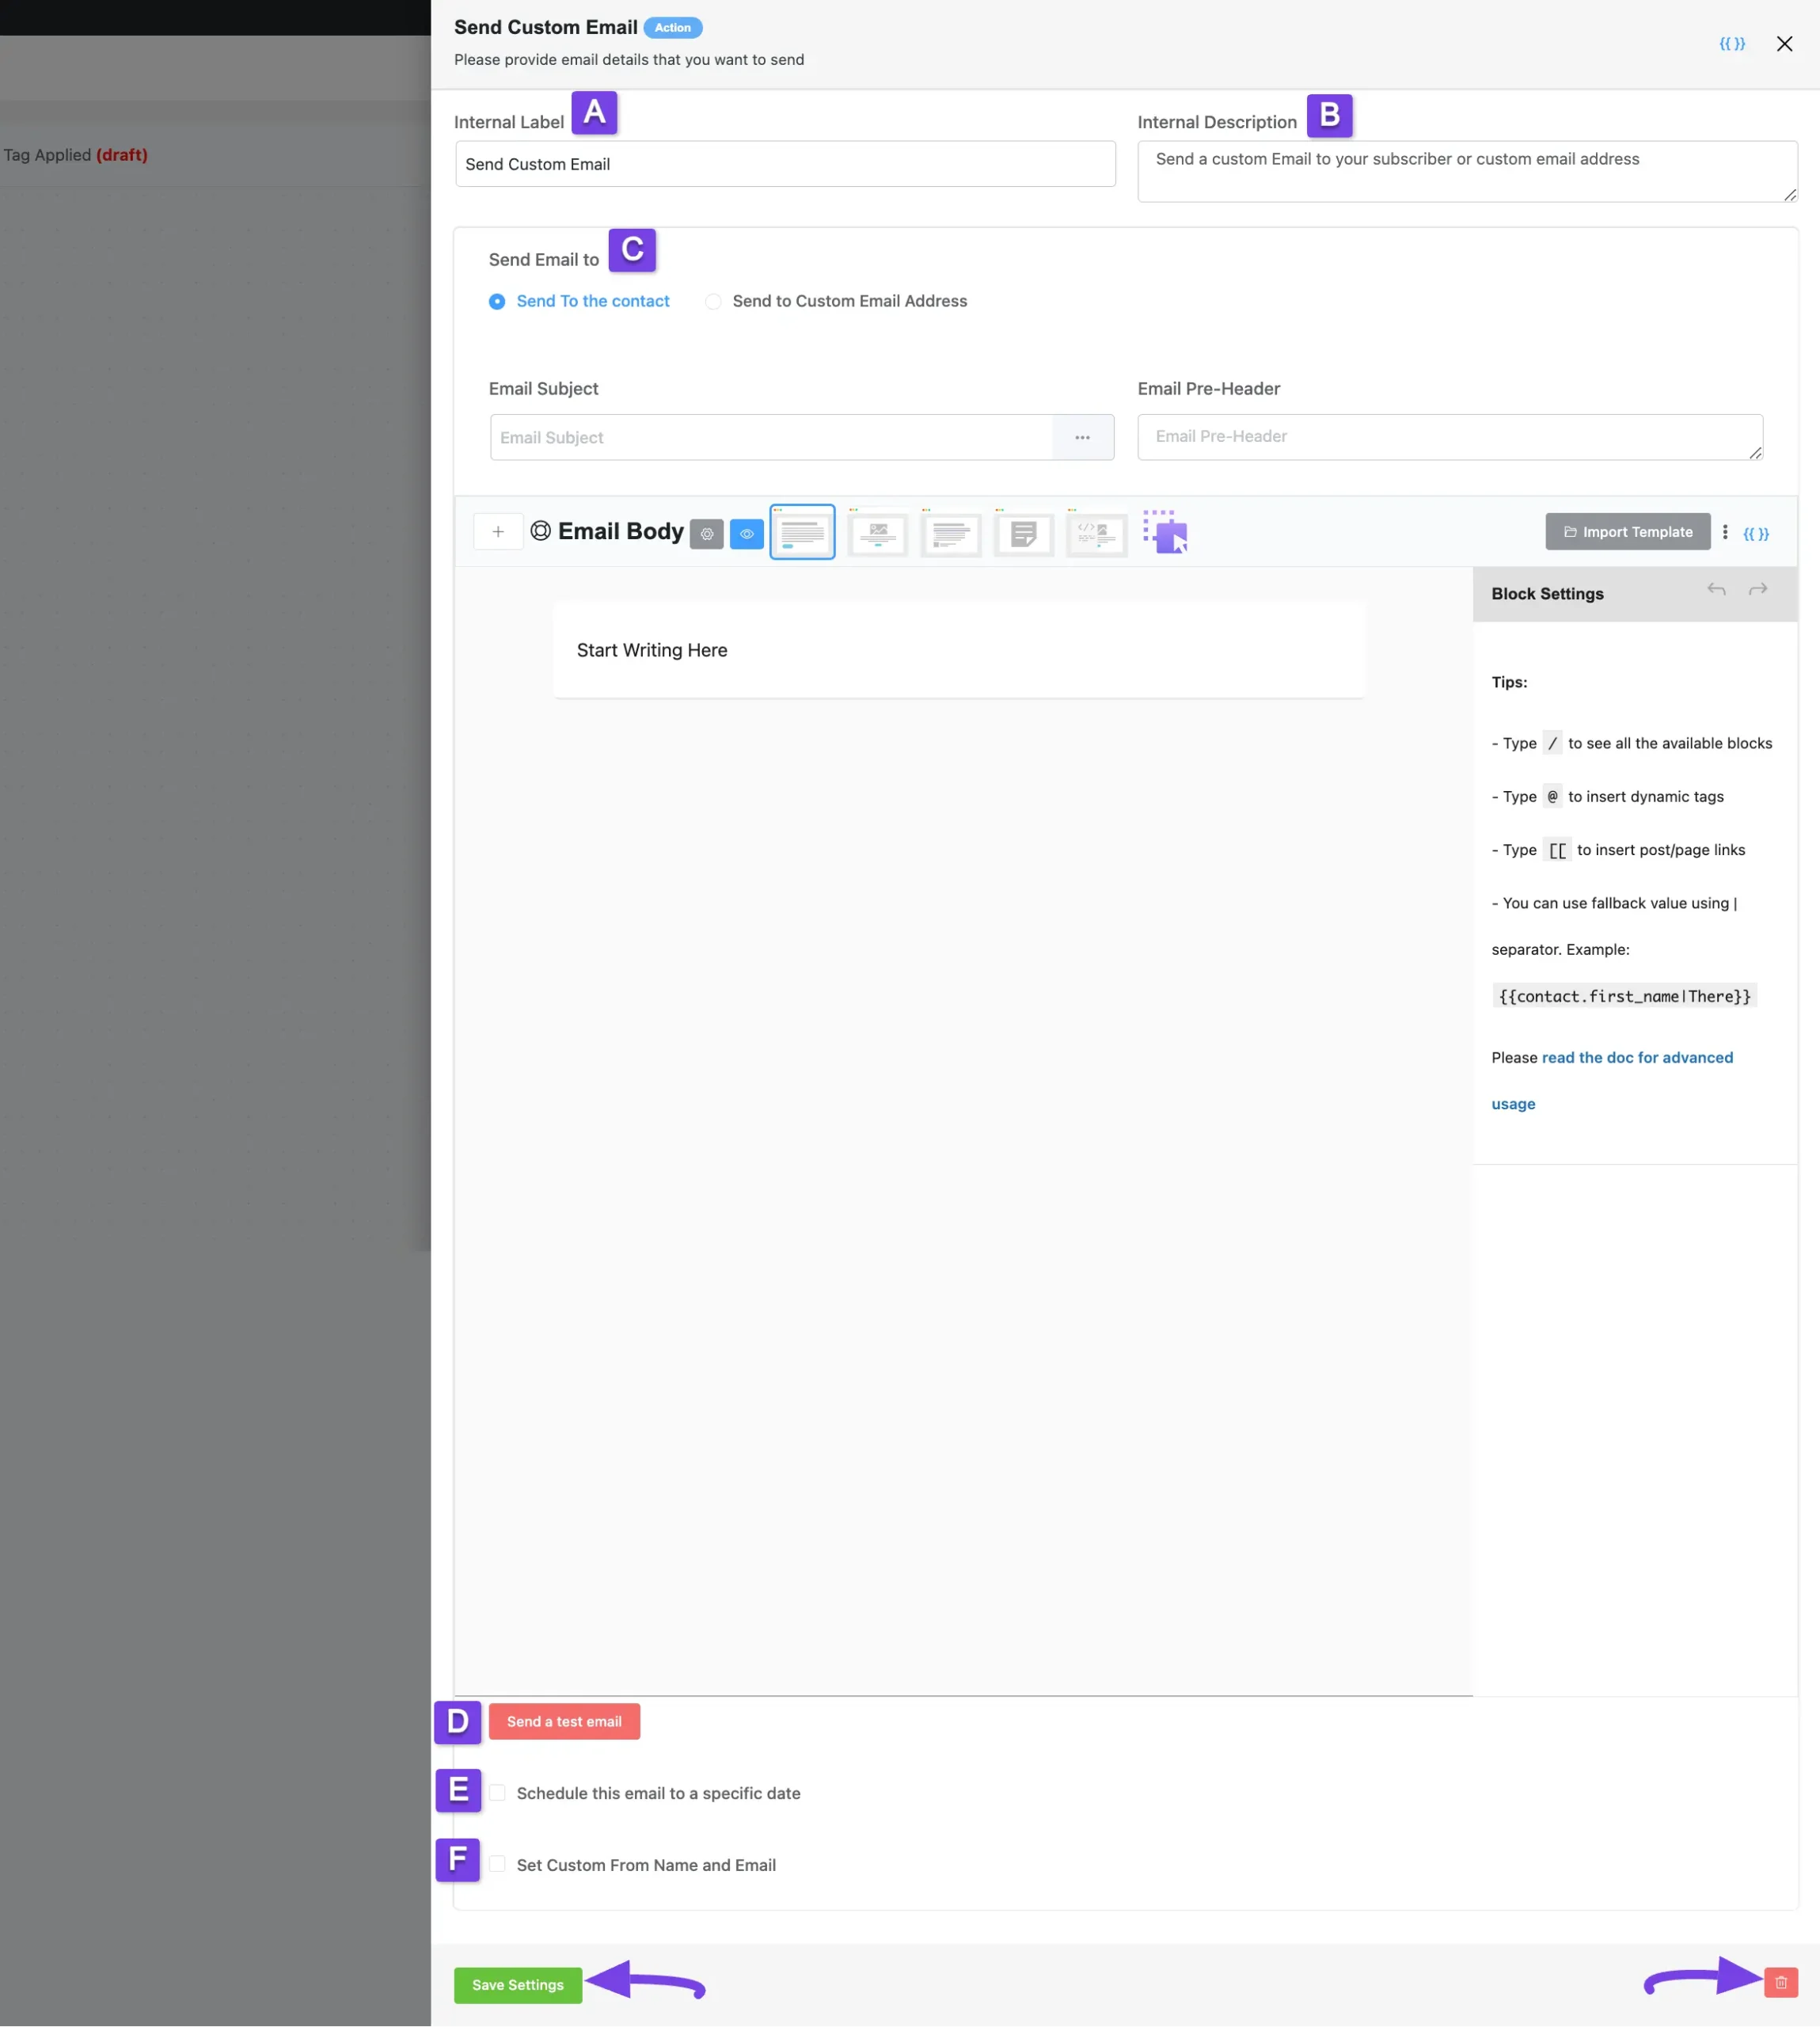
The Settings of the Send Custom Email Action mentioned in the screenshot above is briefly explained below;
A. Internal Label #
Here, a Name for the Action will be automatically added so you can easily find it later. You can change it to suit your needs.
B. Internal Description #
A description of the action will also be automatically added as a Subtitle. You can also change it to suit your needs.
C. Send Email To #
This option lets you customize the email you want to send and also provides Two Recipient options for choosing to whom you want to send the email. These are:
- Send to contact
- Send to Custom Email Address
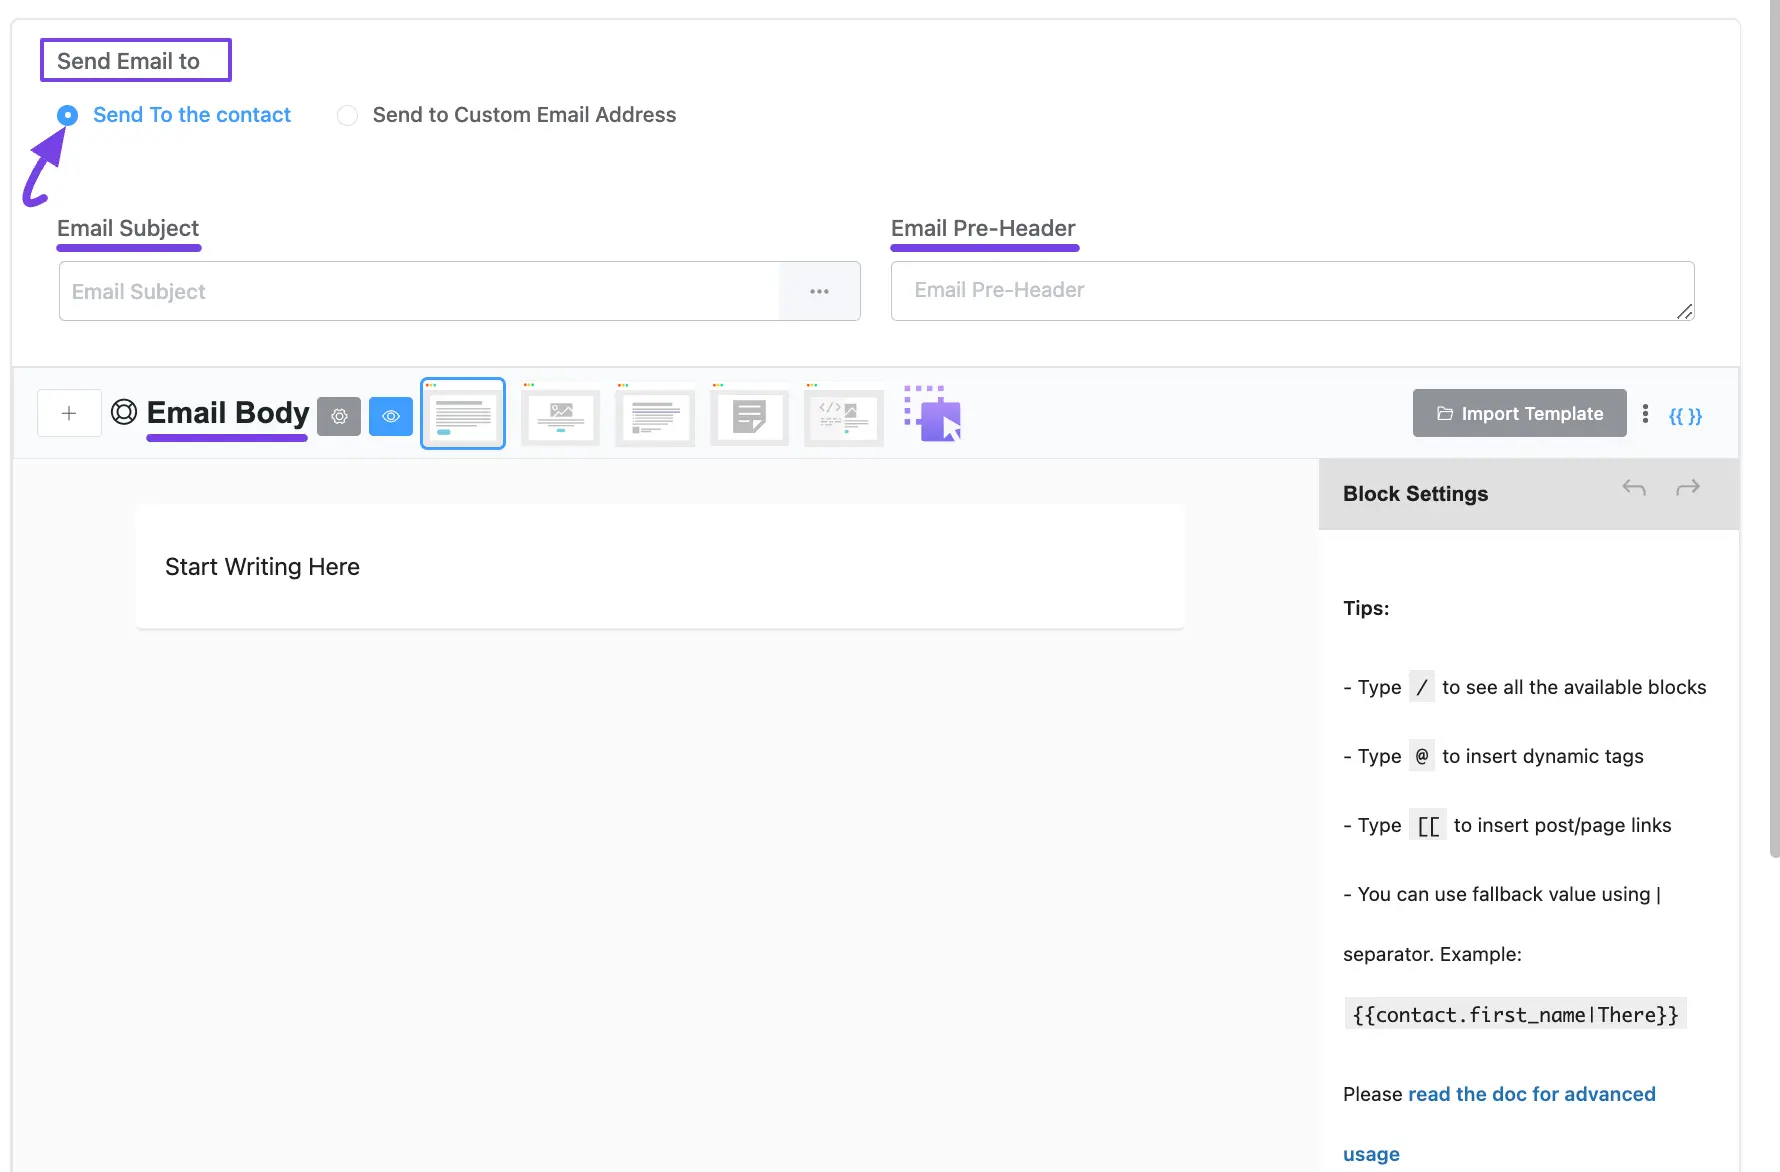
a. Send to Contact #
Select this option to send emails to the CRM Contacts within the Automation.
- Email Subject: The Email Subject is shown as a subject or topic in the recipient’s email clients.
- Email Pre-Header: An Additional short subject is shown as a small subject line beside the primary subject.
- Email Body: Here, you will write the entire email body text. To learn more, read these Compose Email in FluentCRM and Importing Email Templates into FluentCRM documentation.
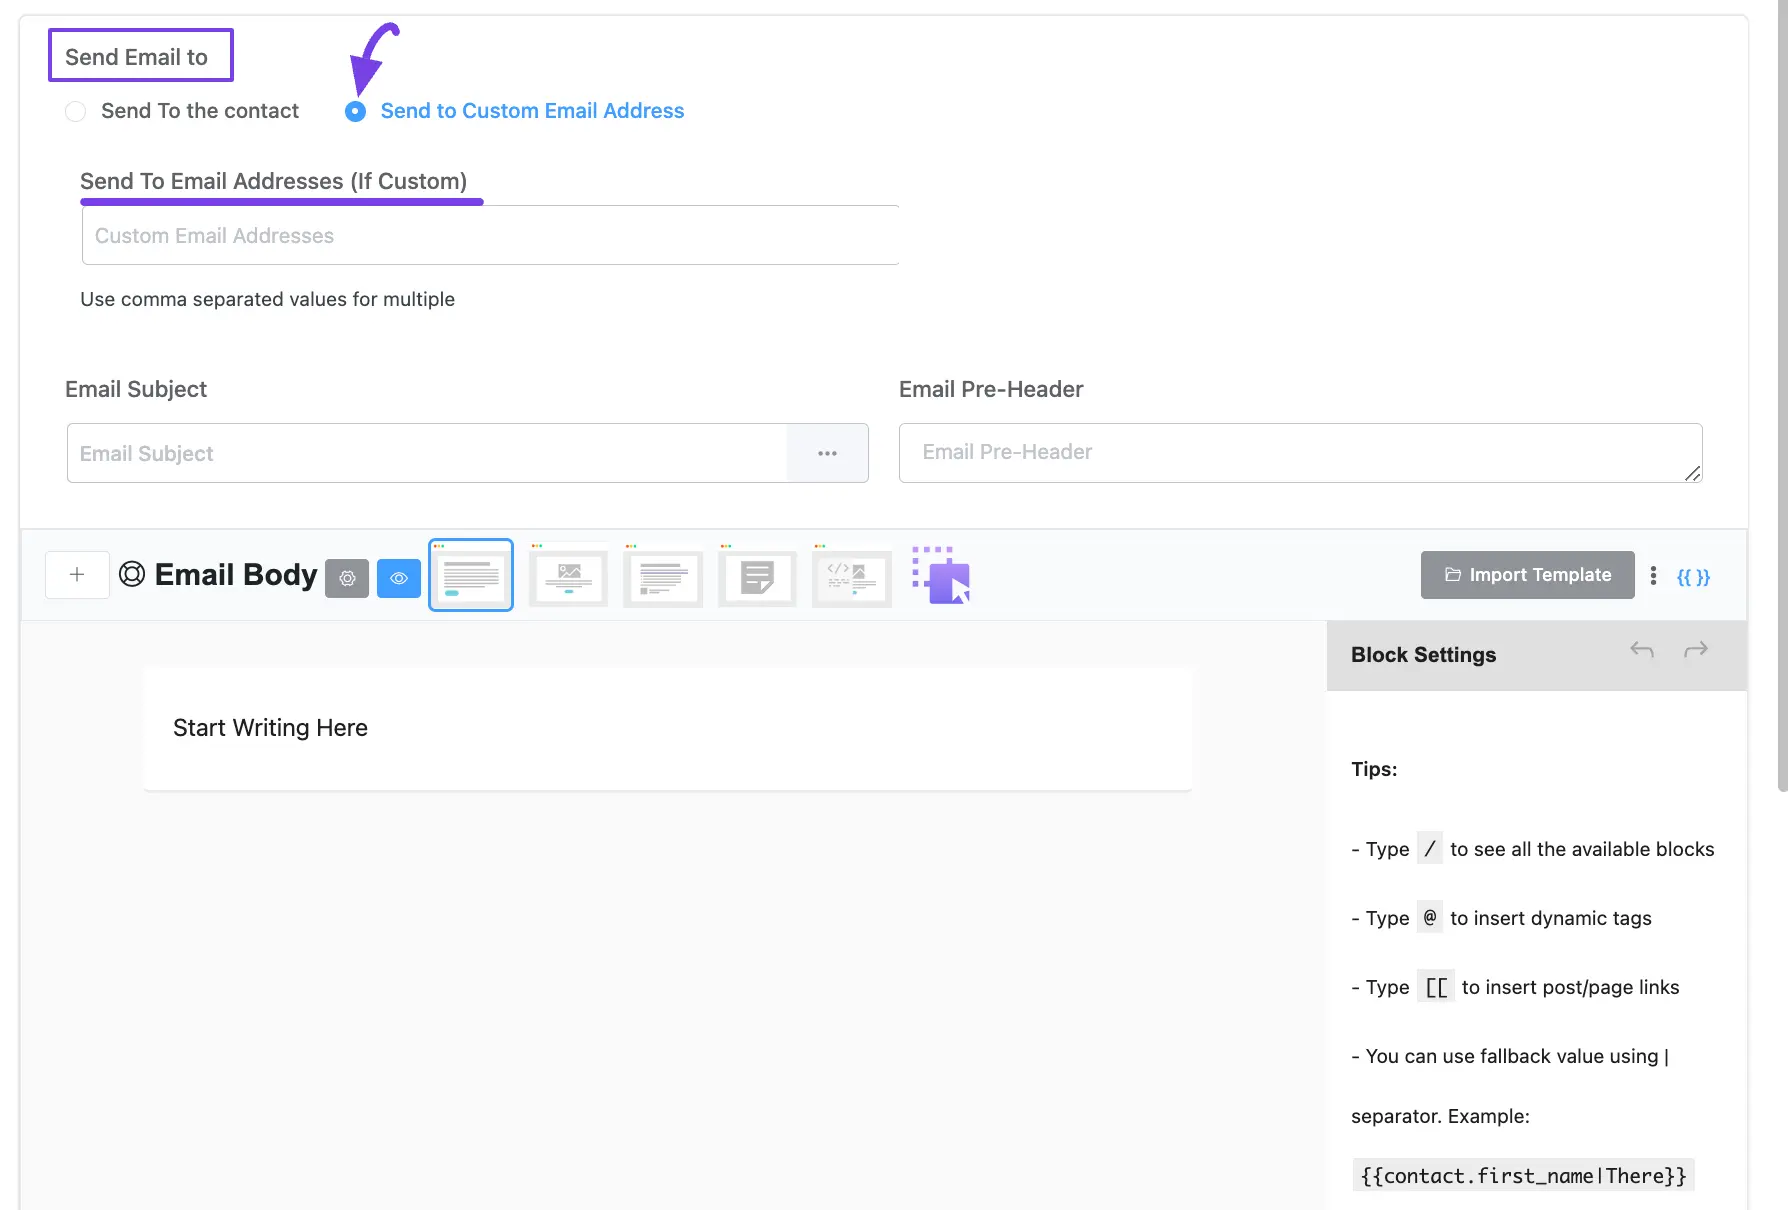
b. Send to Custom Email Address #
Select this option to send emails to any custom email address within the Automation.
- Send To Email Address (If Custom): Here, enter the desired email address where you want to send this Email.
To learn the use of the other setting options mentioned in the screenshot below, read this Section.
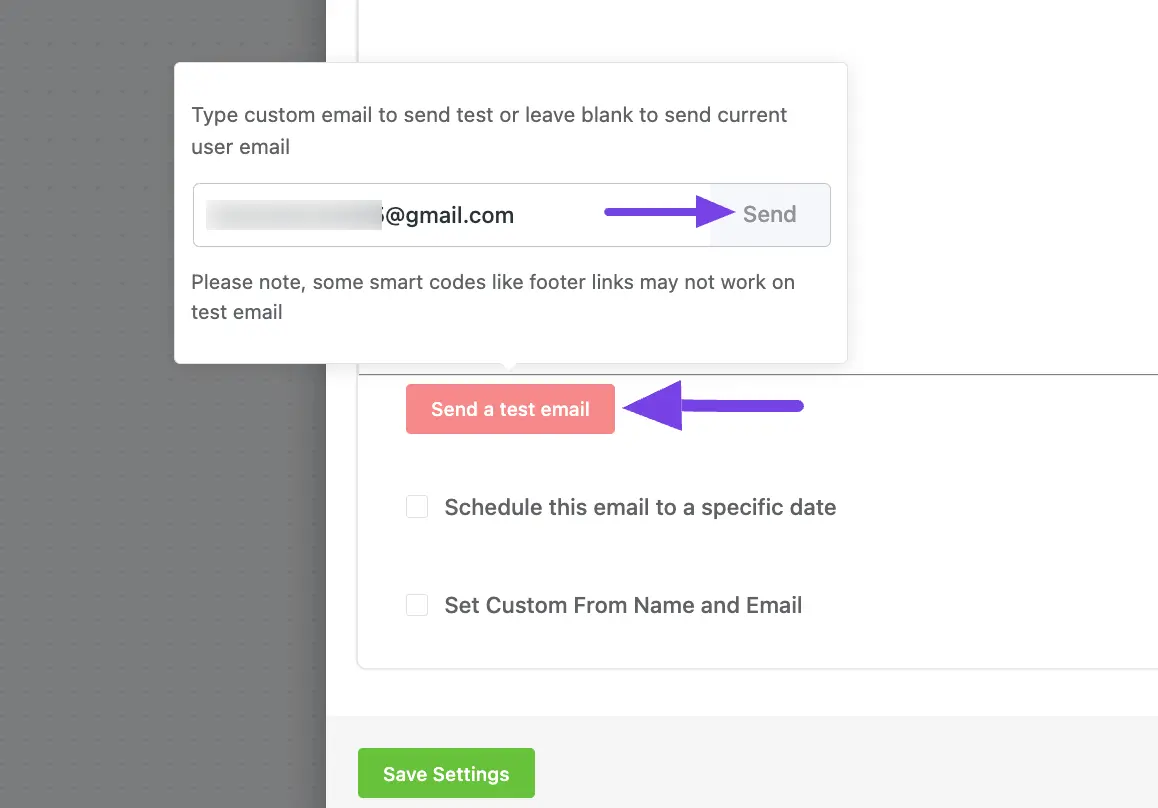
D. Send a Test Email #
We always recommend using this option to test your email before sending it to real recipients to ensure it functions properly.
To send a test email, click the Send a test email, input the email address where you want to receive the test email and click on the Send button.
Once the email is sent successfully you will see a Success Message in the below right corner.
E. Schedule this email to a specific Date #
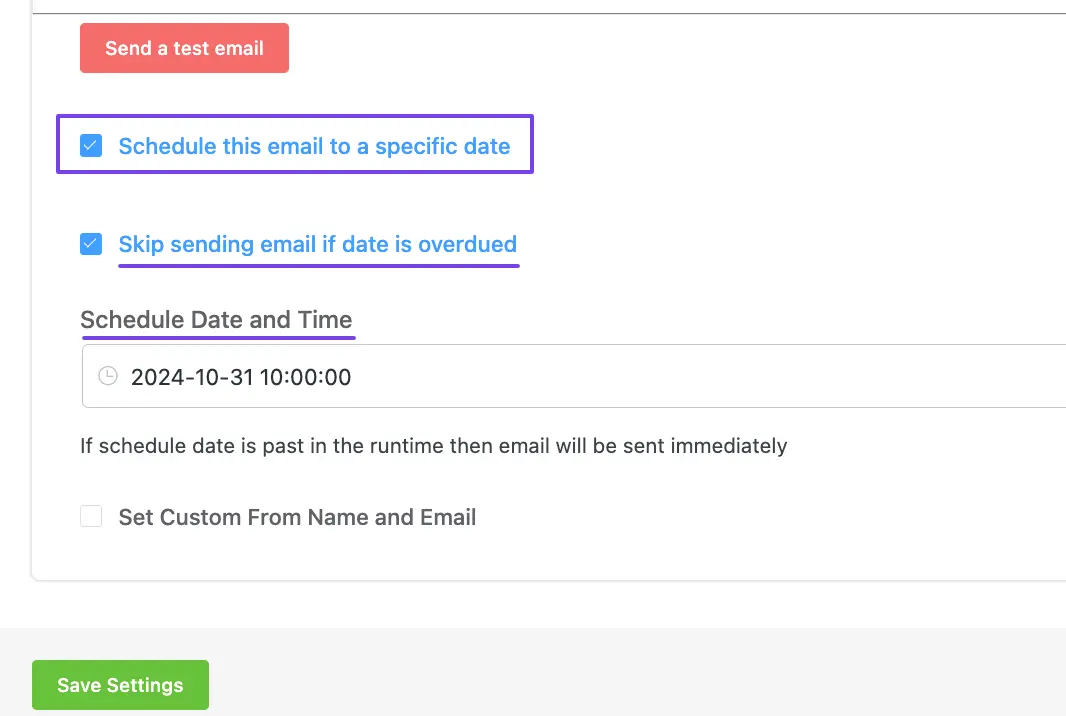
Checking this option lets you set a specific Date and Time to send your email using the Schedule Date and Time field.
Also, check this “Skip sending email if date is overdued” option if you don’t want to send the email after the scheduled date has passed.
F. Send Custom From Name and Email #
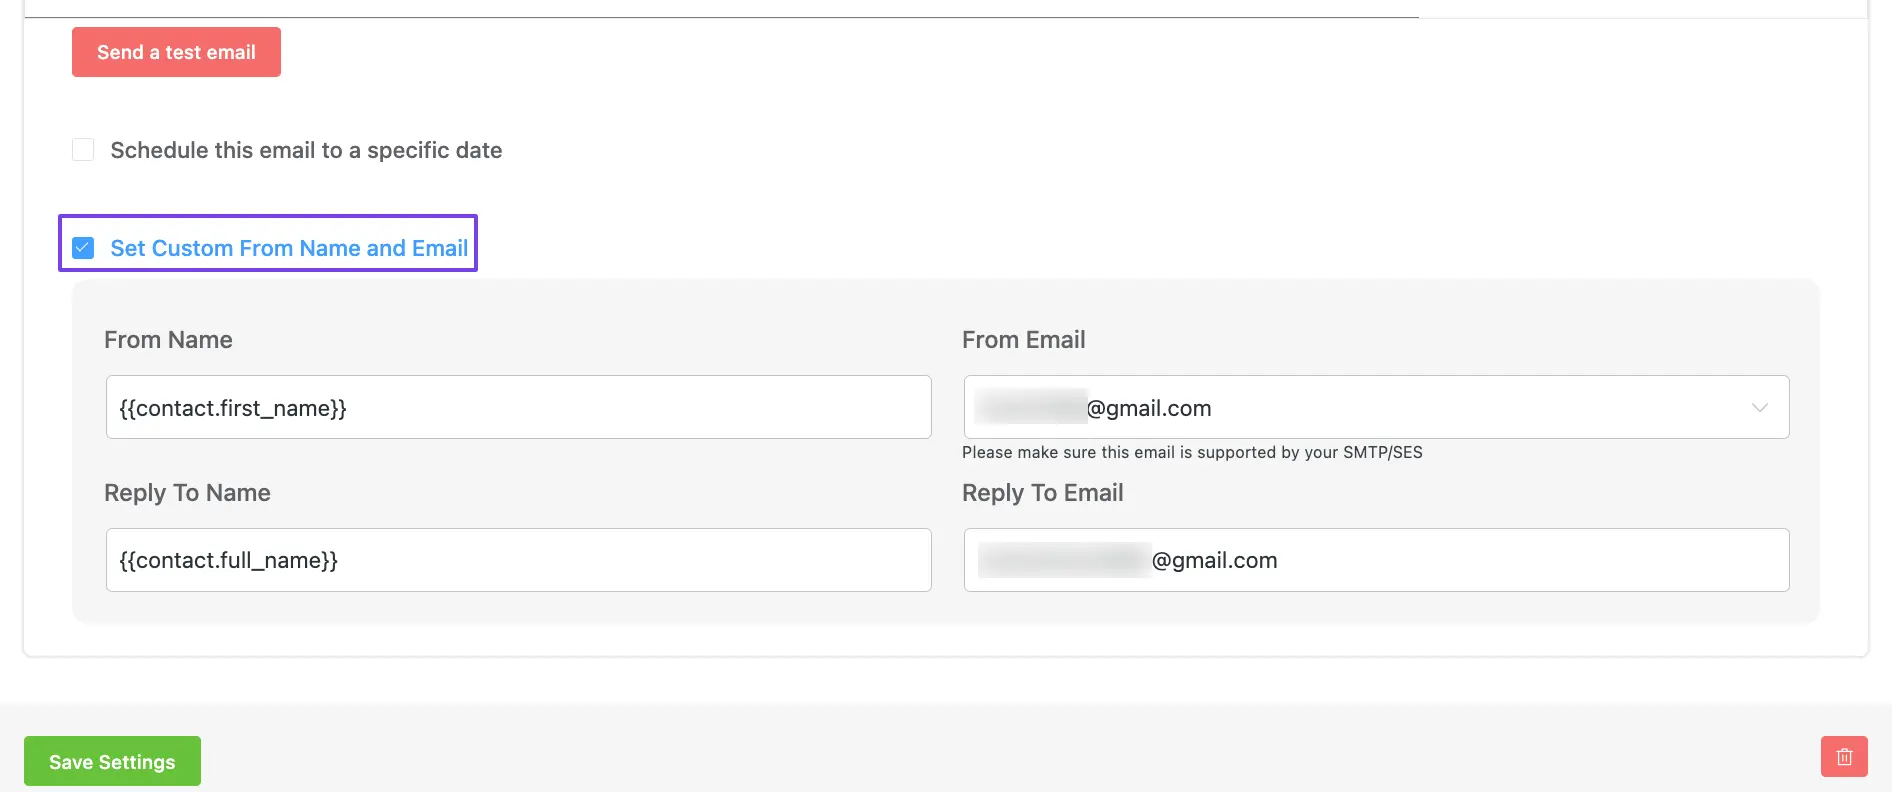
Checking this option lets you customize your form name and email.
- From Name & Email: Here, you can specify the sender name and email in the From Name and From Email fields respectively. Plus, you can add different dynamic data in the From Name by inserting SmartCodes to make the email more personalized.
- Reply To Name & Email: With this option, you can specify the receiver name and email for users to reply to the notification, ensuring you receive their responses. Also here, you can use the SmartCodes in the Reply To Name field. If you leave this field blank, the user reply will be sent to the Default Email you set for your site.
2. Set Sequence Emails #
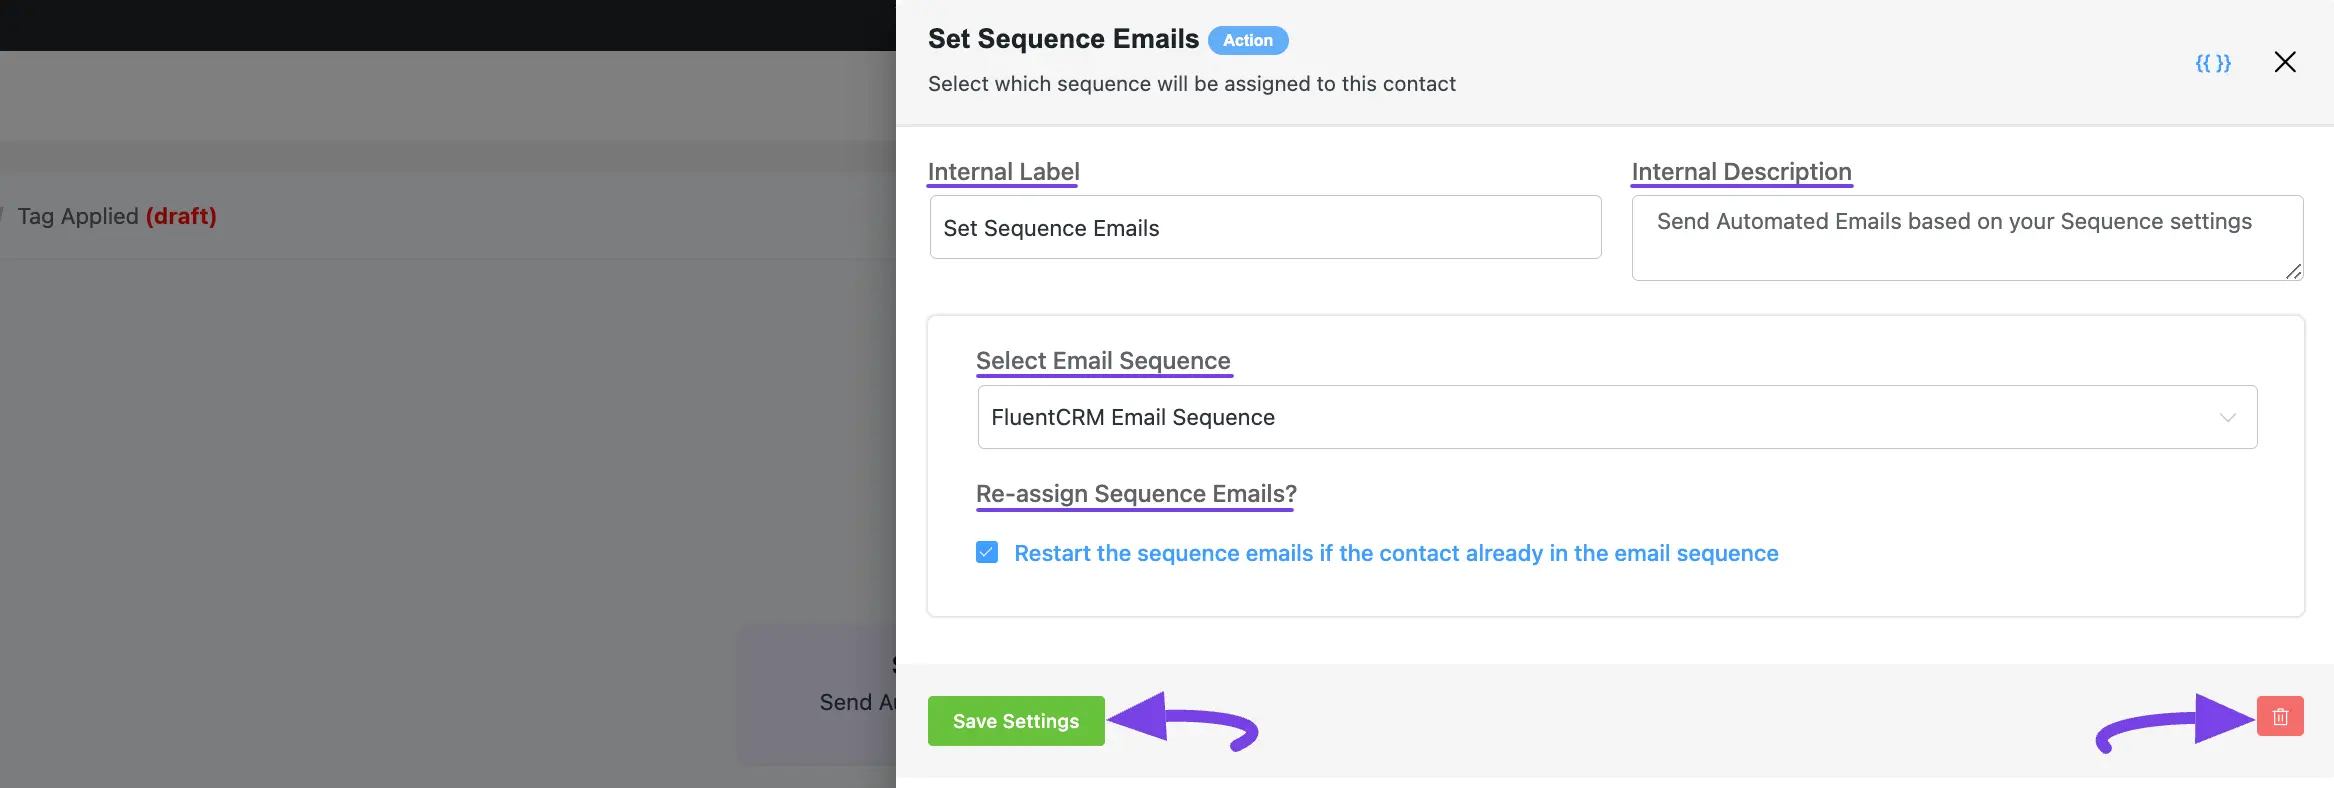
This action lets you select in which sequence the contact will be added within the automation.
After selecting this Action, a tab will appear on the right-hand side with options to set up your action.
Settings of the Set Sequence Emails action: #
- Interval Label: Here, a Name for the Action will be automatically added so you can easily find it later. You can change it to suit your needs.
- Internal Description: A description of the action will also be automatically added as a Subtitle. You can also change it to suit your needs.
- Select Email Sequence: Select an Email Sequence from the dropdown list using the Dropdown Arrow. If you do not have any existing Email Sequence in your FluentCRM, read this Documentation to create one.
- Re-assign Sequence Emails?: Check this option if you want to restart the sequence emails for already existing contacts in the email sequence.
Once you are done, click the Save Settings button to save all your changes.
You can also Delete the action by clicking the Trash Icon if needed.
3. Cancel Sequences Emails #
This action lets you select from which sequences the contact will be removed within the automation.
After selecting this Action, a tab will appear on the right-hand side with options to set up your action.
Here are the Settings of the Cancel Sequences Emails action:
- Select Email Sequence: Select an Email Sequence from the dropdown list using the Dropdown Arrow. If you do not have any existing Email Sequence in your FluentCRM, read this Documentation to create one.
To learn the use of the First Two setting options mentioned in the screenshot below, read this Section.
Once you are done, click the Save Settings button to save all your changes.
You can also Delete the action by clicking the Trash Icon if needed.

4. Send Campaign Email #
This action lets you select for which email campaign will be scheduled to this contact within the automation.
After selecting this Action, a tab will appear on the right-hand side with options to set up your action.
Here are the Settings of the Send Campaign Email action:
- Select Campaign: Select a Campaign from the dropdown list using the Dropdown Arrow. If you do not have any existing Email Campaign in your FluentCRM, read this Documentation to create one.
To learn the use of the First Two setting options mentioned in the screenshot below, read this Section.
Once you are done, click the Save Settings button to save all your changes.
You can also Delete the action by clicking the Trash Icon if needed.

If you have any further questions, concerns, or suggestions, please do not hesitate to contact our @support team. Thank you.


Hello can you send a campaign to a list of contacts through an automation?
Example, we created a form that creates an event on a specific date. The form then activates a campaign email to be sent to selected people in a list.
Can you also create campaigns from forms? Example, the form mentioned above is filled out and then fills up empty fields/content blocks in the campaign.
Hi James, in that case, you can create automation with the form submission trigger and then use shortcodes to fill out the email body. If you can’t figure it out on your own, feel free to reach out to our support team.