
Once your list and forms are set, you are ready to go for creating an email campaign. You can run email campaigns to send your marketing messages to the subscribers who opted for your marketing messages. In FluentCRM, an email campaign is a bulk email marketing campaign that is sent to many contacts at once instantly or in a scheduled time defined by you. This is as easy as adding a template, adding the content, designing the template, selecting your audience group, and then sending it off to your subscribers.
Things to do before you start an email campaign with FluentCRM
- Firstly make sure you have subscribers in your contact lists. If you don’t have subscribers in your contact lists, Import Contacts into FluentCRM or follow the Opt-in Forms (Fluent Forms) Basic Configuration to capture leads from a Signup form.
- Be sure to FluentCRM Global Settings before you start sending your first email campaign.
Create a New Campaign #
From Emails ➜ All Campaigns, you can create an email campaign by clicking on the + Create New Campaign button.
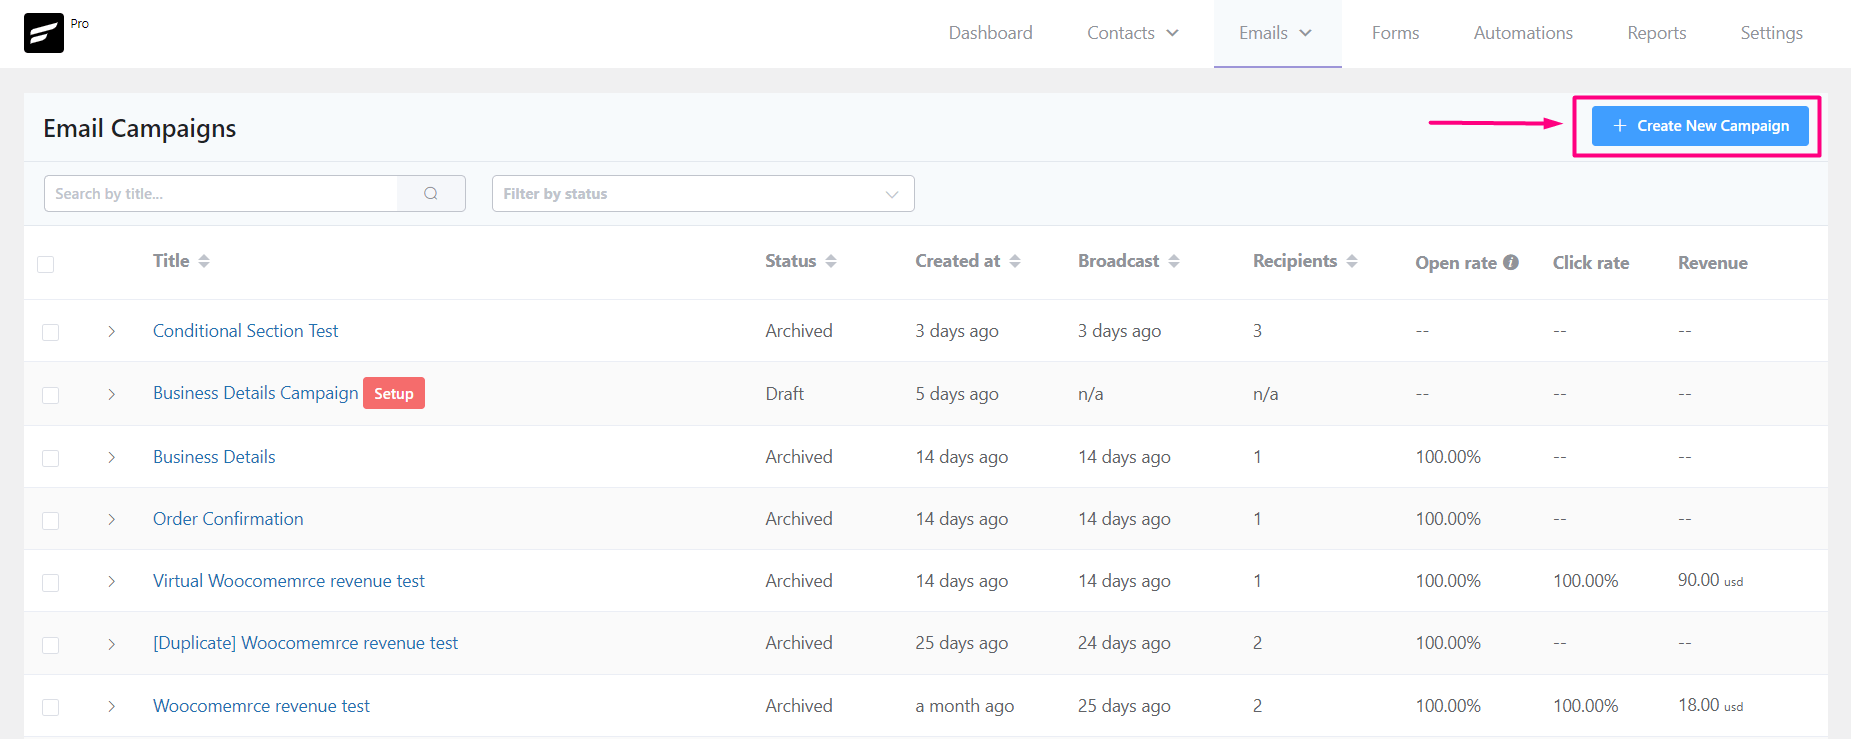
After clicking on the button a modal window will appear asking for the Email Campaign Name. Please provide a relevant Email Campaign Name and click on the Create Campaign button.

Compose Email #
Then you will be redirected to the Email Composing page of the Campaign. Please check our Compose Email in FluentCRM to know a detailed guide about composing Emails in FluentCRM.
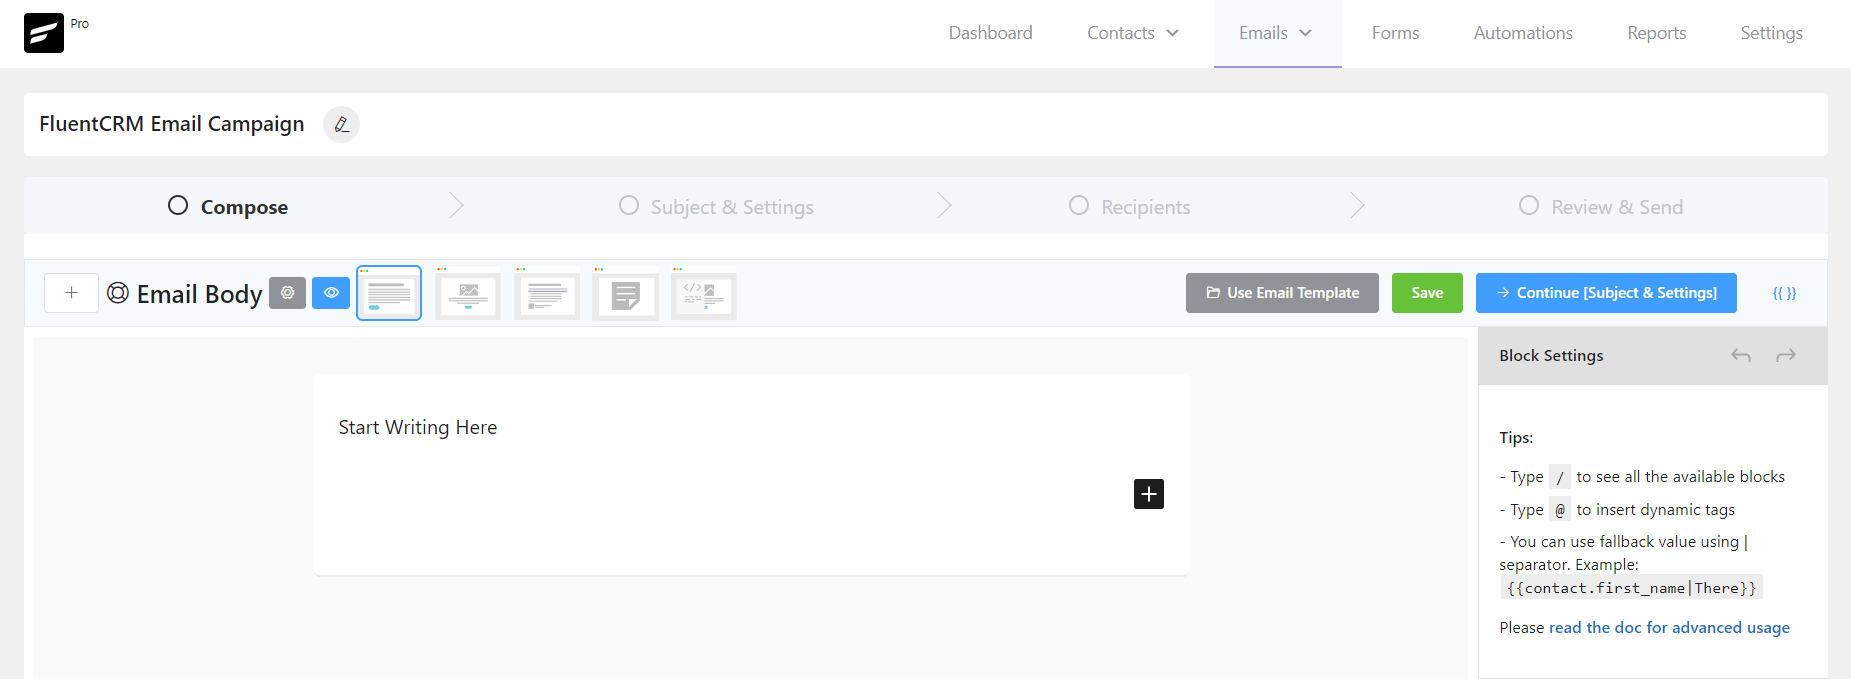
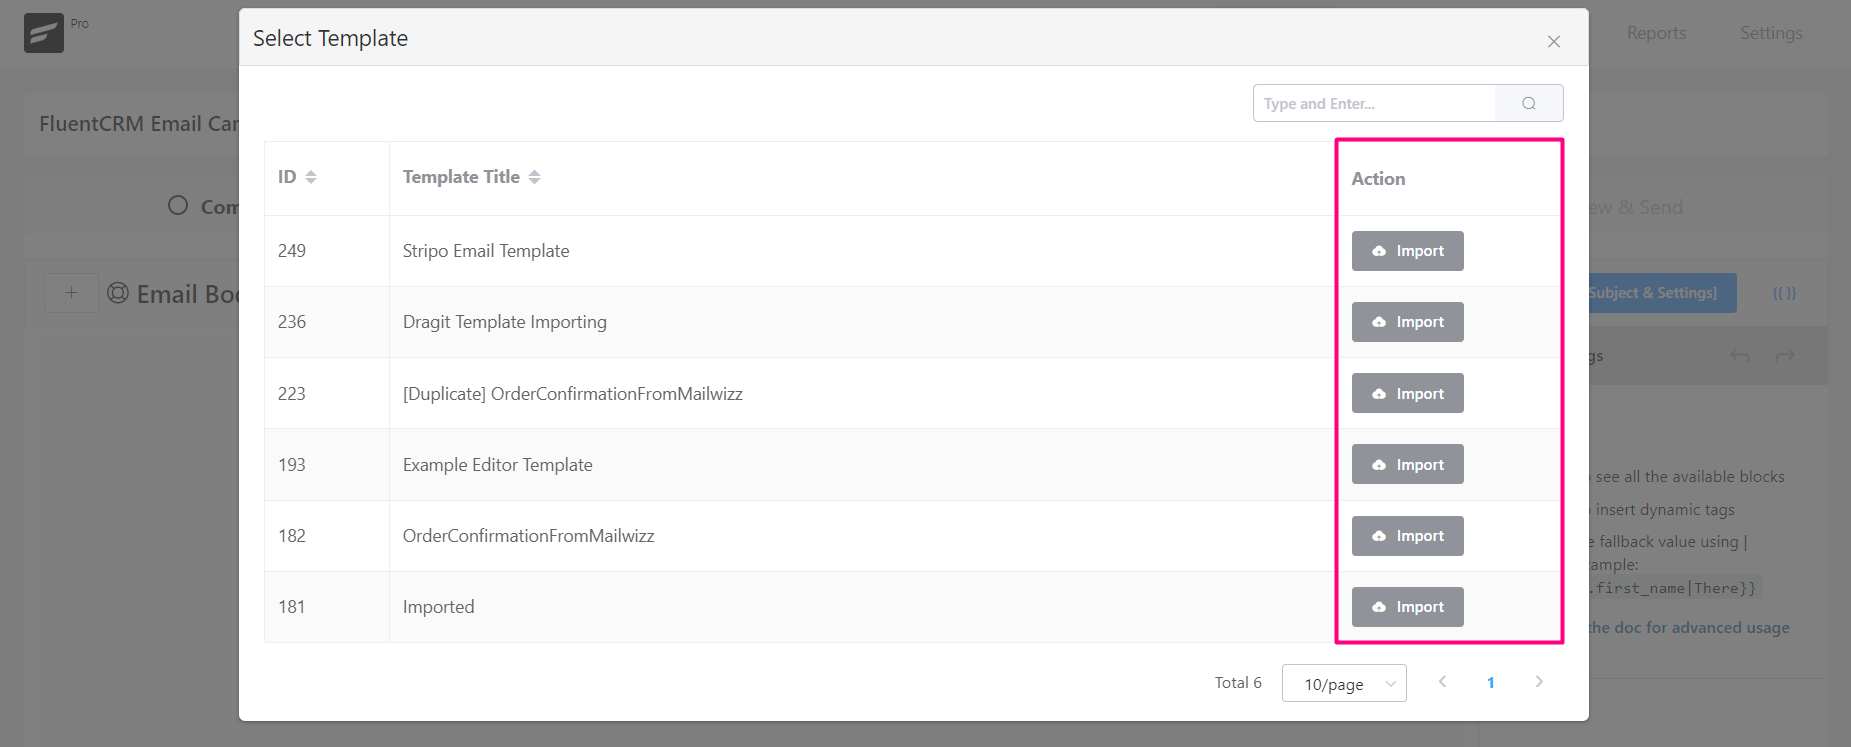
Import Existing Email Template #
You can also use a premade or predesigned Email Template to use in the Email Campaign by Clicking on the Use Email Template button. To know more details about Email Templates please visit Email Templates in FluentCRM.
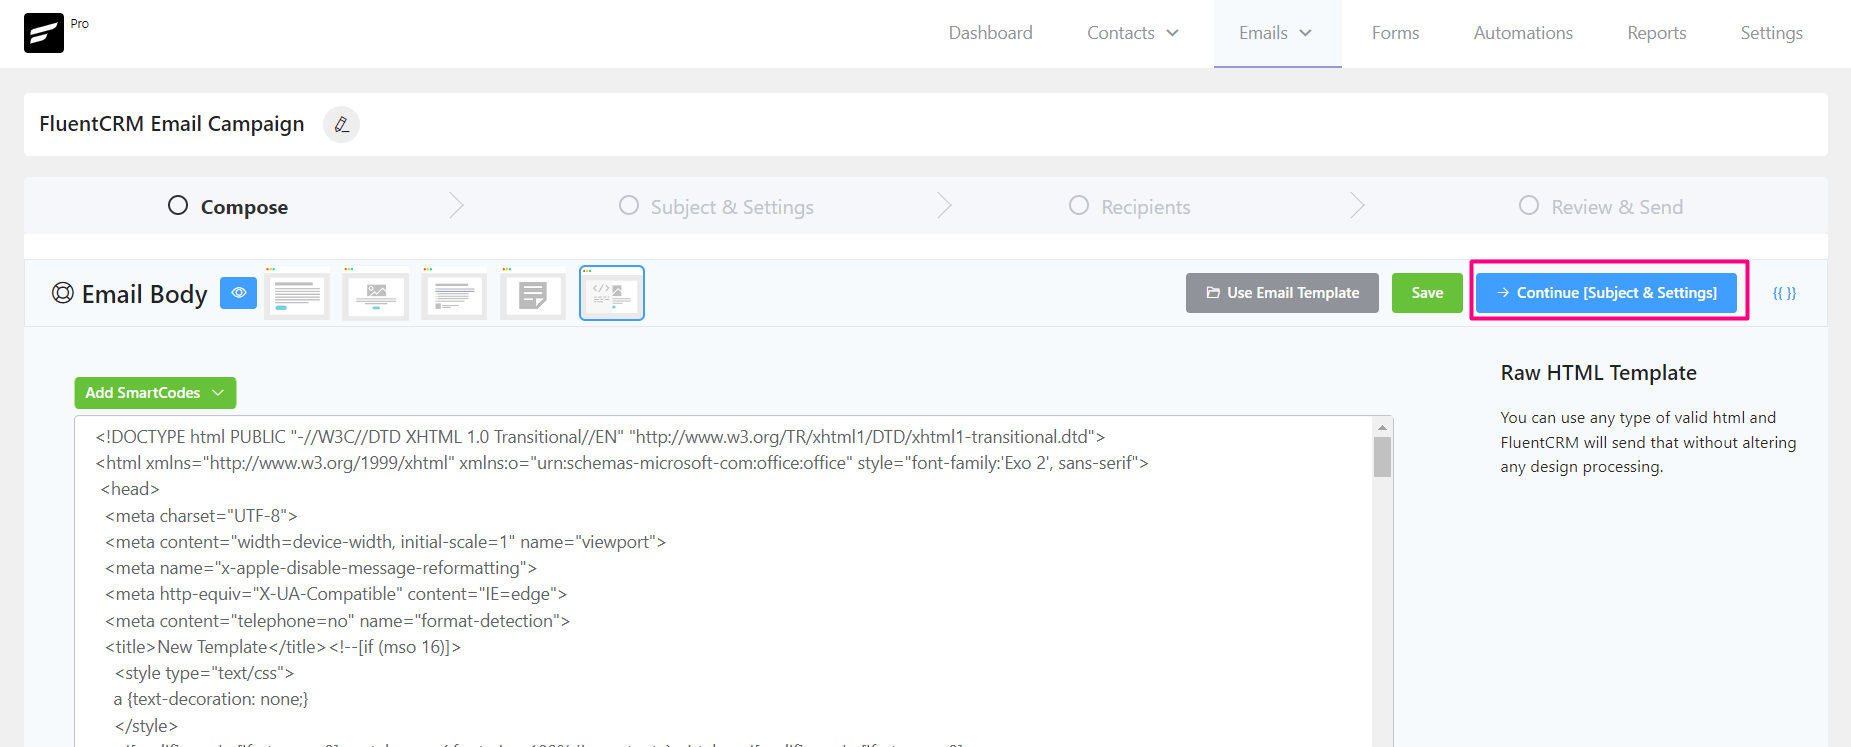
Once you are done manually composing the new Email Content or Importing an existing Email Template Click on the ➜ Continue [Subject & Settings] button to go to the next step.
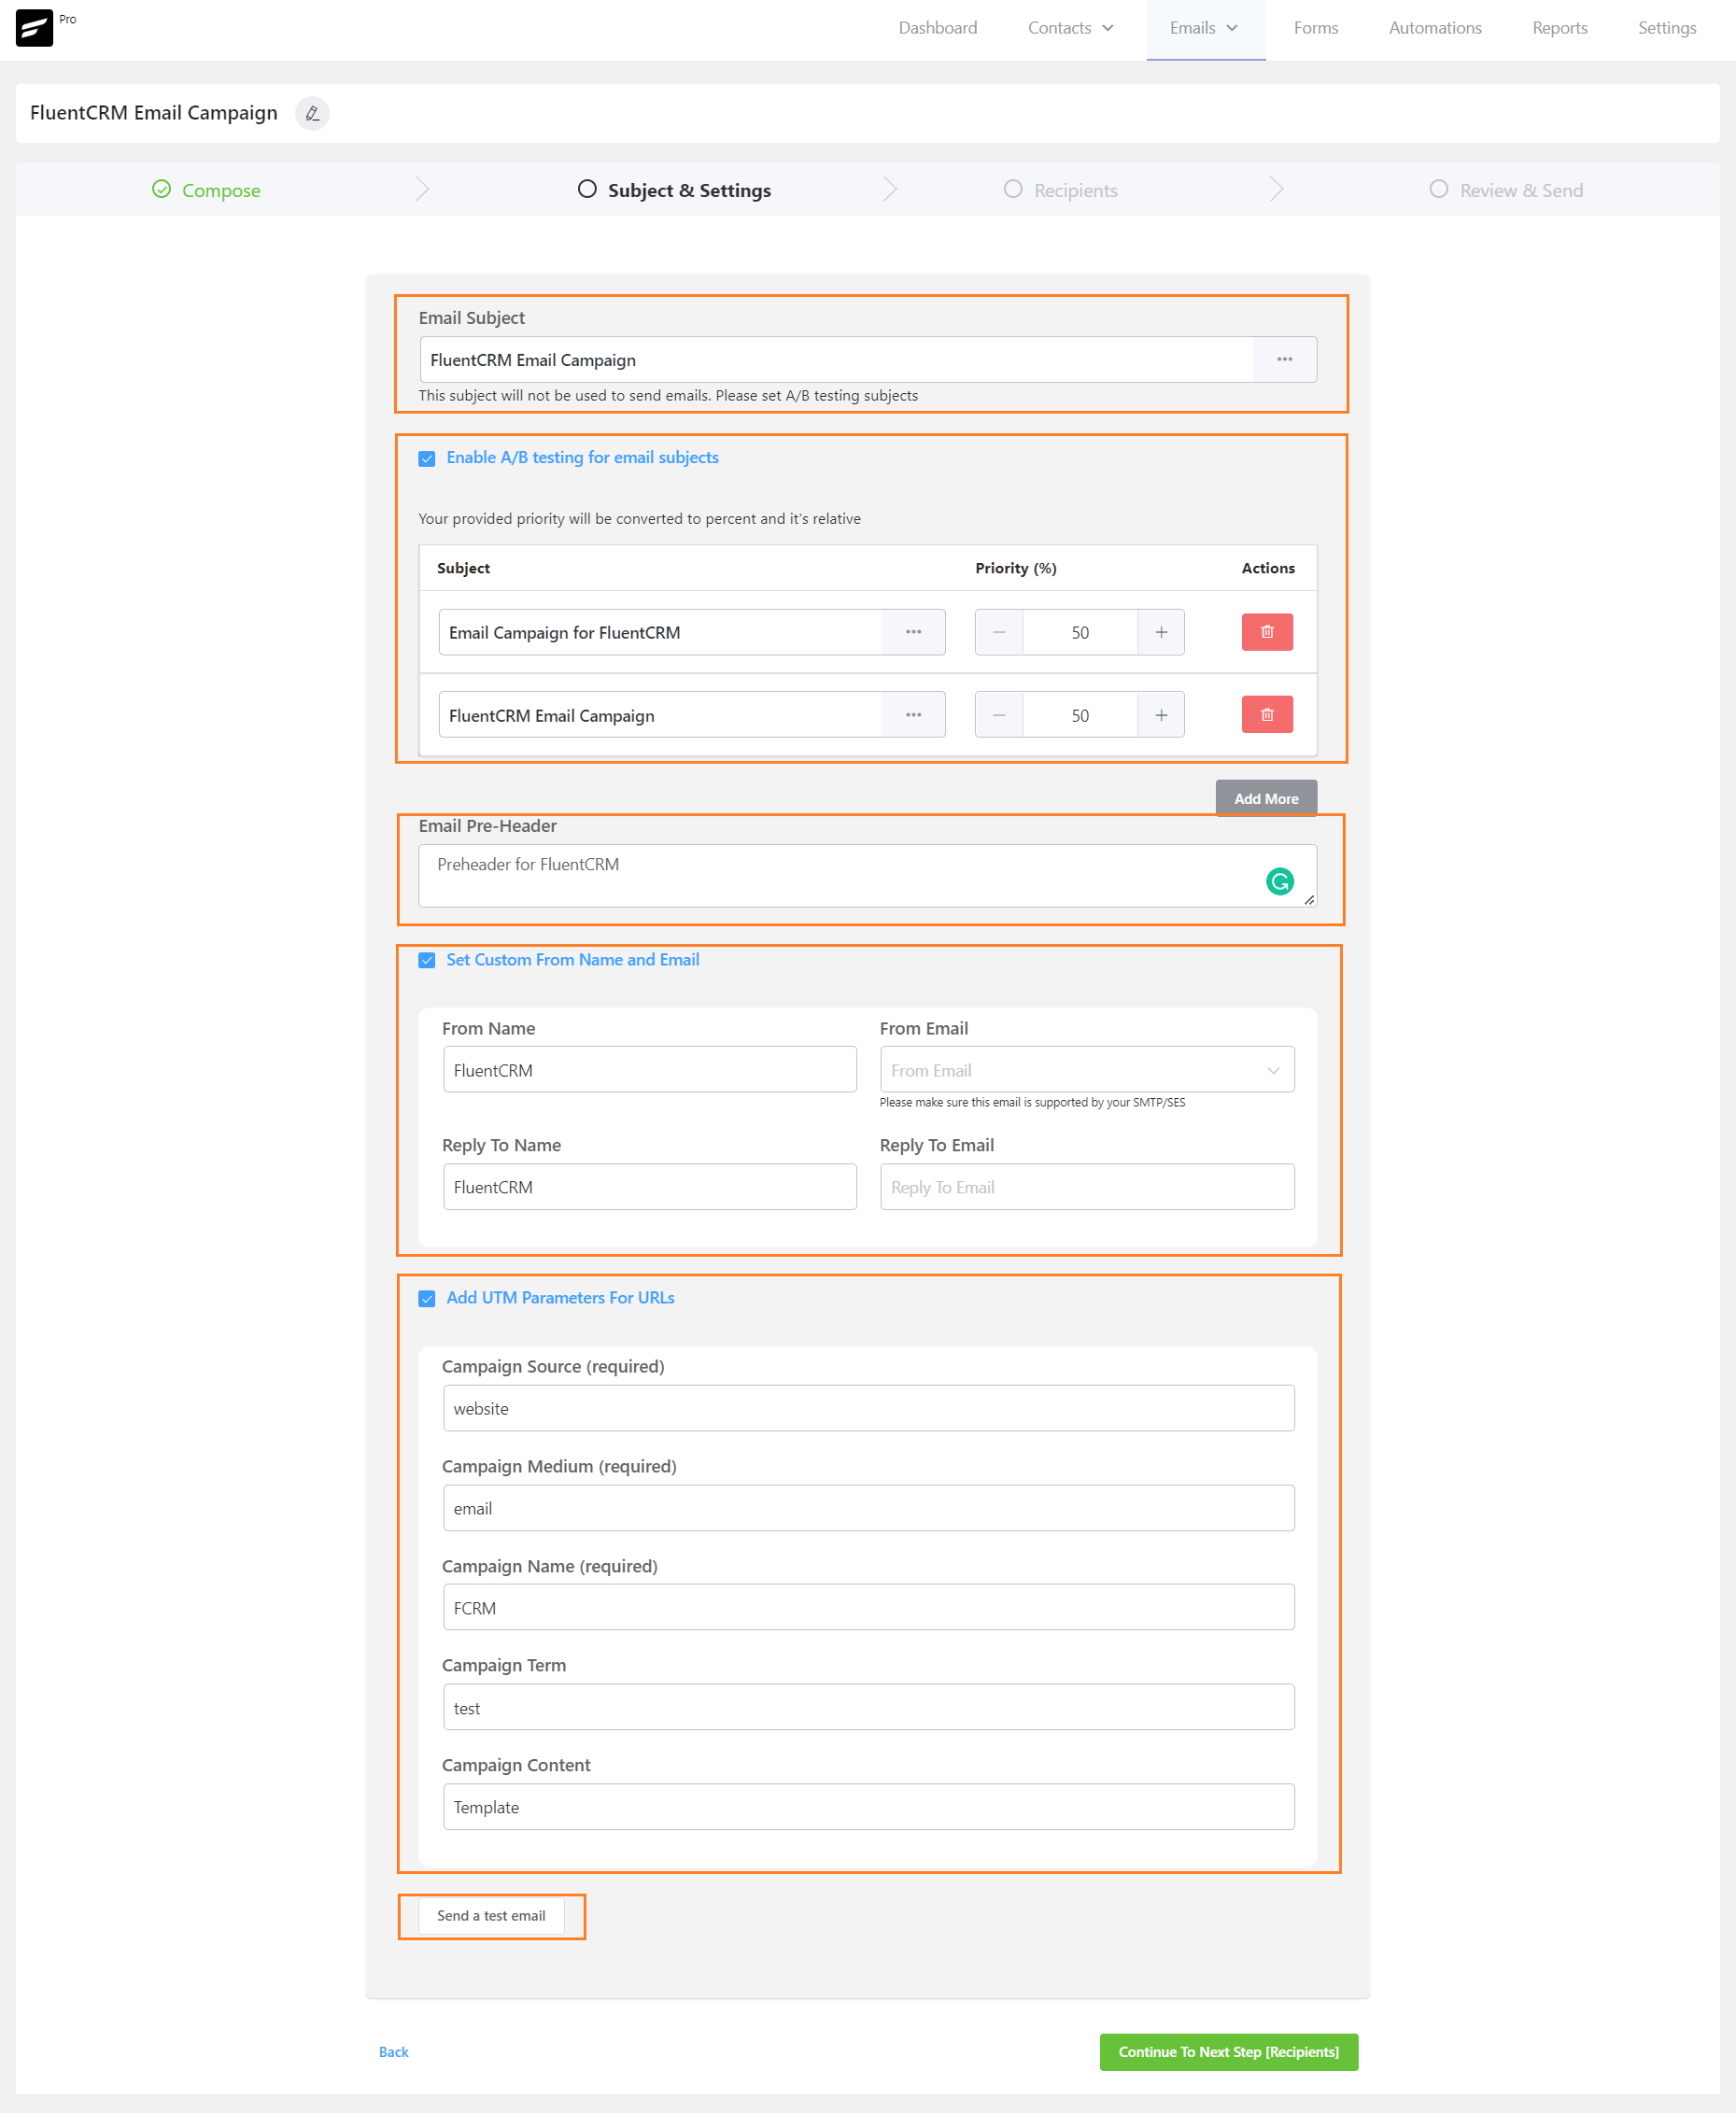
Subject & Settings #
In this section, you will work on the various components of your Email Subject & Other Settings. This step defines the Email Campaign settings that are mostly technical and very important parts of Email Marketing.
Primary Subject & A/B Subjects #
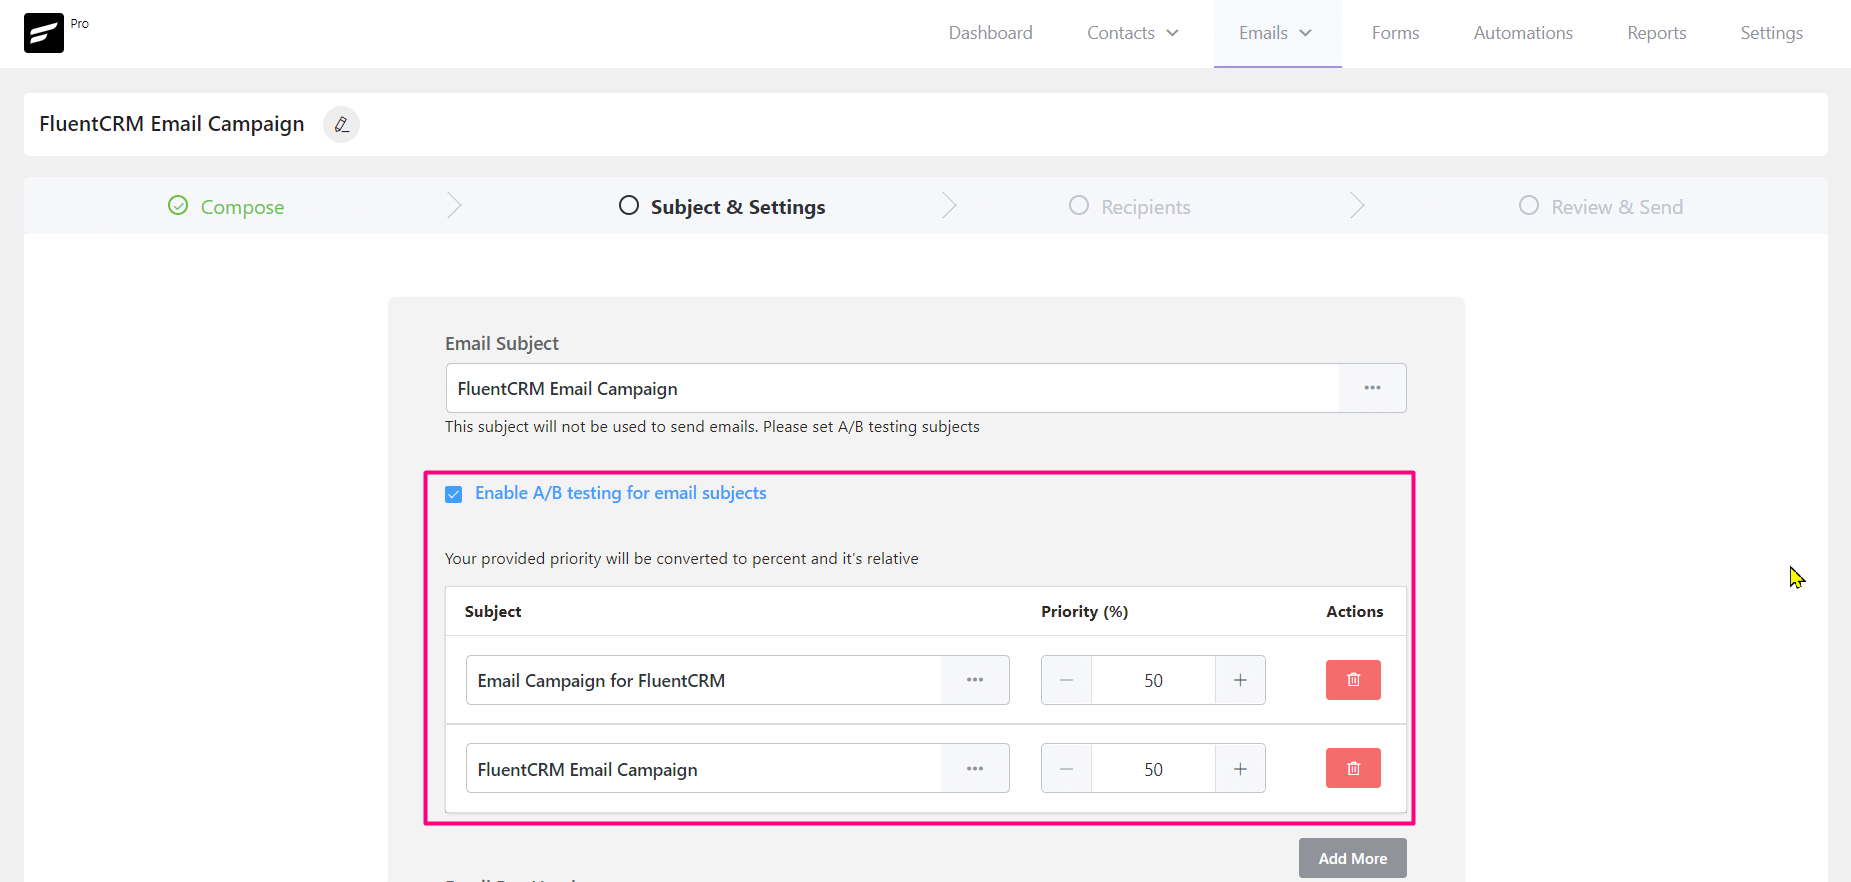
In the Subject field, enter a subject line for your email. The subject plays a very important role in whether the email will be opened by a user or will just ignore the email.
You can add multiple subjects for A/B testing. This will help you determine which subject is working best for your emails by checking the A/B test result. The priority ratio defines how many emails with that subject out of the total users will be sent.
You can also use dynamic values in the Email Subject choosing them by clicking on the 3 Dots. The available data properties are discussed in the SmartCode in Email Editor.
Email Pre-Header #

This is the short summary text that follows the subject line when viewing an email from the inbox.
Custom Mail From #
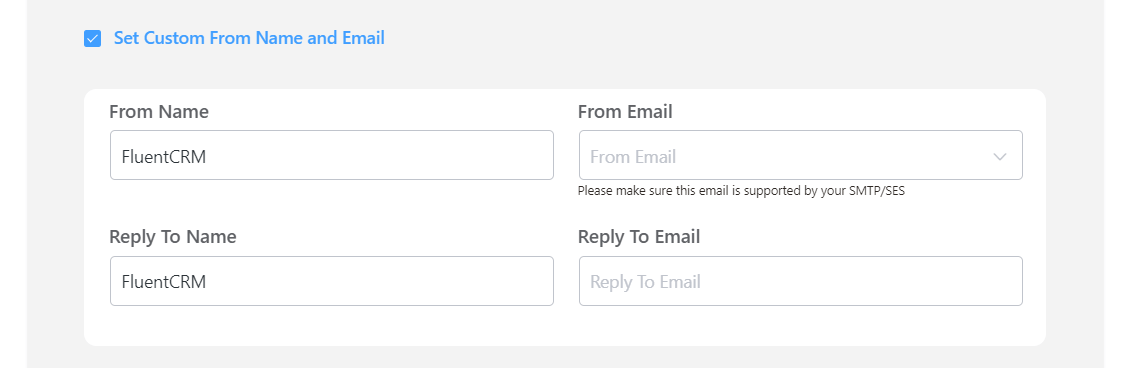
Click the checkbox to set the custom from the name and email. If you don’t set it here then your global email setting will be used for sending the emails.
If you have configured multiple email connections as delivery or senders in the FluentSMTP plugin. You can use any of them as a sender for this Email Campaign. For example, you may use global@wpmanageninja.com as the default sender. But if you want to use marketing@wpmanageninja.com as the sender for this email campaign you would need to configure it in the FluentSMTP first and then you can use it in the Custom Mail From setting here.
UTM Parameters #
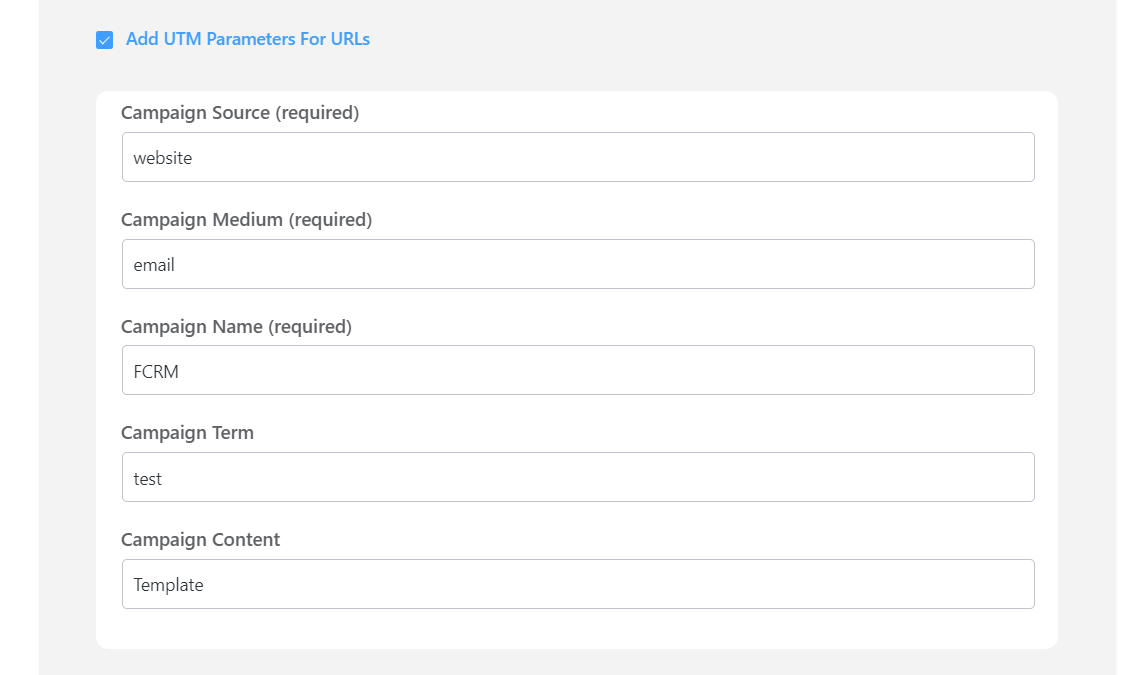
Click the checkbox to Add the required UTM Parameters For URLs: Campaign Source, Medium, and Campaign Name for the UTM parameter. You can also add Campaign Term and Content for the URL parameter.
Sending a Test Email from Email Campaigns #
When you are done with all the fields of Subject & Settings, you can send a test email to your mailbox.
To send a test email from Email Campaigns, please click on the Continue [Subject & Settings] button from the top right corner of the Email Campaign Compose Settings section and then click on the Send a test email button and input the email address where you want to receive the test email and click on the Send button as shown in the below screenshot.
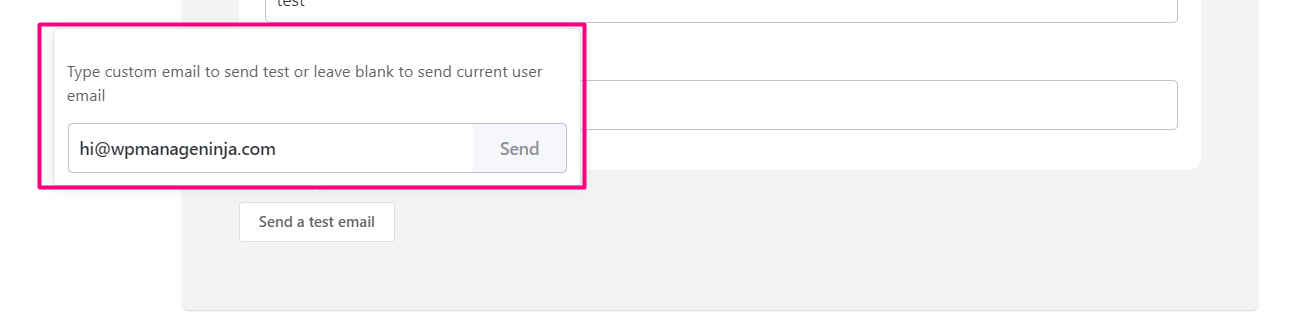
Once the email is sent successfully you will see a Success Message saying the Test email is sent successfully. on the top right corner.
Click on the Continue button and go to the next step to add the recipient to this email campaign.
Full Overview of Subject & Settings #
Once you have configured all of the above depending on your requirements, you will see the options as below. You may leave any of the options if you do not wish to use or set them. But an Email Subject is required.
Recipients #
Now when you are done with the Email Content, Email Subject, and Sender details, it’s time to select the recipients who will get the campaign or newsletter email.
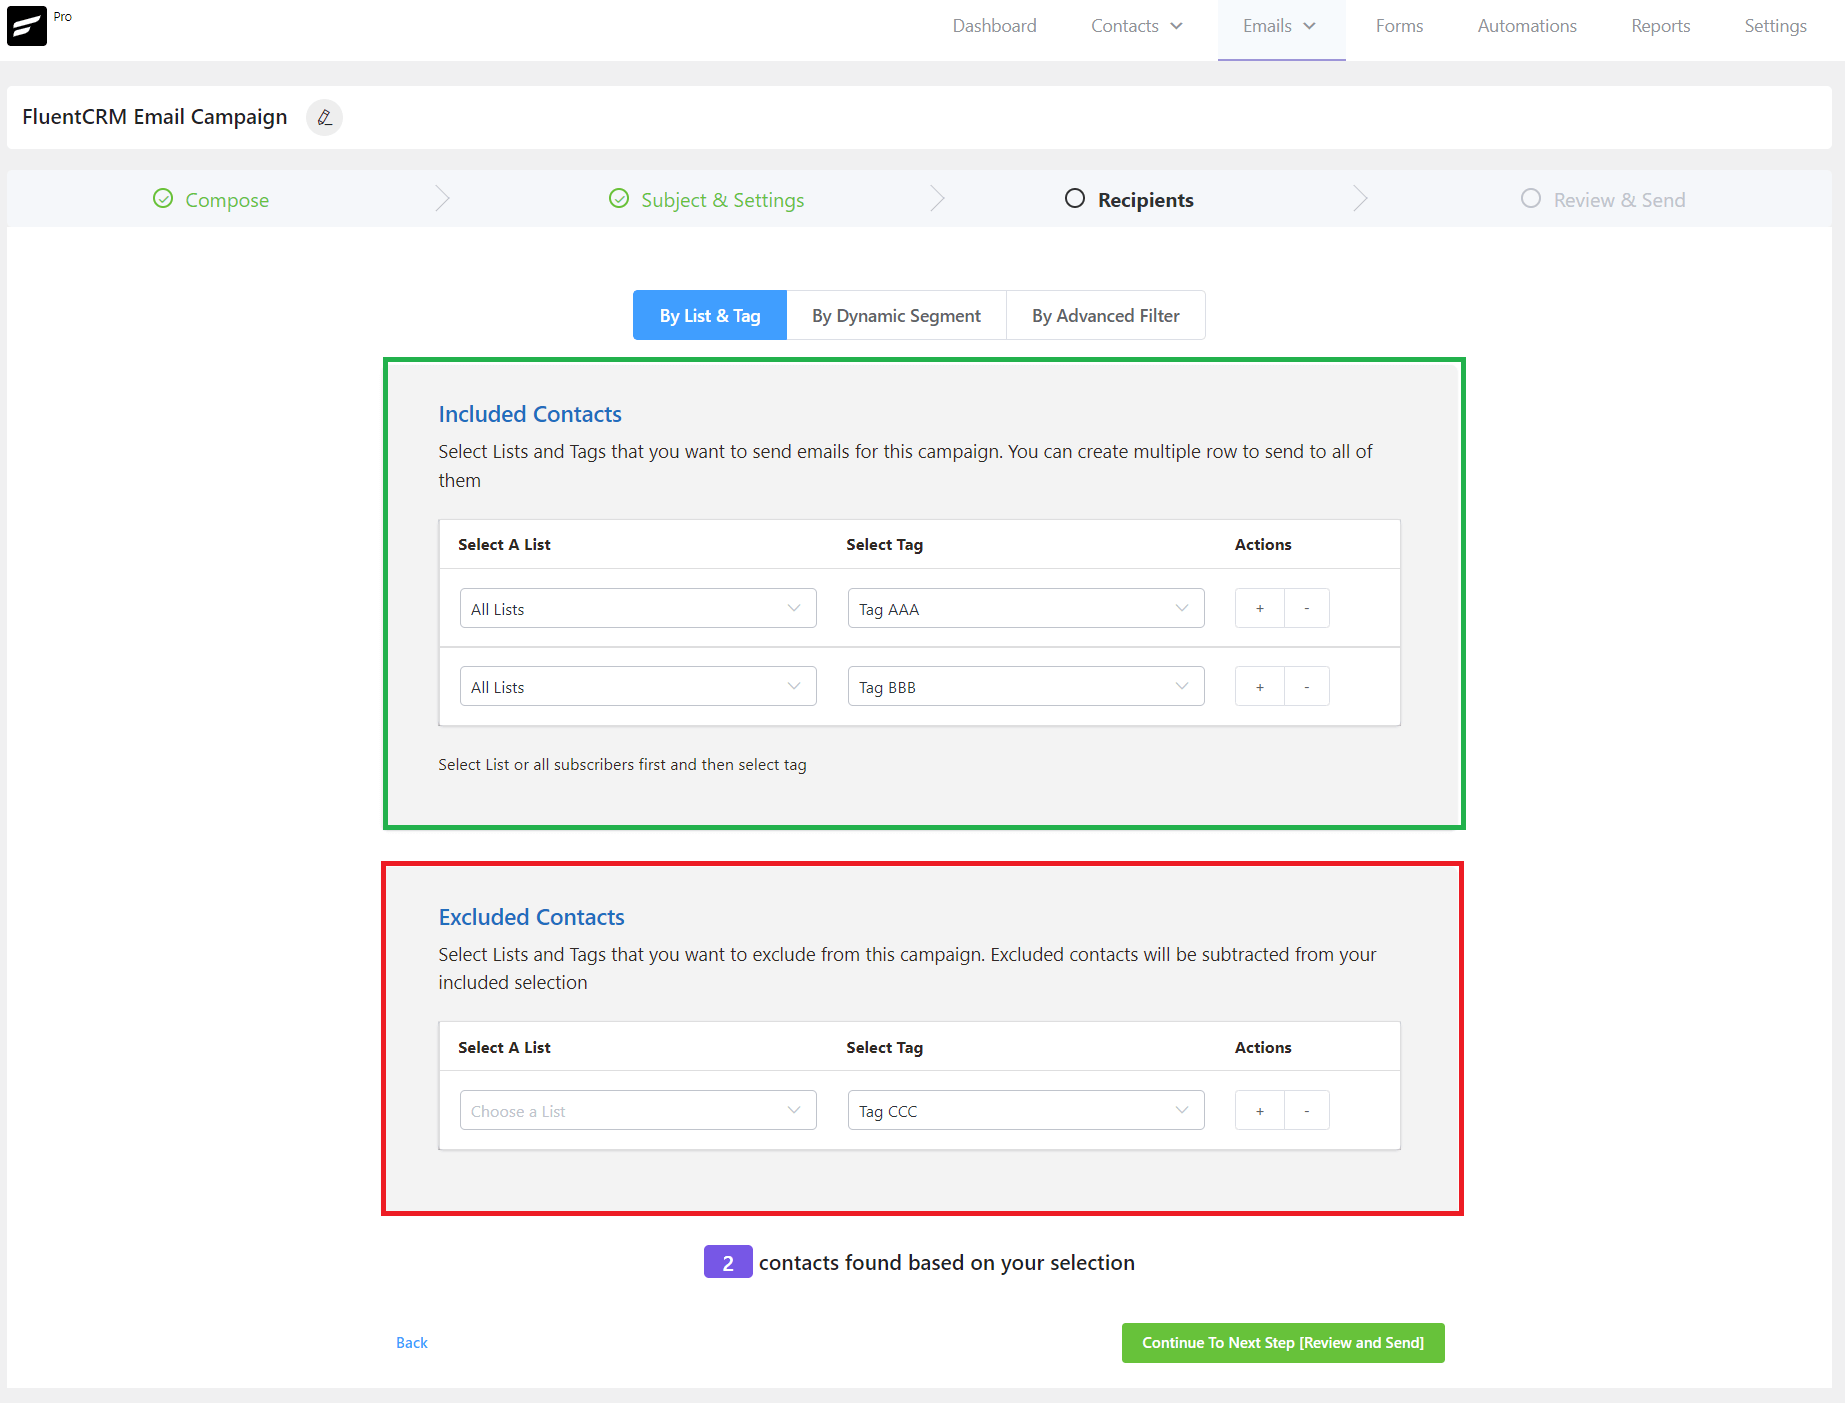
You can add recipients:
- By List & Tag,
- By Dynamic Segment and
- By Advanced Filter.
By List & Tag #
Choose your List & Tag. You can select one list and one tag from the dropdown. To use multiple Lists and tags Please click on the + (Plus) icon or – (Minus) icon to remove any of them. You can also exclude contacts from the campaign based on a certain List and Tag.
By Dynamic Segment #
You can also run the campaign by dynamic segments, for example, Woocomemrce Users or LearnDash, LifterLMS users, or any other dynamic segments you created in FluentCRM. Please visit the General & Dynamic Segments documentation to know more details.
By Advanced Filter #
You can select custom contacts by using Advanced Filter and filter the contacts accordingly. This is a wide conditional section based on various Data Properties for Contacts and Activities inside FluentCRM.
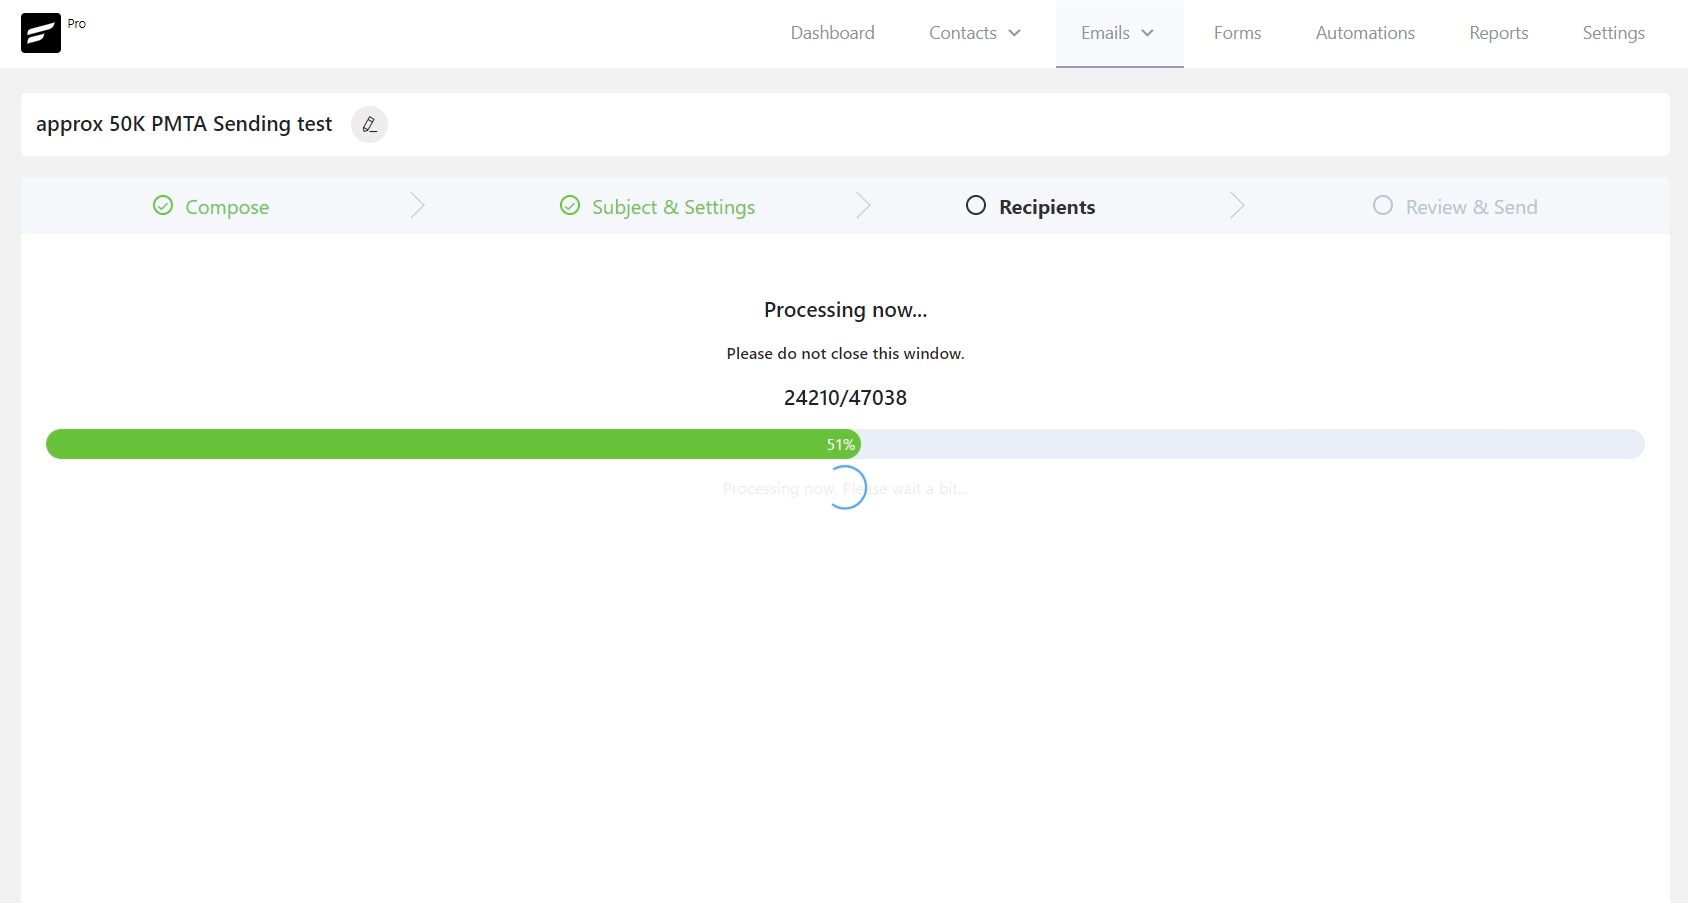
Recipients Processing #
Depending on your selection or the number of contacts the recipients of the email campaign will now be processed. You may not see this screen for only a few contacts. But if the recipients are too high in the number you may see a processing window like the below screenshot. It also depends on the website server resources like CPU, and MEMORY allocated to the website.
Once you are done choosing the Recipients, click continue to the Review & Send step.
Review & Send #
This step will provide you with a brief overview to review the details before sending the email campaign. The email campaign has successfully been set up. Now you can review all your settings in this step. You can still go to Edit Recipients, Edit Subjects, Edit the Email Body, and Send a Test Email.
If anything needs to change you can go back and edit. If everything has been set up correctly you can start the campaign right away.
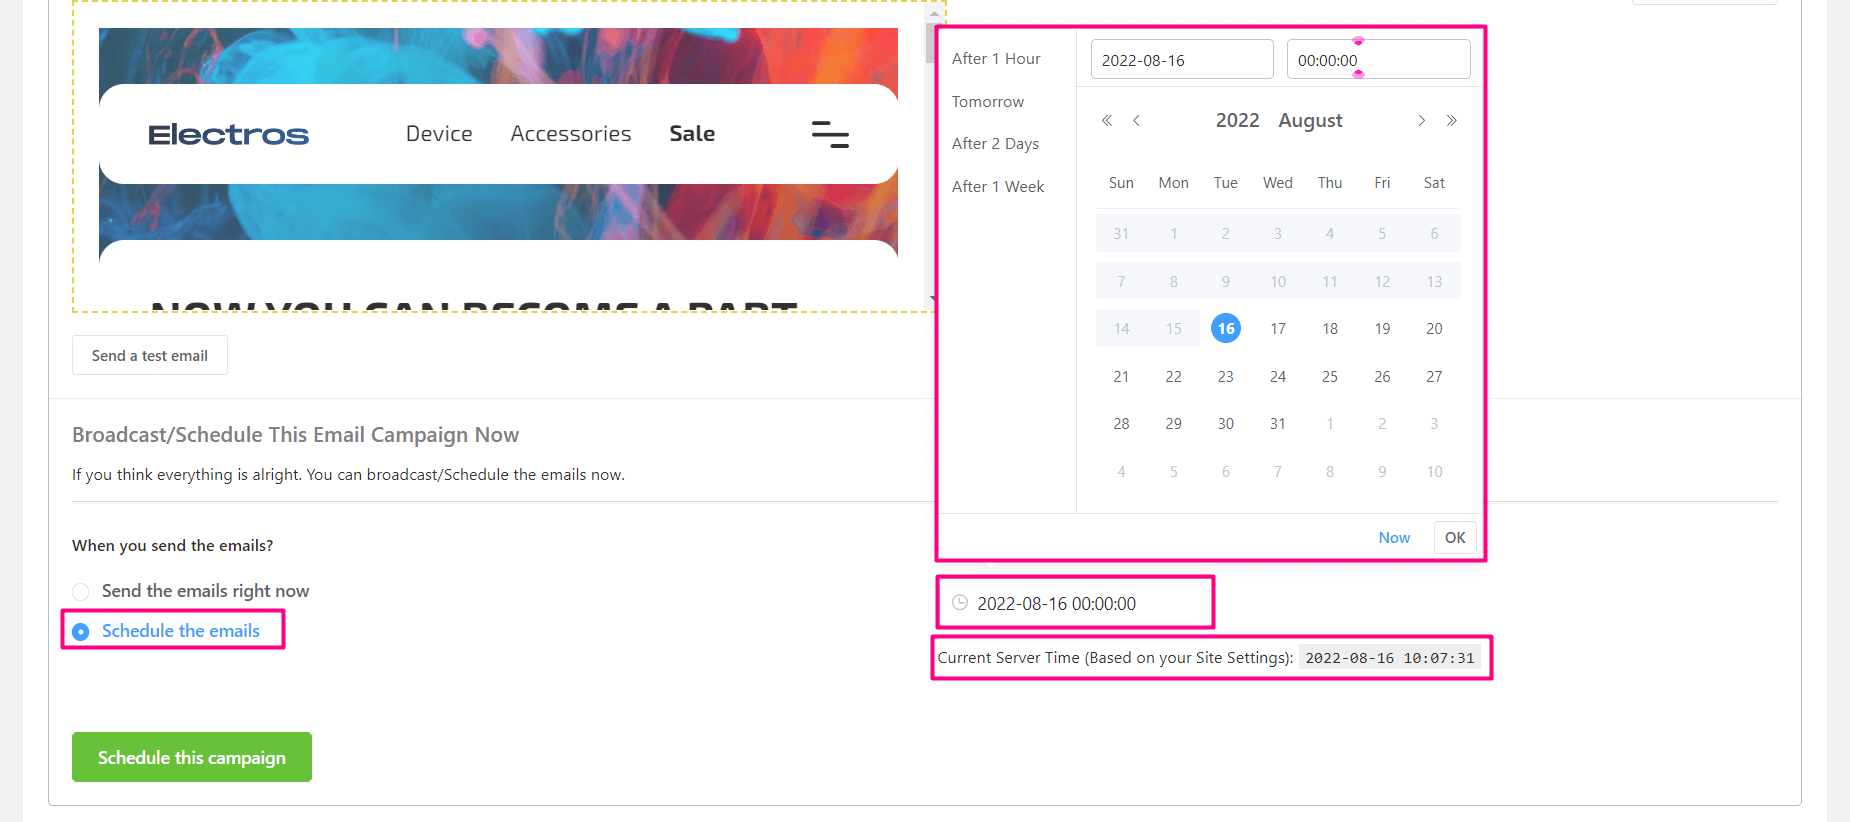
Send Campaign immediately #
Now when you are done with all the previous settings, you can either send the campaign immediately or schedule it discussed in the later section.

Schedule Campaign #
You can schedule the campaign also by selecting the date and time. You will be able to schedule it After 1 Hour, Tomorrow, After 2 days, and After 1 Week as a built-in option on the left of the calendar. The Send the Email Right Now button will work as the immediate sending as the previous option. Please make sure to compare the time according to your needs with the WordPress Time settings. You will also be able to see the Current Server Time defined in the WordPress Settings.
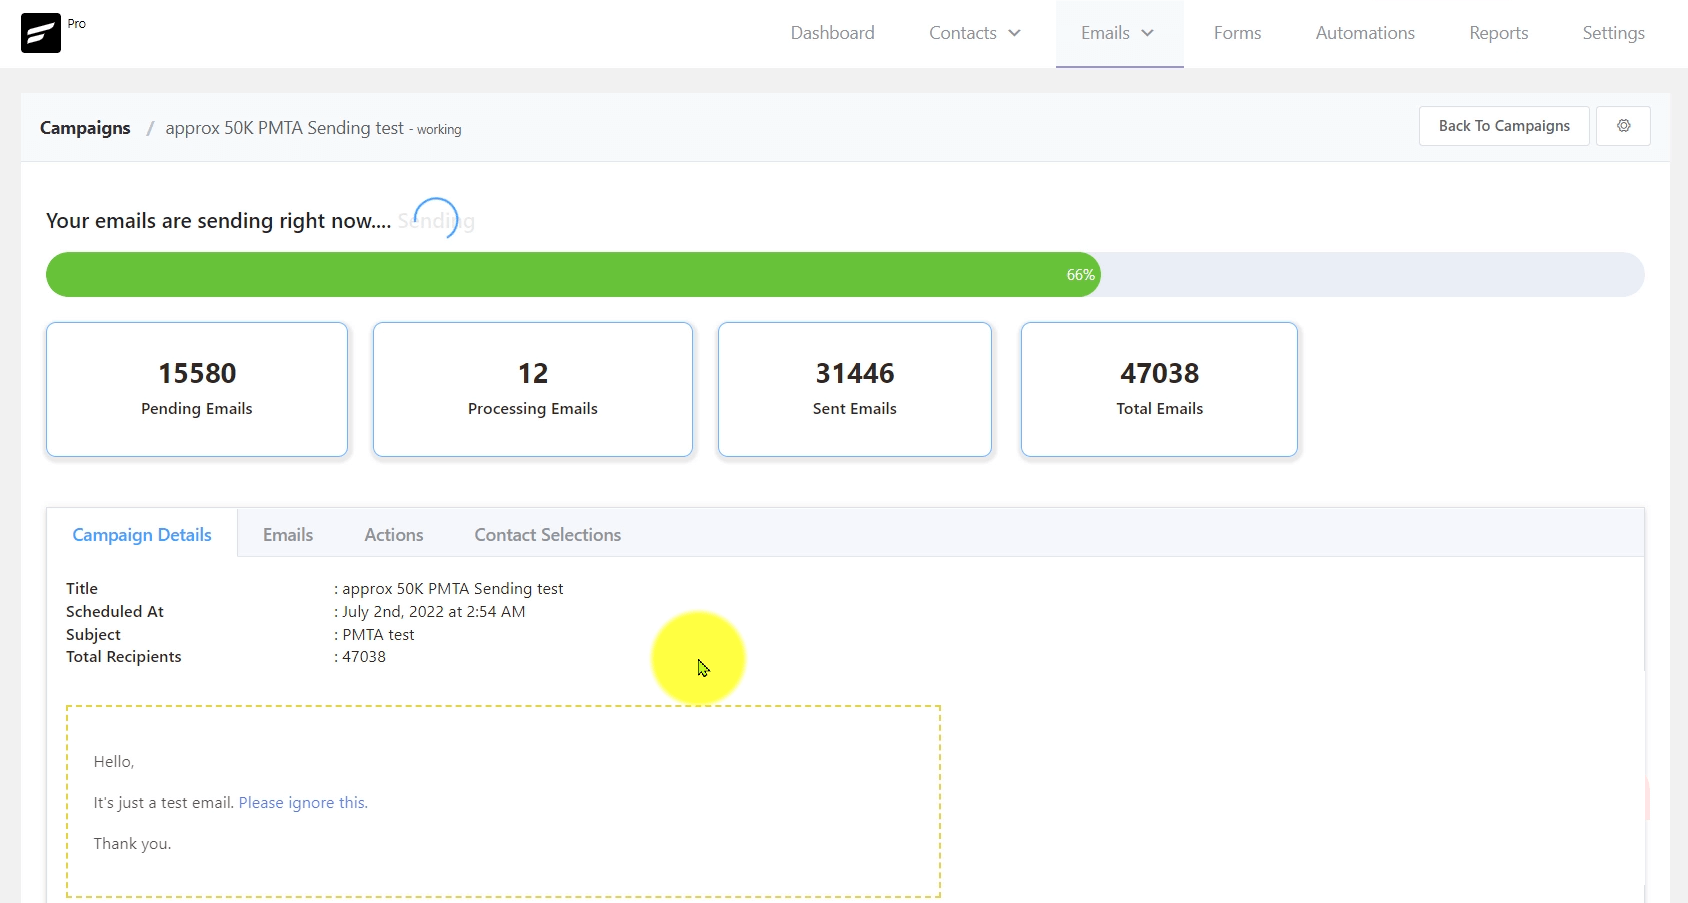
Campaign Delivery #
Once you start sending immediately you will see a screen similar to the below screenshot. It will show you the Number of:
- Pending Emails: The number of remaining emails to be processed and sent.
- Processing Emails: The number of emails processing or in the memory to be sent.
- Sent Emails: Already sent or delivered emails to recipients.
- Total Emails: The total recipients for the campaign.
Pause Campaign #
If you want to pause the running campaign delivery, please click on the Gear Icon in the Top Right corner and then click on the Pause button.
Once all the emails are delivered you will then see the campaign summary with the statistics and some other actions. Please visit Campaign Summary & Actions to know in-depth details that are available in the summary.
That’s all for Email Campaign creation and sending. Please visit the Campaign Summary & Actions documentation to Manage the campaigns or apply various actions to users of the campaign you sent.


Can I add the cc recipients to the email campaign? How to do it?
Hi Duy, This feature isn’t available at the moment.
how do I automatically transfer a pending list person to a subscribed list person when they confirm their double opt in subscription?
They are moved to the subscribed list automatically. No manual action required.
When the option “schedule emails within a specified date-time range” is used, does it spread evenly the emails? If I choose a wider range, will it send email at a lower frequency than if I choose a narrow range?
Hey Francois, yes, that’s what it does. 🙂
Hi, How can you resend a campaign to those people who didn’t open it, please? I can’t find anything in the documentation or plugin on this. Thanks.
Hi Steve, this feature isn’t available for now. The R&D is looking into it.
Hi Nazir, is there a place where you are tracking feature requests? I would also like to vote for the ability to resend a campaign to people who did not open it the first time. Thanks, Nick
Hi Nick, we are handling feature requests internally but if you still want to make it count, here’s the link to our feature request form: https://fluentcrm.com/?fluent-form=6
Why does my recurring campaign look different when viewing it in outlook?
Hi Gus, can you please reach out to our support team with the details?
Is there a way to resume a paused campaign if I paused because of a last-minute change. Is there a way to correct and send to the remaining emails?
Hi C, you can clone the campaign and resend it after making the changes.
There is no pause button in the gear icon! How can we stop sending emails?
Hi Rene, You can only cancel email campaigns. We haven’t added the pause option yet.
How do I add attachments to my email?
That would be great, too!
How can I select a campaign that has already been sent and replicate it to send to new subscribers?
Click the > button beside the campaign and then click duplicate. Then you can select the recipient.
Hi lovely team!
Is there a way to set a default value for a custom field?
Use case: I want to use the personalization field for the contact’s name – but I would like to have a default value so that if the contact does not have a name value assigned to them they don’t just see a gap – is that possible?
Hi Katie, you an use a fallback value with merge tags. For example: you can use “Hi, {{contact.first_name | there}}” instead of “Hi, {{contact.first_name}}”. If the name isn’t available, “there” will appear as a fallback. More examples here
Can you add a pdf attachment to a campaign template
Hi, Attaching files to bulk emails will cause spamming. So this feature isn’t available.
Could you add this options and just, add a warning on it ?
Thanks
Hi John, unfortunately, our R&D has rejected this feature and it won’t be available in FluentCRM.
How do you recommend we send .ics for our scheduled events?
Maybe allow attachements with minimal size?
This can be an option, I’ll check with the developers.
Is there away to add recipients to an active Email Campaign?
Also I do not see the option to Delete a Contact, only remove from list.
or Unsubscribe
Hey I am creating a campaign.
But at the Recipients Step I get Error
“Sorry, No subscribers found based on your filters”
QUESTION: Of course I have none…Im setting this up for the first time…whats up with that? What am I missing?
Thanks
Hey Pasquale,
The step won’t let you pass if you have no contacts, consider adding a sample email to go to the next step.
Will campaigns automatically exclude contacts who are set as a status of bounced?
yes, bounced addresses will be excluded automatically.
Is it possible to schedule an email campaign to send every week automatically?
make them smaller and test, that worked out for me.
When creating campaign you cannot go back in and edit anything. Terrible design.
This whole app is terribly designed and the flow is horrible.
Editing anyting in this app is a nightmare. Haven’t been this disappointed in an app in a login time.
I have been using the plug in for a year. And I have few problems I would like to address.
1) is there anyway to send a series of emails based on date? The email sequence only apply how many days, weeks, or month from the starting point or the last email. I need to set automated emails send on specific day of the month and the dates are different on every month. So far, the only way I can remotely closed to what i want is to set each campaign to schedule to send. This is okay, but a bit of pain. because once I send the schedule, I can’t edit the mail anymore. I have to duplicate the mail and delete original, and edit the copied email and schedule again.
Was there any other easier to way to create a sequence email on date basesis?
2) Because of problem #1. I set a series of single campaigns as a sequence and set them for 3 months ahead. And I noticed the contact lists for these campaigns are already fixed. So now If I have new subscribers to my list, the new subscribers are not added to the campaigns even though new subscribers are registered and tagged properly. I opened the scheduled sequence and the number of scheduled emails has not been changed at all. So I have to duplicate all of the scheduled campaigns and set them all to send updated subscriber counts.
This is horrible.
How can I fix this?
Hi,
is there a way to automatically send emails by batches of a few hundred at a time in order to stay under the limit of the 300 free emails / day offered by sendinblue? Thanks
Hi Chris, that’s not possible unfortunately.
Hello,
IMHO, the Campaign Mode lacks an important feature. That the email list gets updated before sending a scheduled campaign. Because if I schedule an email for 2 weeks, the people that registered between the time I scheduled the campaign and the day it’s sent will not receive it.
I have configured my SMTP well and i am able to send test emails from Fluent CRM but after setting up the campaign and “Send emails now” nothing is being sent out. All emails remains in “Pending” status.
Any idea what I need to do?
I’m not sure about this, please contact our support team: https://wpmanageninja.com/support-tickets/
Hello and thank you for your work.
Do you know when the possibility of modifying an already planned campaign will be available? Because, for now, I have to duplicate in order to be able to edit again. It is really painful.
Thanks in advance
Hi Frank, I’ve forwarded your request to our dev team. They’ll look into it and hopefully, it will be available soon.
Is there a way to customize the body to include the recipient’s name? How do I call it?
Hi! Yes, just type @ .
It would be really helpful if there was a simple ‘Save Draft’ radio button *as well as* Send the emails now and the Schedule the emails options.
My first time using this I drafted the email and couldn’t see where to save (and did know when it would be sent so ignored Schedule).
So, I pressed the ‘Schedule this campaign’ button and instead of saving the draft, or taking me to the calendar to (temporarily) place it in a date, it sent the campaign instantly.
Not what I was expecting!
Please consider adding a ‘Save Draft’ option.
Hi Rob,
I’m not sure where you’re looking for the “save draft” button. FluentCRM allows you to save the email template as you’re editing it. you can also schedule the email campaign in the “review and send” step. If this didn’t work for you, please contact our support: https://wpmanageninja.com/support-tickets/
I’m not looking to save a template just a draft of the email I am working on.
I do not want to schedule it either as it won’t be finished (as I often draft emails before finishing and sending them).
I’m simply looking for a Save Draft function and for that email to go into a holding position (not a schedule one) until it is reopened, finished and ready to send/schedule.
Also, I cannot see how to Pause and Edit a previously scheduled email that has not yet been sent. How can I do this?
Thanks!
Hi Rob,
Thanks for your query (and suggestion!). Unfortunately, FluentCRM does not have a save draft button and you can’t edit your copy or campaign once you’ve scheduled it. At this moment, you can save your email as a template and schedule it for a specific date. However, we believe that the save draft feature and the ability to edit an email campaign after you’ve scheduled it should be also available in FluentCRM. So we have forwarded your suggestion to our developers. We appreciate your patience.
Thanks!
Thanks for forwarding the suggestion.
when adding images in emails they are not getting displayed in any mail client, Gmail, mac os mail app, outlook, any idea’s why? permission is all set, working with amazon SES.
While creating a Campaign how do I insert a Divider line? I don’t see a Block for this; there is a “Spacer” block but no Divider block.
Thanks,
Bryan
I’m having the same problem. Were you able to get this resolved?
Hi, RD! I’m having the same problem now. Were you able to get this resolved? If so, could you share how?
Hey guys, we’ll be adding the divider option early next quarter.
How can I enter automated members name in email message?
Like dear [user_name]
Thank you!
Hello, Is there a way to do a test email broadcast to only one or two email recipients. I need to see what the received email will look like in Outlook, Gmail, Hotmail… for mobile and desktop devices.