
FluentCRM provides several Primary Actions to trigger tasks automatically. Once automation is triggered, you can add the desired Action/s to handle advanced, repetitive, or routine tasks automatically. Besides primary actions, FluentCRM also offers a variety of action blocks that let you automate processes even when you’re away from your website.
This article will provide detailed information about all Primary Actions of FluentCRM Automation.
All Primary Actions #
To learn how you can use all the Primary Actions in your FluentCRM, follow the steps with screenshots below –
First, go to the Automation section from the FluentCRM Navbar, and open your desired Automation by clicking on its title.
Or, create a new one by clicking the + New Automation.
To learn how to create a new automation funnel, read this Documentation.
For example, I opened the Tag Applied automation funnel to explain all the Primary Actions of FluentCRM.

Now, click the Plus Icon or hover over it and click the Add Action / Goal option to view all the Primary Actions.
Now, a pop-up page will appear with all the primary Action blocks of FluentCRM to choose from.

A detailed explanation of the Actions mentioned above is given below –
1. Wait X Days/Hours Action #
This action lets you define a time span before executing the next action. It is very helpful for adding a time gap between the actions in which it is placed. After selecting this Action, a tab will appear on the right-hand side with options to set up your action.
Here are the Settings of the Wait X Days/Hours action:
- Interval Label: Here, a Name for the Action will be automatically added so you can easily find it later. You can change it that suit your needs.
- Internal Description: A description of the action will also be automatically added as a Subtitle. You can also change it suit to your needs.
- Waiting Type: This action has 4 types of timespan to make delays. These are:
- Wait by Period
- Wait until Date
- Wait by Weekday
- Wait by Custom Field
Once you are done, click the Save Settings button to save all your changes.
You can also Delete the action by clicking the Trash Icon if needed.
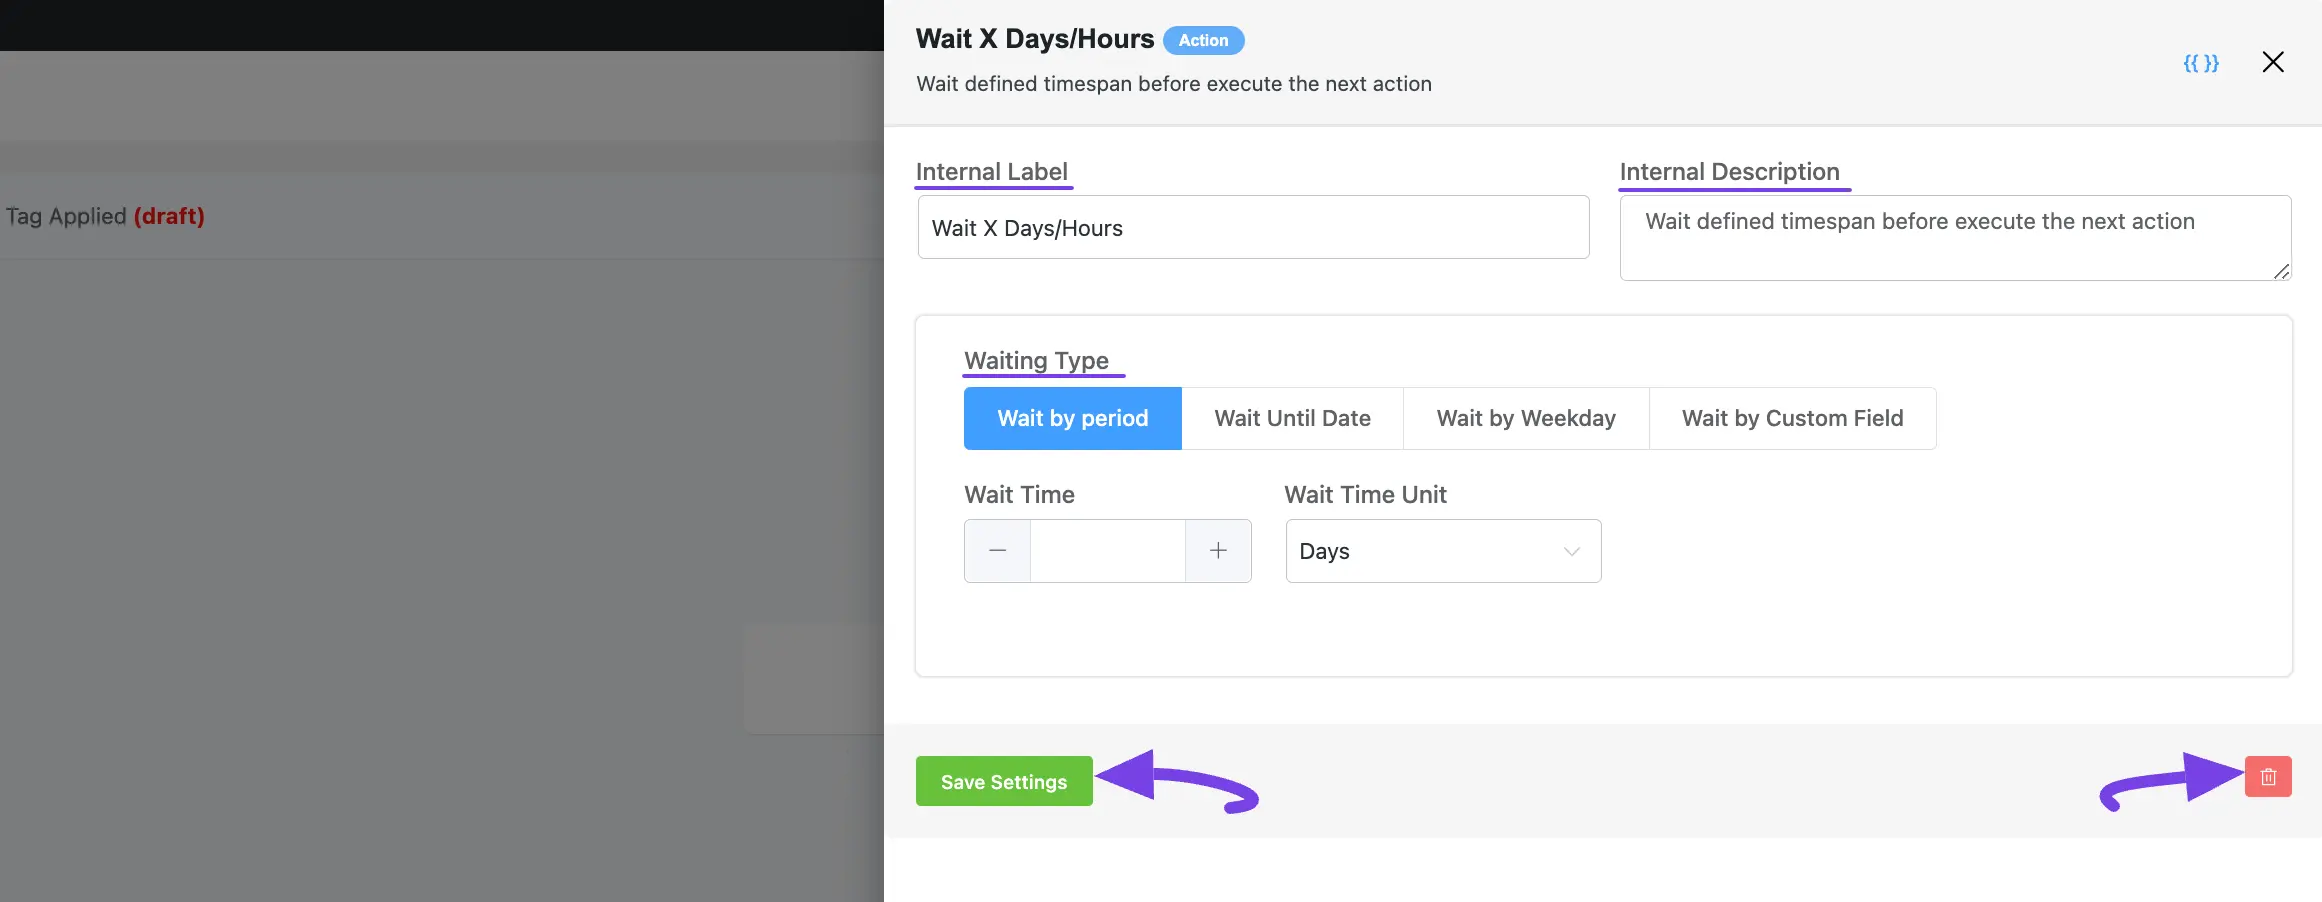
A. Wait by Period #
Use this option to set the waiting time between actions based on Days, Hours, or Minutes.
- Wait Time: Provide a Numerical Value based on how many Days/Hours/Minutes delay you want between actions.
- Wait Time Unit: Select the Unit of Waiting Time as Days/Hours/Minutes by clicking the Dropdown Arrow according to your needs.

B. Wait Until Date: #
Use this option to set the waiting time between actions based on a specified date and time.
- Select Date: Date Selector to select the date from the Calendar.
- Select Time: Time Selector to select the Time on that Date.
- Now Button: This will let you automatically input the current Date and Time.
Once you specify the Date and Time, click the Ok button.

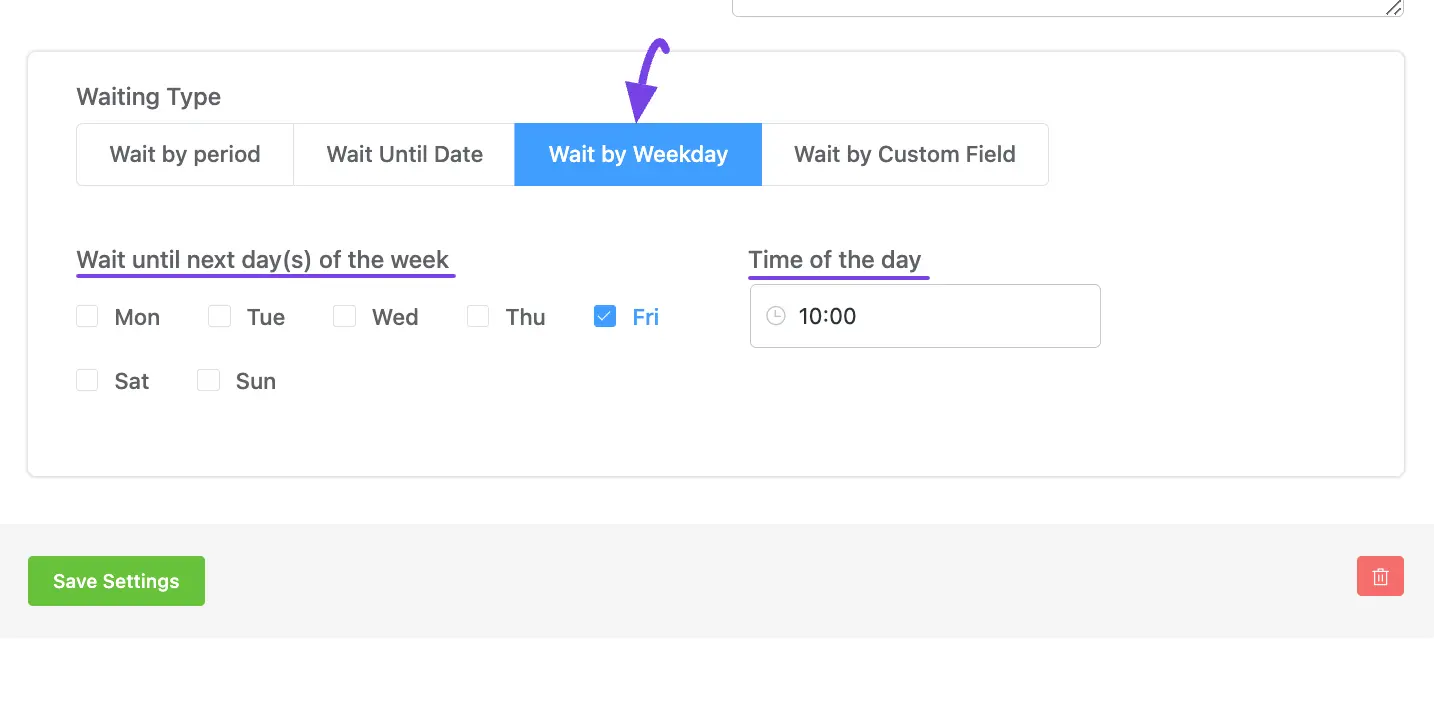
C. Wait by Weekday #
Use this option if you want to set the waiting time between actions for a specific day at a specific time.
- Wait until the next Day(s) of the week: Check the box to select the desired Day/s.
- Time of the Day: A time selector to choose the time for the selected Day/s.
D. Wait by Custom Field #
With this option, you can set wait times between actions based on a Custom Contact Field of Contact/s. For instance, if you choose Contact’s Next Date of Birth, the automation will pause until that specific date.
To learn more about Custom Contact Fileds, read this Documentation.

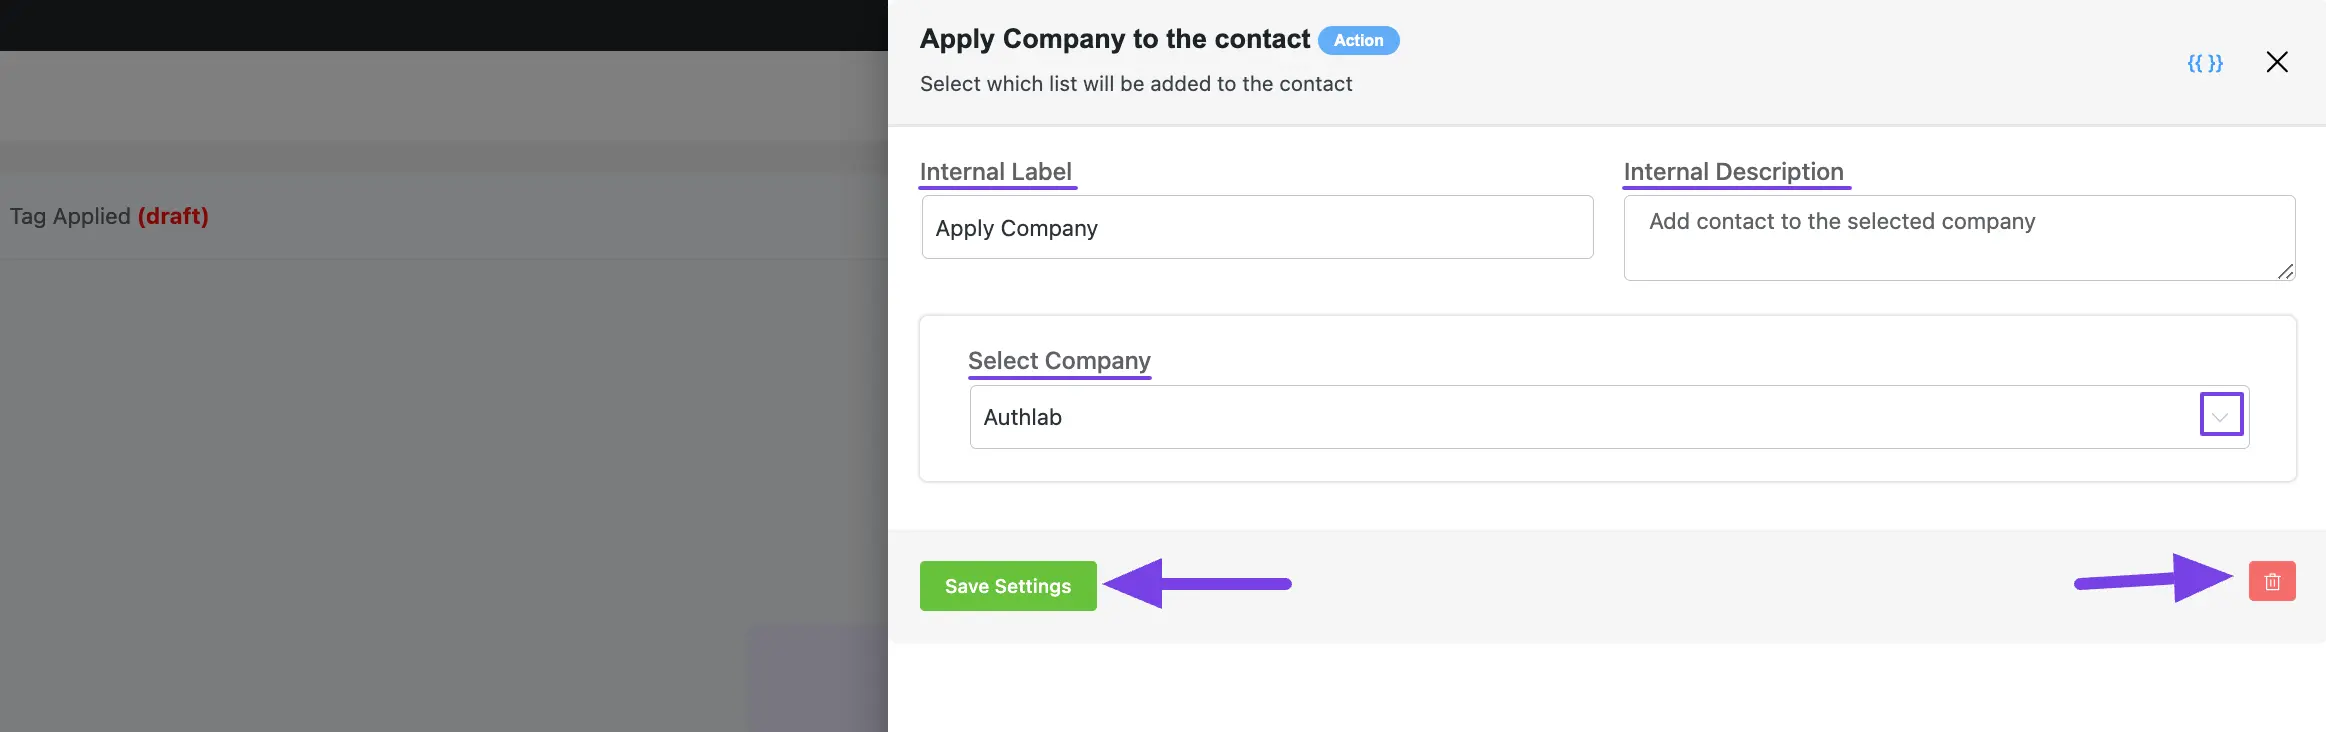
2. Apply Company #
This action lets you select to which company the contact will be added after the automation starts.
After selecting this Action, a tab will appear on the right-hand side with options to set up your action.
Here are the Settings of the Apply Company action: #
- Interval Label: Here, a Name for the Action will be automatically added so you can easily find it later. You can change it to suit your needs.
- Internal Description: A description of the action will also be automatically added as a Subtitle. You can also change it to suit your needs.
- Select Company: Select a Company from the dropdown list using the Dropdown Arrow. If you do not have any existing Company in your FluentCRM, read this Documentation to create one.
Once you are done, click the Save Settings button to save all your changes.
You can also Delete the action by clicking the Trash Icon if needed.
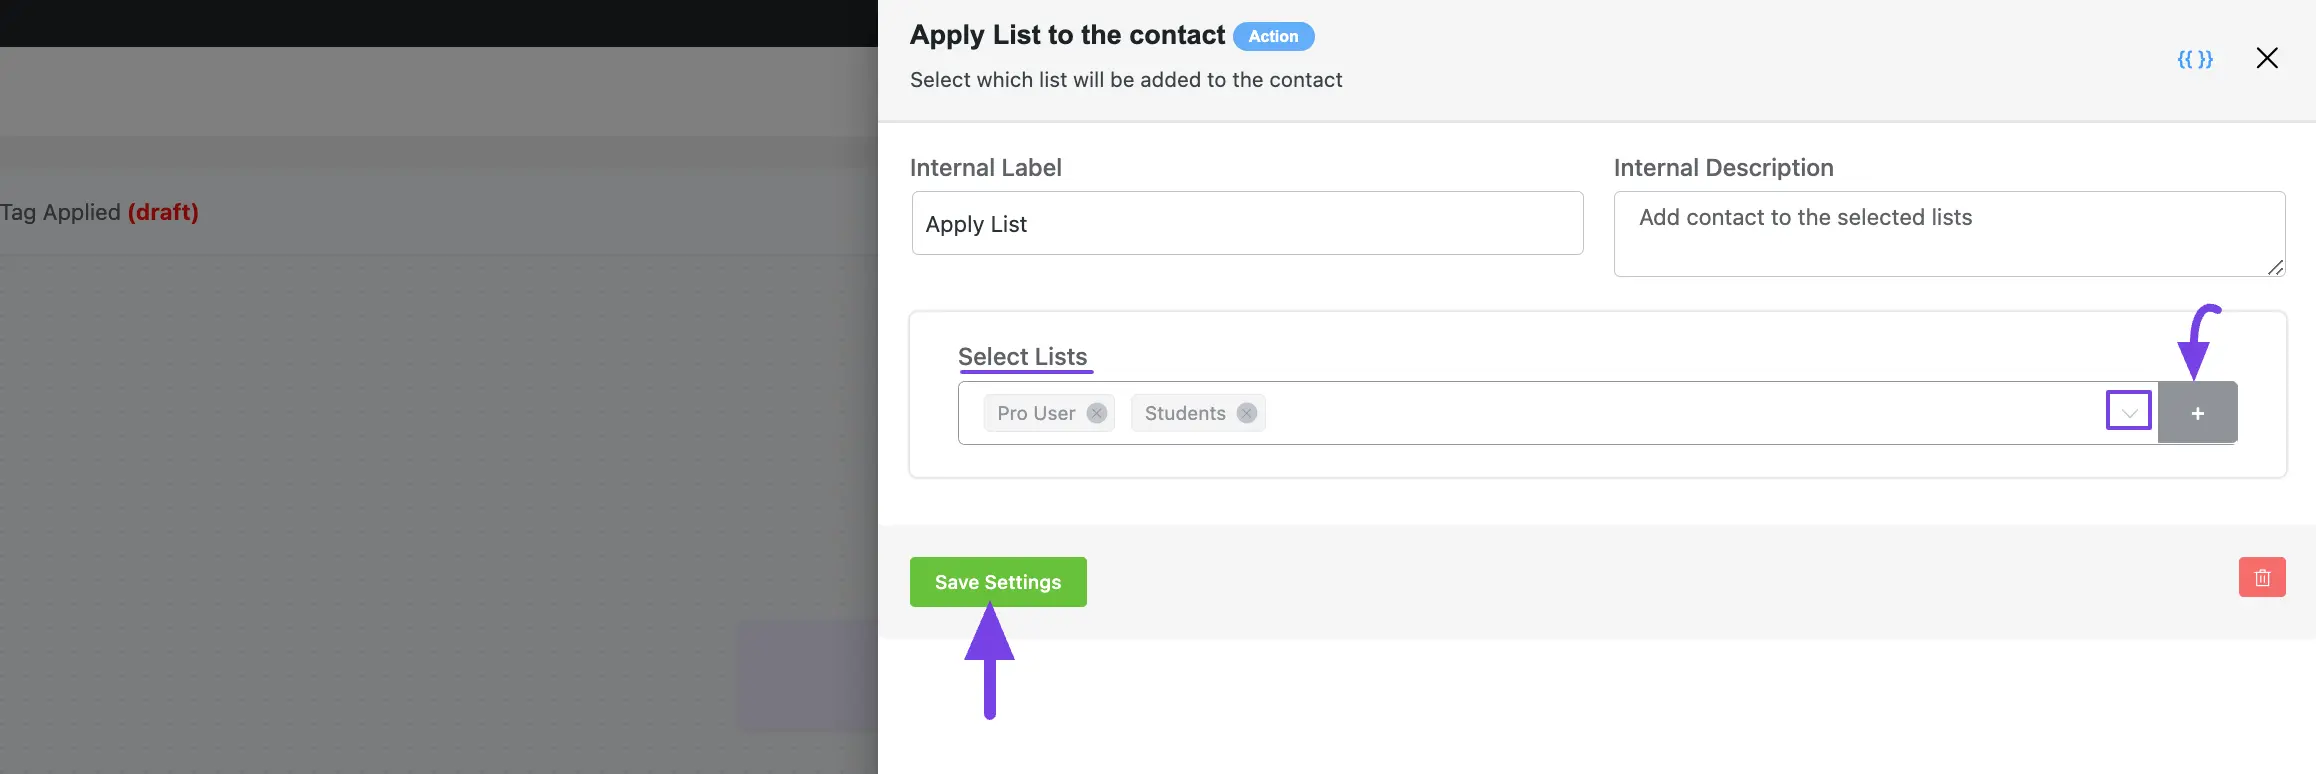
3. Apply List #
This action lets you select to which list/s the contact will be added after the automation starts.
After selecting this Action, a tab will appear on the right-hand side with options to set up your action.
Here are the Settings of the Apply List action:
- Select Lists: Select the List (single or multiple) from the dropdown list using the Dropdown Arrow. If you do not have any existing Contact List in your FluentCRM, you can directly create one from here by clicking the Plus icon.
To learn the use of the First Two setting options mentioned in the screenshot below, read this Section.
Once you are done, click the Save Settings button to save all your changes.
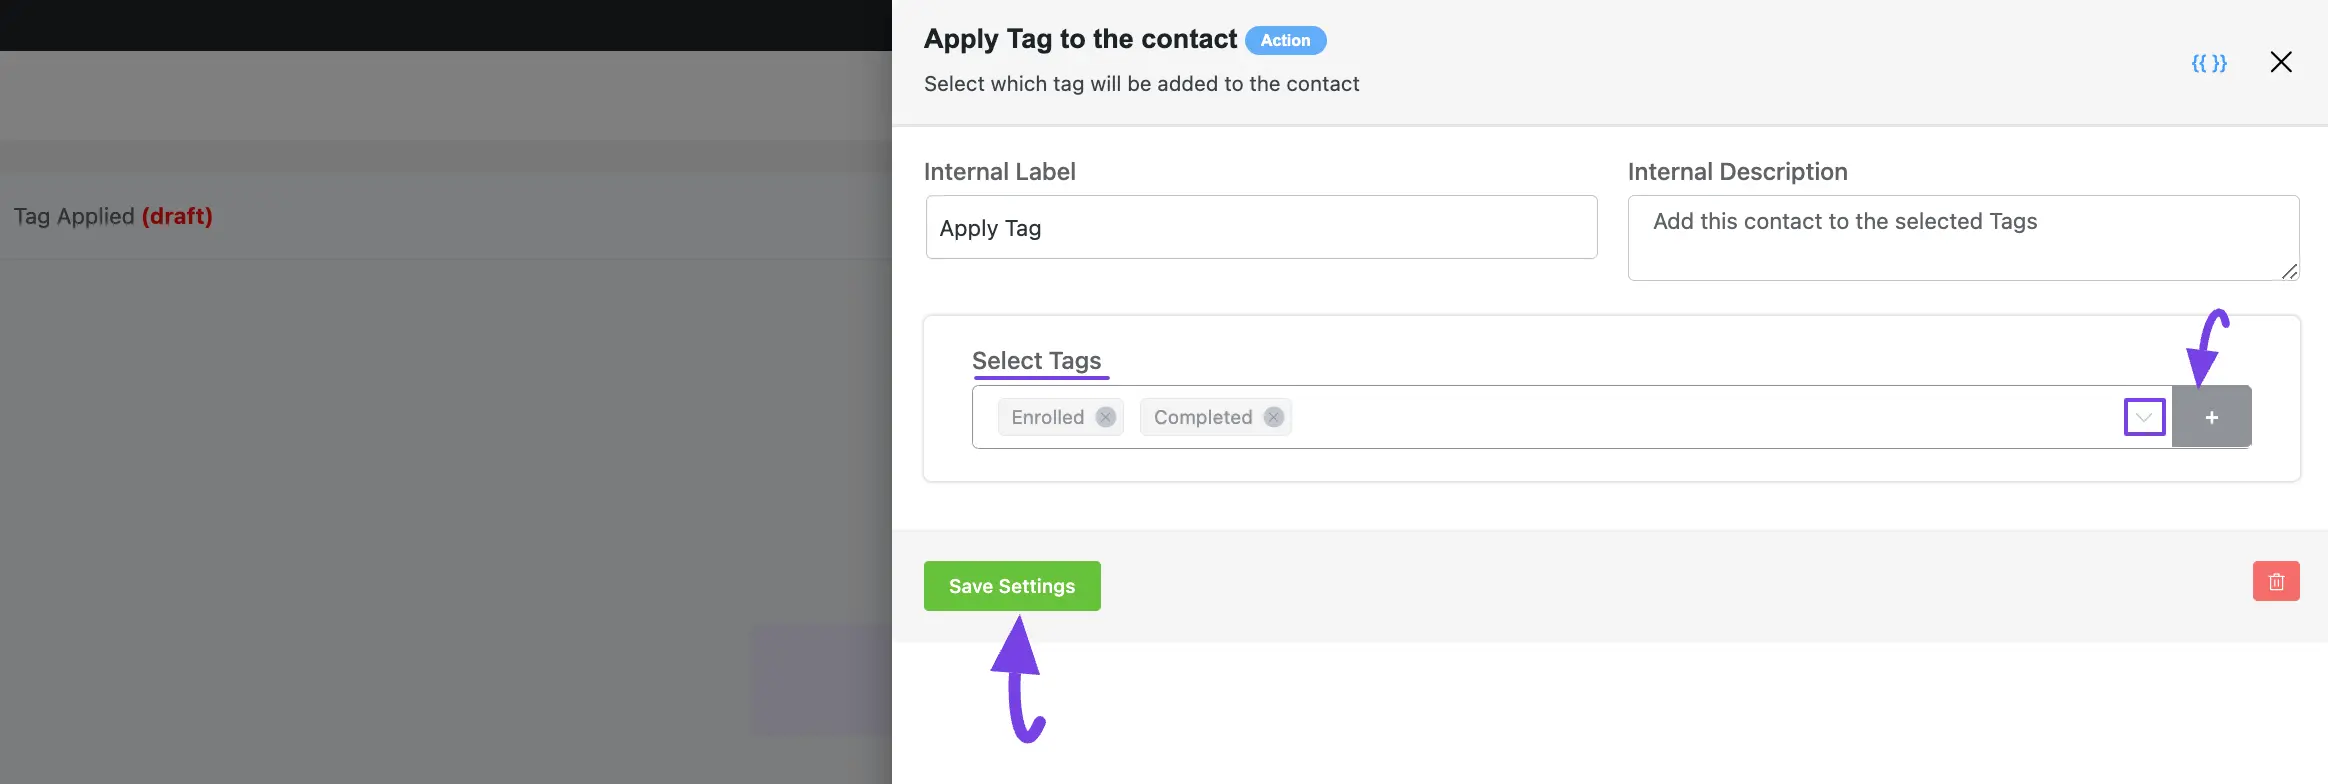
4. Apply Tag #
This action lets you select which tag/s will be added to the contact after the automation runs.
After selecting this Action, a tab will appear on the right-hand side with options to set up your action.
Here are the Settings of the Apply Tag action:
- Select Tags: Select the Tag (single or multiple) from the dropdown list using the Dropdown Arrow. If you do not have any existing Contact List in your FluentCRM, you can directly create one from here by clicking the Plus icon.
To learn the use of the First Two setting options mentioned in the screenshot below, read this Section.
Once you are done, click the Save Settings button to save all your changes.
5. Remove From Company #
This action lets you select from which company the contact will be removed after the automation starts.
After selecting this Action, a tab will appear on the right-hand side with options to set up your action.
Here are the Settings of the Remove From Company action:
- Select Company: Select a Company from the dropdown list using the Dropdown Arrow. If you do not have any existing Company in your FluentCRM, read this Documentation to create one.
To learn the use of the First Two setting options mentioned in the screenshot below, read this Section.
Once you are done, click the Save Settings button to save all your changes.

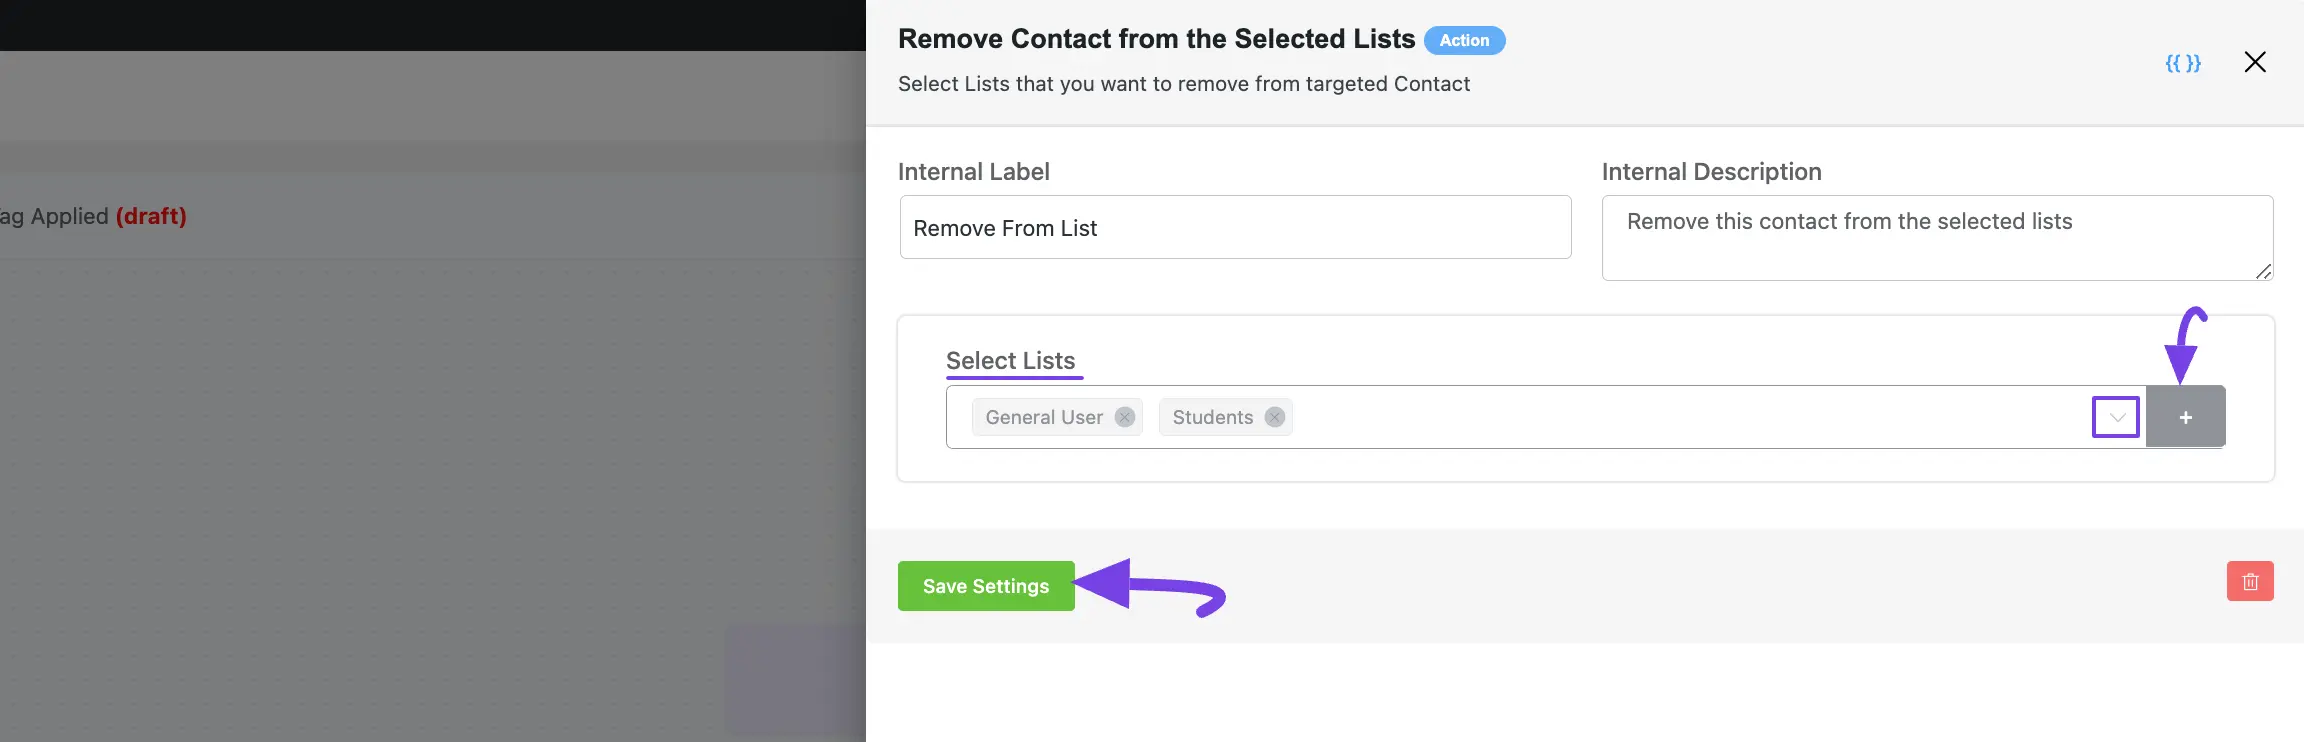
6. Remove From List #
This action lets you select from which list/s the contact will be removed after the automation starts.
After selecting this Action, a tab will appear on the right-hand side with options to set up your action.
Here are the Settings of the Remove From List action:
- Select Lists: Select the List (single or multiple) from the dropdown list using the Dropdown Arrow. If you do not have any existing Contact List in your FluentCRM, you can directly create one from here by clicking the Plus icon.
To learn the use of the First Two setting options mentioned in the screenshot below, read this Section.
Once you are done, click the Save Settings button to save all your changes.
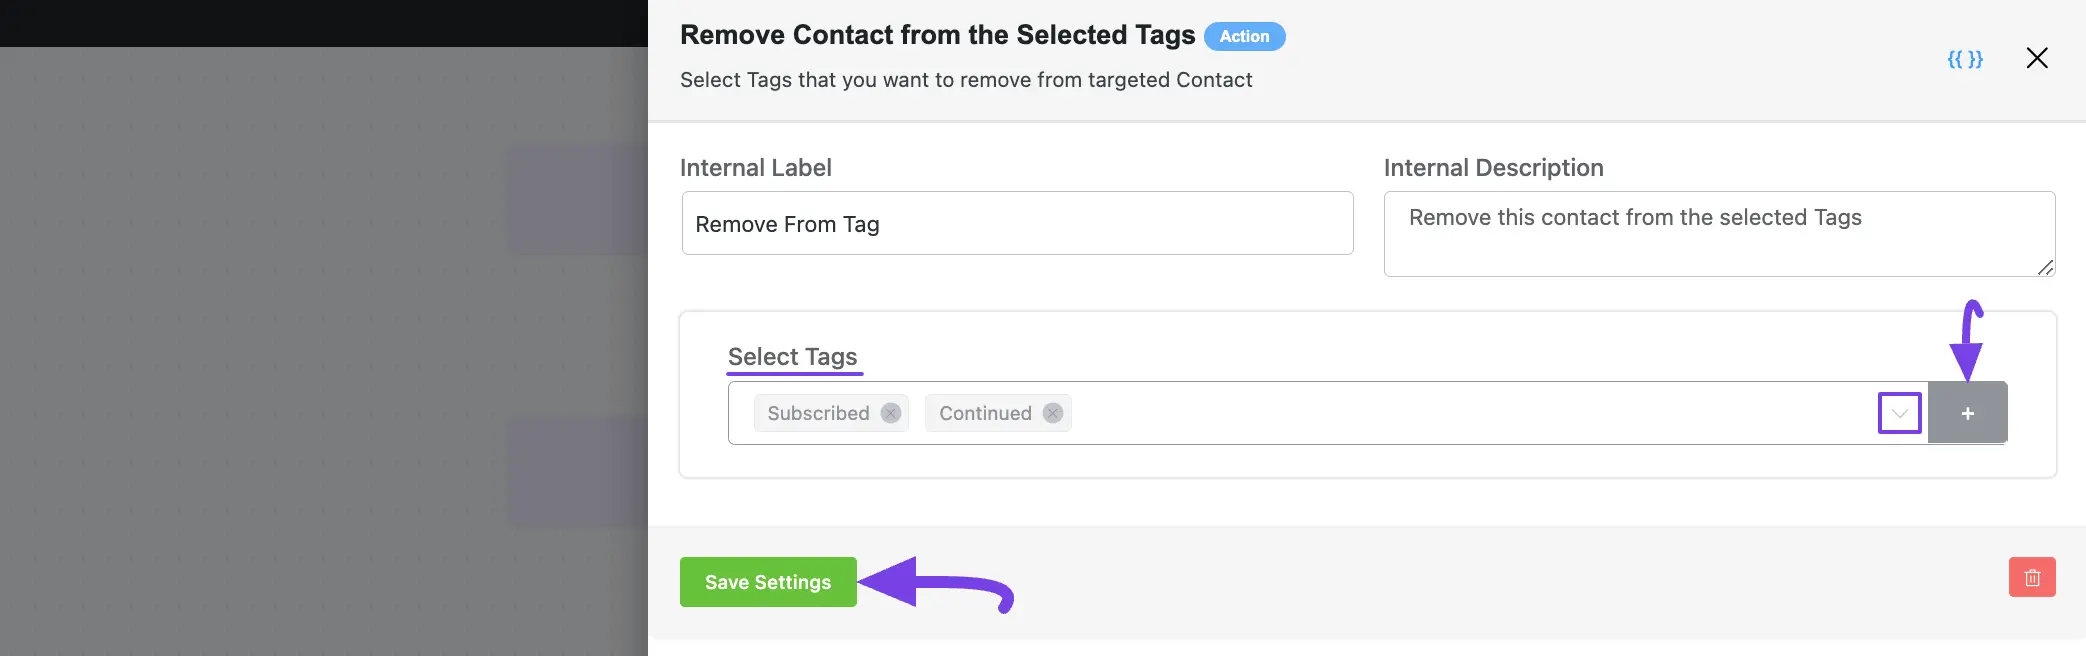
7. Remove From Tag #
This action lets you select which tag/s will be removed from the contact after the automation starts.
After selecting this Action, a tab will appear on the right-hand side with options to set up your action.
Here are the Settings of the Remove From Tags action:
- Select Tags: Select the Tag (single or multiple) from the dropdown list using the Dropdown Arrow. If you do not have any existing Contact List in your FluentCRM, you can directly create one from here by clicking the Plus icon.
To learn the use of the First Two setting options mentioned in the screenshot below, read this Section.
Once you are done, click the Save Settings button to save all your changes.
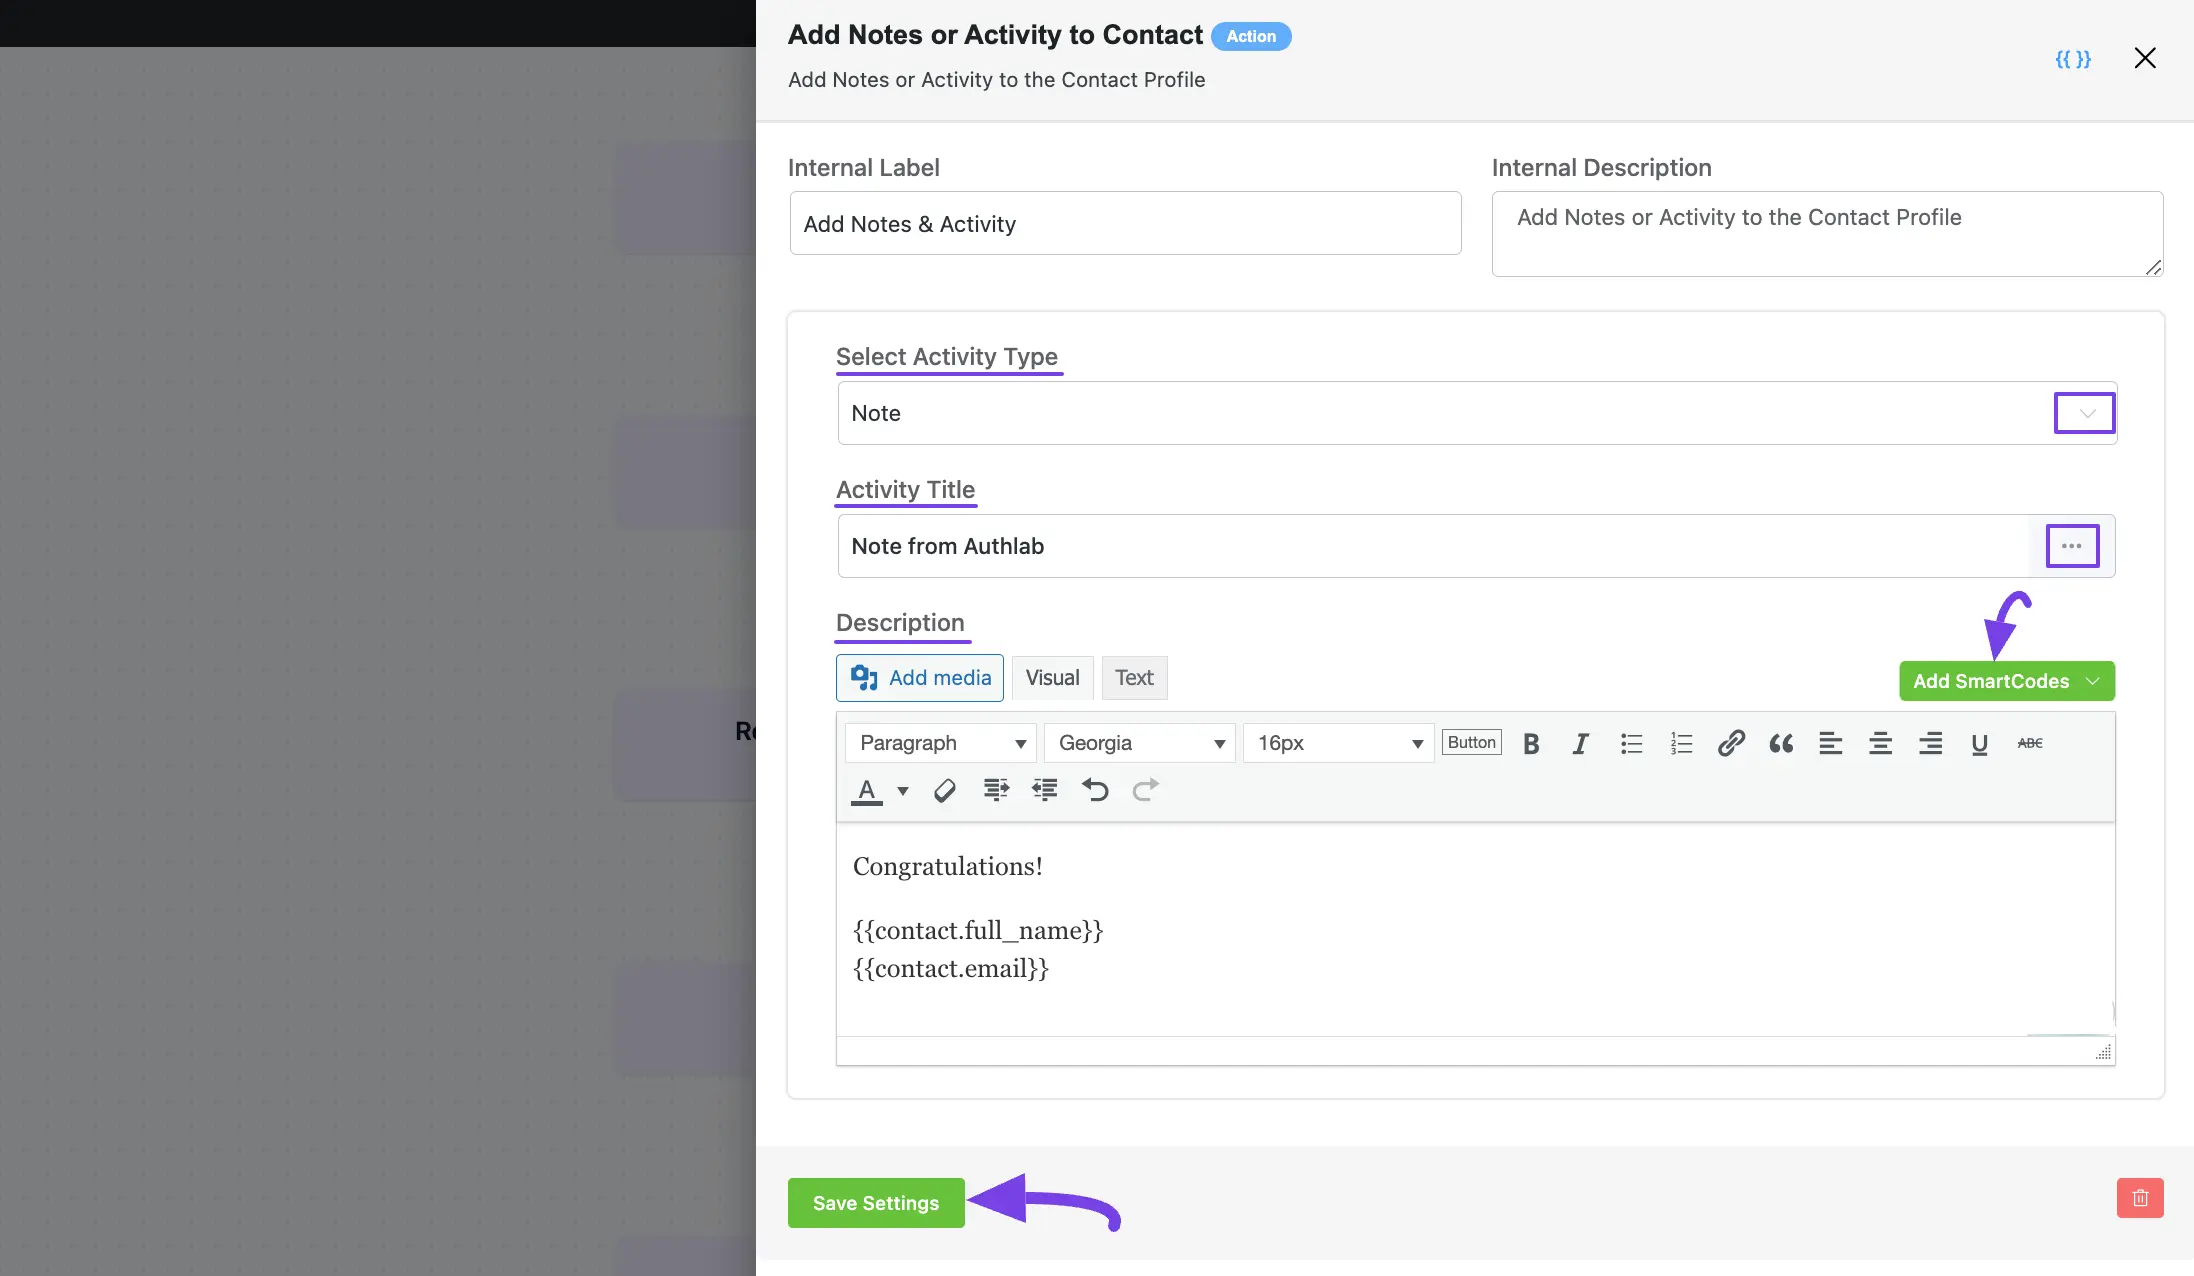
8. Add Notes & Activities #
This action lets you add notes or activities to the contact profile after the automation starts.
After selecting this Action, a tab will appear on the right-hand side with options to set up your action.
Here are the Settings of the Add Notes & Activities action:
- Select Activity Type: Select the activity type from the dropdown list using the Dropdown Arrow that you want to run within this automation funnel. For, example, I selected the Note activity. You can select Call, Email, Meeting, etc. as per your needs.
- Activity Title: Enter a Title for the activity so that you can find it easily later. Here, you can use the SmartCodes by clicking the Three-dot-icon.
- Description: Here, you can add a description for your note. You can also use the SmartCodes here by clicking the Three-dot-icon.
To learn the use of the First Two setting options mentioned in the screenshot below, read this Section.
Once you are done, click the Save Settings button to save all your changes.
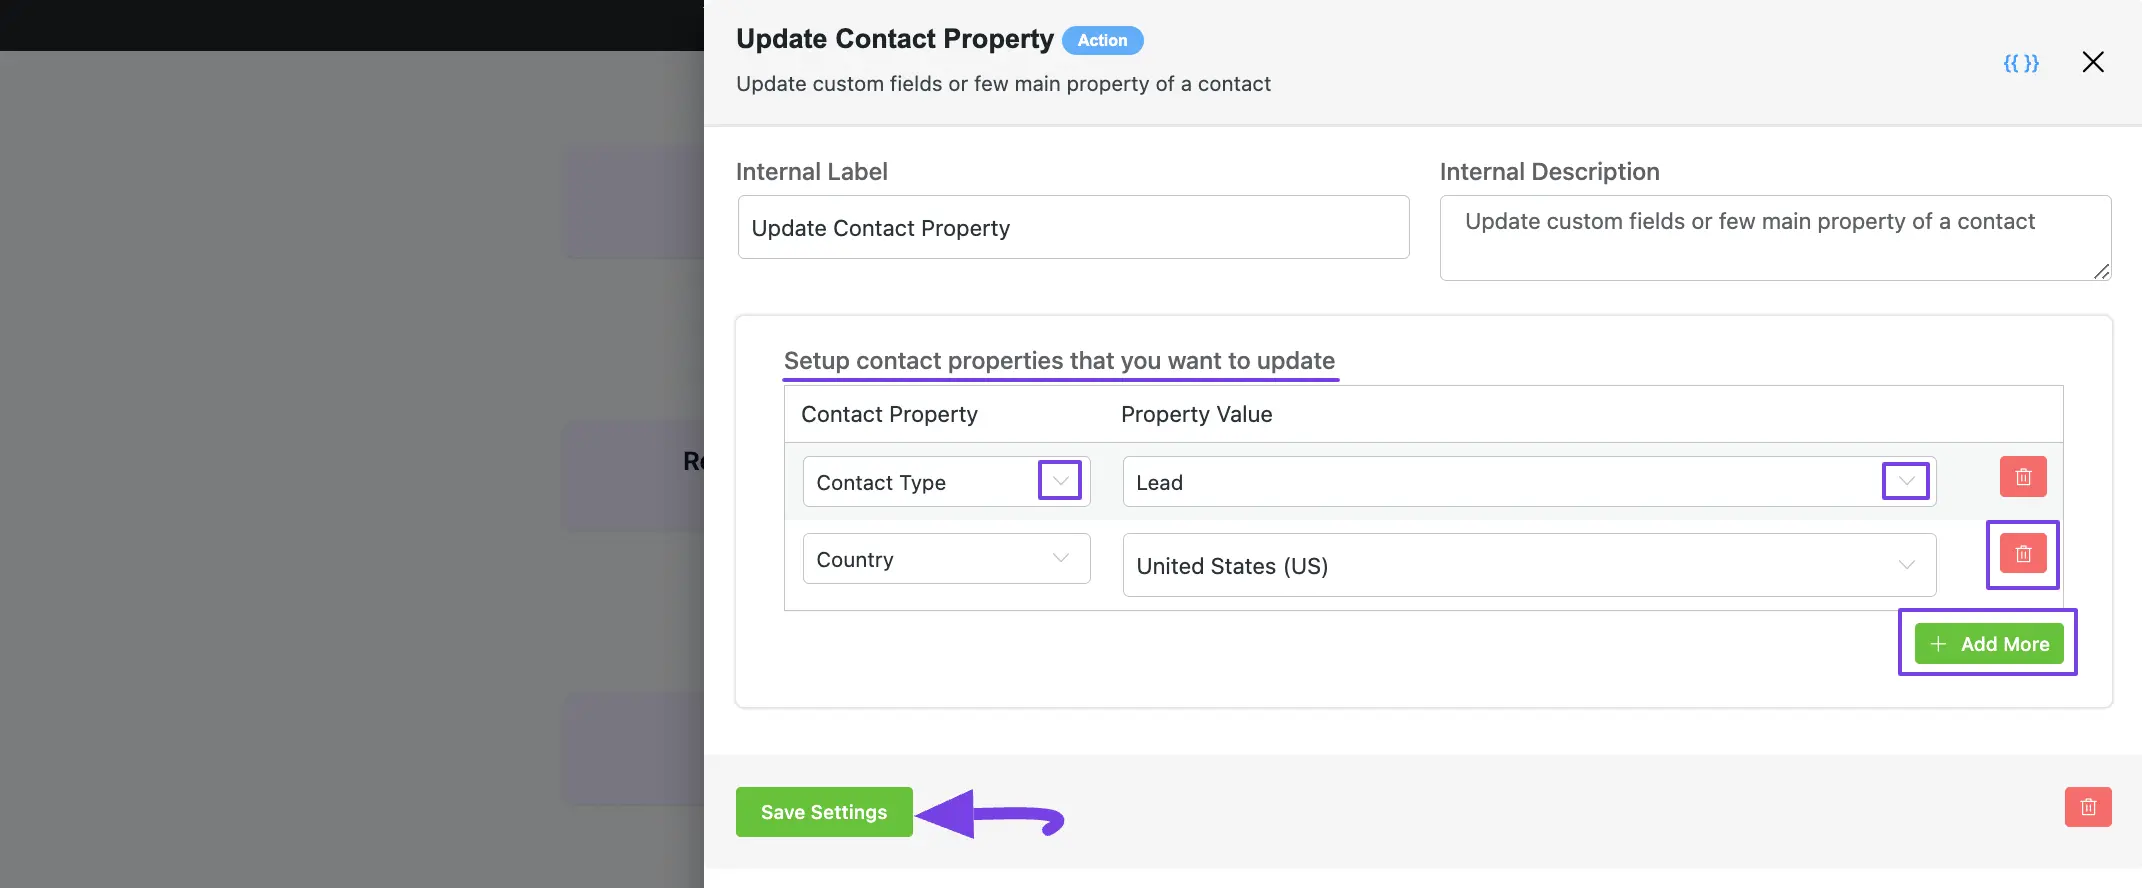
9. Update Contact Property #
This action lets you update custom fields or a few main properties of contact after the automation starts.
After selecting this Action, a tab will appear on the right-hand side with options to set up your action.
Here are the Settings of the Update Contact Property action:
- Select contact properties that you want to update: With this option, you can select the contact Property and the proper Value of that property from the dropdown list by clicking the Dropdown Arrow. You can add as many properties as you want by clicking the +Add More button, and delete any existing property by clicking the Trash Icon.
To learn the use of the First Two setting options mentioned in the screenshot below, read this Section.
Once you are done, click the Save Settings button to save all your changes.
10. Outgoing Webhook #
This action lets you send data to an external server via the GET or POST Method after the automation starts.
After selecting this Action, a tab will appear on the right-hand side with options to set up your action.
Once you are done, click the Save Settings button to save all your changes.
You can also test your webhook by clicking the Send Test Webhook button.
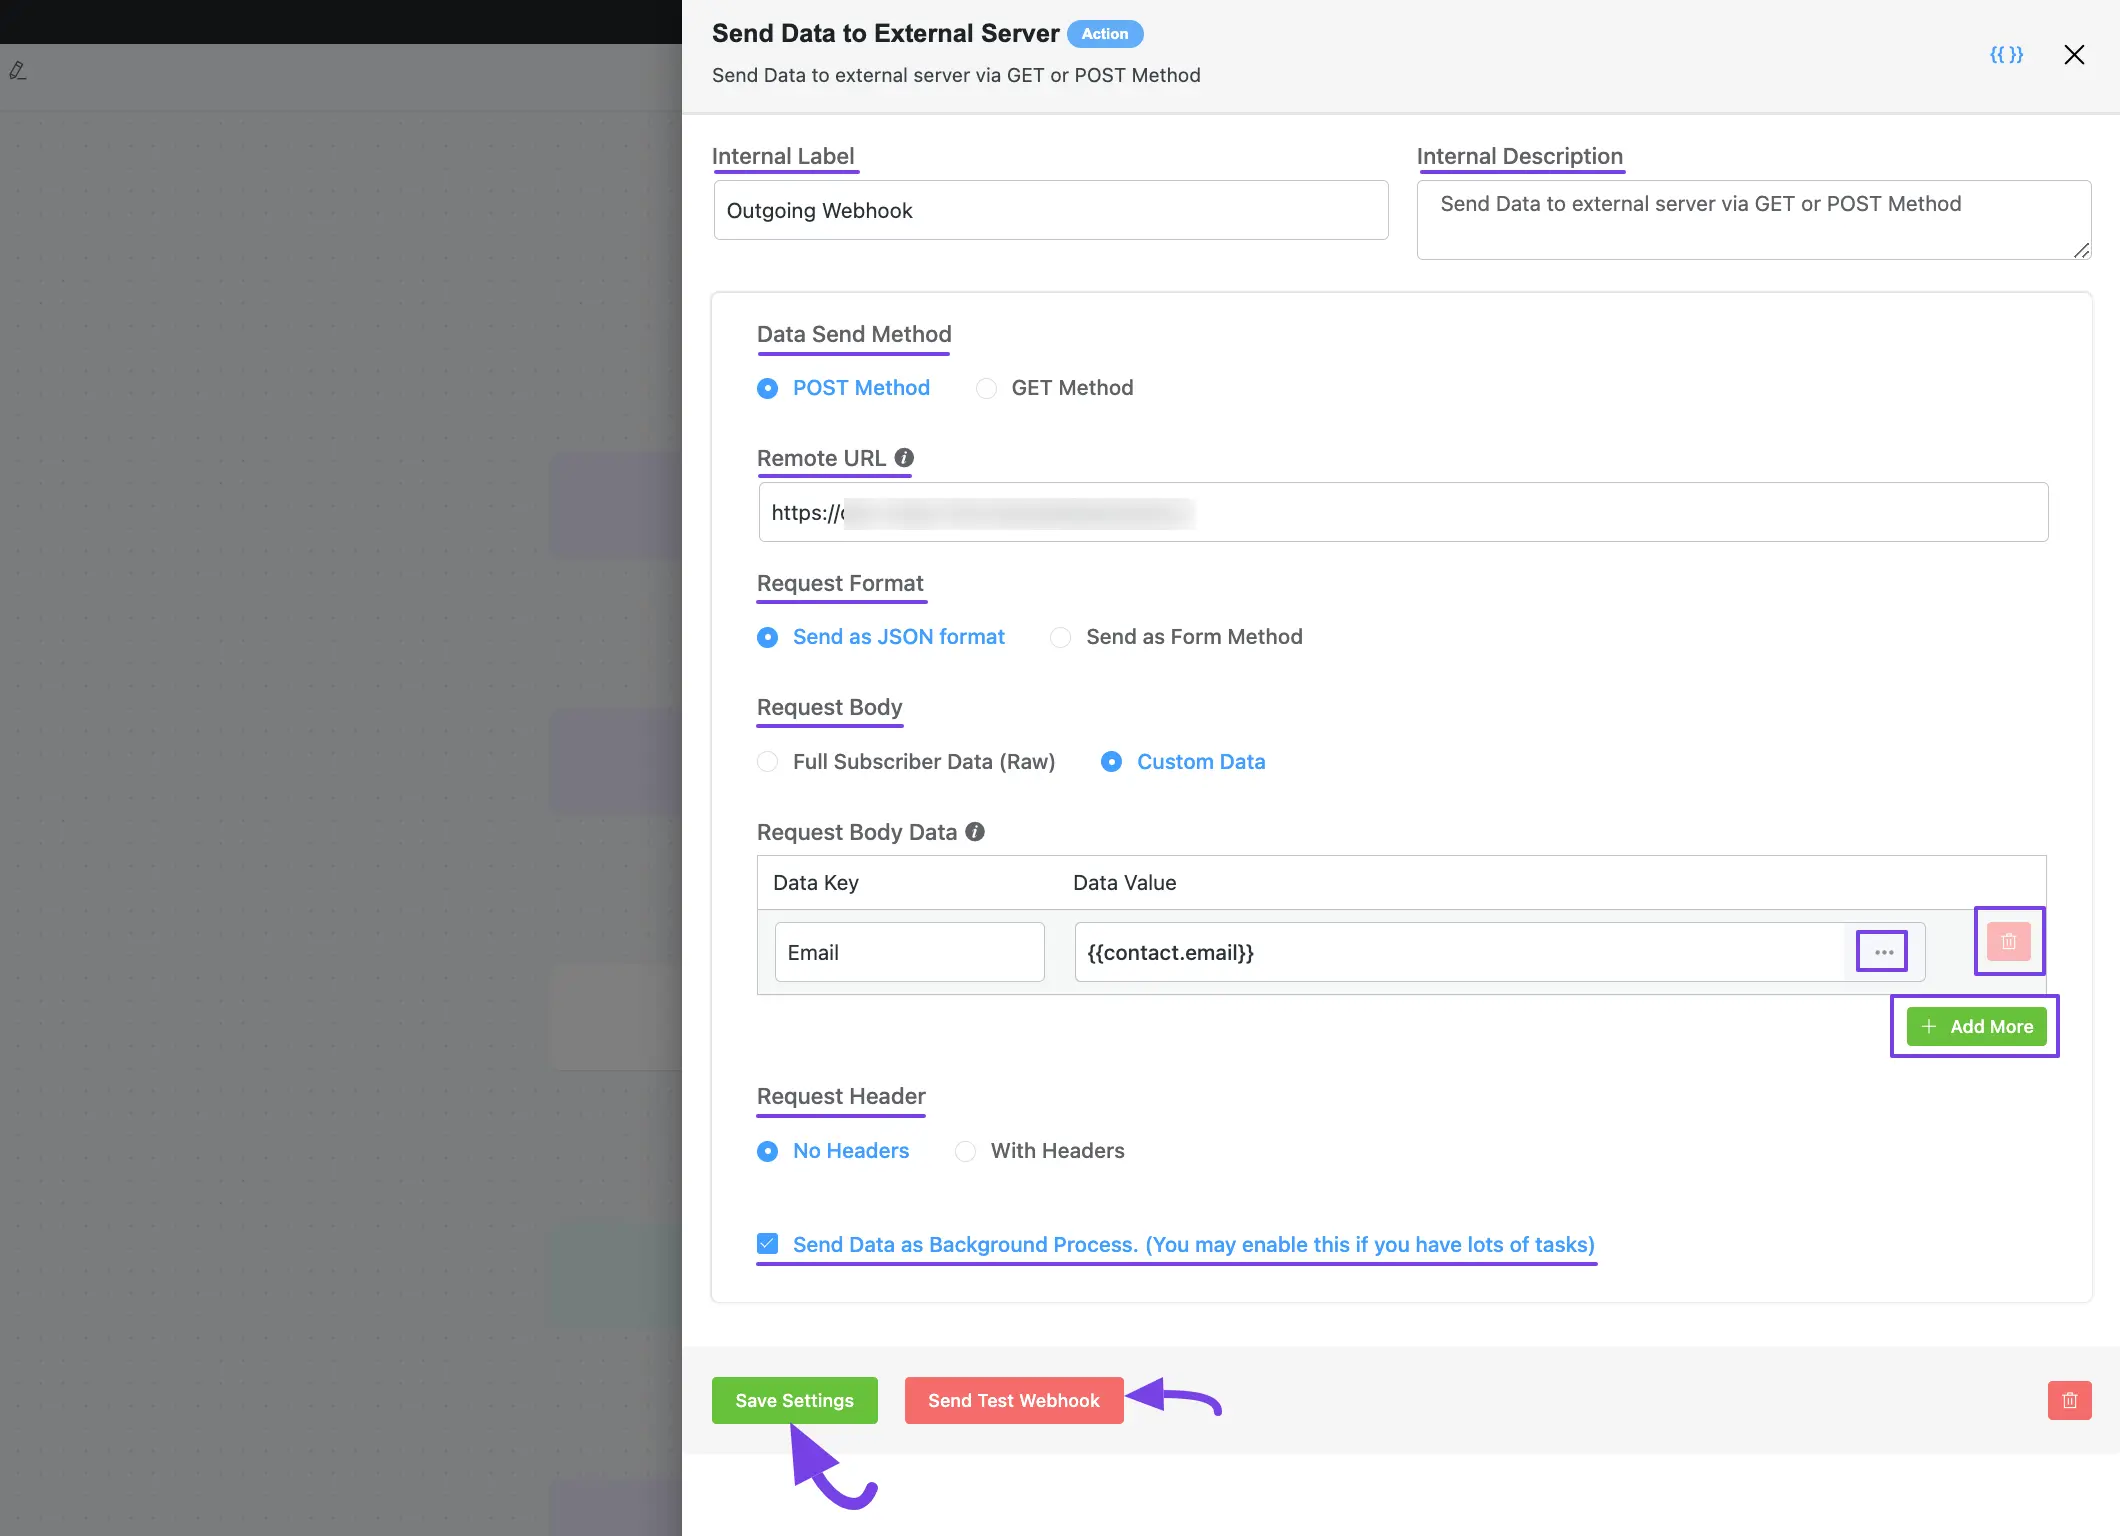
The Settings of the Outgoing Webhook action mentioned above are explained below:
- Internal Label & Description: To learn the use of these settings options, read this Section.
- Data Send Method: Select your data send method either Post or Get by checking the desired box.
- Remote URL: Here, provide a valid URL to where you want to send the data.
- Request Format: Select your request format either JSON or Form by checking the desired box.
- Request Body: The request body of the webhook is the data to be sent to the remote source. You can choose either Full Subscriber Data (Raw) or Custom Data as the request body. If you select Custom data, you will get the Request Body Data option to map the data for custom sending data type using the below fields.
- Data Key: The key mapped to the remote source will accept the sent data value.
- Data Value: The value from FluentCRM you are going to send to the remote source against the Data Key. You can use the SmartCodes by clicking the Three-dot-icon.
Also, you can add as many Request Body Data as you want by clicking the +Add More button, and delete any existing body data by clicking the
Trash Icon.
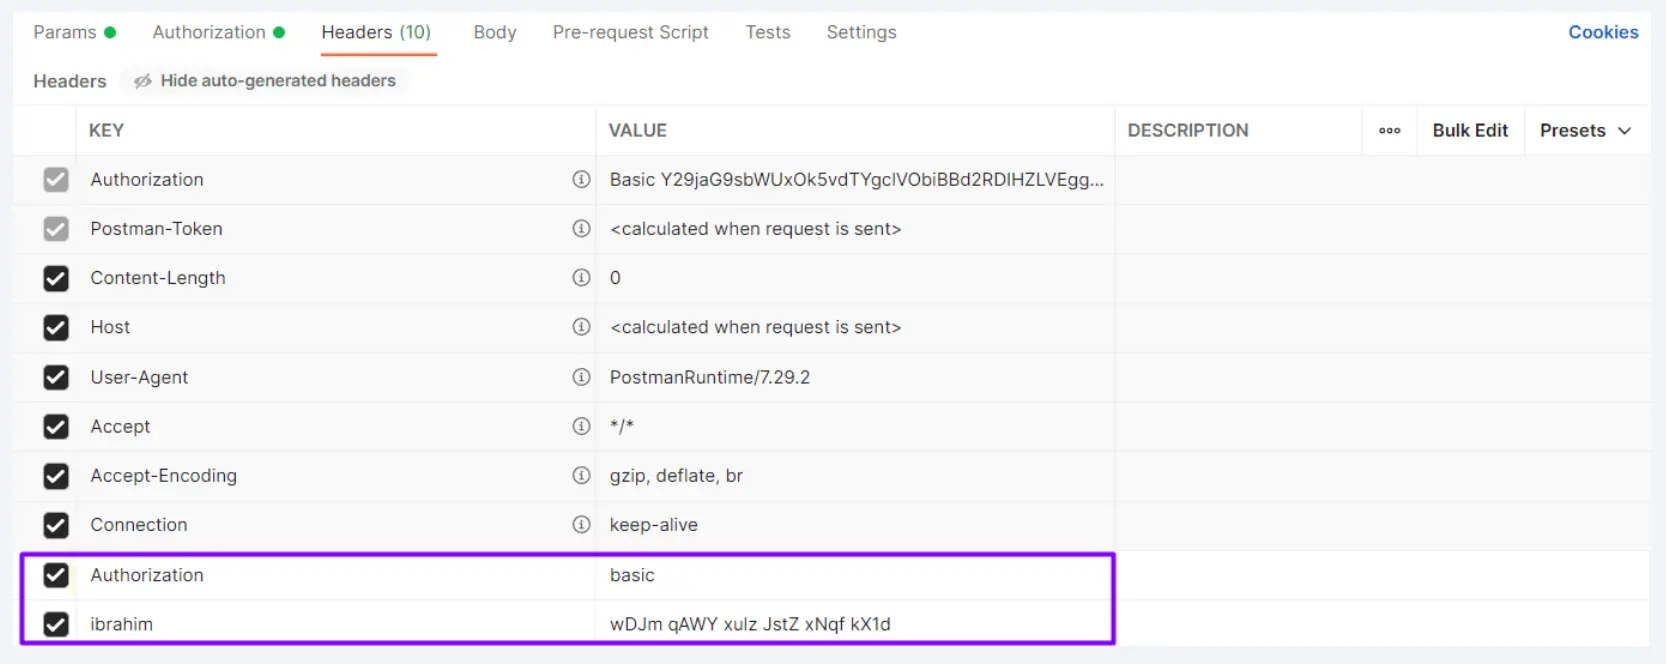
- Request Header: Use the With Headers option if you want to map data for request headers. This is particularly helpful when you need to add additional headers, such as authentication, which may be required by the receiving provider.
For instance, authentication can be implemented using Basic OAuth.
An example of these additional headers is shown in the screenshot below:
If you don’t want to add headers, simply check the No Headers box.
- Send Data as Background Process: Check this option if you have a lot of tasks running, you may want to enable the option to Send Webhook Data as Background Process. However, unchecking this option is recommended so that the webhook data is sent immediately.
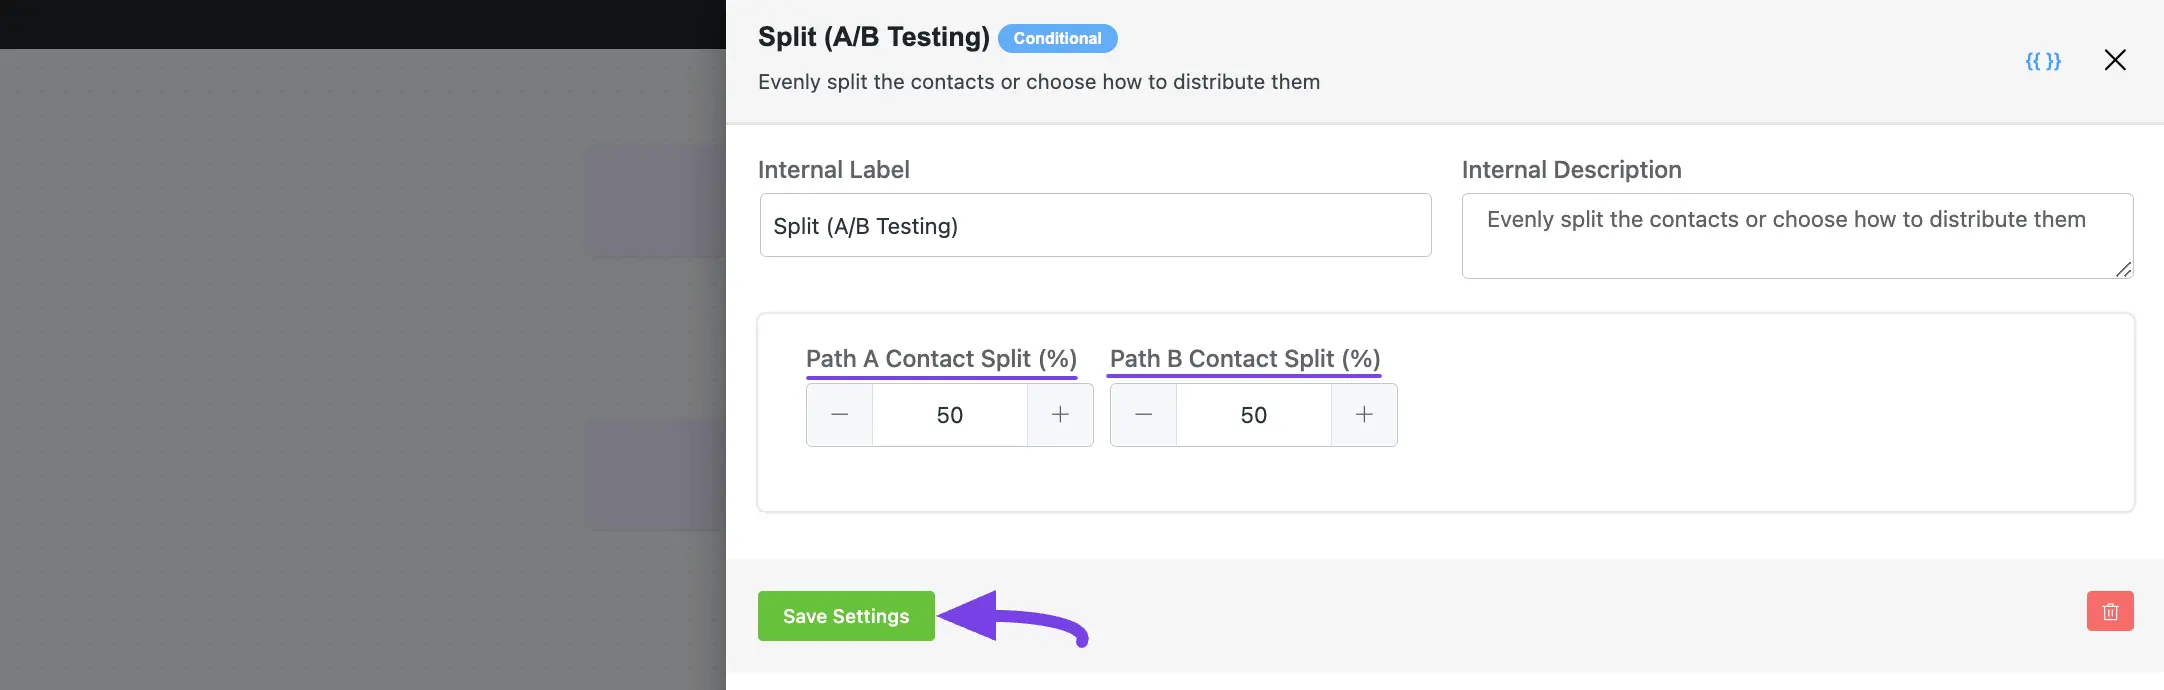
11. Split (A/B Testing) #
This action lets you evenly split the contacts or choose how to distribute them after the automation starts.
After selecting this Action, a tab will appear on the right-hand side with options to set up your action.
Here are the Settings of the Split (A/B Testing) action:
- Path A Contact Split (%): Set the percentage of Path A to distribute contacts for testing conditions and benchmarking to find the most effective approach.
- Path B Contact Split (%): Set the percentage of Path B to distribute contacts for testing conditions and benchmarking to find the most effective approach.
To learn the use of the First Two setting options mentioned in the screenshot below, read this Section.
Once you are done, click the Save Settings button to save all your changes.
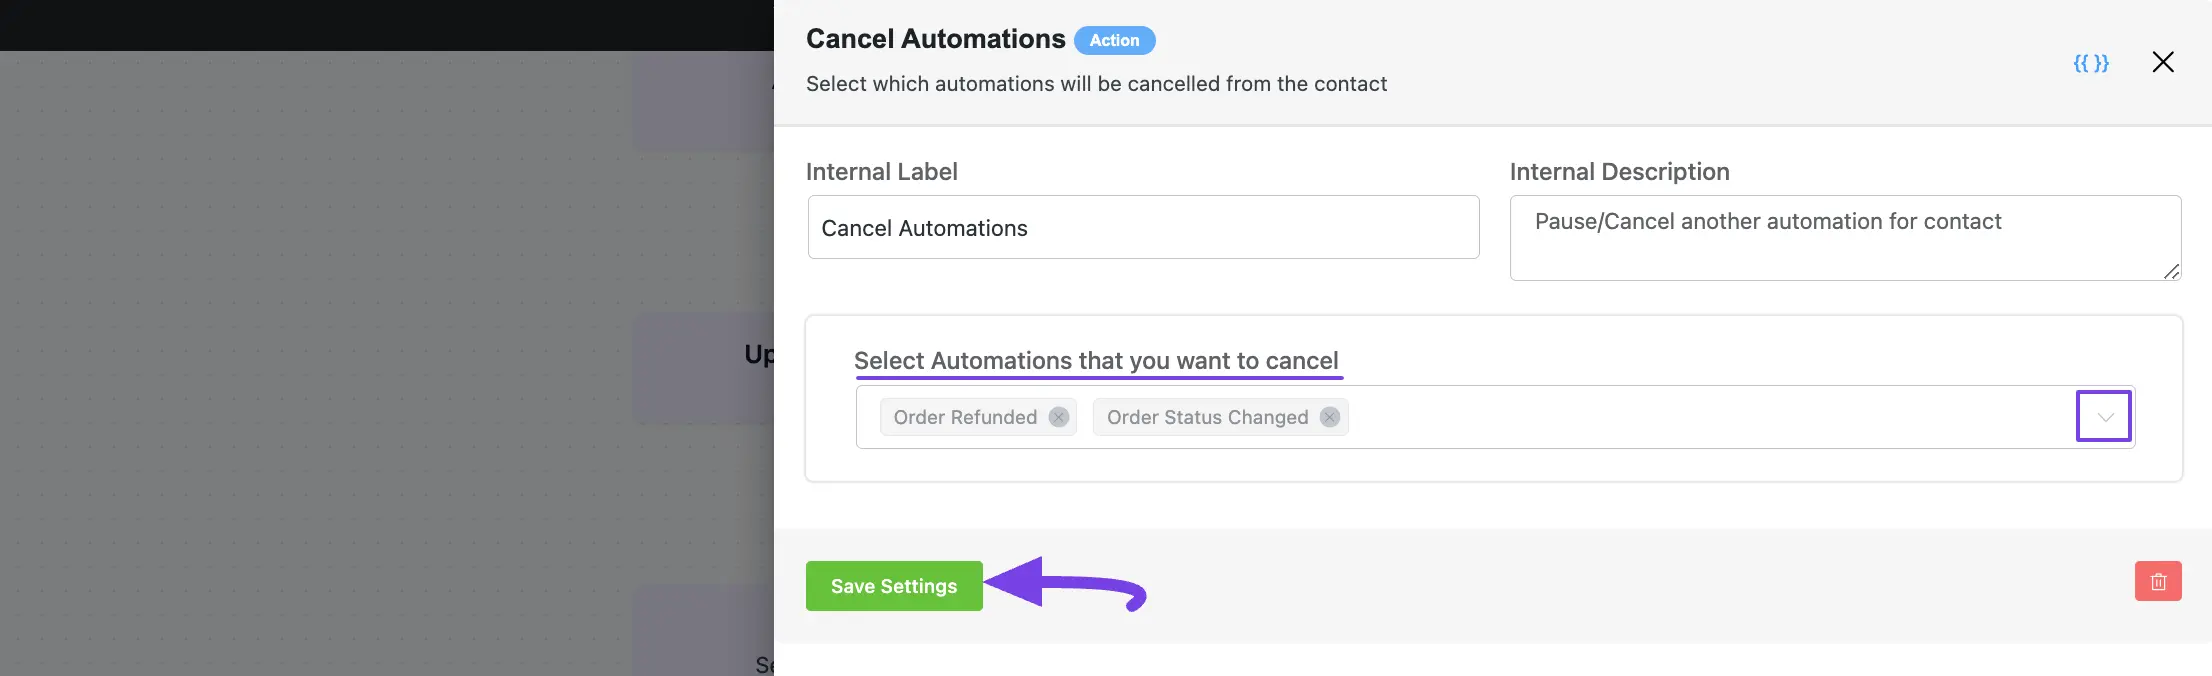
12. Cancel Automation #
This action lets you select which automations will be canceled from the contacts after the automation starts.
After selecting this Action, a tab will appear on the right-hand side with options to set up your action.
Here are the Settings of the Cancel Automation action:
- Select Automation that you want to cancel: Select the other Automation/s you want to cancel reaching this point for the contact.
To learn the use of the First Two setting options mentioned in the screenshot below, read this Section.
Once you are done, click the Save Settings button to save all your changes.
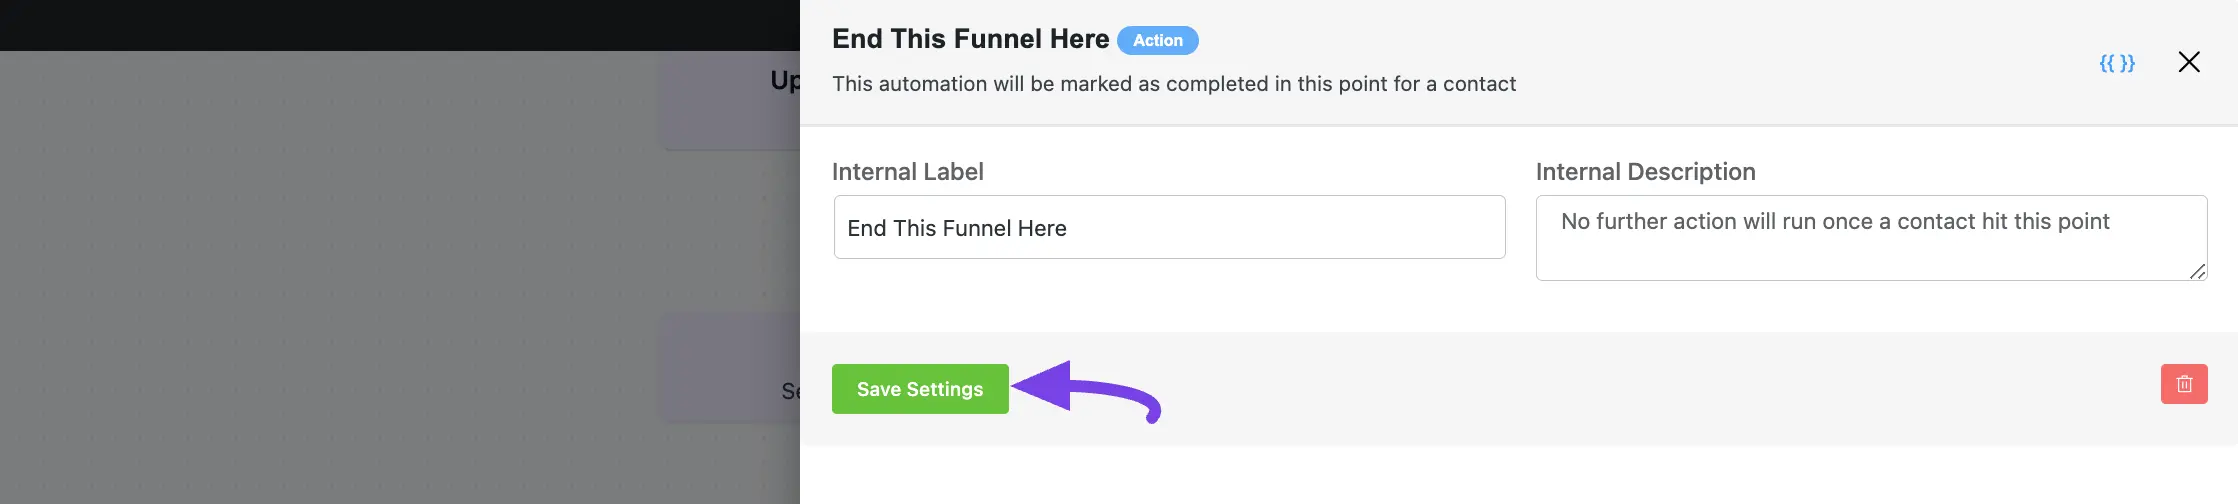
13. End This Funnel Here #
After choosing this action, this automation will be marked as completed at this point for contacts.
After selecting this Action, a tab will appear on the right-hand side with options to set up your action.
Here are the Settings of the End This Funnel Here action:
- Interval Label: Here, a Name for the Action will be automatically added so you can easily find it later. You can change it to suit your needs.
- Internal Description: A description of the action will also be automatically added as a Subtitle. You can also change it to suit your needs.
Once you are done, click the Save Settings button to save all your changes.
If you have any further questions, concerns, or suggestions, please do not hesitate to contact our @support team. Thank you.


I would like to update a custom field (date) with the current date.
With the update contact action I need to pick a static date. Is there an option to store the current date into a contact date-field?
It is very important, indeed!
Hi Gerald, this feature isn’t available. Our R&D is evaluating. 🙂
I am trying to add contacts from a list already created into an active automation. Can anyone tell me how to do this?
If I use the “Cancel Sequence Emails” does that stop all unsent emails for that contact?
In other words, if they are in the sequence on email #3 of 10 and the automations cancels they won’t receive any further emails in the sequence, correct?
I’m looking to purchase fluentcrm but how do you add condition ?
– if customer has 0 purchase
– if customer spent more than $99
Also how do you add suggested products in email template base on customer product view history ?
And a link to his abandoned cart…
These are mandatory for any e-commerce marketing email software !
Does FluentCRM support retargeting pixels?