In FluentCRM, the Company Module feature organizes contacts to one or more company records. In this company record, you can see company information and the contacts you have added under the company. This article will guide you through the process of using this feature.
One of the notable features of the Company Module is organizing one or more contacts under a single entity. Additionally, it automatically retrieves company logos from their website using the website URL only.
Activate/Enable Company Module #
You can enable the Company Module feature using Two different options. These are:
- Addons
- Advanced Features Config
To learn how you can enable this feature using the options mentioned above, follow the steps with the screenshots below –
Enable Company Module Using Addons #
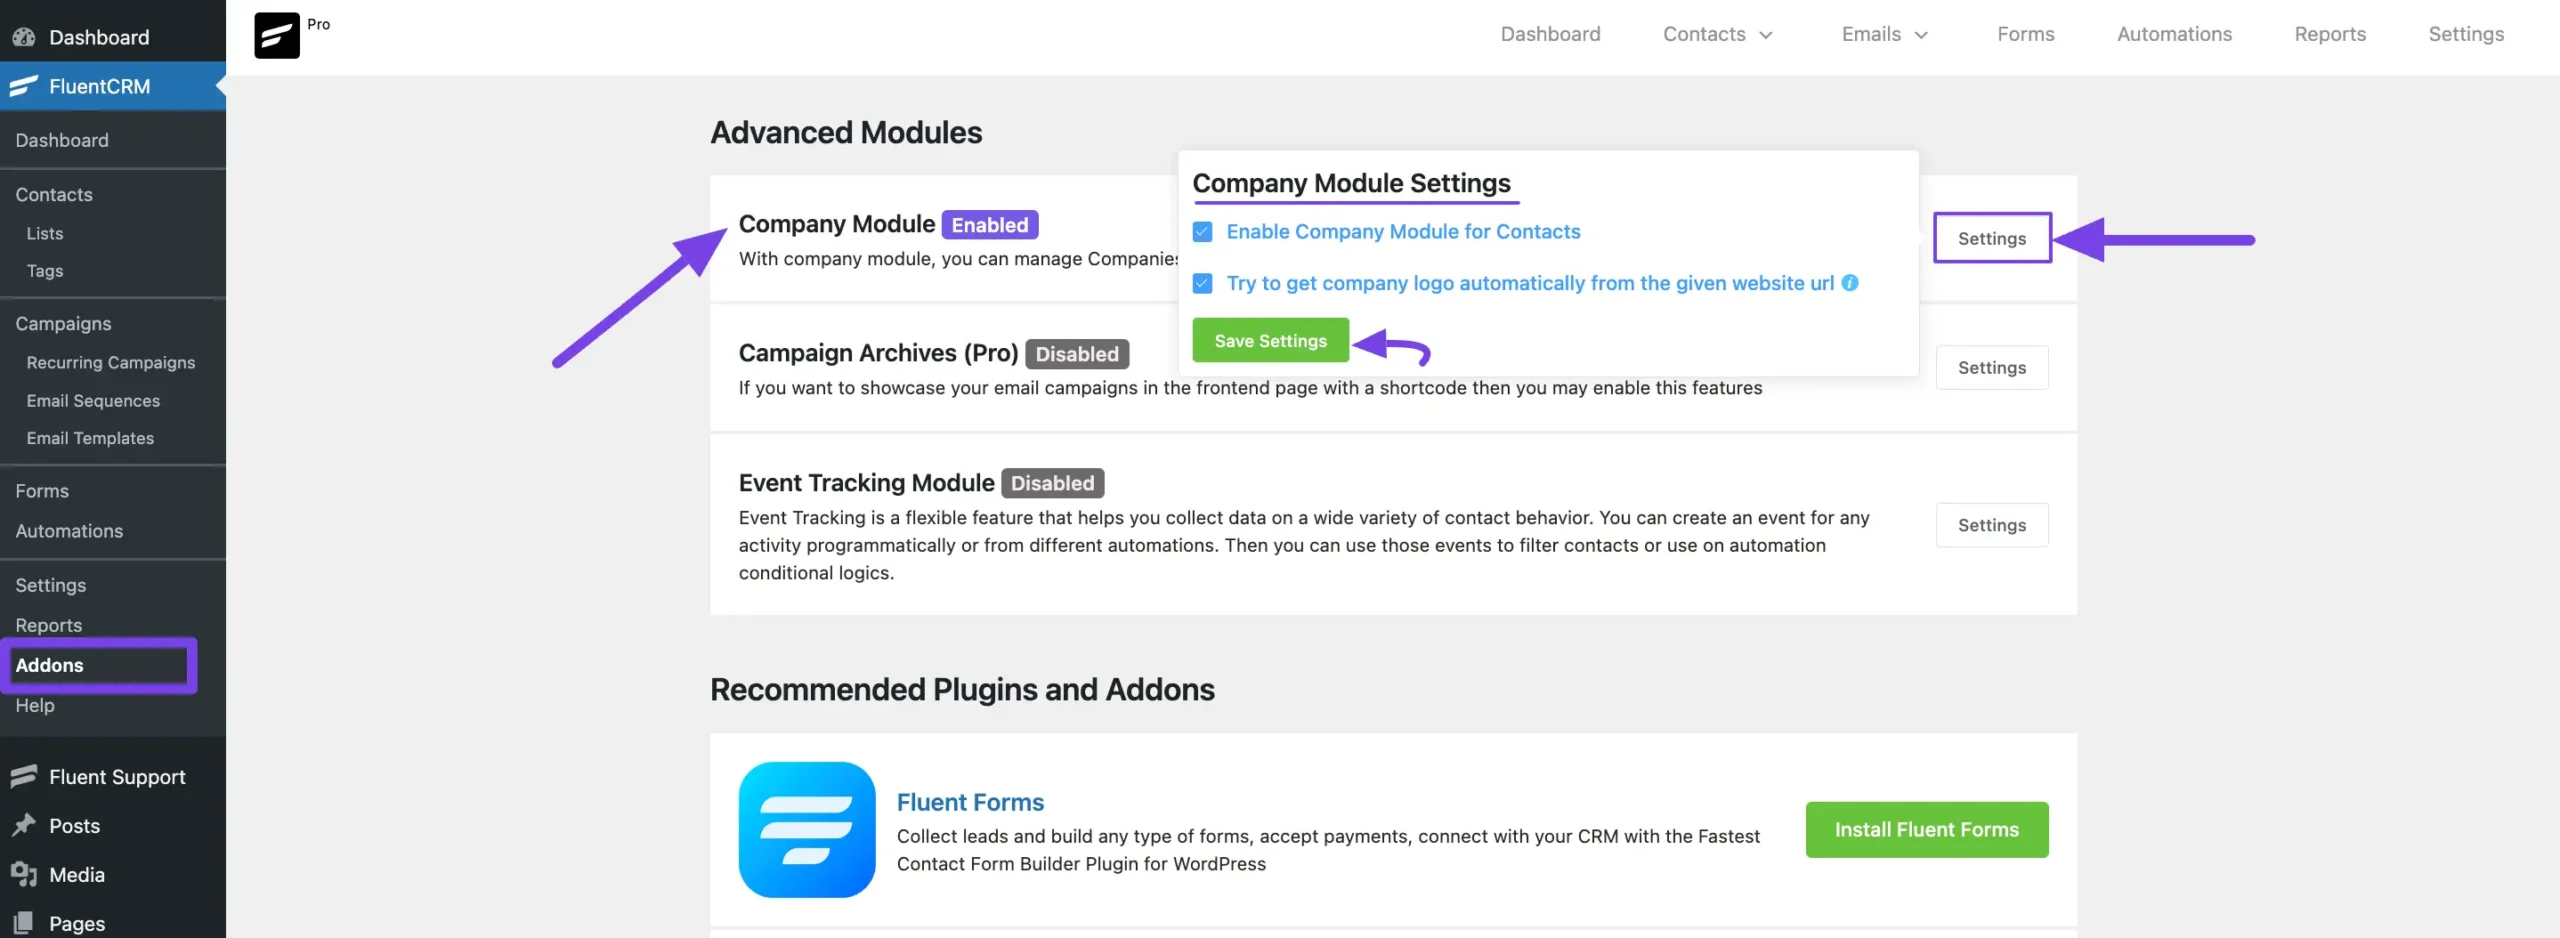
First, go to the Addons section in your Fluent CRM Sidebar and you will find the Company Module option under the Advanced Modules.
Now click the Settings button and a popup will appear where you need to check the boxes.
Then, click the Save Settings button to unlock the Company Module features and fetch the company logo automatically through its website URL.
Enable Company Module Using Advanced Features Config #
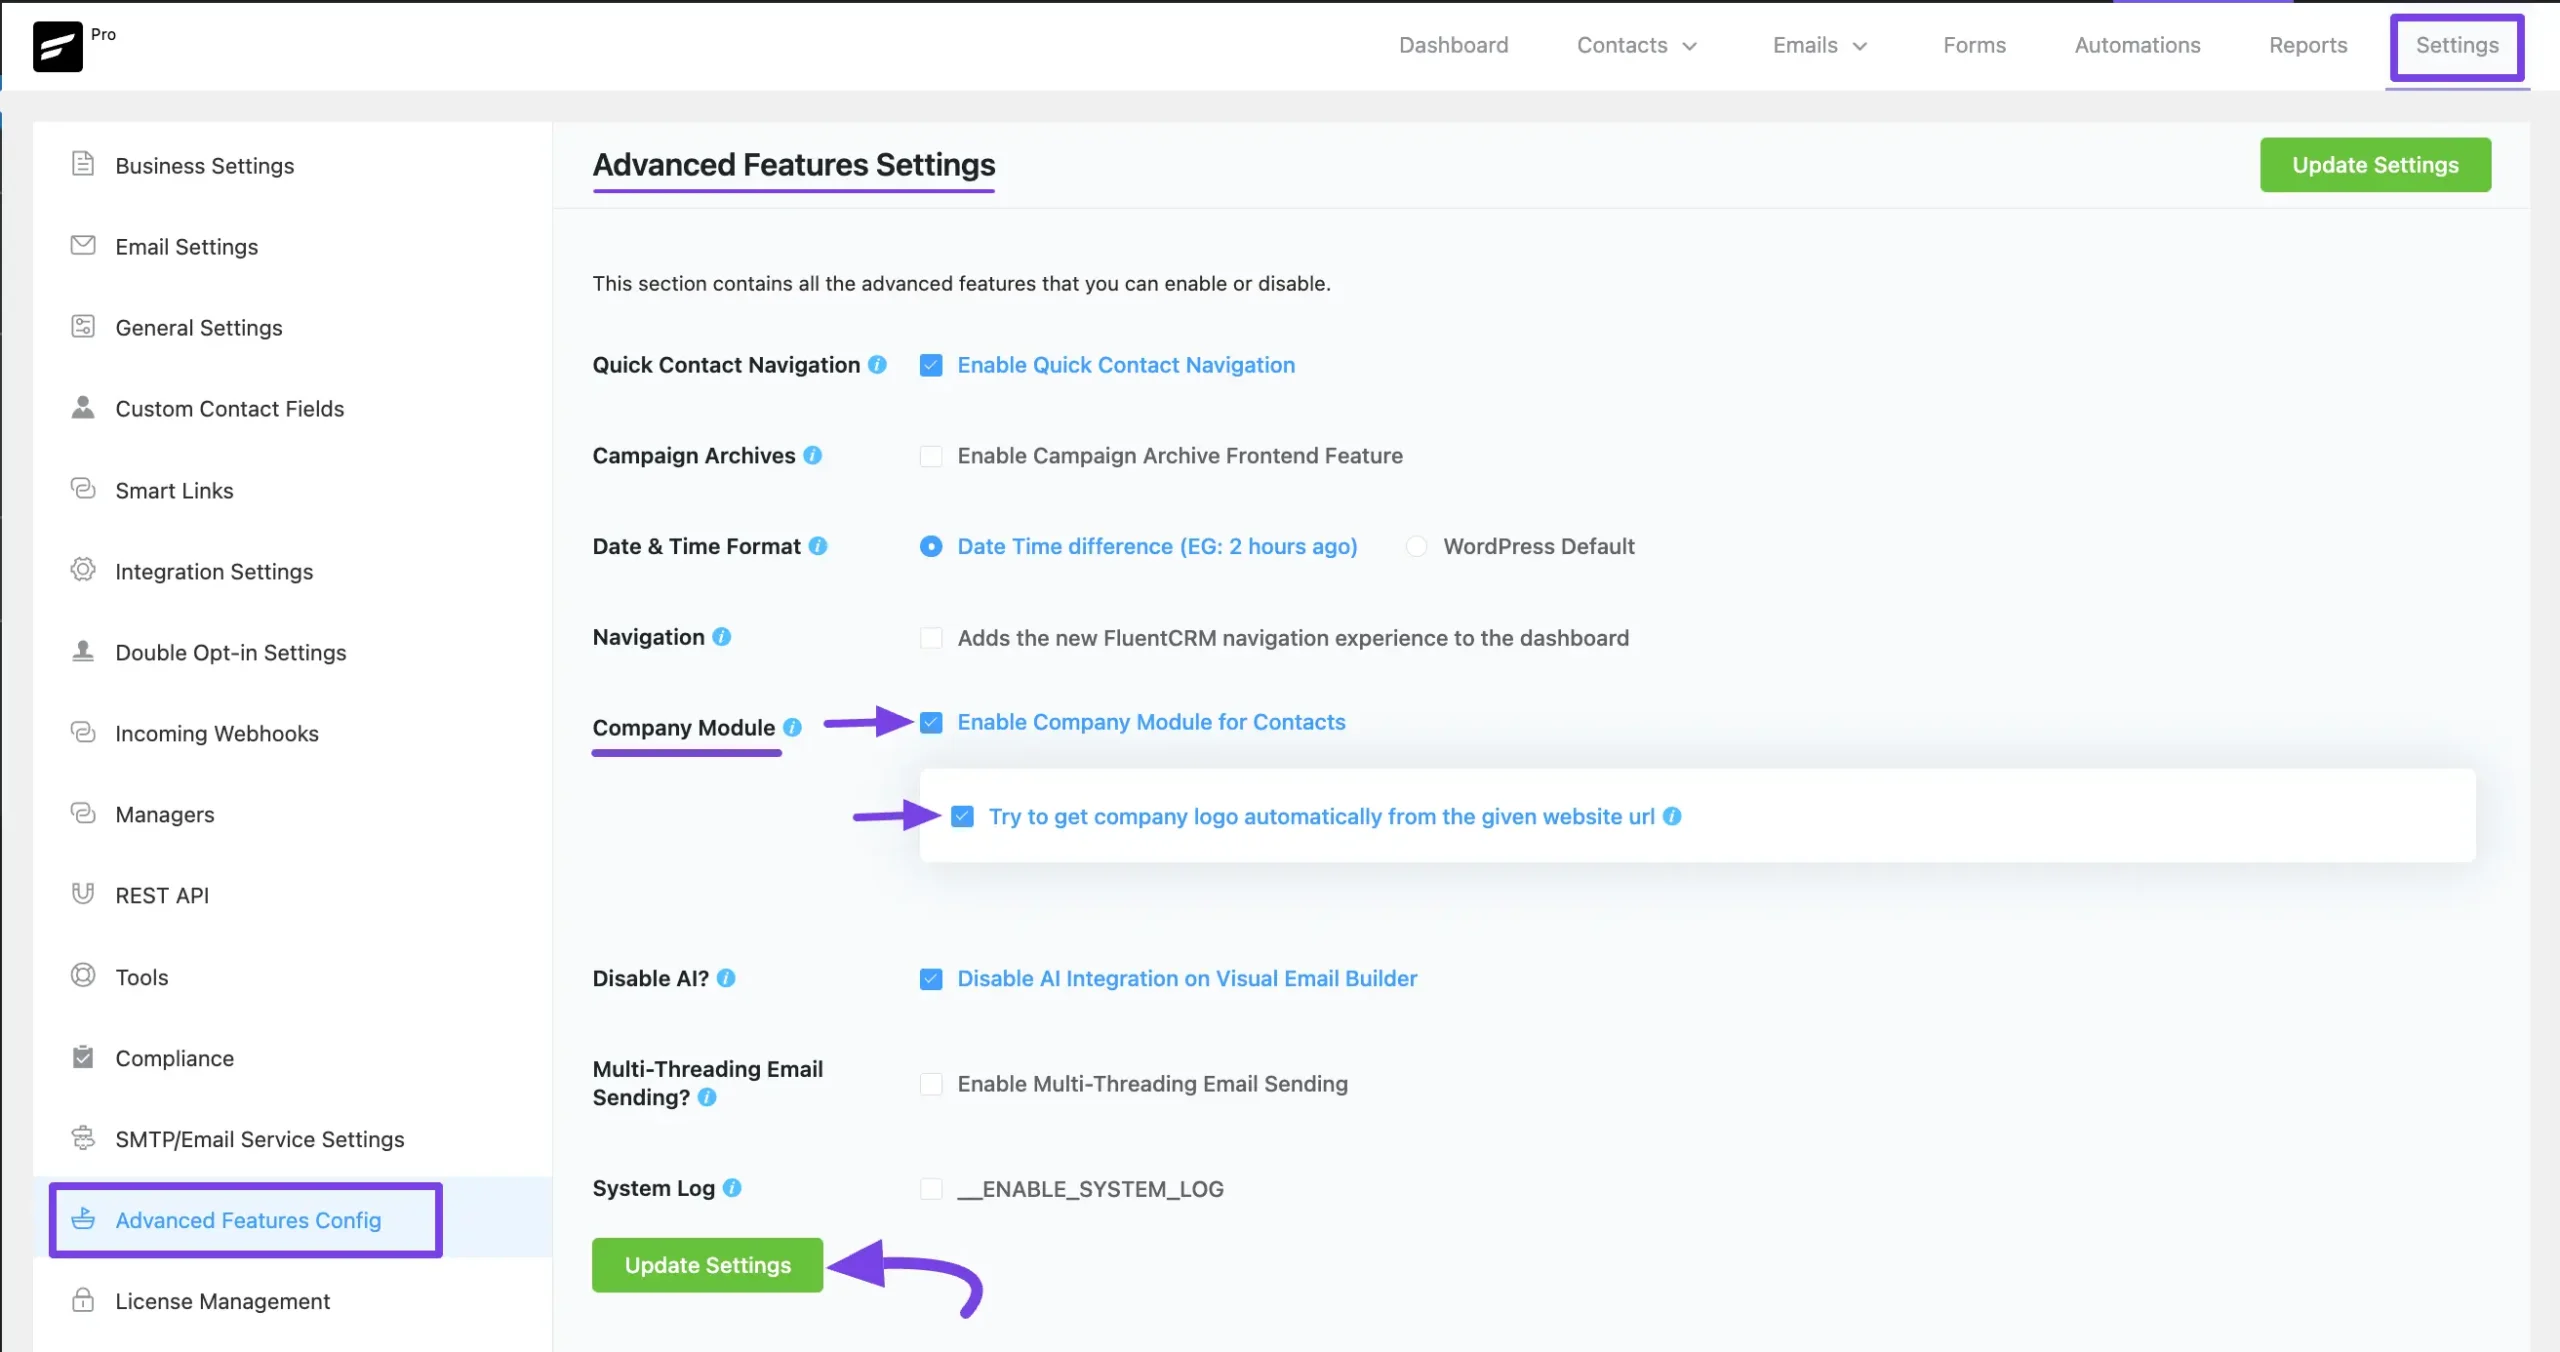
First, go to Settings from the top right corner of the Fluent CRM Navbar, click the Advanced Feature Config settings page, scroll down and you will find the Company Module option.
Here, you will find two settings options. These are
- Enable Company Module for Contacts: Enable this to unlock the Company Module feature inside the Contacts section dropdown of the Fluent CRM Navbar.
- Try to get company logo automatically from the given website URL: Enable this to fetch the company logo automatically by providing only the website URL of the company.
Adding Companies #
To learn how you can Add your desired Companies in the Contacts section, follow the steps with the screenshots below –
After enabling the Company Module feature, go to Companies from the Contacts section dropdown.
Remember, you will not get this “Companies” option inside the Contacts section if you do not activate/enable the company module.

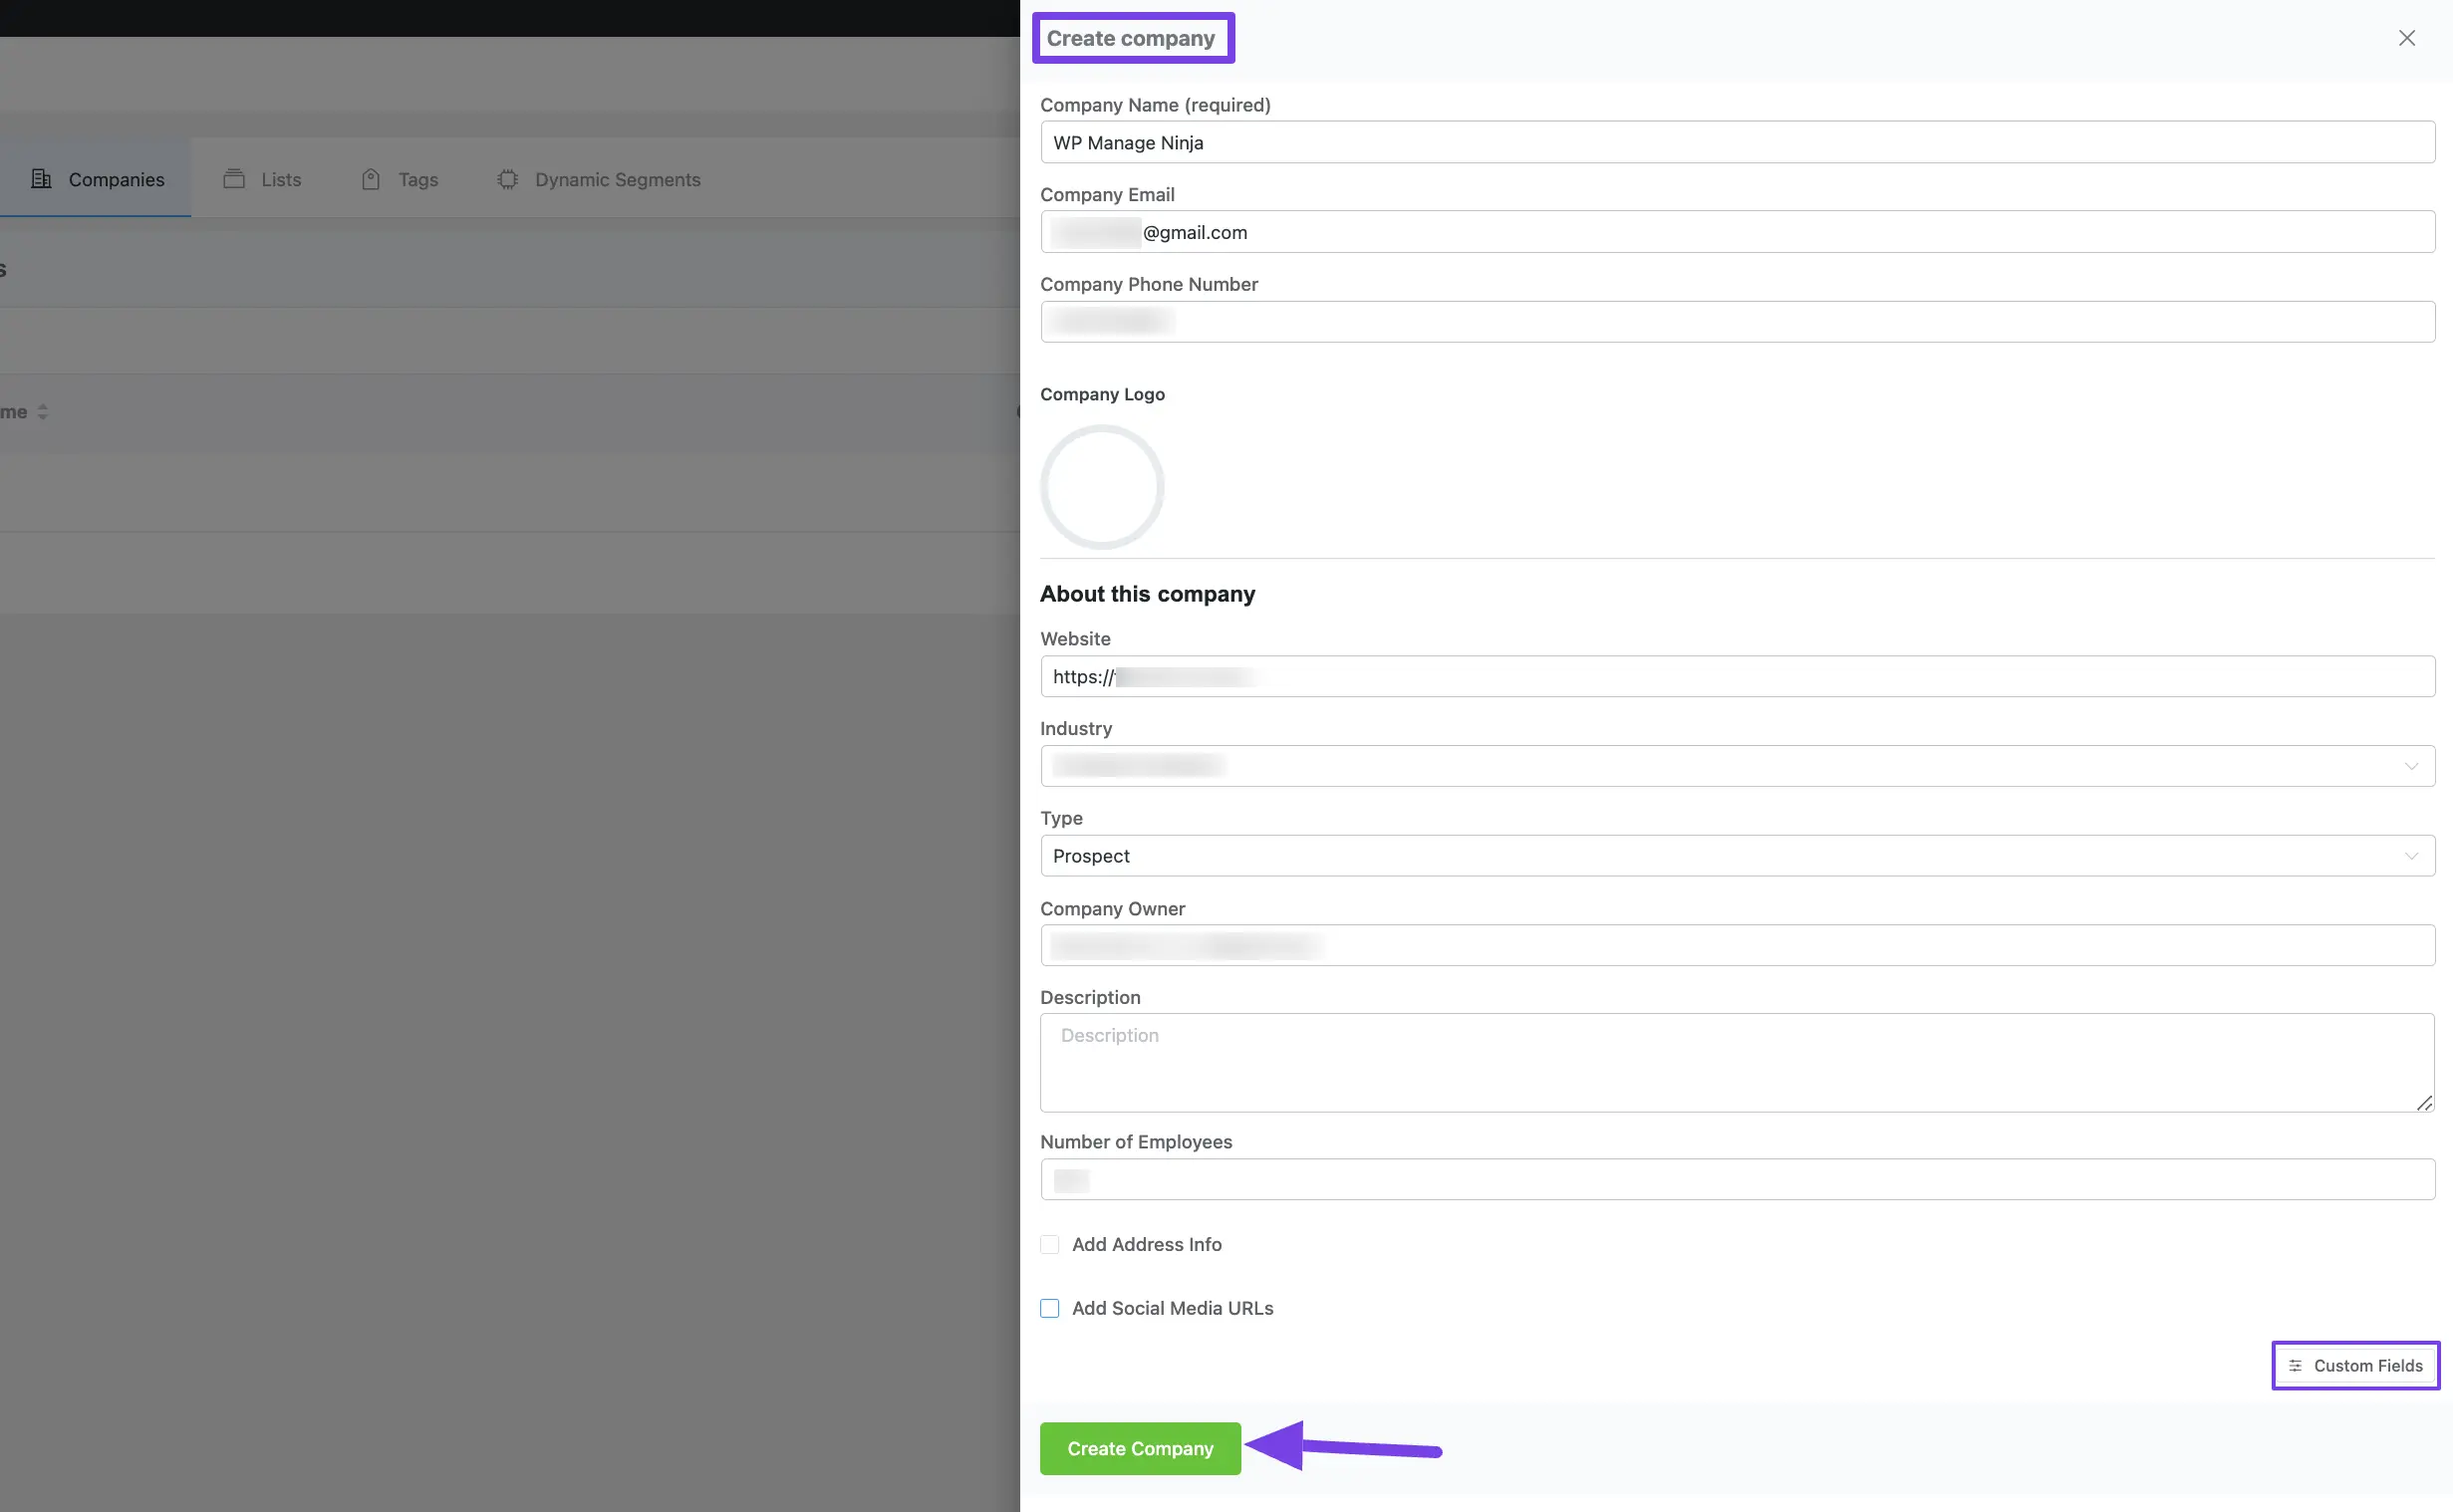
To add company details, simply click the + Add Company button and a pop-up will appear where you can enter the company details.
You can also import company details from a CSV file by clicking the Import button.
Or, conveniently export company details to a CSV file by clicking the Export button.

After providing all the necessary information, click the Create Company button.
Once you add the company, you will get Three major options. These are:
Contacts is for adding and organizing the contacts under a single company, and Notes & Activities and Custom Fields for adding the essential information to the company.
- Contacts
- Notes & Activities
- Custom Fields
Contacts #
Now, you can easily add contacts for the added companies. To learn how to add contacts, follow the screenshots below –
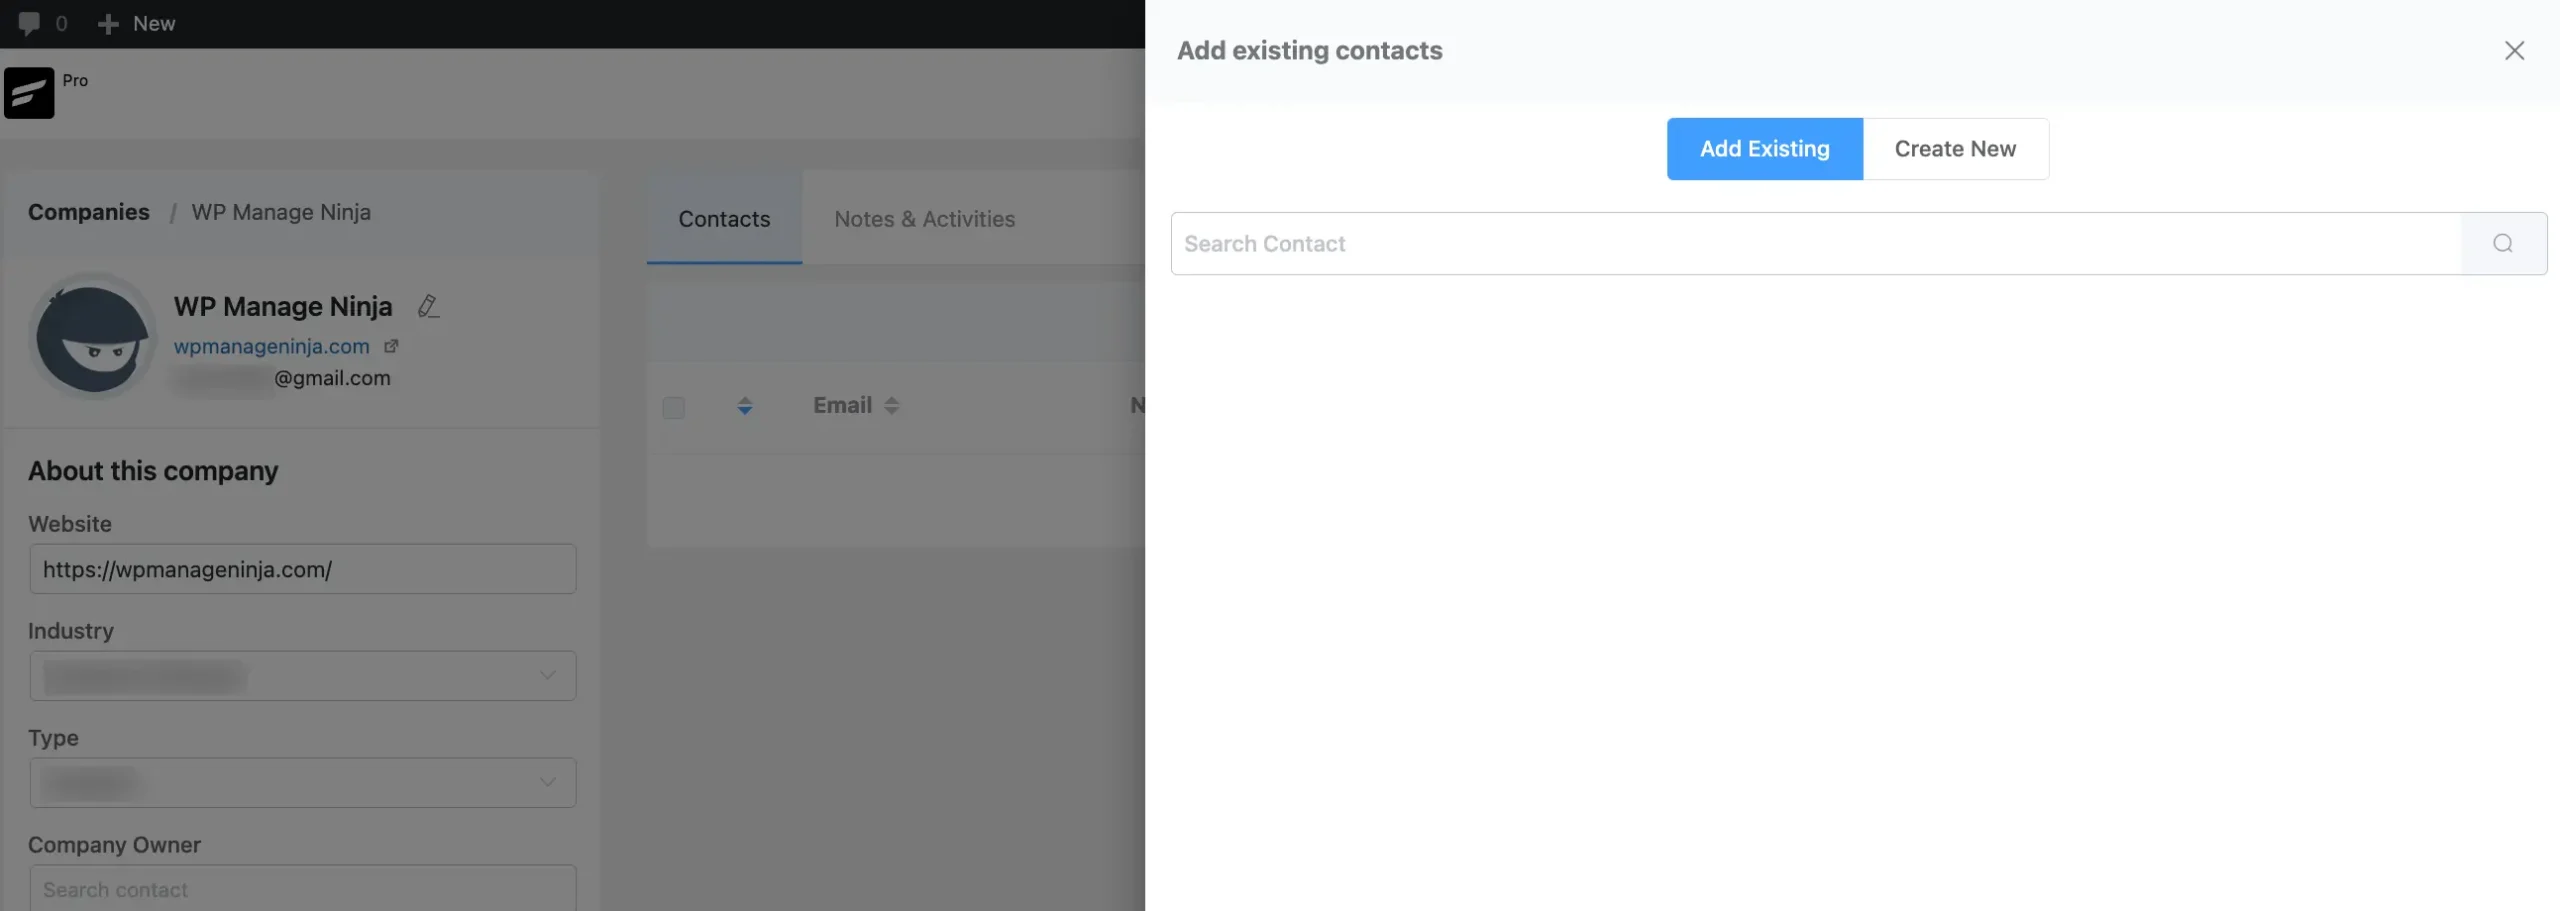
Click the + Contacts button, and a pop-up will appear.
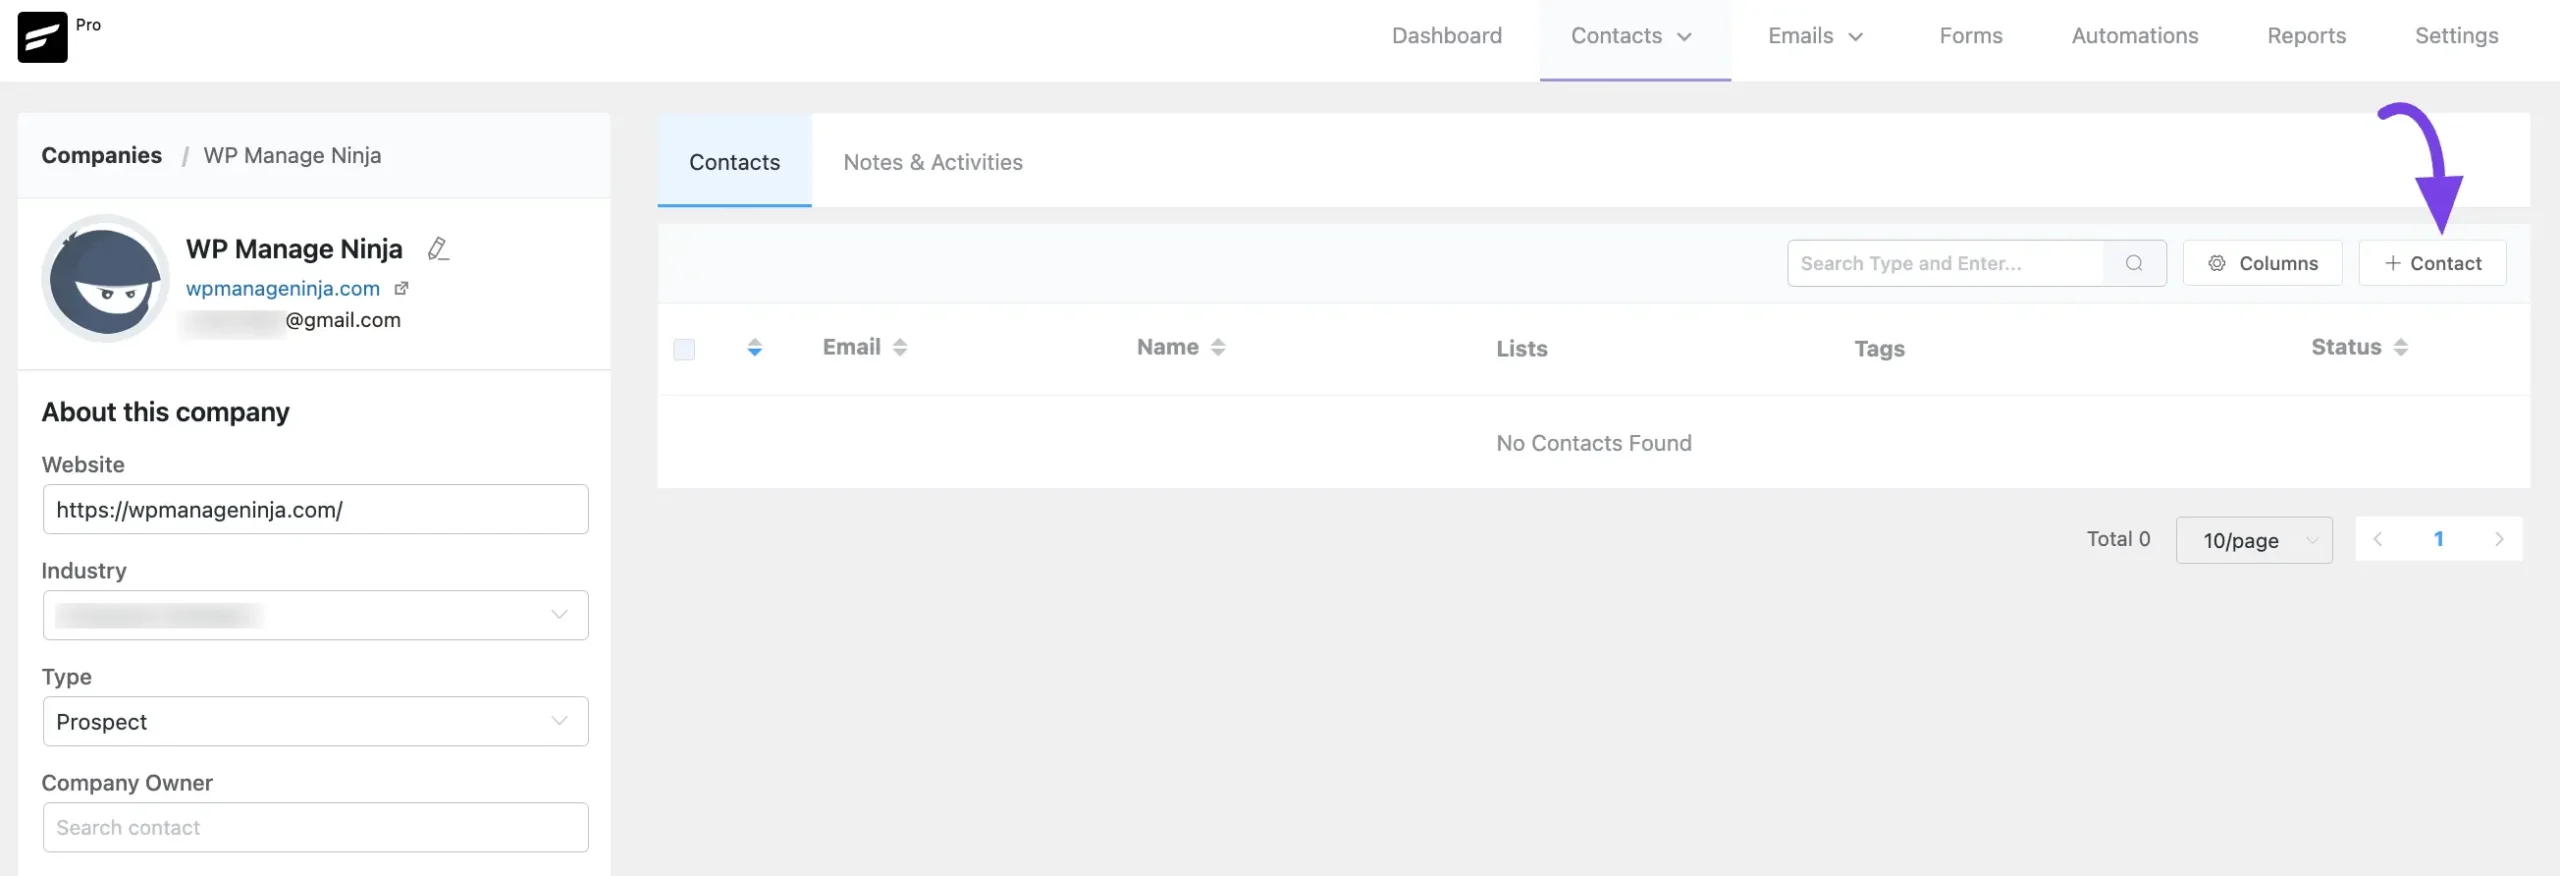
Here, you can add existing contacts or create new ones for the company from the pop-up window.
Notes & Activities #
You can also add notes and activities for the company using the “Notes & Activities” section.
The data for the Notes & Activities under Companies are independent from the Individual Contacts’ Notes & Activities data.
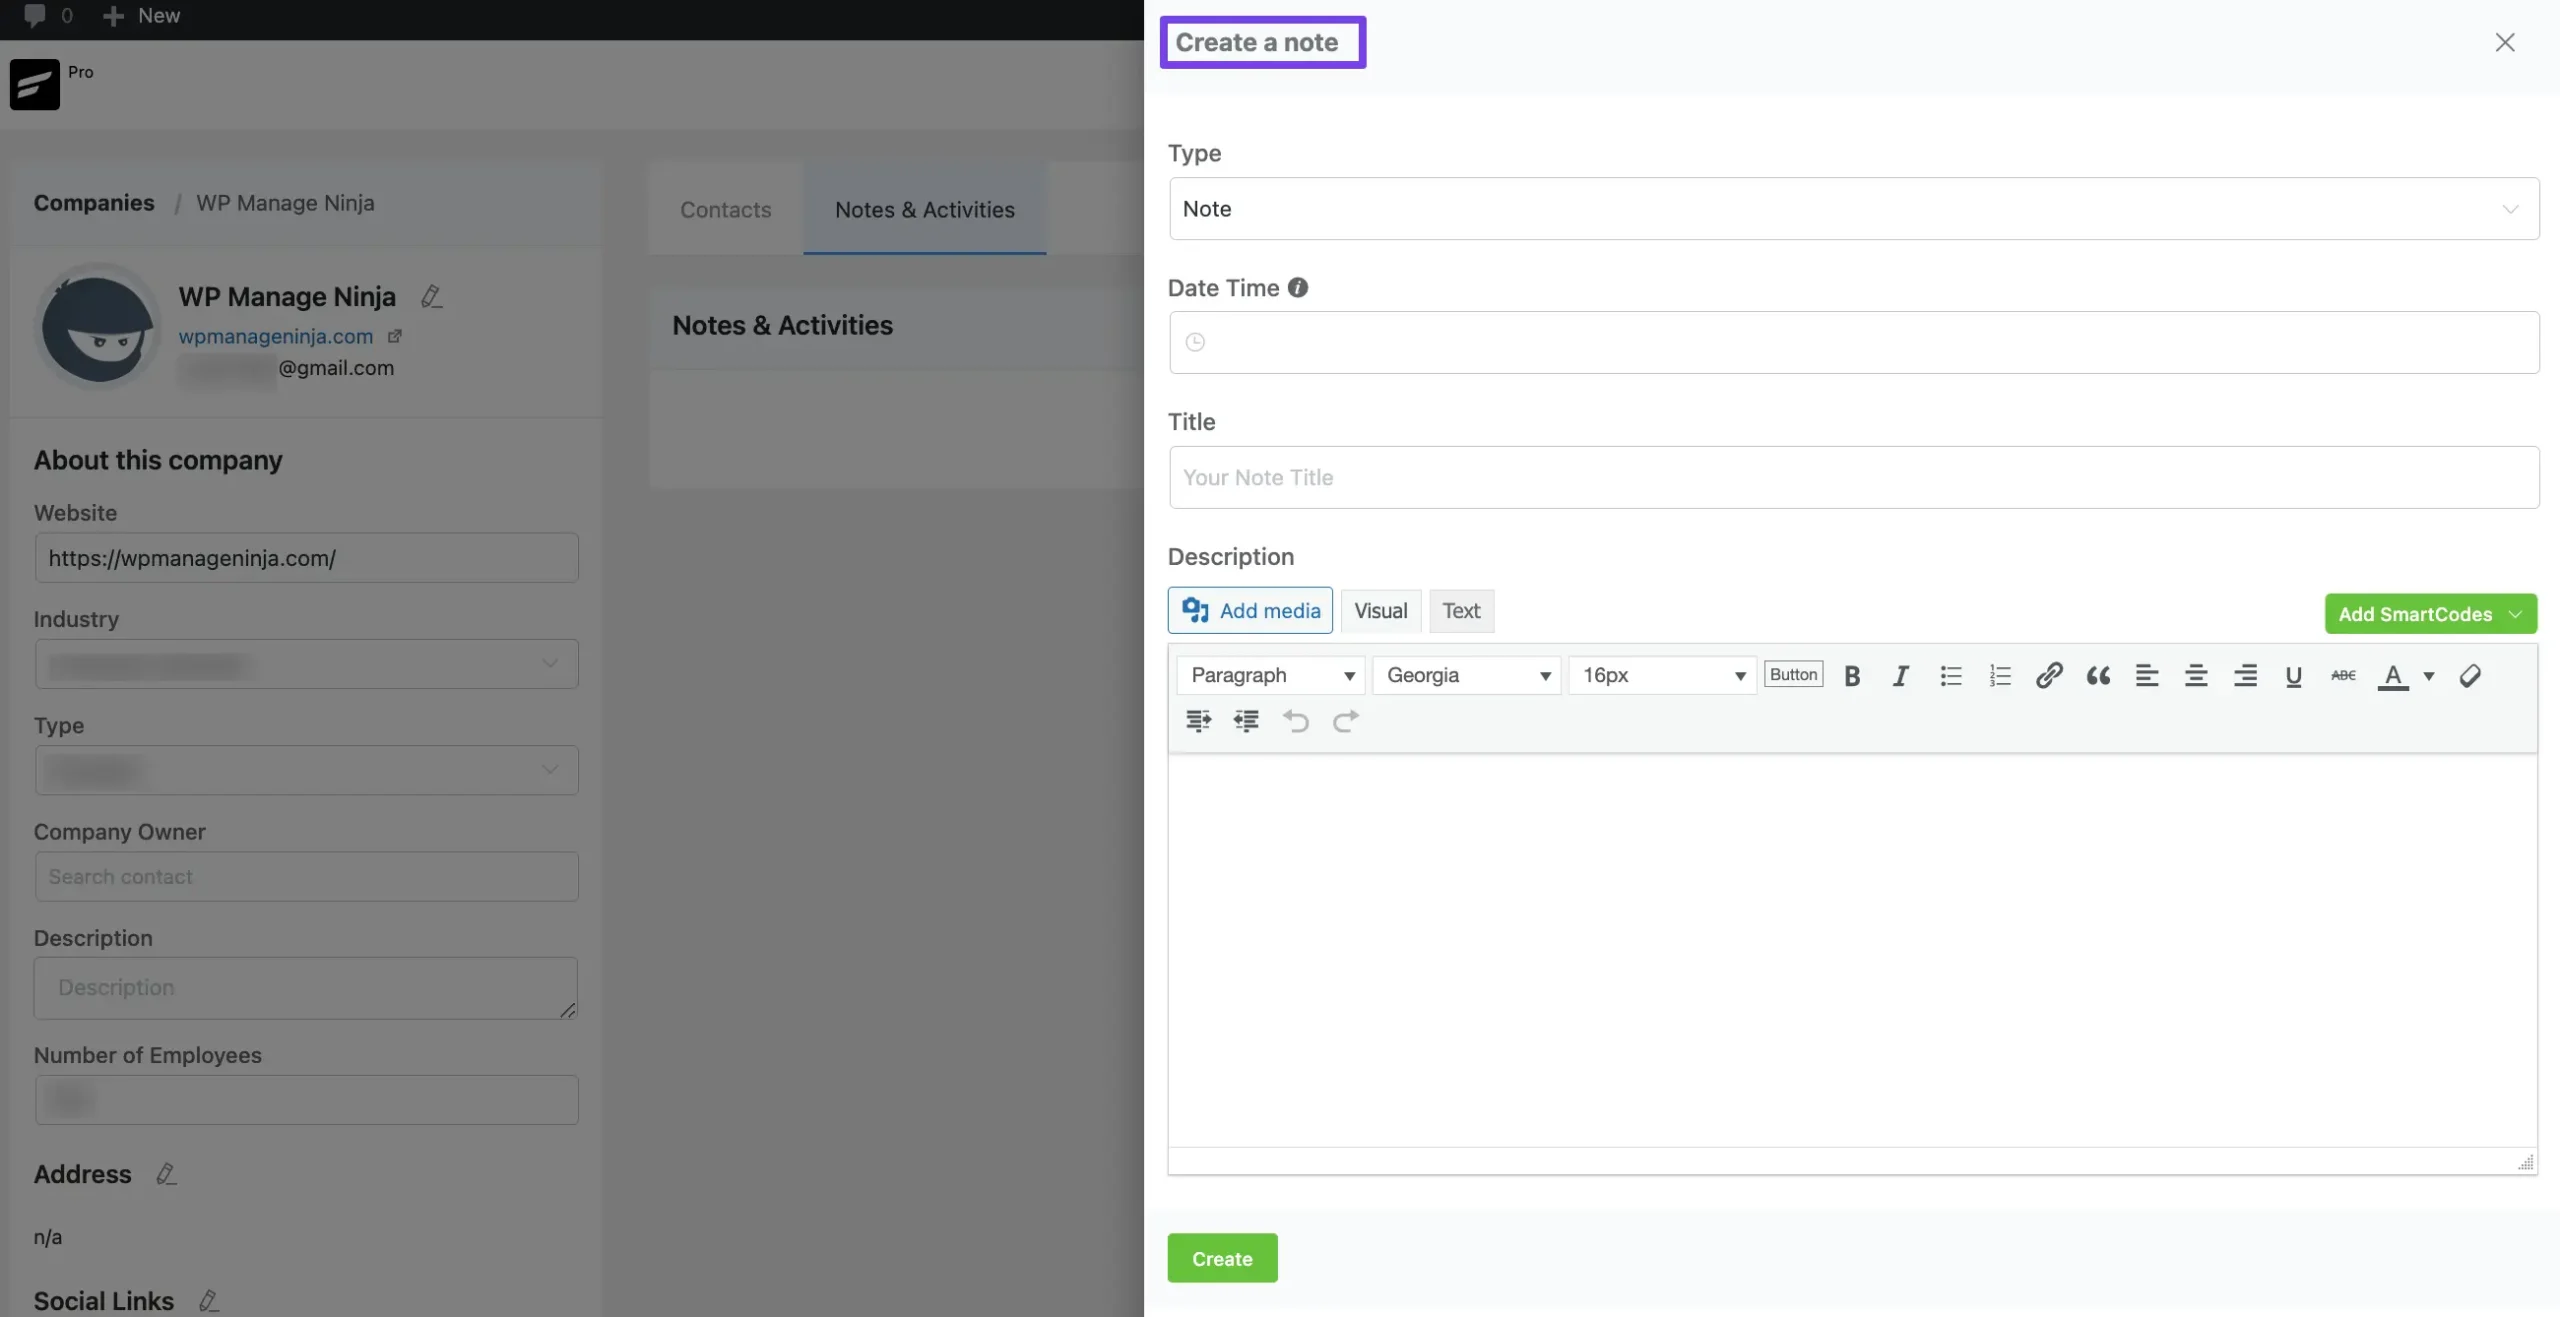
Click on the Add New button to add notes for the company and a pop-up will appear.

Here, you can add notes for the company from the pop-up window.
Custom Fields #
Fluent CRM doesn’t have any designated field for adding additional data to your company details. But you can do it easily with the Custom Field feature of Fluent CRM.
The data for the Custom Fields under Companies are independent from the Individual Contacts’ Custom Fields data.
To learn how to add Custom Fields in Companies, follow the steps with screenshots below –
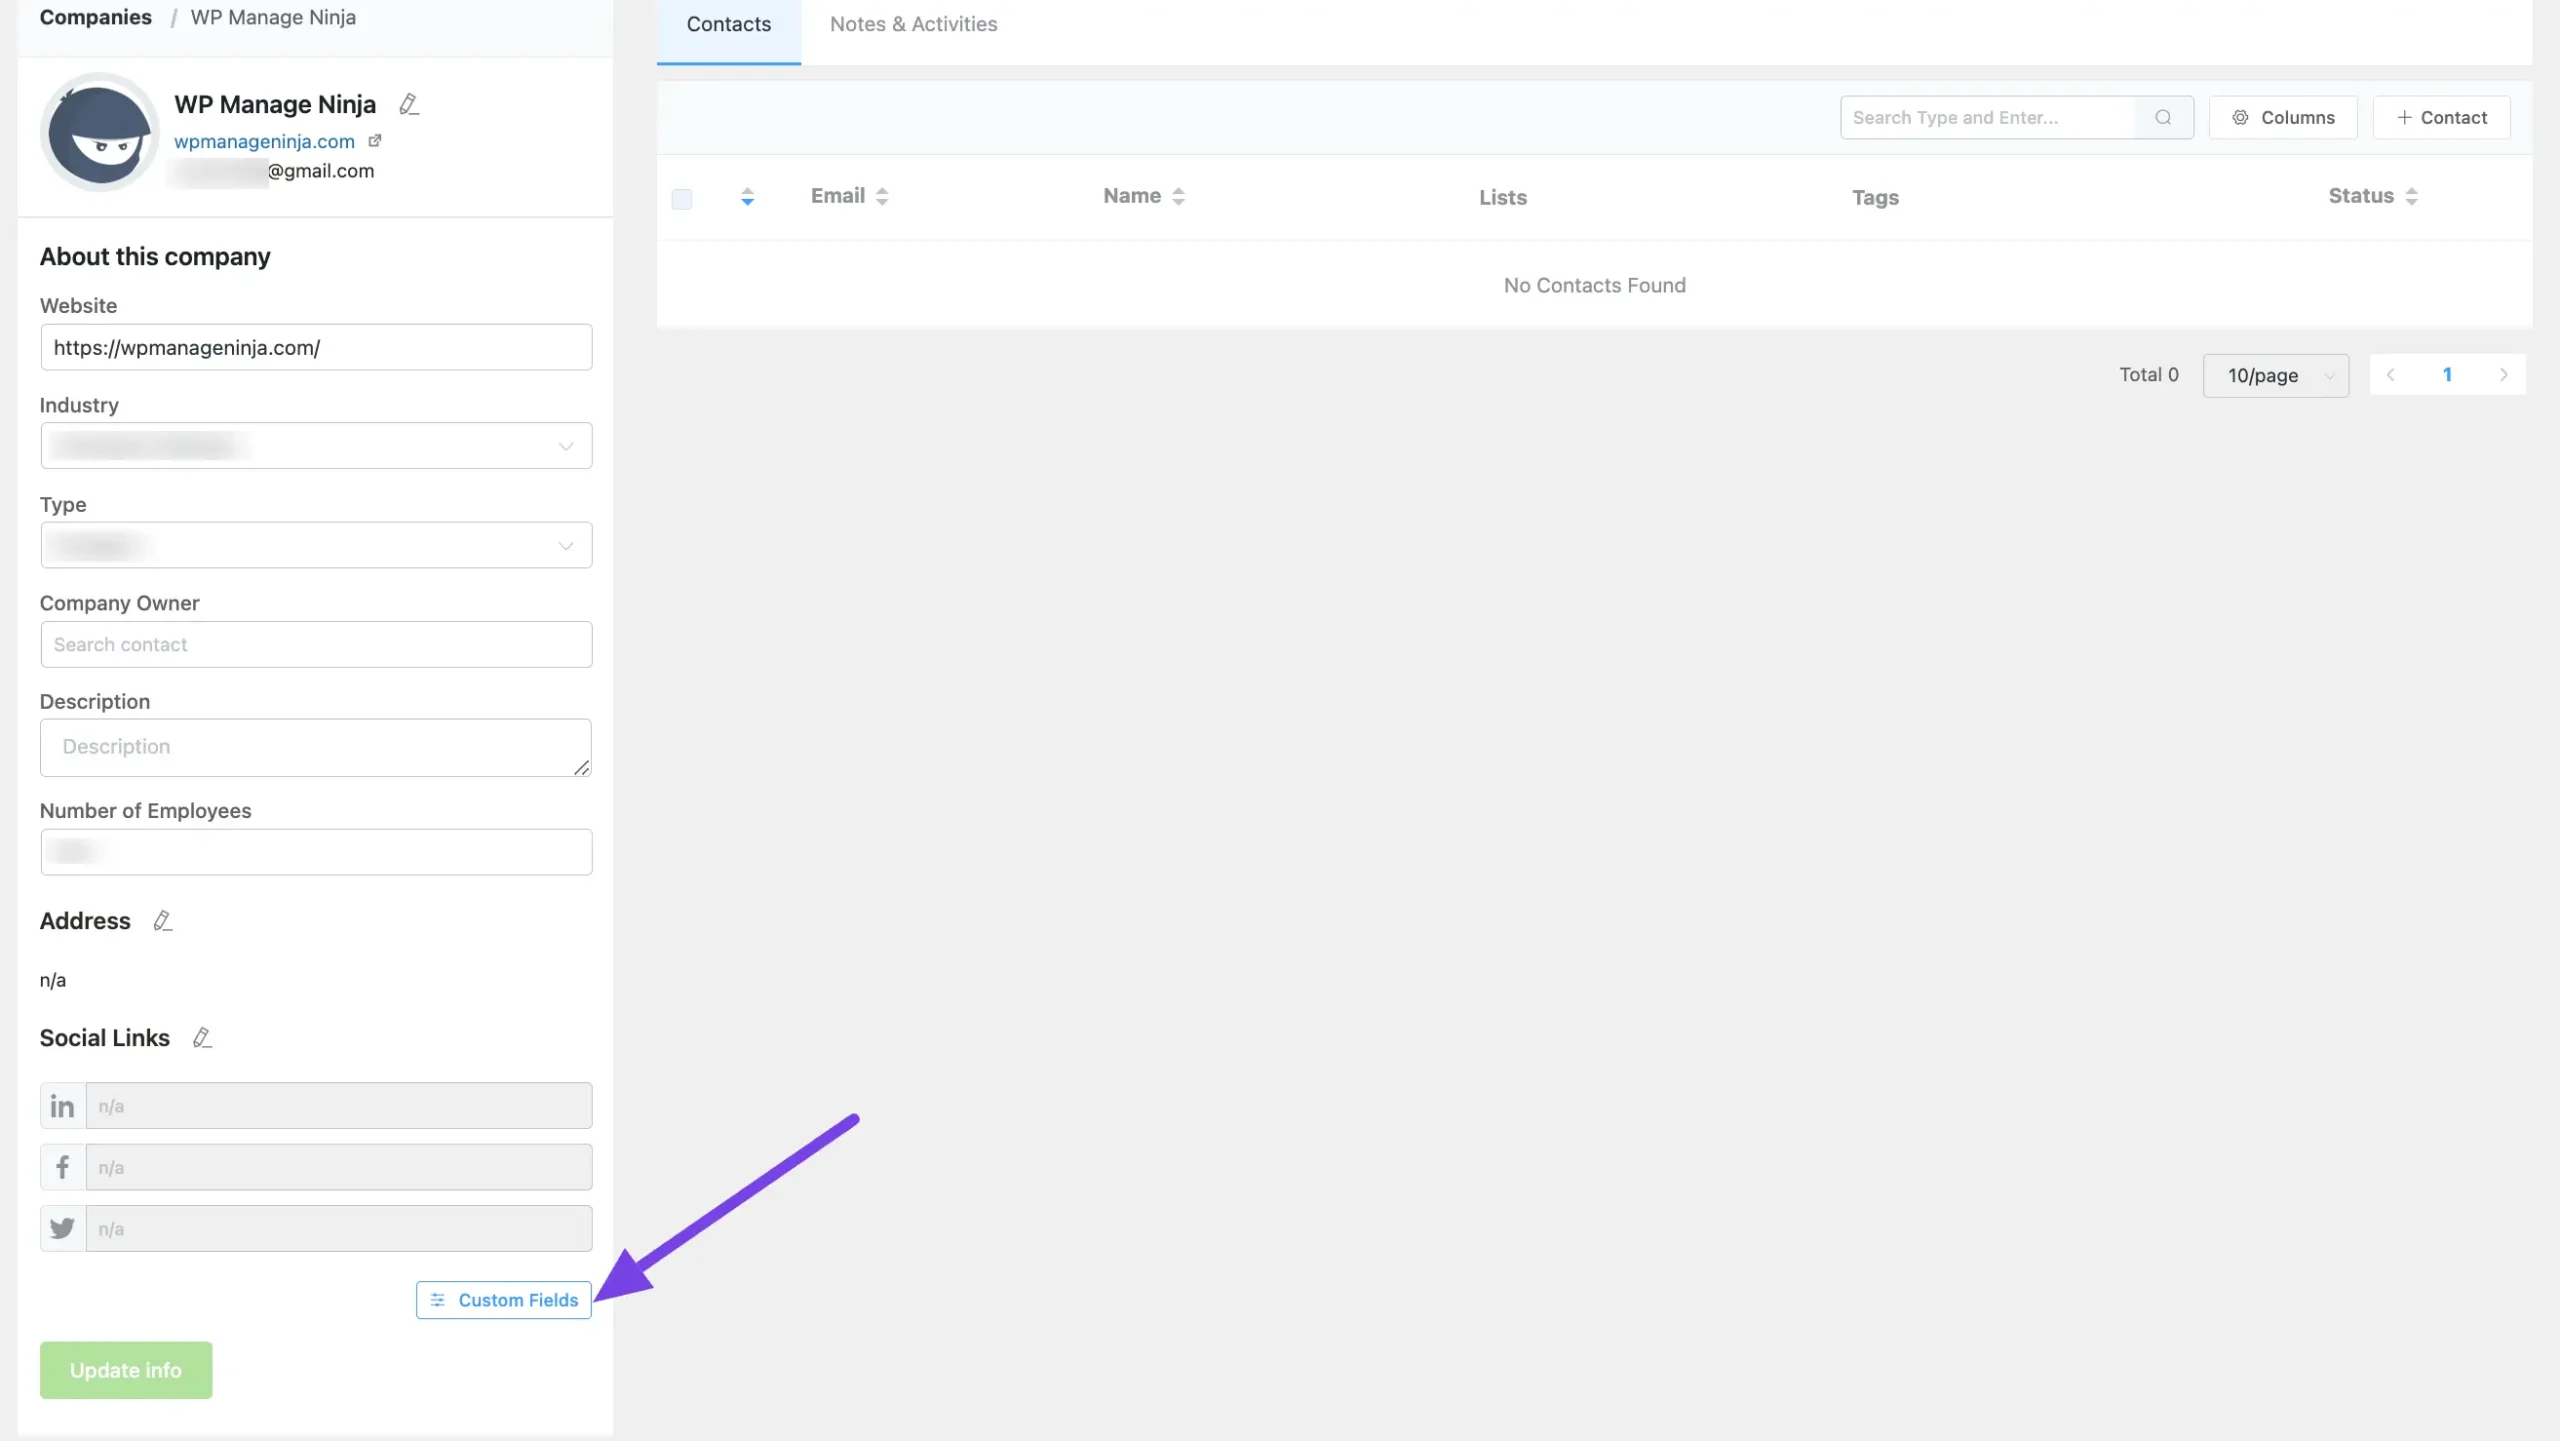
From the left sidebar, click the Custom Fields button, and a pop-up page will appear on the right-hand side.
Now, click the Add Field button to add the new field for your company.

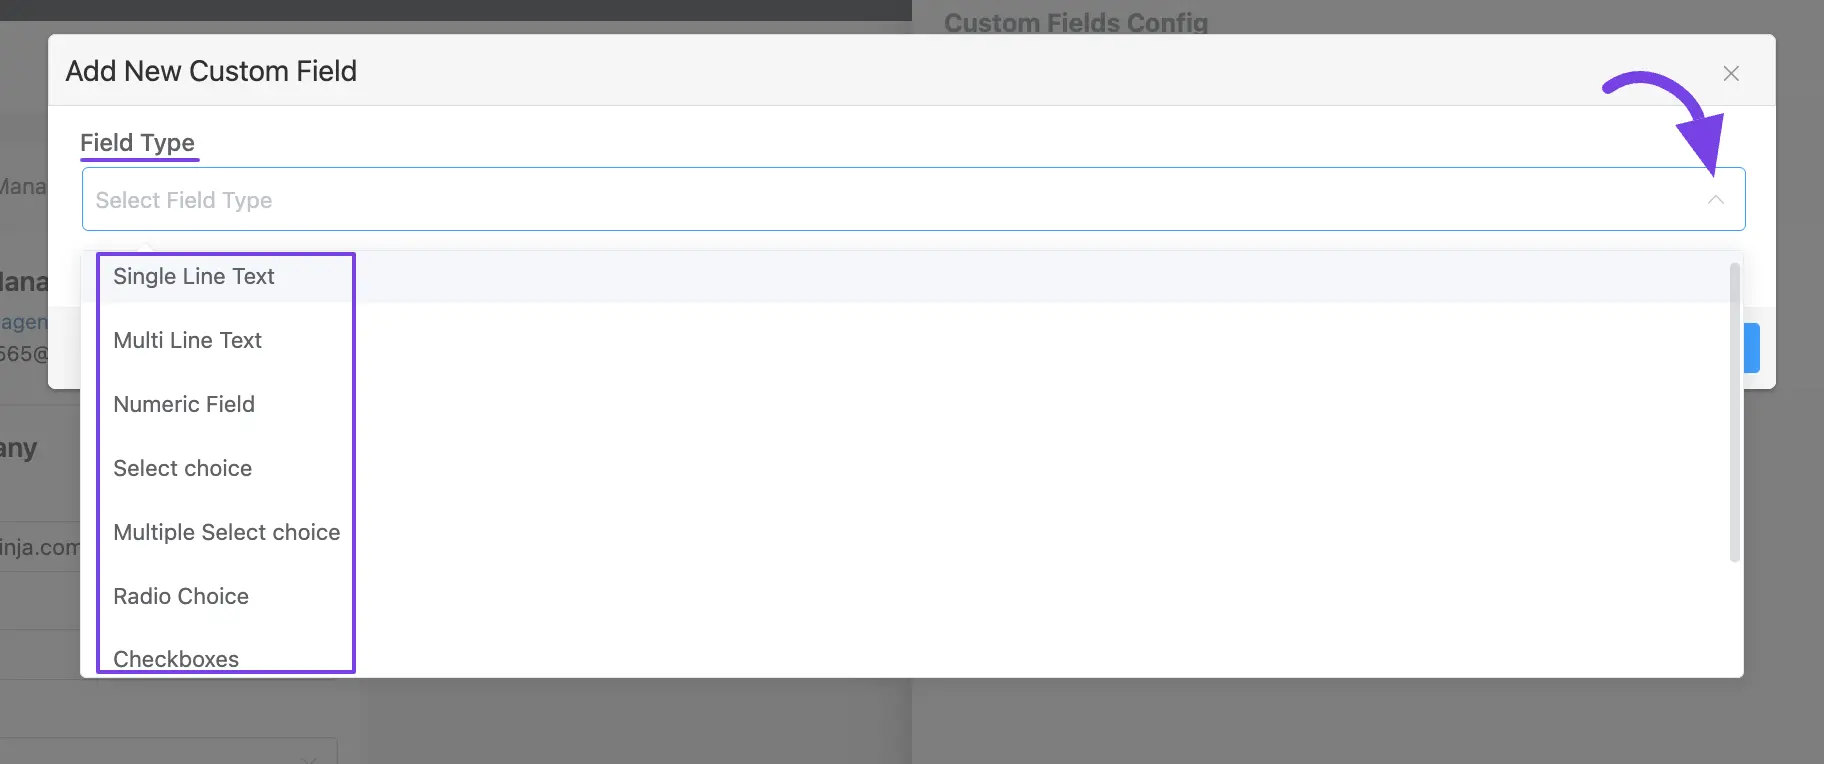
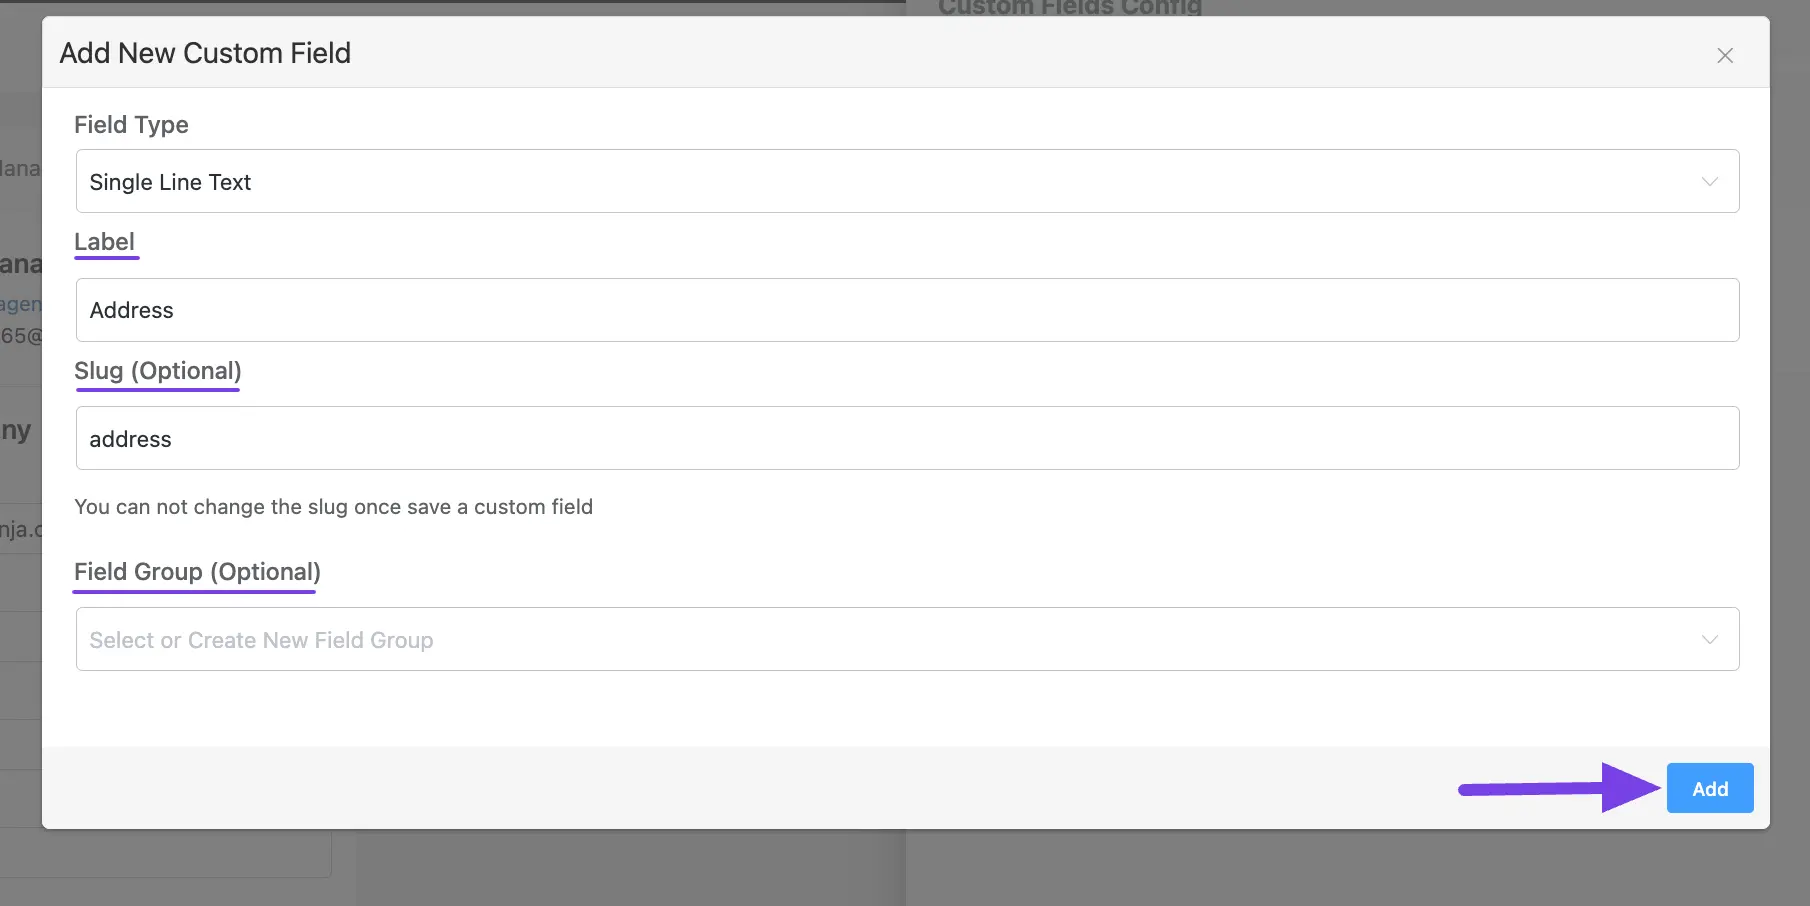
Then, choose the Field Type from the dropdown menu that suits your needs and click the Add button and a popup page will appear.
You will get the following Field Types from the Dropdown List to add the desired Information:
- Single Line Text: Used for adding one-liner entries.
- Multi-Line Text: Used for adding descriptive information.
- Numeric Fields: Used for adding numerical inputs.
- Select Choice: Used for selecting one input as a choice from multiple values.
- Multiple Select Choice: Used for selecting multiple inputs as choices.
- Radio Choice: Used for adding radio button choices.
- Checkboxes: Used for adding multiple/single tick inputs.
- Date: Used for adding date information from the calendar.
- Date and Time: Used for adding the exact time with the date information.
After selecting the Field Type, configure all the additional information according to your necessity.
For example, here, I am choosing the Single Line Text field type for adding the custom field. You can choose anyone according to your needs.
You will get the following additional fields for almost each field type –
- Labels: Used to name the field for general users in the Fluent CRM interface.
- Slug (Optional): Slugs can be used to call up custom fields in code.
- Field Group (optional): This option is for adding sub-fields under a main field. For example, under the Address field, you can add sub-fields like City, Postcode, and Country.
Once you are done, click the Add button and your custom field will be added.
You can add as many custom fields as you want according to your needs by following the same process.
If you have any further questions, concerns, or suggestions, please do not hesitate to contact our @support team. Thank you.


Is it possible with this module to send emails from 2 different domains. My client has 2 domains for the same company but different area.
Hi Franchie, no. it’s not possible.
As a charity we would like to change the Company entity name to something else eg Organisation or Partner. Is this possible?
Should be possible to do with a custom code. Please submit a support ticket: https://wpmanageninja.com/support-tickets/
It would be better if there was a filter manager that could only see contacts from certain companies
Can you explain how I can assign a contact to a company via the FluentForm+FluentCRM integration? I have a Company field in the form but can’t find a way to map it to the Company in FluentCRM
Go to Field Mapping>Other Fields and select ‘Primary Company’ from ‘Field Label’. Then select your company field from the ‘Field Value’
It would be nice to be able to assign Custom Fields to Companies. So We can add specific information only relative to the company and not to the contact. This way we could program also specific campaigns containing or filtering by custom fields.
Yes, this is an important feature request and we are seriously considering adding this in the next 2-3 updates.
That’s why I also looked for information in the documentation.
For example, I would like to ask the Company what kind of service it uses, what size hosting package it has, what additional domain names are included, SSL type: Normal, Wildcard. The function of individual fields, which can now be linked to the Partner, would be more useful for a company.
I think it’s simple (but I know it can be complicated), but the unique fields function that can be linked to the Partner must be cloned to the Company.
I’m really looking forward to an update that includes this.
Hi,
We are looking forward to this development so that there is a Custom field for the company, not for the company’s employees.
When is this expected to be released?
Thanks!
You might see this in the next quarter. 🙂
How can I add titles to the contact for each company he/she is affiliated with? If it requires custom fields, is it better to include them within the company profile or the individual profile?