FluentCRM offers various Actions, particularly for LMS (Learning Management System) platforms like LifterLMS, LearnDash, and TutorLMS, to trigger tasks automatically. Once the automation is triggered, you can automatically add the desired Action/s to manage advanced, repetitive, or routine tasks.
This article will provide detailed information about all LMS Actions in FluentCRM Automation.
Remember, to use the LMS Actions you must install and activate all the LMS Plugins in your website. Plus, learn the detailed integration process of LearnDash, LifterLMS, and TutorLMS with FluentCRM.
All LMS Actions #
To learn how you can use all the LMS Actions in your FluentCRM, follow the steps with screenshots below –
First, go to the Automation section from the FluentCRM Navbar, and open your desired Automation by clicking on its title. Or, create a new one by clicking the + New Automation.
To learn how to create a new automation funnel, read this Documentation.
For example, I opened the Tag Applied automation funnel to explain all the Actions in CRM.

Now, click the Plus Icon, or just hover over it and click the Add Action / Goal option to get all the LMS Actions.

Now, a pop-up page will appear with all the LMS Action Blocks of FluentCRM to choose from. These are:
- LifterLMS
- LearnDash
- TutorLMS
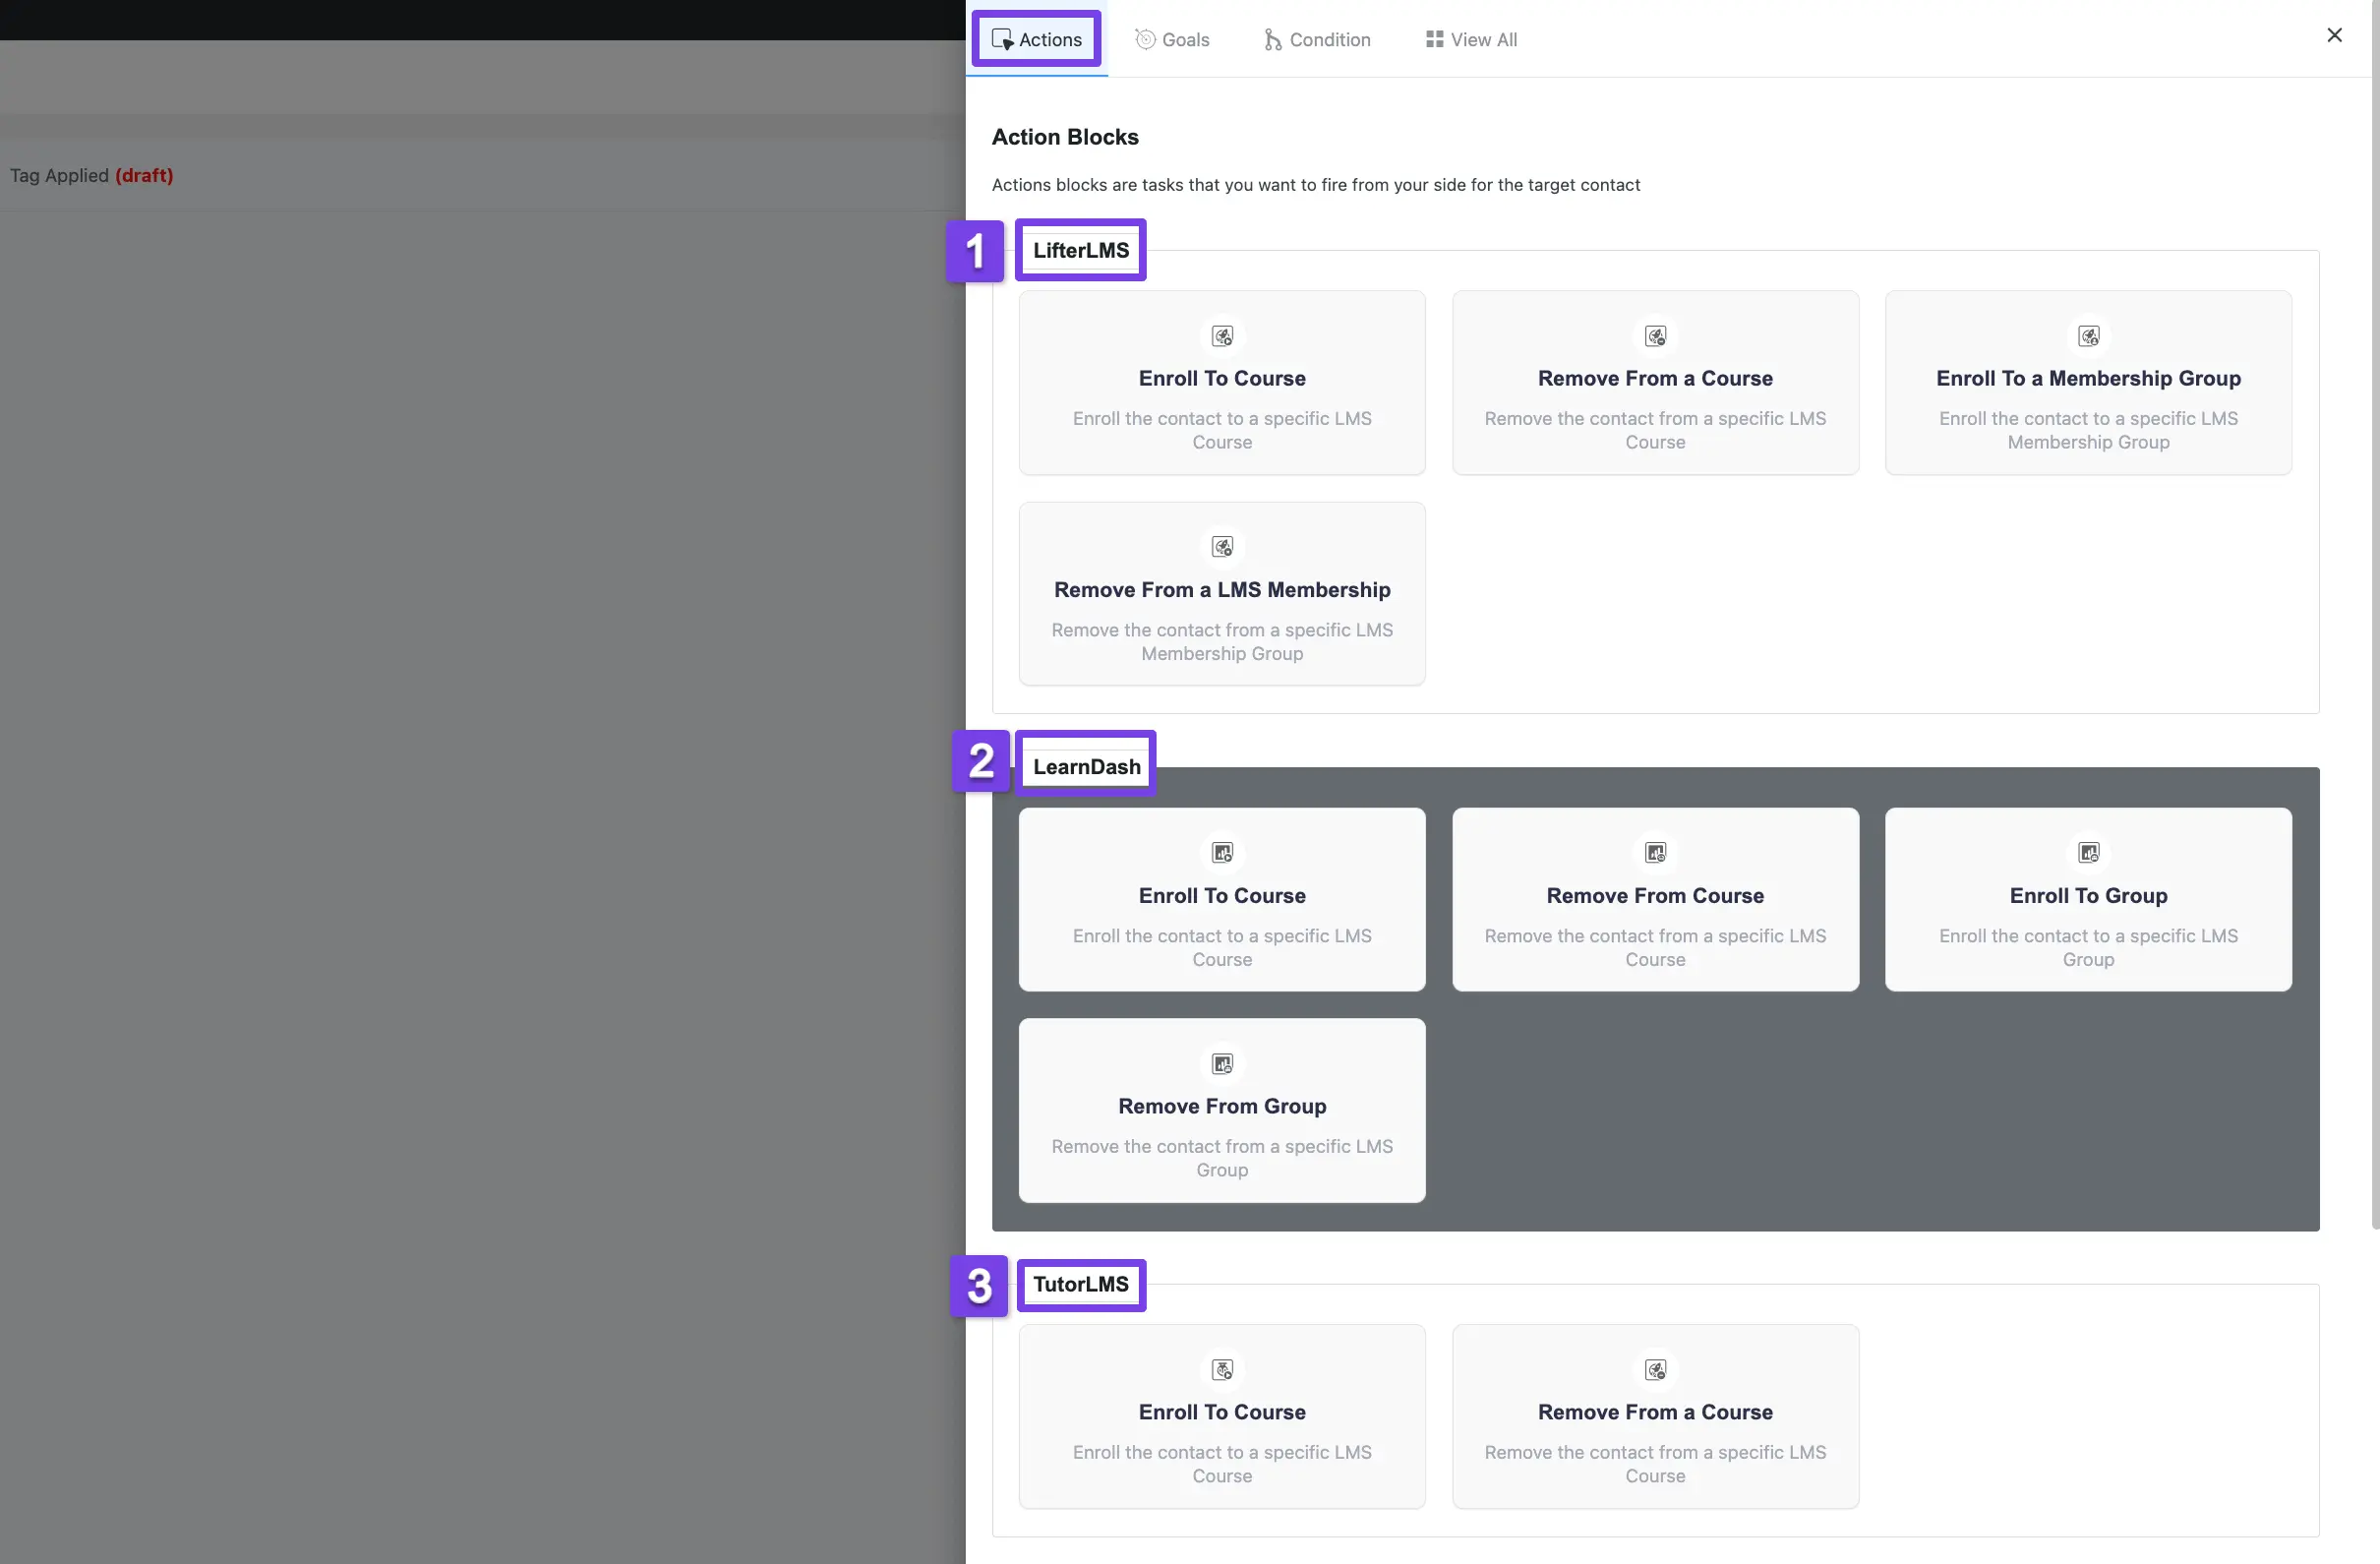
A detailed explanation of the Actions mentioned above is given below –
1. LifterLMS #
A detailed explanation of the following Actions under LifterLMS is given below –
- Enroll To Course
- Remove From a Course
- Enroll To a Membership Group
- Remove From a LMS Membership
Enroll To Course #
This action lets you Enroll the contact to a specific LMS Course.
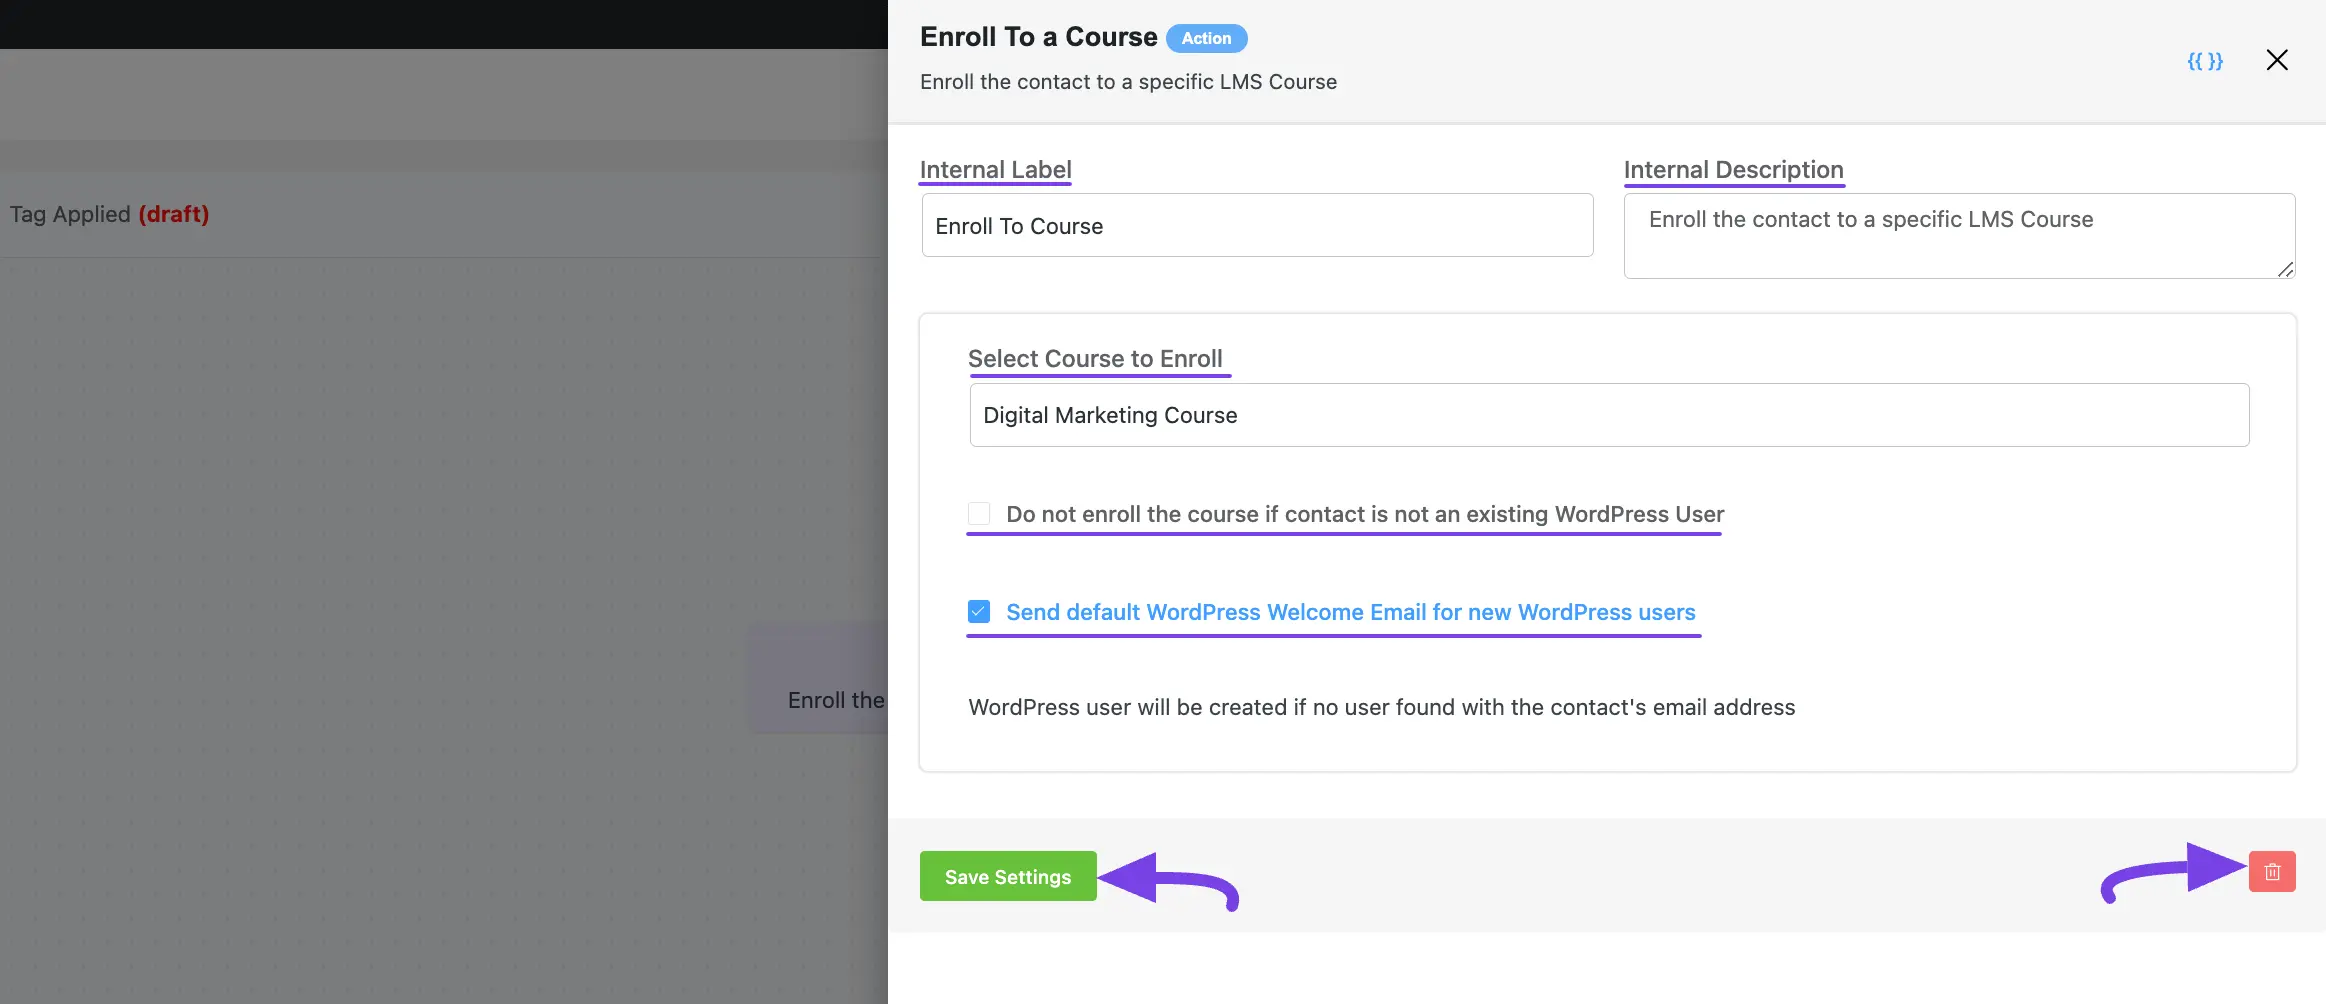
After selecting this Action, a tab will appear on the right-hand side with options to set up your action.
Settings of the Enroll To Course Action #
- Interval Label: Here, a Name for the Action will be automatically added so you can easily find it later. You can change it according to your needs.
- Internal Description: A description of the action will also be automatically added as a Subtitle. You can also change it according to your needs.
- Select Course to Enroll: Select the course where you want the contacts to be enrolled.
- Do not enroll in the course if contact is not an existing WordPress User: You can restrict contacts from course enrollment if they are not existing WordPress users by checking this option. Remember, if you leave this option unchecked, contacts will be automatically created as WordPress Users using the contact’s email address.
- Send default WordPress Welcome Email for new WordPress Users: Check this option if you want to send a default welcome email to newly created WordPress Users after their WordPress Registration.
Once you are done, click the Save Settings button to save all your changes.
You can also Delete the action by clicking the Trash Icon if needed.
Remove From a Course #
This action lets you Remove the contact from a specific LMS Course.
After selecting this Action, a tab will appear on the right-hand side with options to set up your action.
Settings of the Remove From Course Action #
- Interval Label: Here, a Name for the Action will be automatically added so you can easily find it later. You can change it according to your needs.
- Internal Description: A description of the action will also be automatically added as a Subtitle. You can also change it according to your needs.
- Select a Course that you want to remove from: Select the course from which you want the contacts to be removed.
Once you are done, click the Save Settings button to save all your changes.
You can also Delete the action by clicking the Trash Icon if needed.

Enroll To a Membership Group #
This action lets you Enroll the contact to a specific LMS Membership Group.
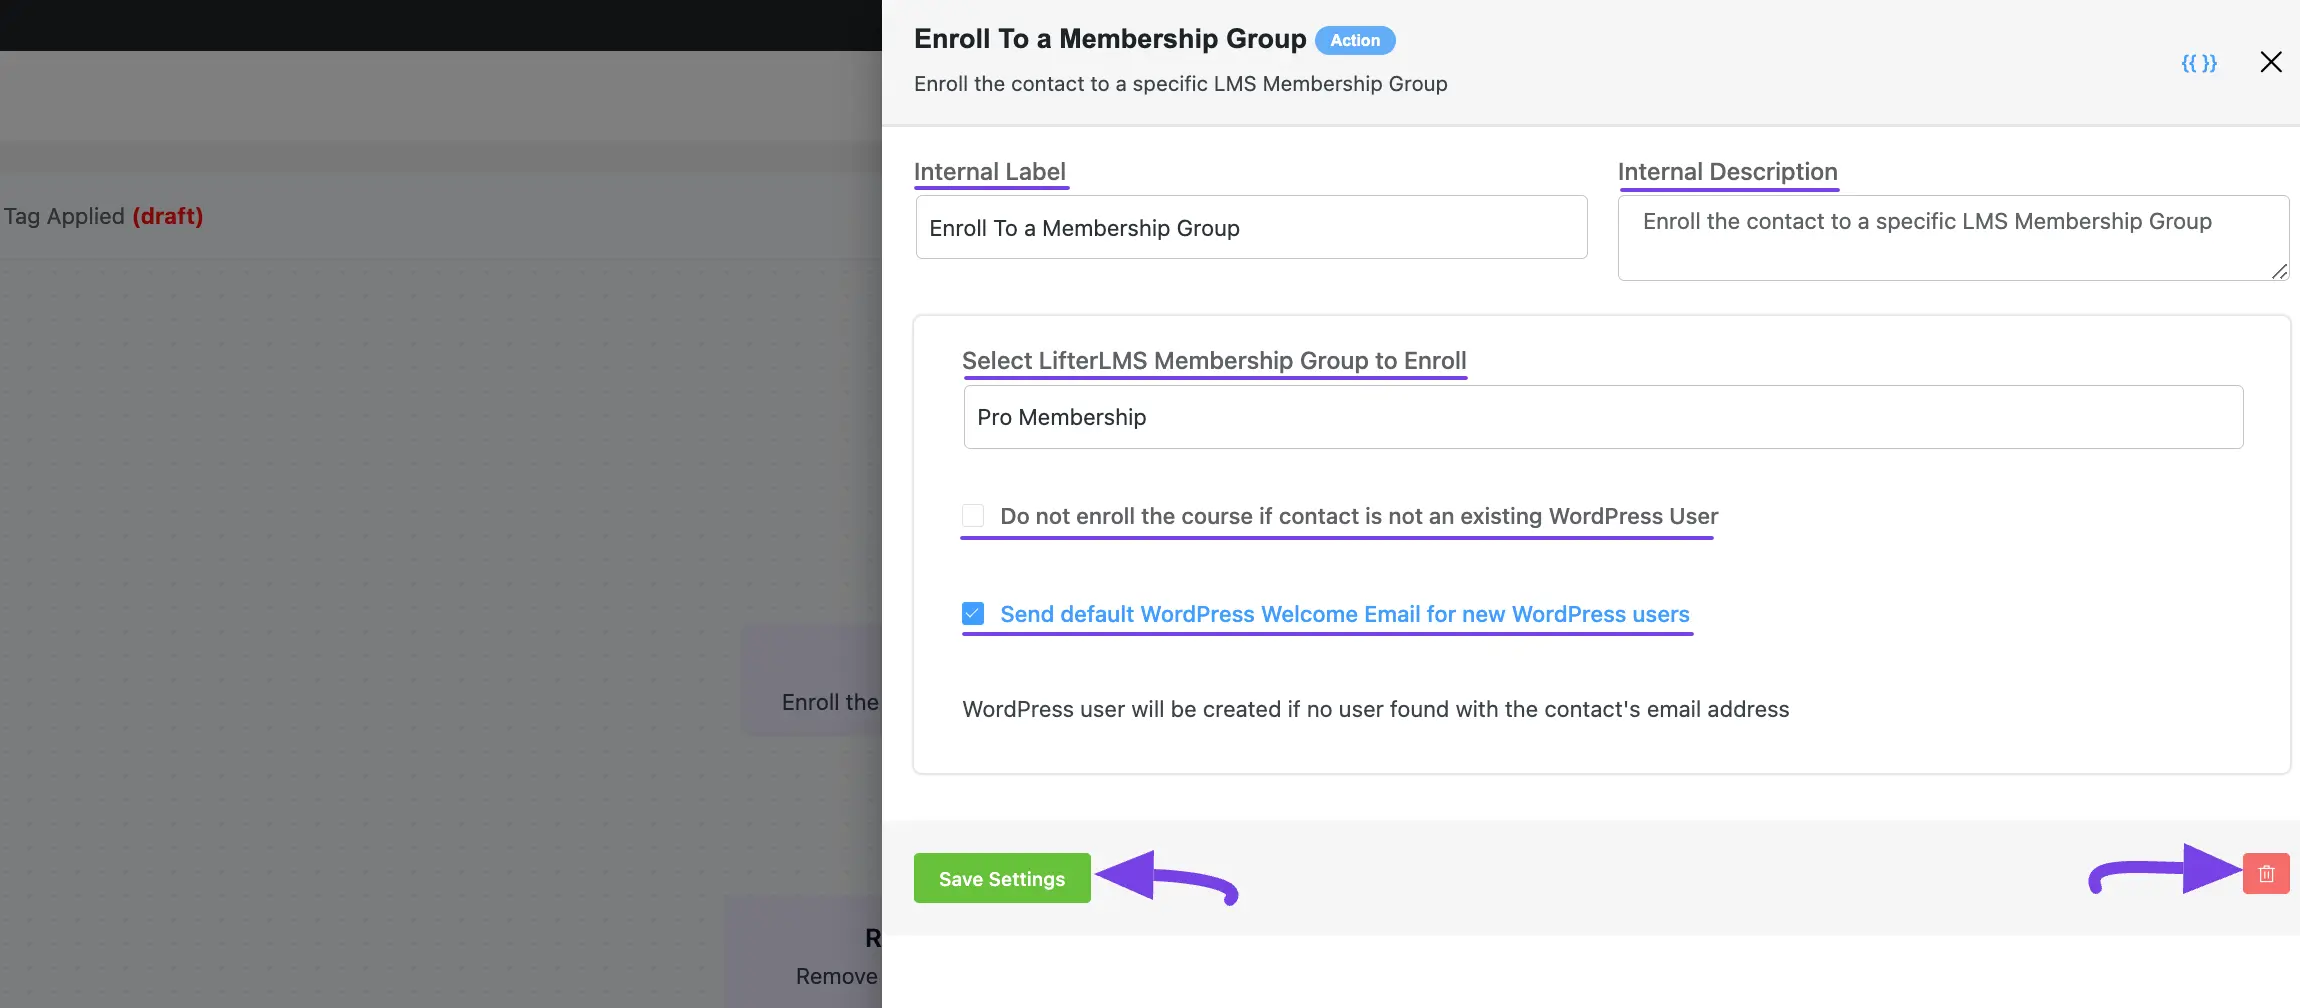
After selecting this Action, a tab will appear on the right-hand side with options to set up your action.
Settings of the Enroll To Group Action #
- Interval Label: Here, a Name for the Action will be automatically added so you can easily find it later. You can change it according to your needs.
- Internal Description: A description of the action will also be automatically added as a Subtitle. You can also change it according to your needs.
- Select LifterLMS Membership Group to Enroll: Select the LifterLMS Membership Group where you want the contacts to be enrolled.
- Do not enroll in the course if contact is not an existing WordPress User: You can restrict contacts from course enrollment if they are not existing WordPress users by checking this option. Remember, if you leave this option unchecked, contacts will be automatically created as WordPress Users using the contact’s email address.
- Send default WordPress Welcome Email for new WordPress Users: Check this option if you want to send a default welcome email to newly created WordPress Users after their WordPress Registration.
Once you are done, click the Save Settings button to save all your changes.
You can also Delete the action by clicking the Trash Icon if needed.
Remove From a LMS Membership #
This action lets you Remove the contacts from a specific LMS Membership Group.
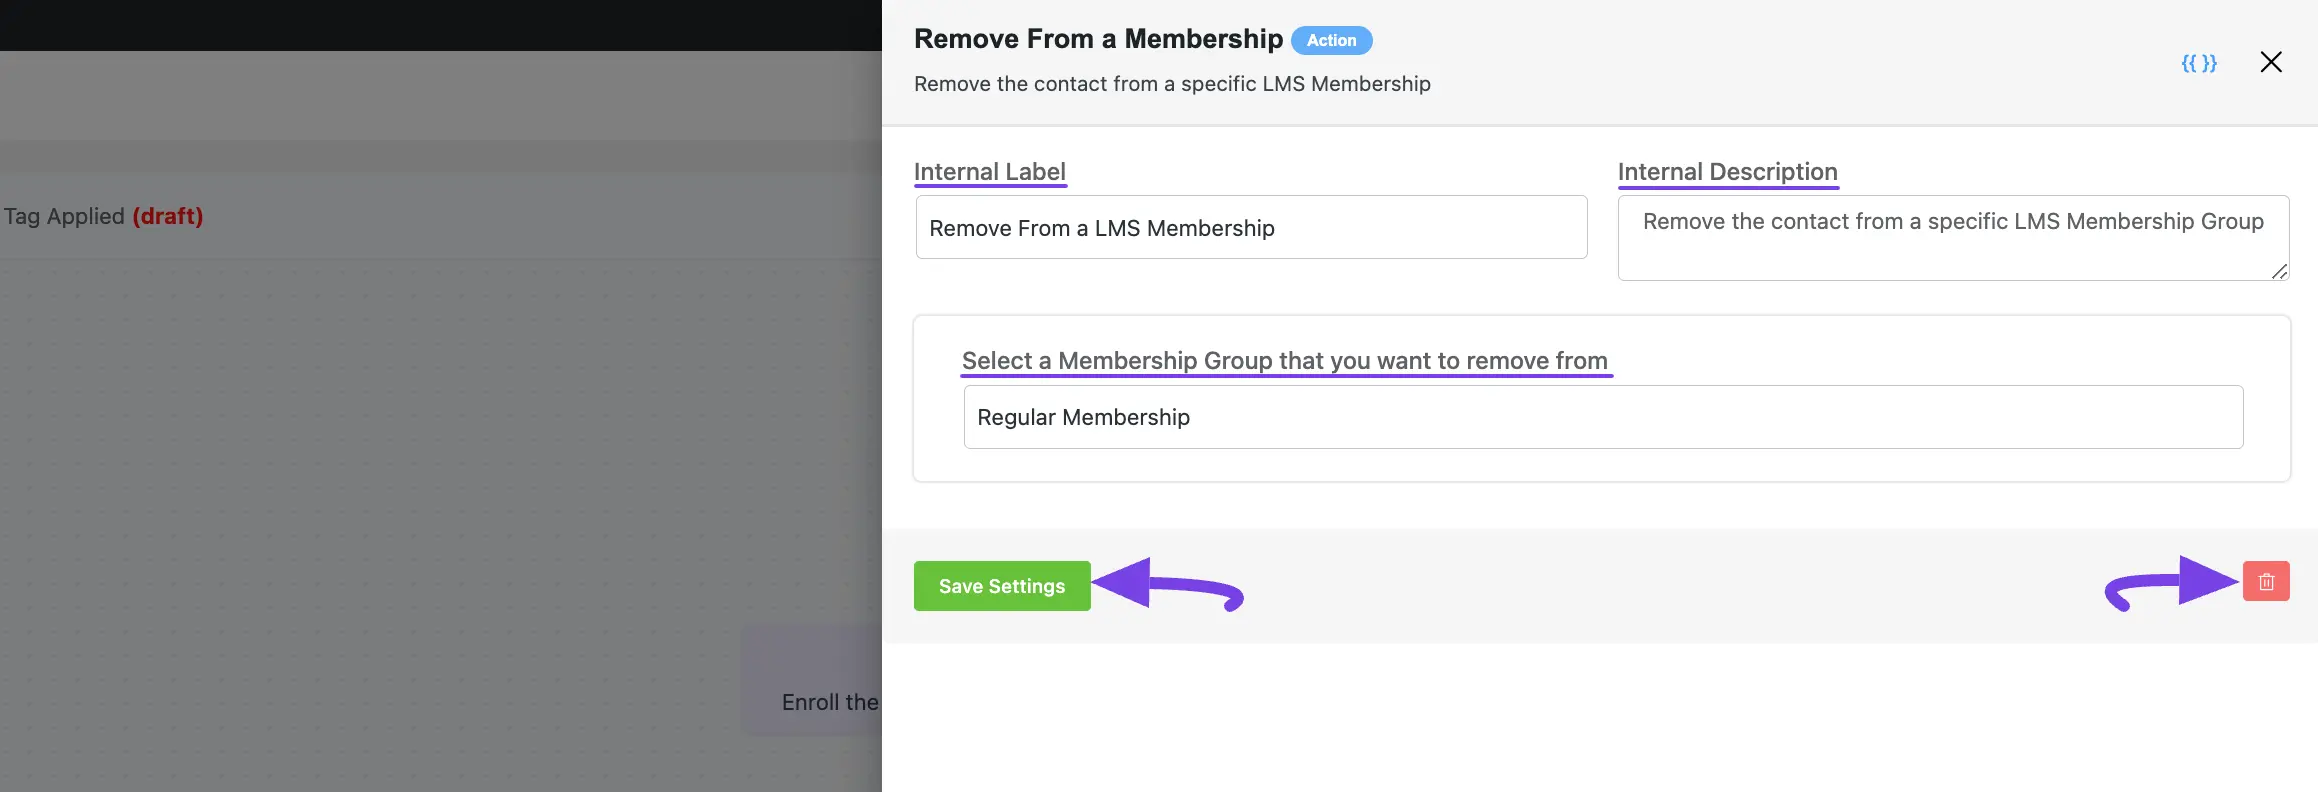
After selecting this Action, a tab will appear on the right-hand side with options to set up your action.
Settings of the Remove From Group Action #
- Interval Label: Here, a Name for the Action will be automatically added so you can easily find it later. You can change it according to your needs.
- Internal Description: A description of the action will also be automatically added as a Subtitle. You can also change it according to your needs.
- Select a Membership Group that you want to remove from: Select the Membership Group from which you want the contacts to be removed.
Once you are done, click the Save Settings button to save all your changes.
You can also Delete the action by clicking the Trash Icon if needed.
2. LearnDash #
All the Actions of LearnDash work the same way as the Actions of LifterLMS.
For a detailed explanation of how to use all the Actions in LearnDash, click on the Actions (attached with links) below –
3. TutorLMS #
All the Actions of TutorLMS work the same way as the Actions of LifterLMS.
For a detailed explanation of how to use all the Actions in TutorLMS, click on the Actions (attached with links) below –
If you have any further questions, concerns, or suggestions, please do not hesitate to contact our @support team. Thank you.


So this is confusing. In the automations I can enroll in a course but what if the person enrolls in a course, how do I start the automation. With a tag?? Via the Fluent CRM tag in the course?
Hi Donna, you can use the “Enrolls in a Course” trigger for this automation.
Hola, en el embudo veo la opción de inscribir a un curso, sin embargo, no lo inscribe si el email ya es usuario de wordpress.
Quisiera poder enrolar al usuario en un curso aun cuando ya esta registrado en wordpress del sitio.
cómo hago?
Hello, in the funnel I see the option to enroll in a course, however, it does not enroll if the email is already a wordpress user.
I would like to be able to enroll the user in a course even if they are already registered on the wordpress site.
As I do?
Hi David, there must be some technical issues. Please submit a support ticket so that our technical experts can take a look into it.