An email sequence is a series of emails automatically sent to specific contacts(subscribers) when they opted in or purchase something or based on other activities. With FluentCRM you can use sequential emails when creating a Funnel.
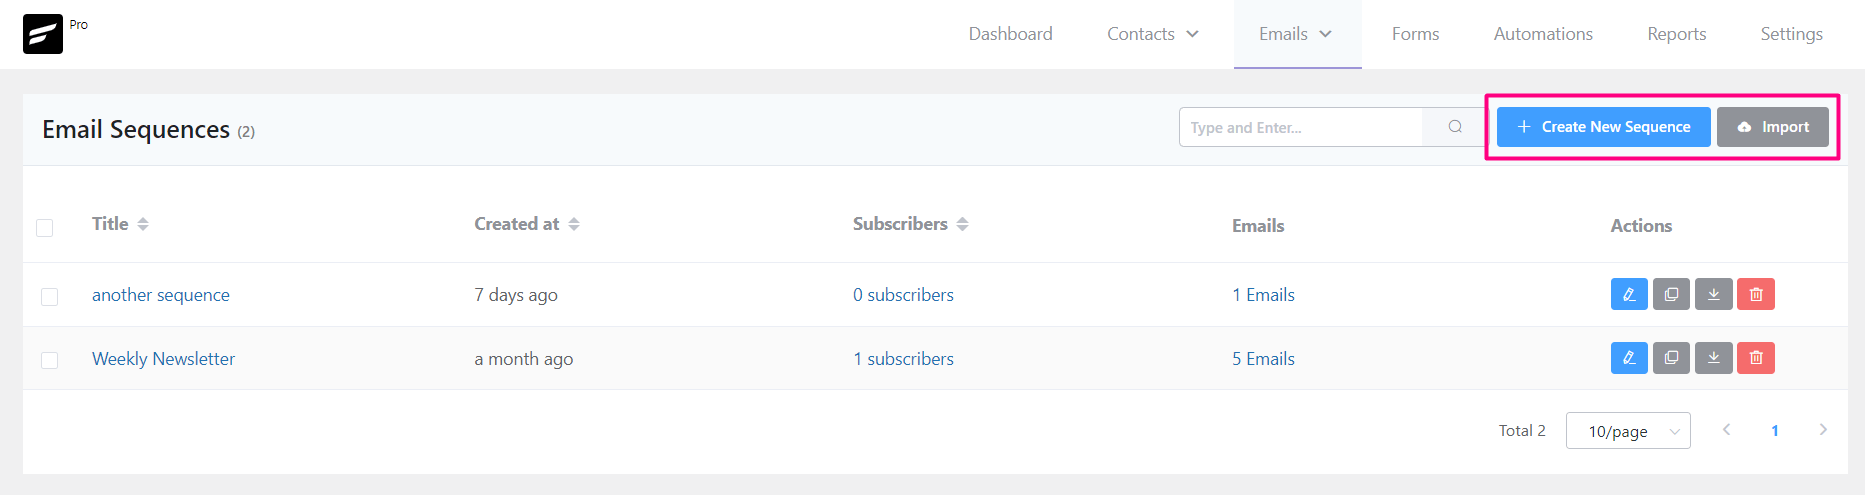
Create New Email Sequence #
From Emails ➜ Email Sequences, To create an email sequence, Hover over Email Campaign and select Email Sequences. Now click on the +Create New Sequence button, You can also click on to the Create Your First Email Sequence if it’s the first time you are creating a sequence.
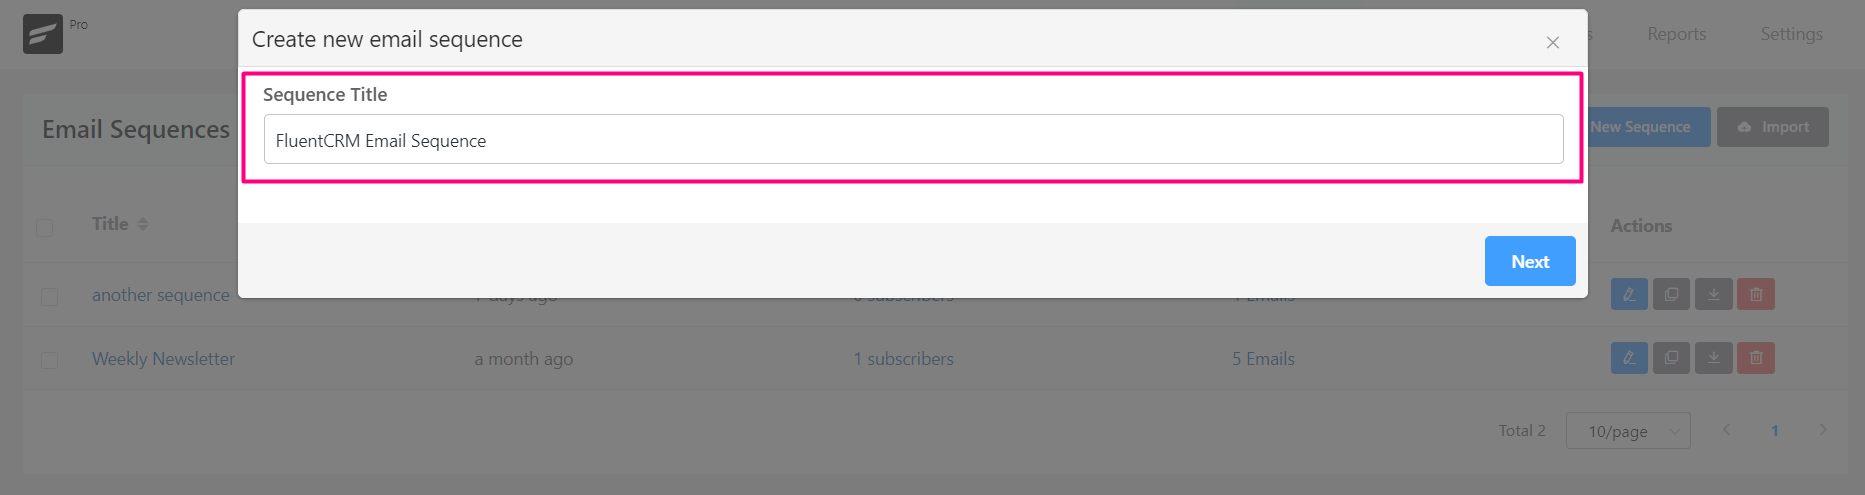
After clicking on the button a popup window will appear asking for Sequence Title as an identifier for the Email Sequence.
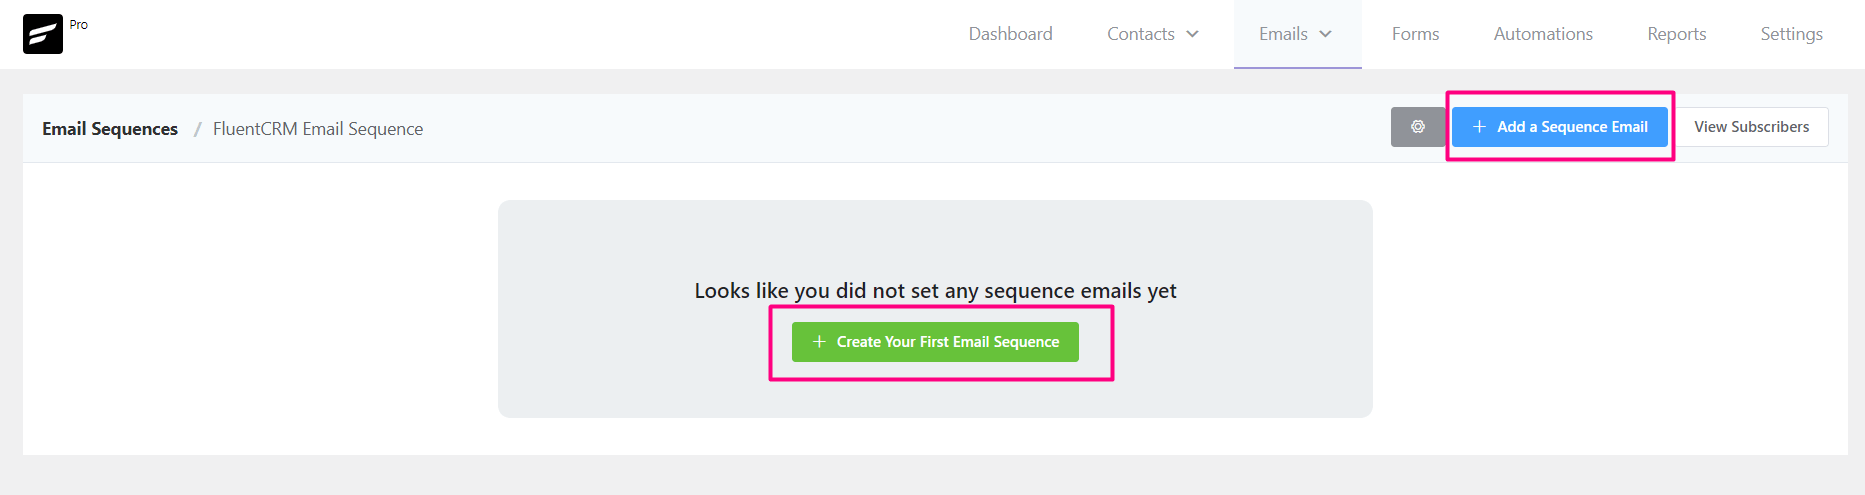
Then you will be redirected to the Sequence dashboard. Now you will be taken to a fresh dashboard where you can add one or multiple emails to the sequence.
Add New Sequence Email #
Start adding email into the sequence by clicking on +Add a Sequence Email.
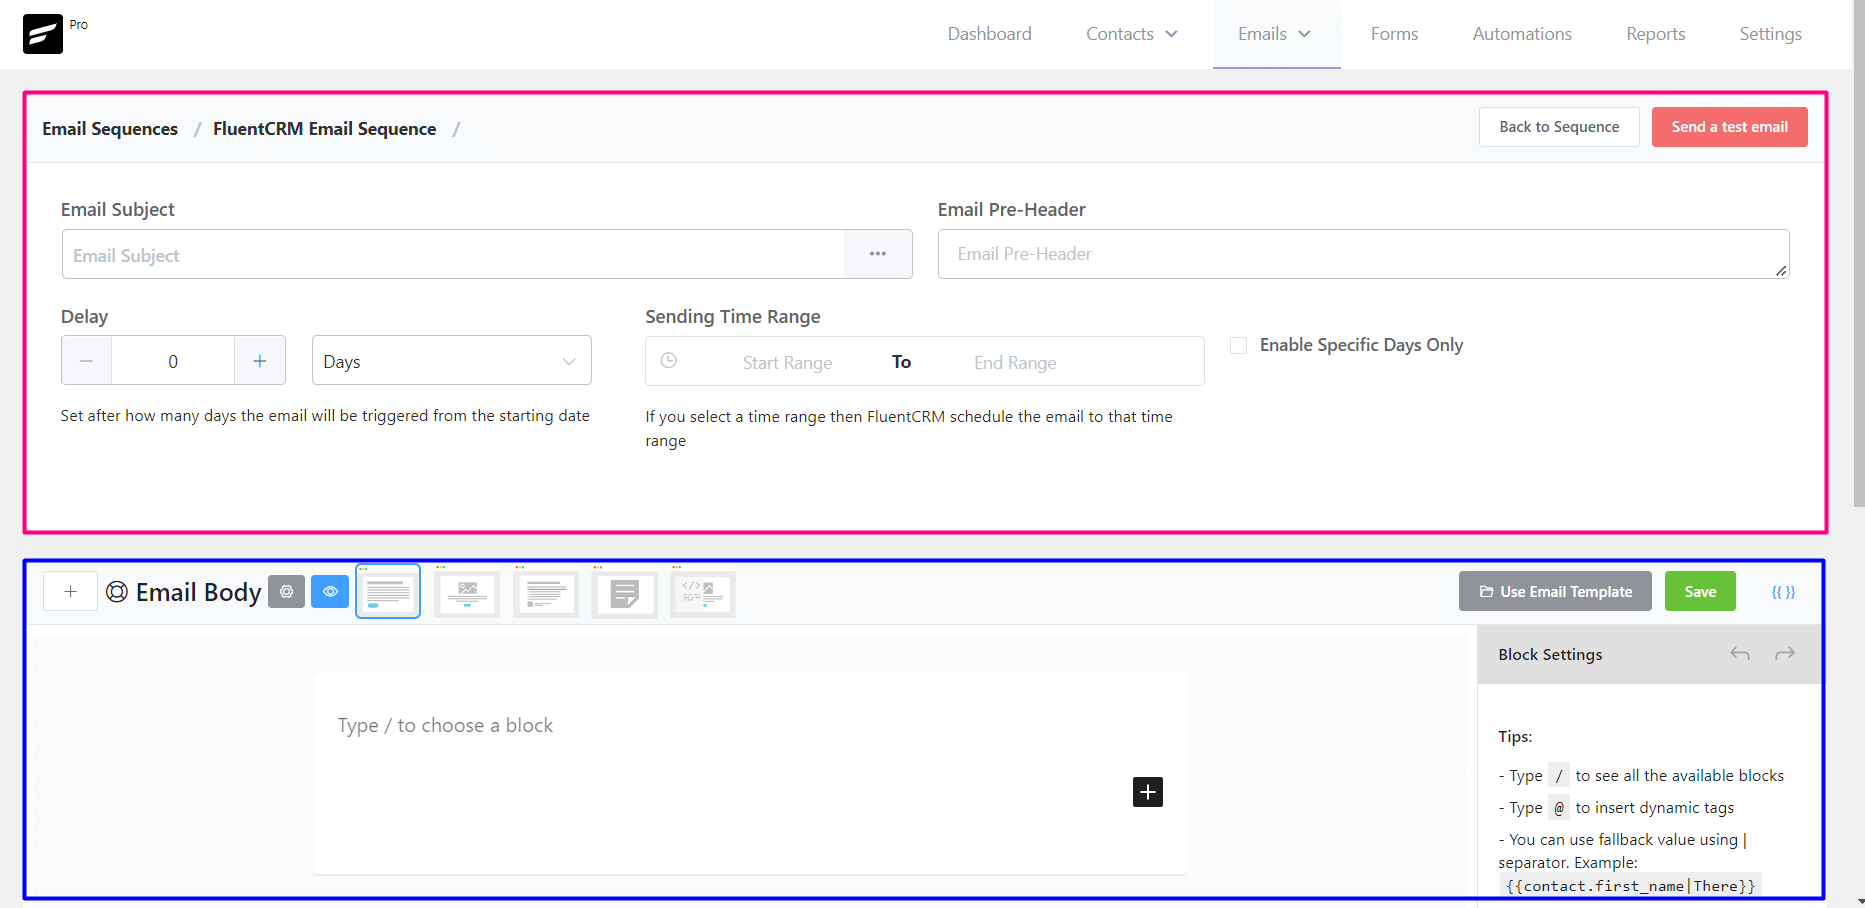
Email Sequence Subject #
Email Subject: Give an appropriate email subject for the email. The email subject is a determining factor in whether it will be opened by the user or ignored.
Email Pre-Header: This is short text followed by the email subject which the user will see in the inbox. A catching and appropriate email pre-header can increase the open rate as well.
Compose Email #
We have a dedicated Compose Email in FluentCRM guide where you will be able to learn in-depth details of composing emails in FluentCRM.
Import Email Template #
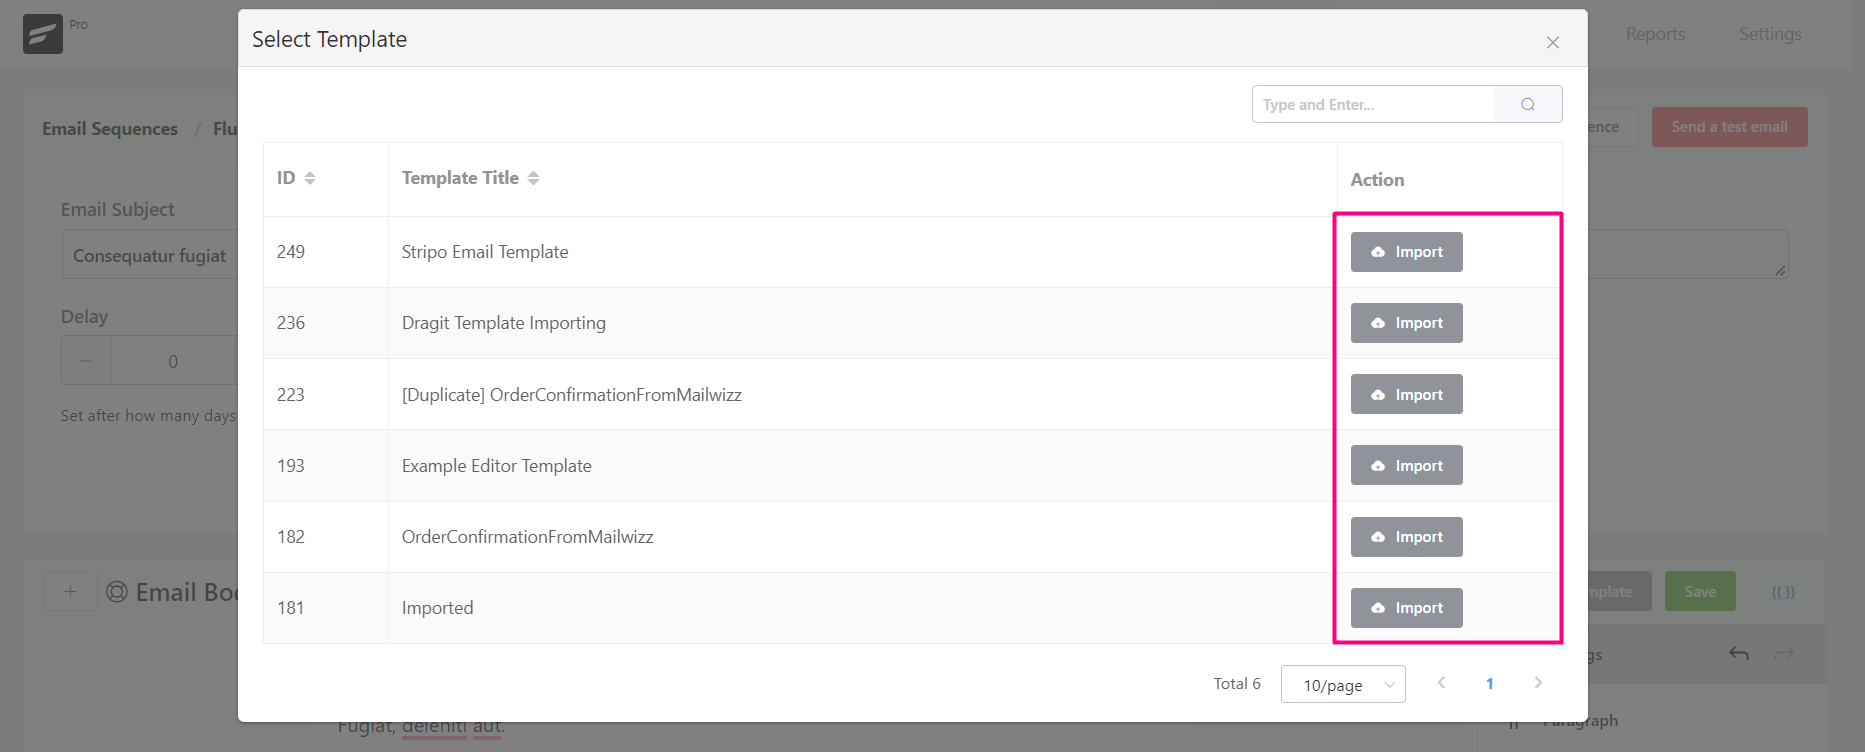
Another amazing feature of FluentCRM is that you can create Email Templates and import them later in Email Campaigns and Email Sequences. To import an email template, please click on the Use Email Template button and select your desired template and click on the Import Button.
SmartCode #
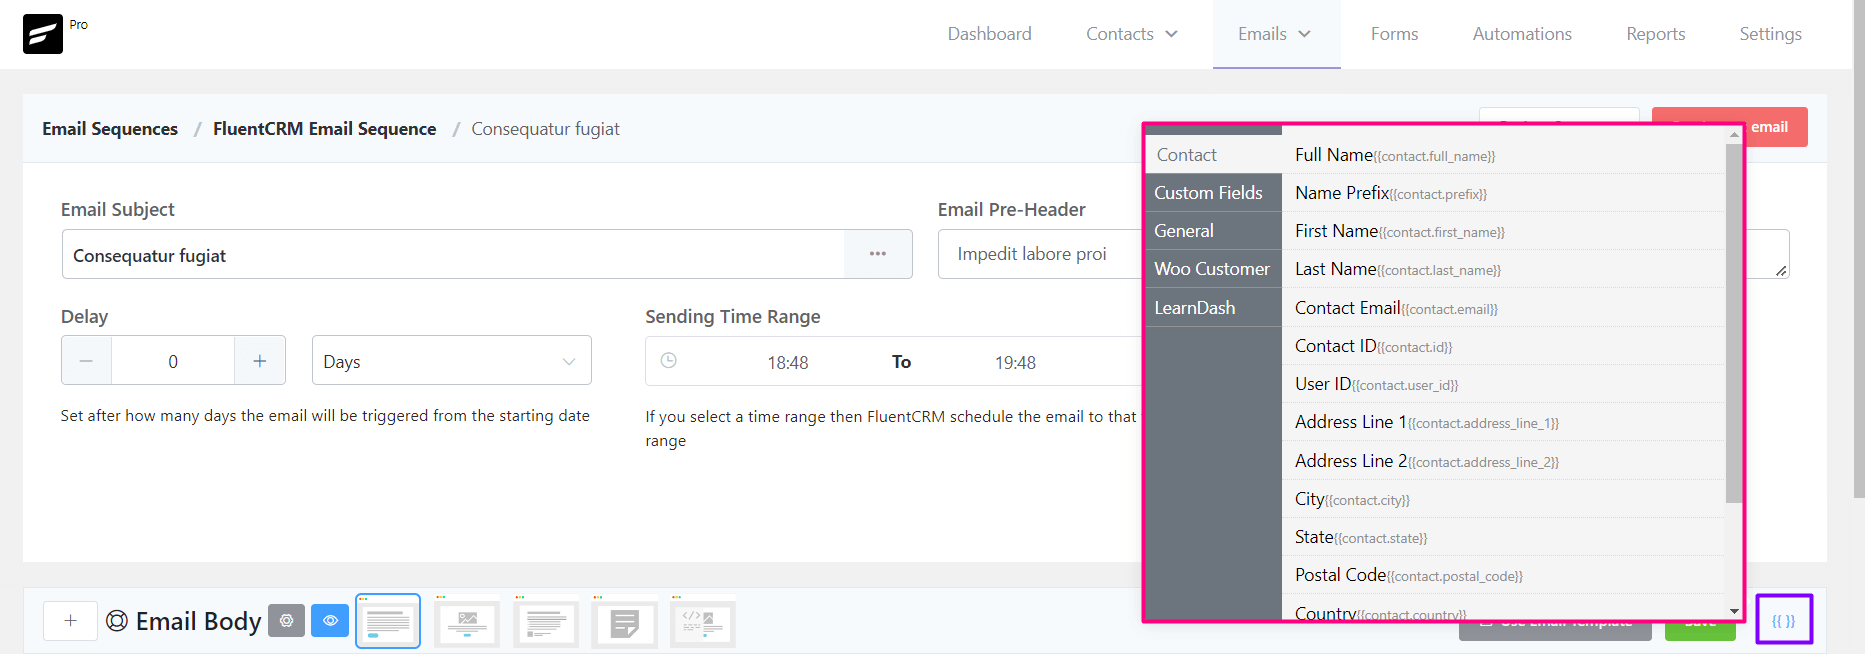
Again another amazing feature of FluentCRM is the dynamic data that can be used in the email body. To learn more about dynamic data using by SmartCode please visit SmartCode in Email Editor.
Delivery Schedule #
This is the most important part of an Email Sequence. Please follow the below guides to define your settings as per your requirements.
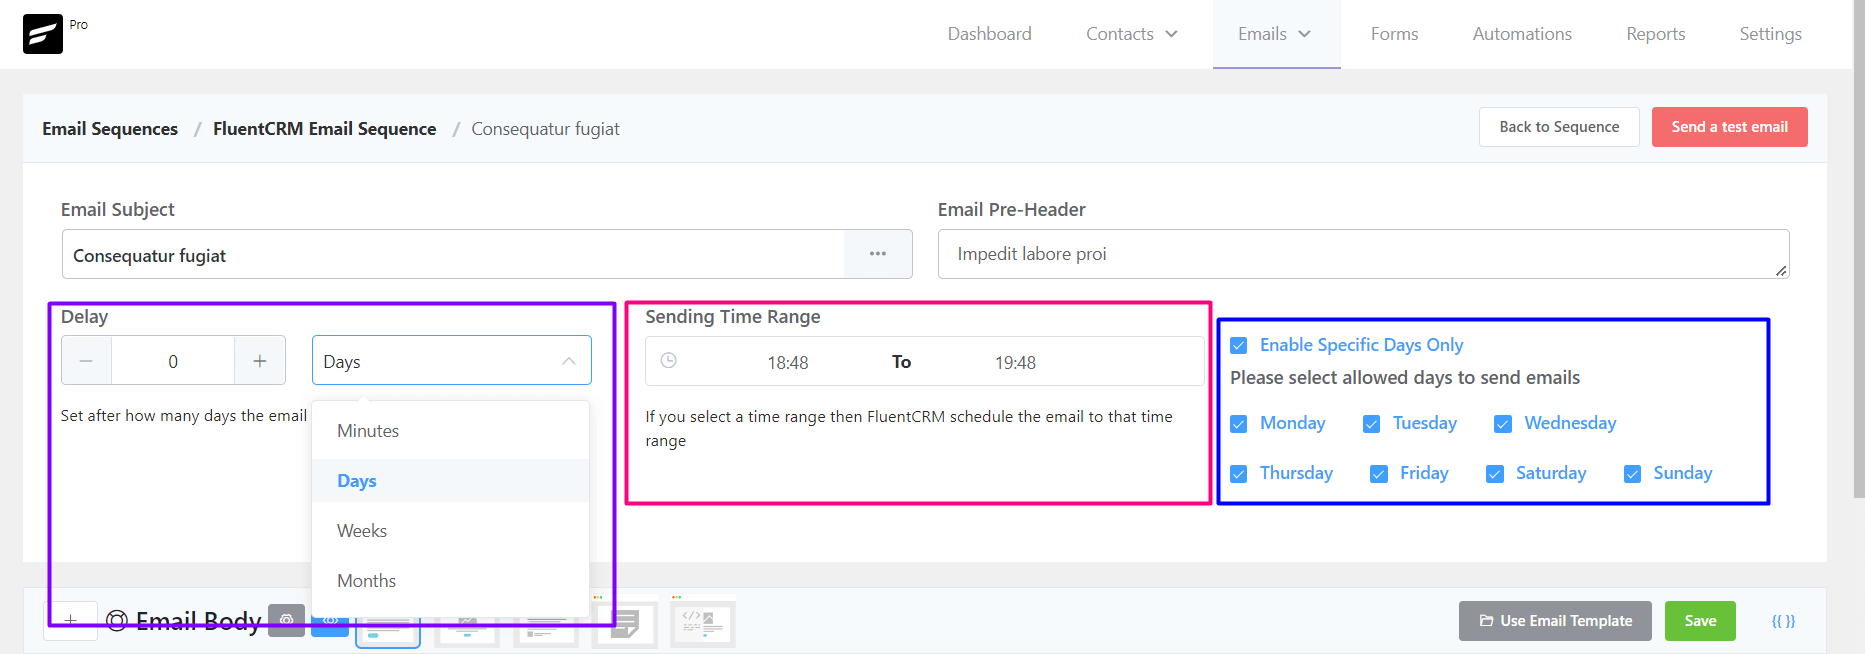
Delay #
Delay is mandatory in sequential email sequences. Choose a delay for the email. If the sequence is for new subscribers and you select 1-day delay then the email will be sent to the user after one day of subscribing. The available options are Minutes, Days, Weeks, and Months. You can also interconvert the values if you do not see like Years.
Be aware of the delay with each email of a sequence. Don’t send multiple emails in one day. One week delay with each email except the welcome email is industry standard for sequential emails.
Time Range #
Choose a time range to specify when the email should be sent. The best time to send an email campaign is in the morning and between 9–11 a.m.
Specific Days #
If you want to send emails to specific days then you should enable and select the days that you want to send. Like you may un-check Saturday and Sunday then that email will not be sent to Saturday and Sunday.
If any automation triggered the sequence after the day you defined (for example, triggered on Monday but the sequence scheduled on Sunday) then the sequence email will be delivered on the day of the next week(Sunday).
Sending a Test Email from Email Sequence #
To send a test email from Email Sequence, please click on the Send a test email button from the top right corner of the Email Sequence Settings section as shown in the below screenshot and then input the email address where you want to receive the test email and click on the Send button.
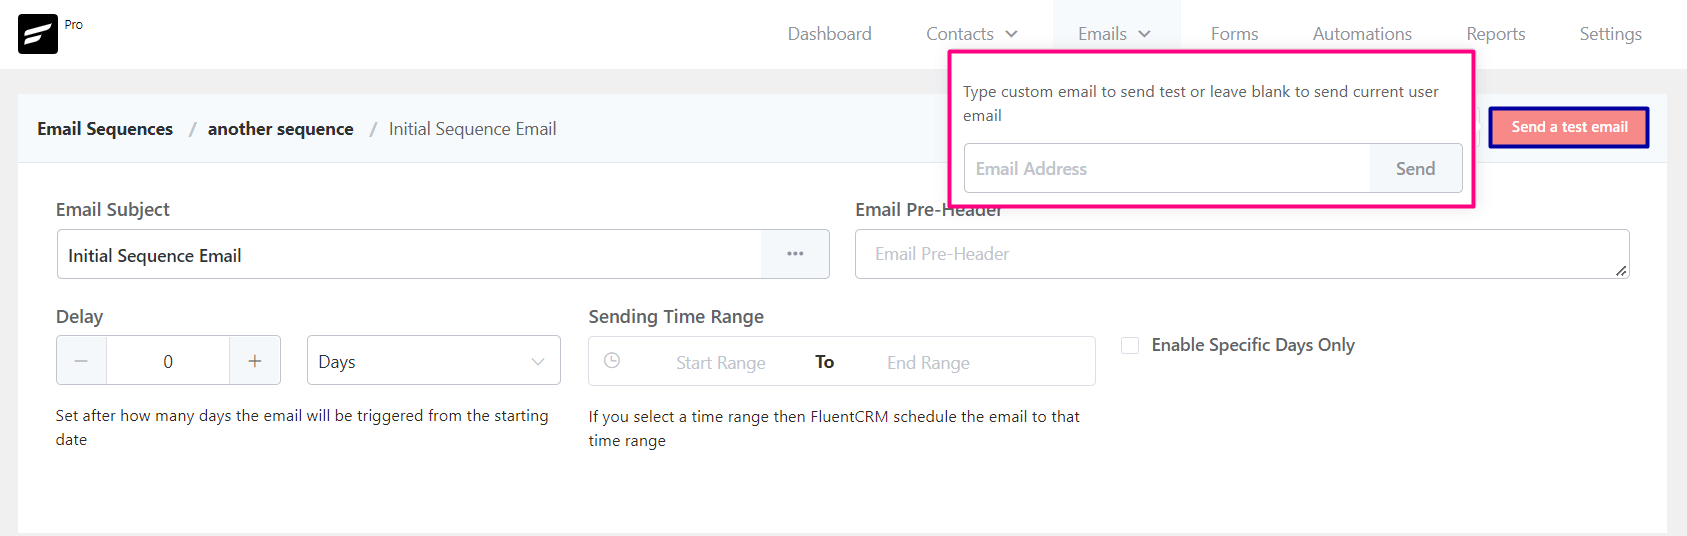
Once the email is sent successfully you will see a Success Message saying the Test email is sent successfully in the top right corner.
Sequence Emails #
So now we just created our first Email of the Email Sequence. Now we can add as many emails as we want following the above guide. Below is an example screenshot of 5 Emails in the Sequence.
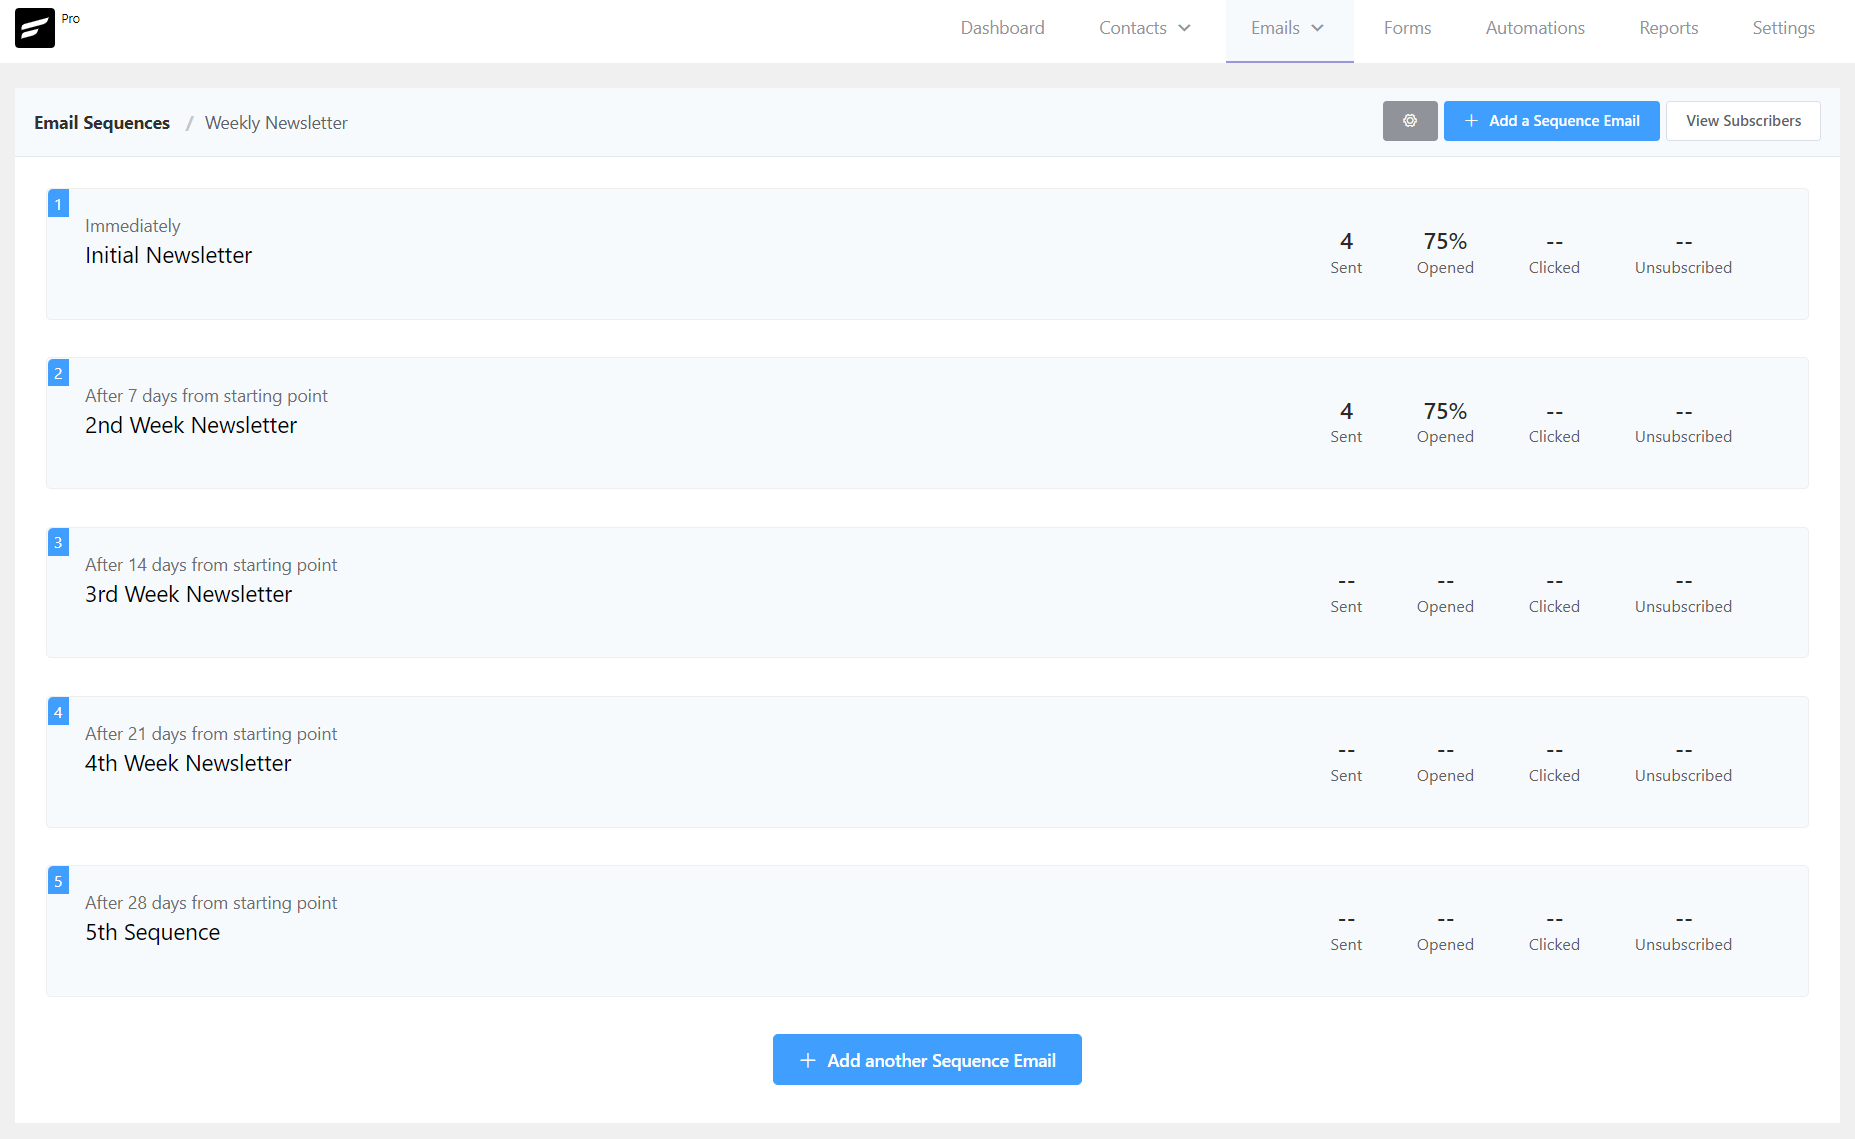
From here you will be able to see the below data properties:
- Subjects: The Email Subject for the Sequence Email.
- Schedule Delay: The delay defined or scheduled for the sequence email.
- Recipients: Total Number of recipients.
- Email Opened: Percentage of the Email Opened against the total number of recipients.
- Link Clicked: Percentage of the Link Clicked against the total number of recipients.
- Unsubscribed: Value of the Unsubs from this Sequence Email.
From this dashboard, you are also able to set custom mail from, rename the email sequence title, view all the subscribers in the sequence, and add new emails in the sequence.
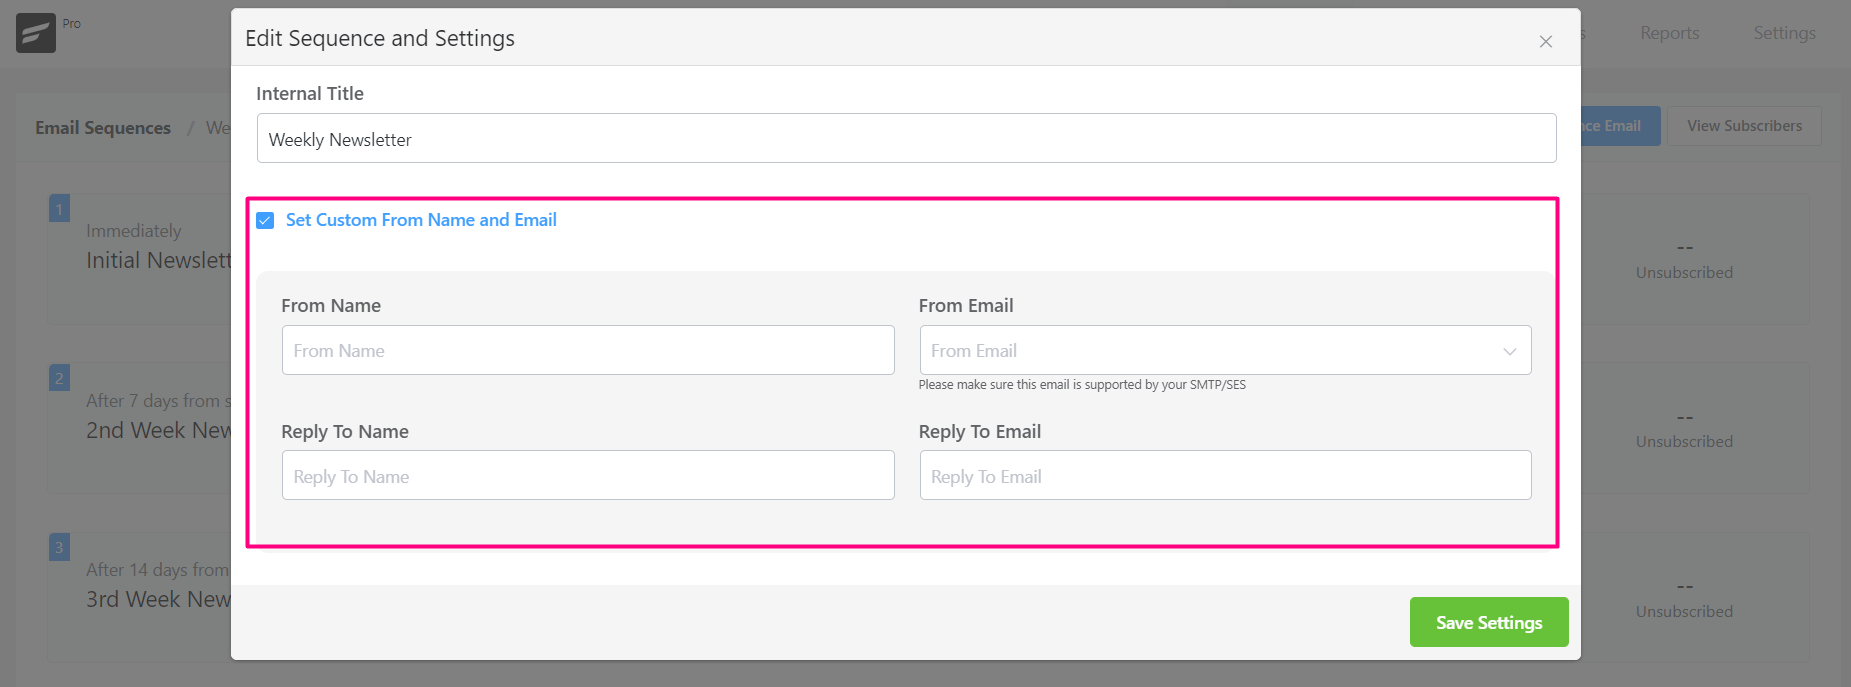
Custom Mail From Settings #
There are cases in that you want to set a custom From Email Address, From Name to be shown in the recipient’s mailbox or Email Clients. FluentCRM allows you to do so easily by clicking on the gear icon on the top section of the Sequence Emails list or dashboard. You can then enable the Set Custom From name and Email. Same as other places you will be able to set From Name, From Email (as a dropdown if configured in the Fluent STMP), Reply-To Name, and Reply-To Email.
Subscribers #
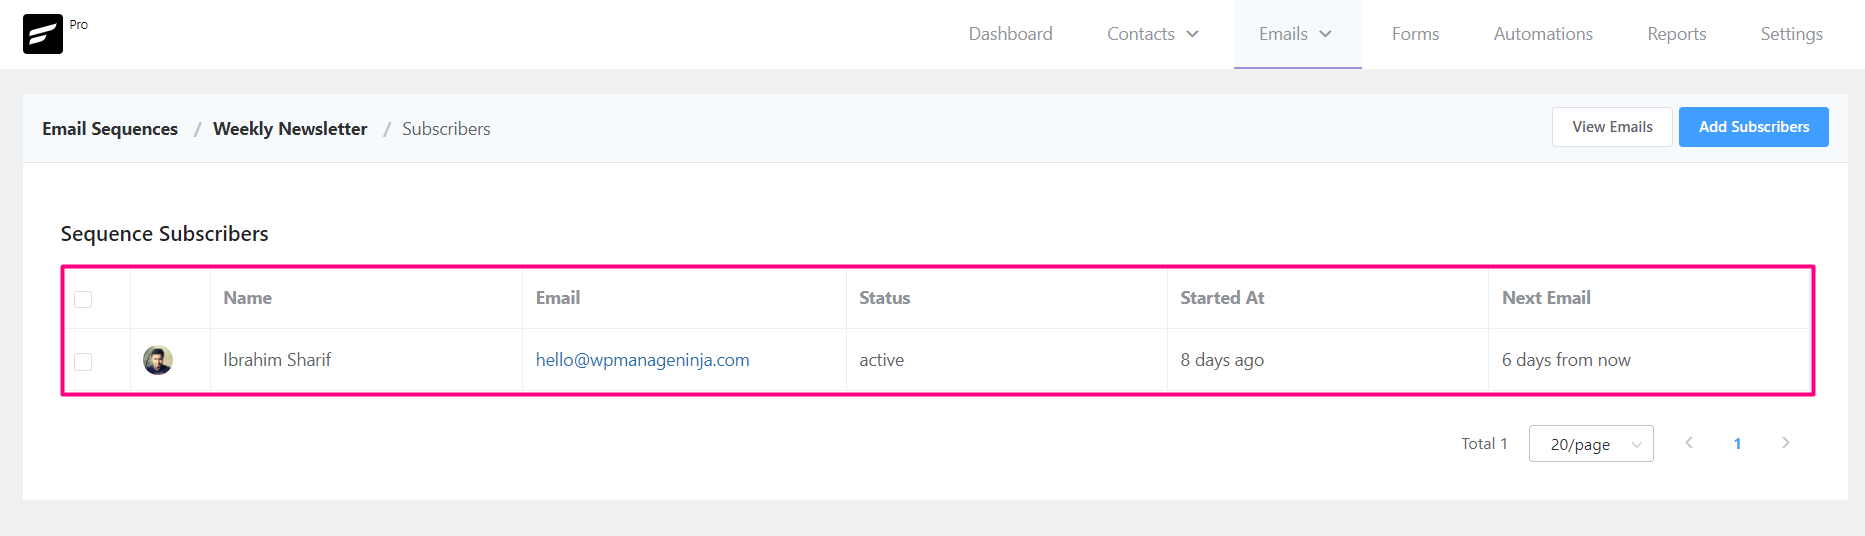
By clicking on the View Subscribers on the top section of the Sequence Emails list or dashboard, you can see all the contacts that are in receiving emails from this Email Sequence. The available overview shows:
- Name: The name of the contact that is in this Email Sequence.
- Email: The email address for the contact.
- Status: The status is either active or completed for the sequence.
- Started at: When the Sequence started for this contact.
- Next Email: The schedule of the next email in from the sequence.
You can add more contacts to the Sequence by clicking on the Add Subscribers button.
You can also select one or more contacts from the list and then Remove them From the Sequence.
Email Sequence in Automation #
Once you’ve created email sequences, you can trigger them inside Automation. To add an email sequence within an automation funnel, simply hit the (+) button and choose Set Sequence Emails from the Email Actions.
So that’s all about email sequences. Go ahead and nurture your audience with any kind of email sequence!
*Tutorial: 4 Excellent Email Sequences and How to Create Them in FluentCRM.


Okay, new question. If I have a 10-day sequence, and want them only sent on weekdays, how does this get set up? If someone joins on a Thursday, they should get Day 0 and Day 1 emails as normally scheduled, but Day 3 email on Monday, Day 4 email on Tuesday, and Day 5 email on Wednesday. However, if someone joins on Monday, they should get daily emails for 5 days before the weekend, and the following ones starting on Monday, but only 1 email per day.
The way I see the settings, if I set all of them to be delivered on the specific days of Monday through Friday, what’s stopping the system from sending out 3 emails on Monday?
It’s about 2 years since this comment thread. The post didn’t answer my question, but the comment thread addresses it and the news wasn’t good, so I tested to see if it’s changed. I have just run a test sequence where I set it up to send emails #2 and #3 in the sequence at minutes 2 and 3, respectively.
As soon as #2 dropped but before #3, which would COMPLETE the sequence for that contact, I added email #4 at 4 minutes (future) and email #1 at 1 minute (past).
As I hoped, it sent #4 out, even though it was not in the sequence when the contact was added. It did not send #1.
So this is perfect behavior. You can run a sequence in perpetuity, so long as you are out in front of the herd. Emails you add will be received by everyone who is not in a completed status.
You can also edit emails in the past, or even add emails (insertions or at the beginning) without affecting any contacts that have already traversed that area in the sequence.
Hi Richard, We refactored the plugin based on user suggestions and there are also more similar features (e.g. you can add new steps and apply them for past contacts). Thanks for running the test and sharing the results.
Is this documented anywhere? I was just looking to see if it was now possible to add new emails to a sequence and have the new emails sent to those mid-way through the sequence. This has been one of the main limitations of FluentCRM, in addition to not being able to define different double opt-in emails per list / signup form.
Hey, Is there an option now to stop and pause sequences? We are at the point day before the webinar, and a user who registers today, I don’t need to receive the whole series.
How can i trigger an automation (email) Welcome serie
AFTER – the double Opt In – confirmation .
I dont see the “conditions” as email subcriber status “as” a trigger.. ??
Jonas
I need the same as this gentleman! What trigger to use once the person goes from pending to subscribed?
If you have enabled DOI, you can achieve this scenario. No manual setup required. 🙂
How can i add utm parameters to the link in sequences emails?
Yes, +1, this is super important!
Hi Adrian & Tobias,
We have added this feature in FluentCRM 2.6.0. Hope you’re enjoying the feature! 🙂
Hi,
Is there any way to set the frequency of mails as 1 email per minute in an email sequence
If I delete a sequence will all of the emails in that sequence automatically stop so none of the subscribers receive any more emails?
No, that can only be done through automation by using the cancel sequence emails action.
So, I’ll explain my case better. I have 4 emails to be sent to a customer, the purpose of these emails is for the customer to respond at least 1.
If the customer responds to email 2, the other emails should not be sent.
If the customer responds to the first email, the others do not need to be sent.
This automation is what I want to do. A condition so that when the customer responds to 1 email, the others are not sent
I know this is an old comment, but for the benefit of future readers, I would do this using a Smart Link, where a tag is added, which in turn triggers an automation, where you can cancel the email sequence.
Hi,
Is there a way to change the sequence of emails? Drag and drop emails to move them up or down in the sequence?
Thanks!
Hi Peter, Yes, to change the sequence of emails, you need to change the delay of your emails and they will be automatically rearranged.
Thanks, Nazir!
Thanks Nazir for your response.
By using smartlink, applying tags & removing from the initial trigger tag, will it stop email 3 & 4 from getting to the recipient? or will it still complete the sending of all 4 emails even if they where successfully moved to a new tag?
Also, if you don’t mind me asking, what is the (use case) difference between smart link and Link click benchmark?