FluentCRM offers several Primary Triggers that let you start an automation funnel based on your user’s behavior. Besides primary triggers, there are plenty of other Triggers available in FluentCRM that you can use to create automation funnels for automating your workflows according to your requirements.
This article will provide detailed information about all Primary Triggers of FluentCRM Automation.
Remember, to use all the CRM Triggers, you need to have FluentCRM Pro Plugin installed and activated in your WordPress Site.
Primary Triggers of FluentCRM #
To learn how you can use all the primary Triggers of your FluentCRM, follow the steps with screenshots below –
First, go to the Automation section from the Fluent CRM Navbar, and click + New Automation.
To learn the detailed process of creating a new automation funnel, read this Documentation.

Now, a pop-up page will appear with all the Popular Pre-built Funnel Templates for creating automation.
You just need to click on the desired templates and it will redirect you to the Automation Editor where the full funnel diagram will be ready automatically.
Alternatively, if you want to create your automation funnel from scratch, simply click on the Create from Scratch tab.

All the Primary Triggers for creating an automation funnel are divided into two major categories in the left sidebar. These are:
- CRM Trigger
- WordPress Trigger
Once you select your desired Trigger, click the Continue button, and put a Title under the Internal Label field for this automation funnel so that you can easily find it later.
If you leave it blank, it will automatically titled according to its trigger’s name.
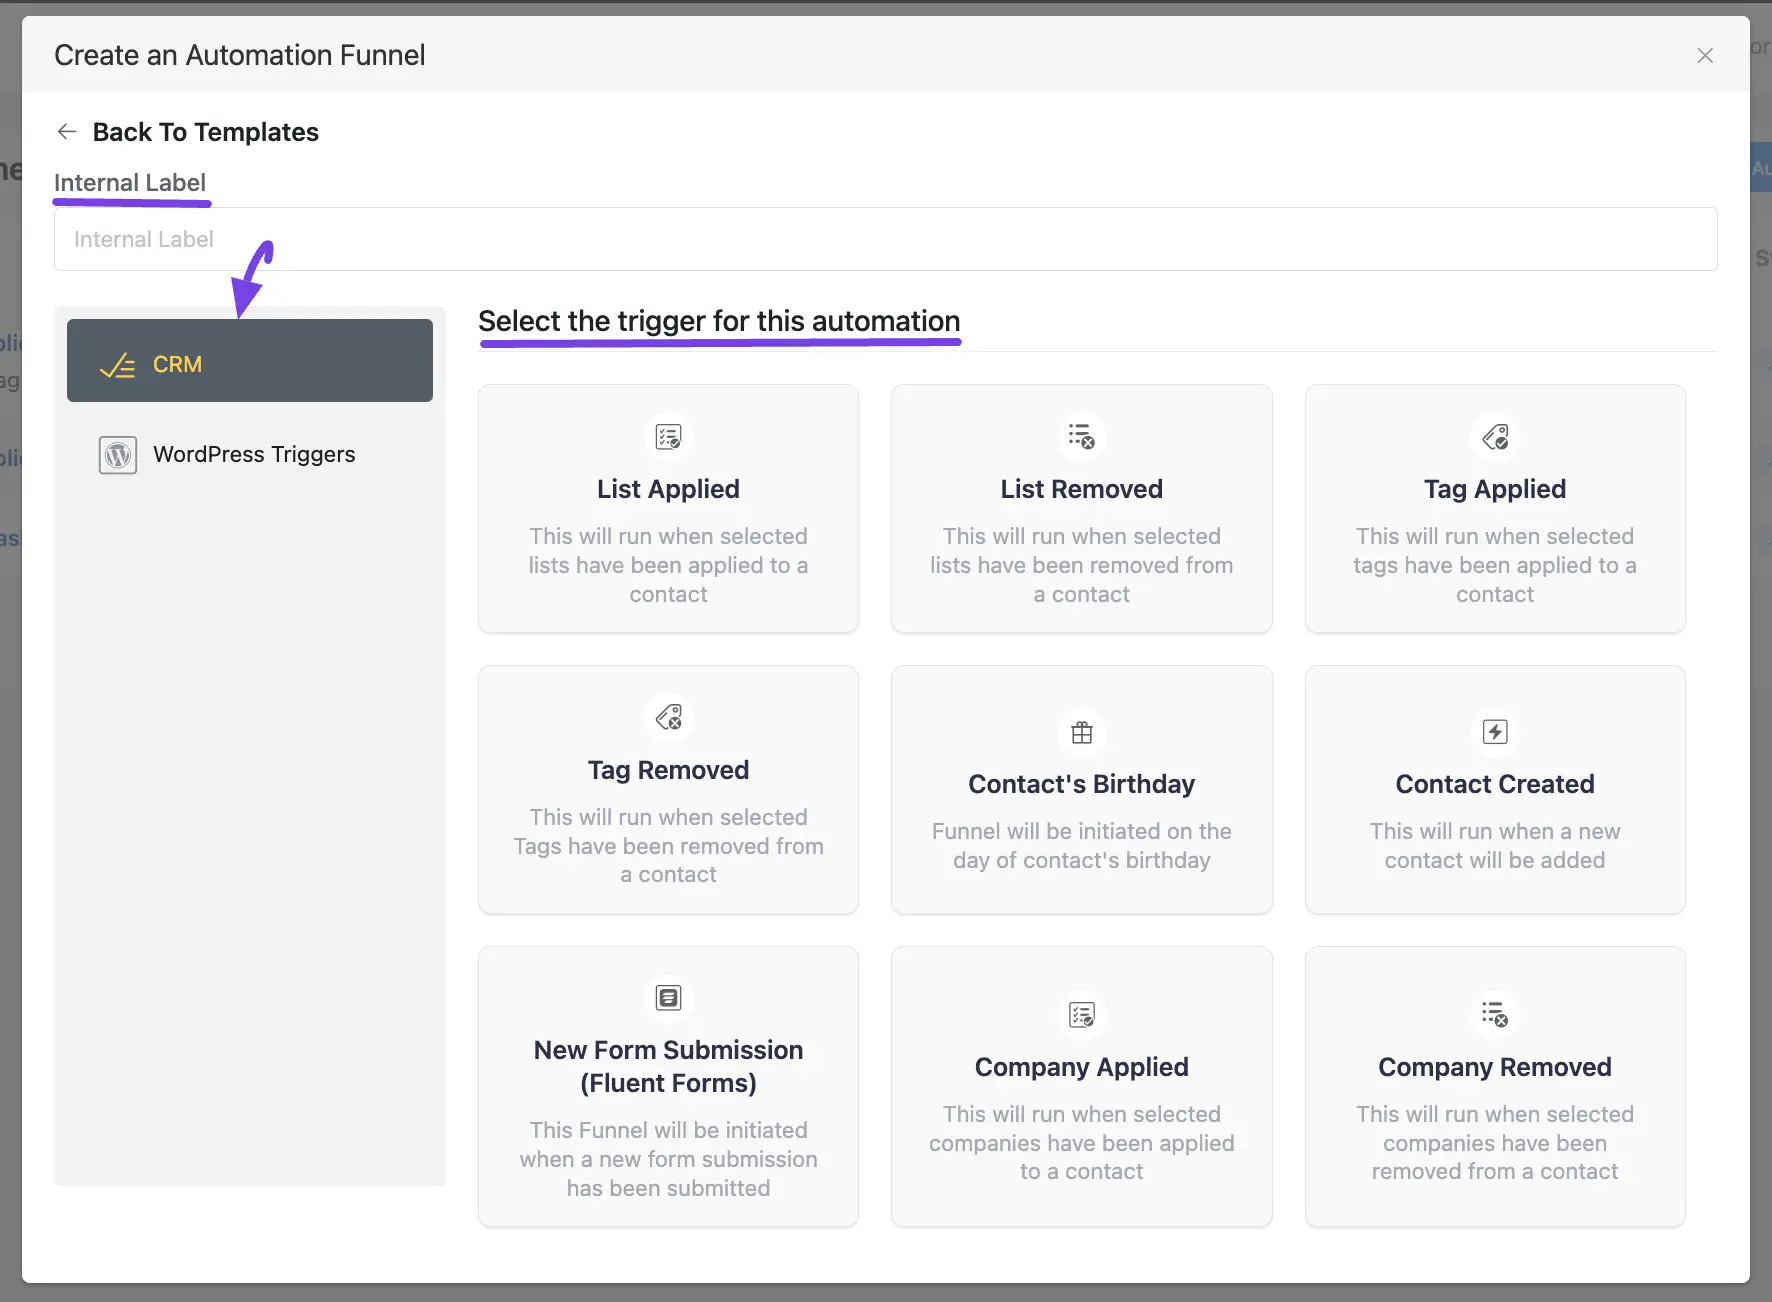
1. CRM Trigger #
The detailed explanation of all the CRM Triggers is given below –
List Applied #
This automation funnel will start once the selected lists have been applied to a contact.
Once you select this trigger, a tab will appear on the right-hand side with options to set your trigger.
Settings of List Applied Trigger #
- Automation Name: Provide a Name for the Automation so that you may find it later easily.
- Internal Description: Write a description that will be used as a Subtitle in the Block Diagram in the Automation Editor.
- Select Lists: Select the Lists (single or multiple) using the dropdown arrow for which you want to trigger this automation funnel. If you do not have any existing Contact List in your FluentCRM, you can directly create one from here by clicking the Plus icon.
- Run When: Select whether the contact needs to belong to one list or all of the lists you’ve selected.
- Run the automation actions even contact status is not in subscribed status: Check this option if you want to run the automation even when the contact’s status is not in subscribed status.
- Restart: Check this option if you Restart the automation multiple times for the same contact that triggers the automation.
Once you are done, click the Save Settings button to save all your changes.
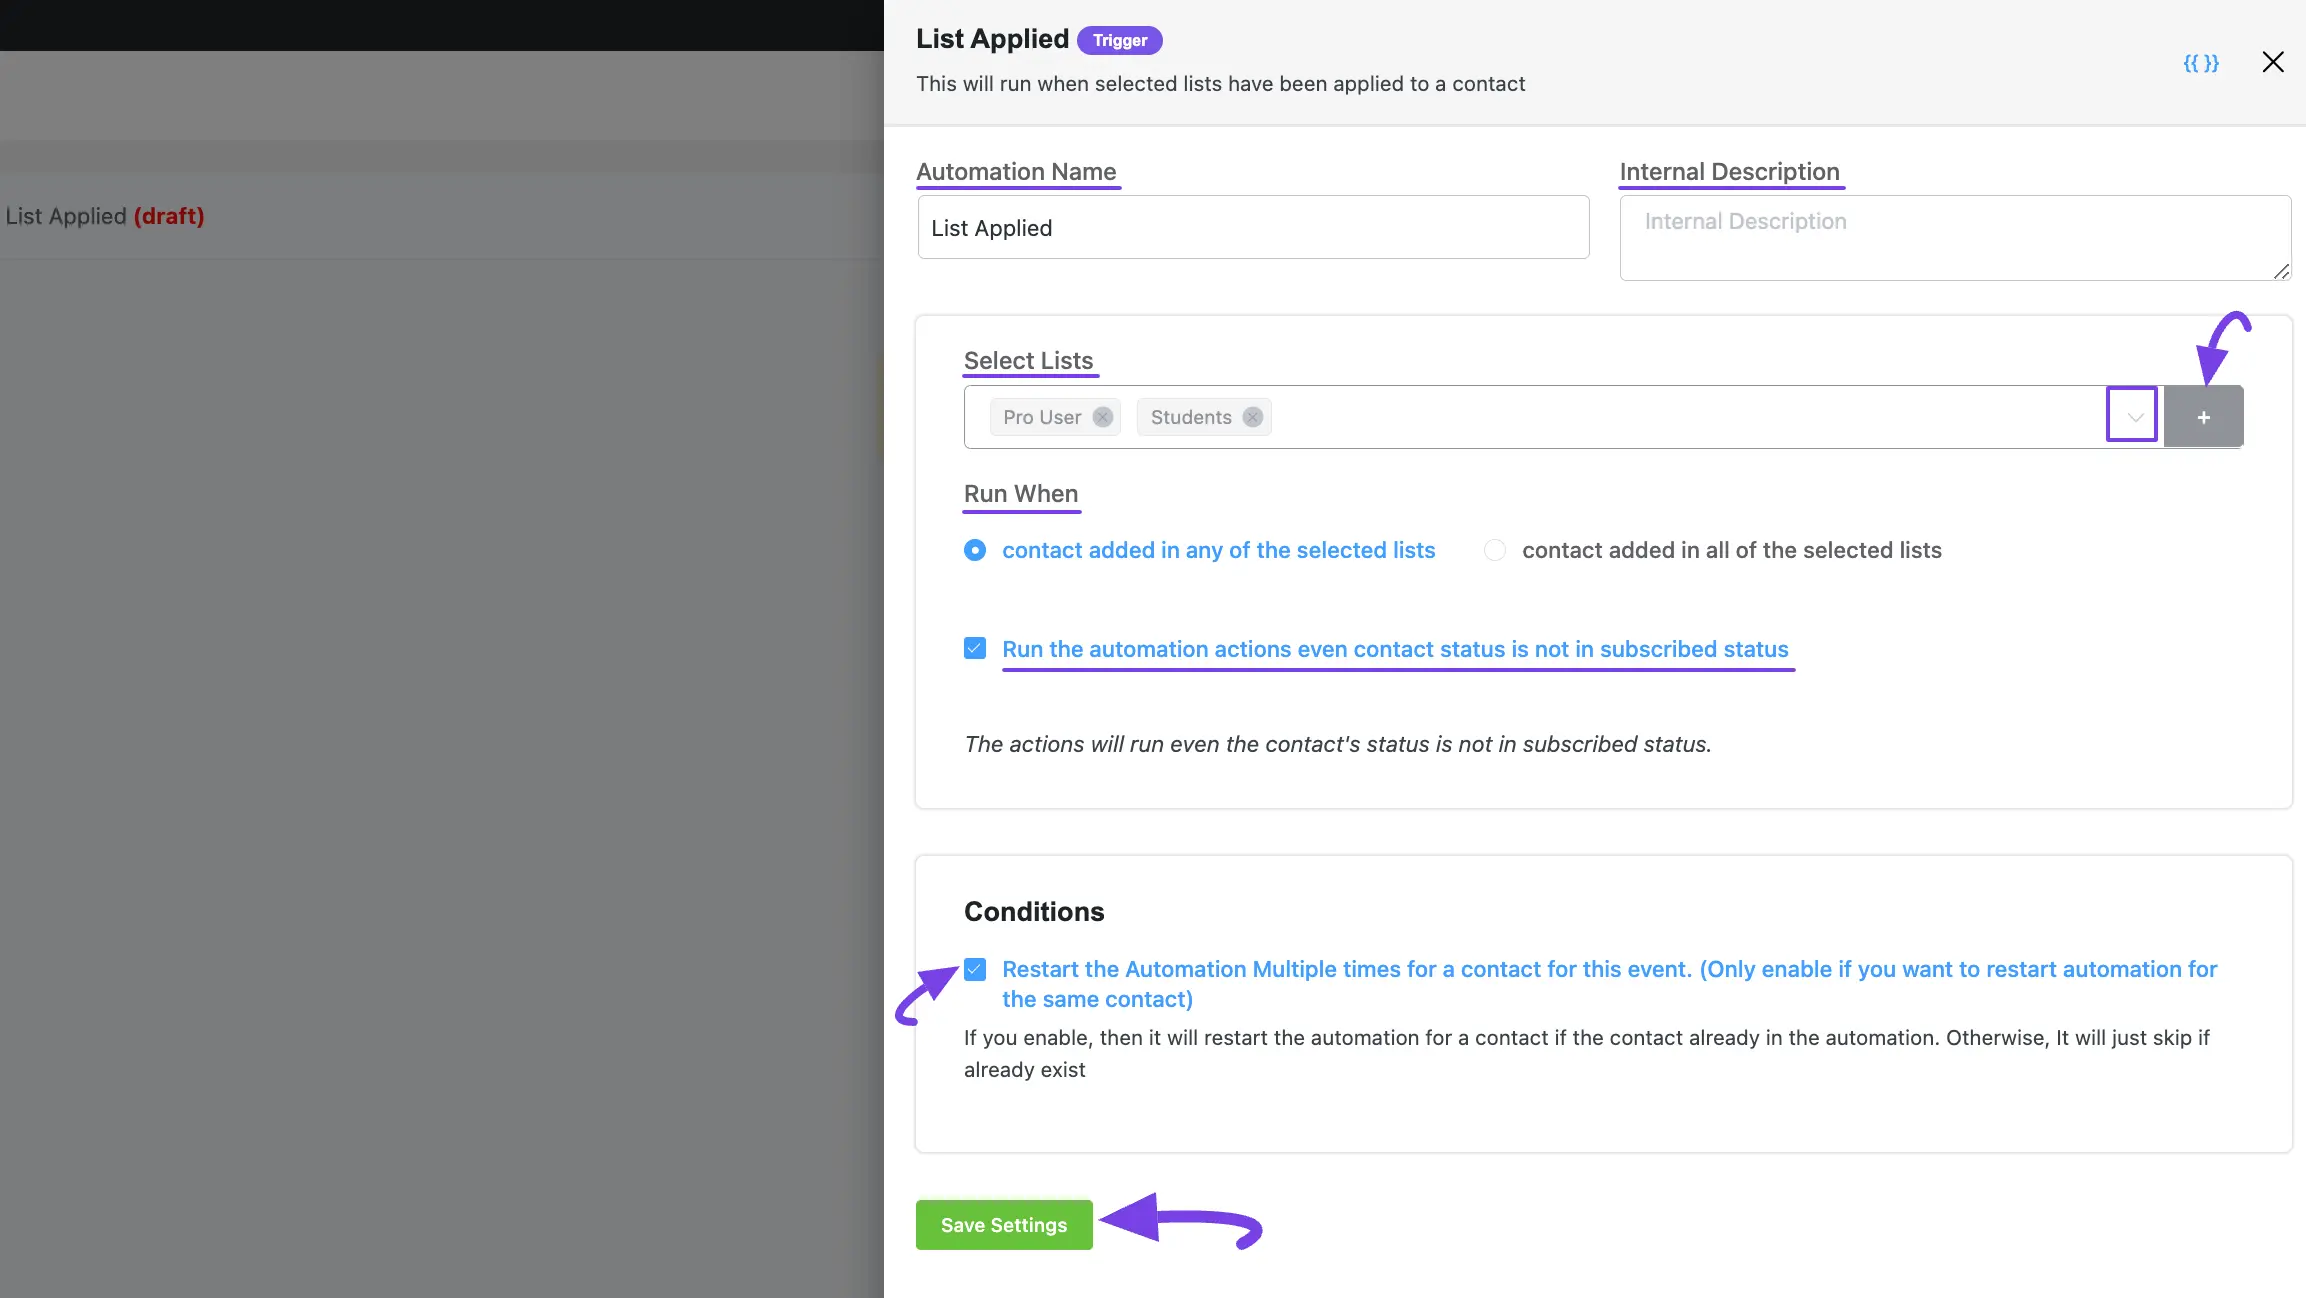
List Removed #
This automation funnel will start once the selected lists have been removed from a contact.
Once you select this trigger, a tab will appear on the right-hand side with options to set your trigger.
To learn the use of all the settings mentioned in the screenshot below, read this Section.
Once you are done, click the Save Settings button to save all your changes.
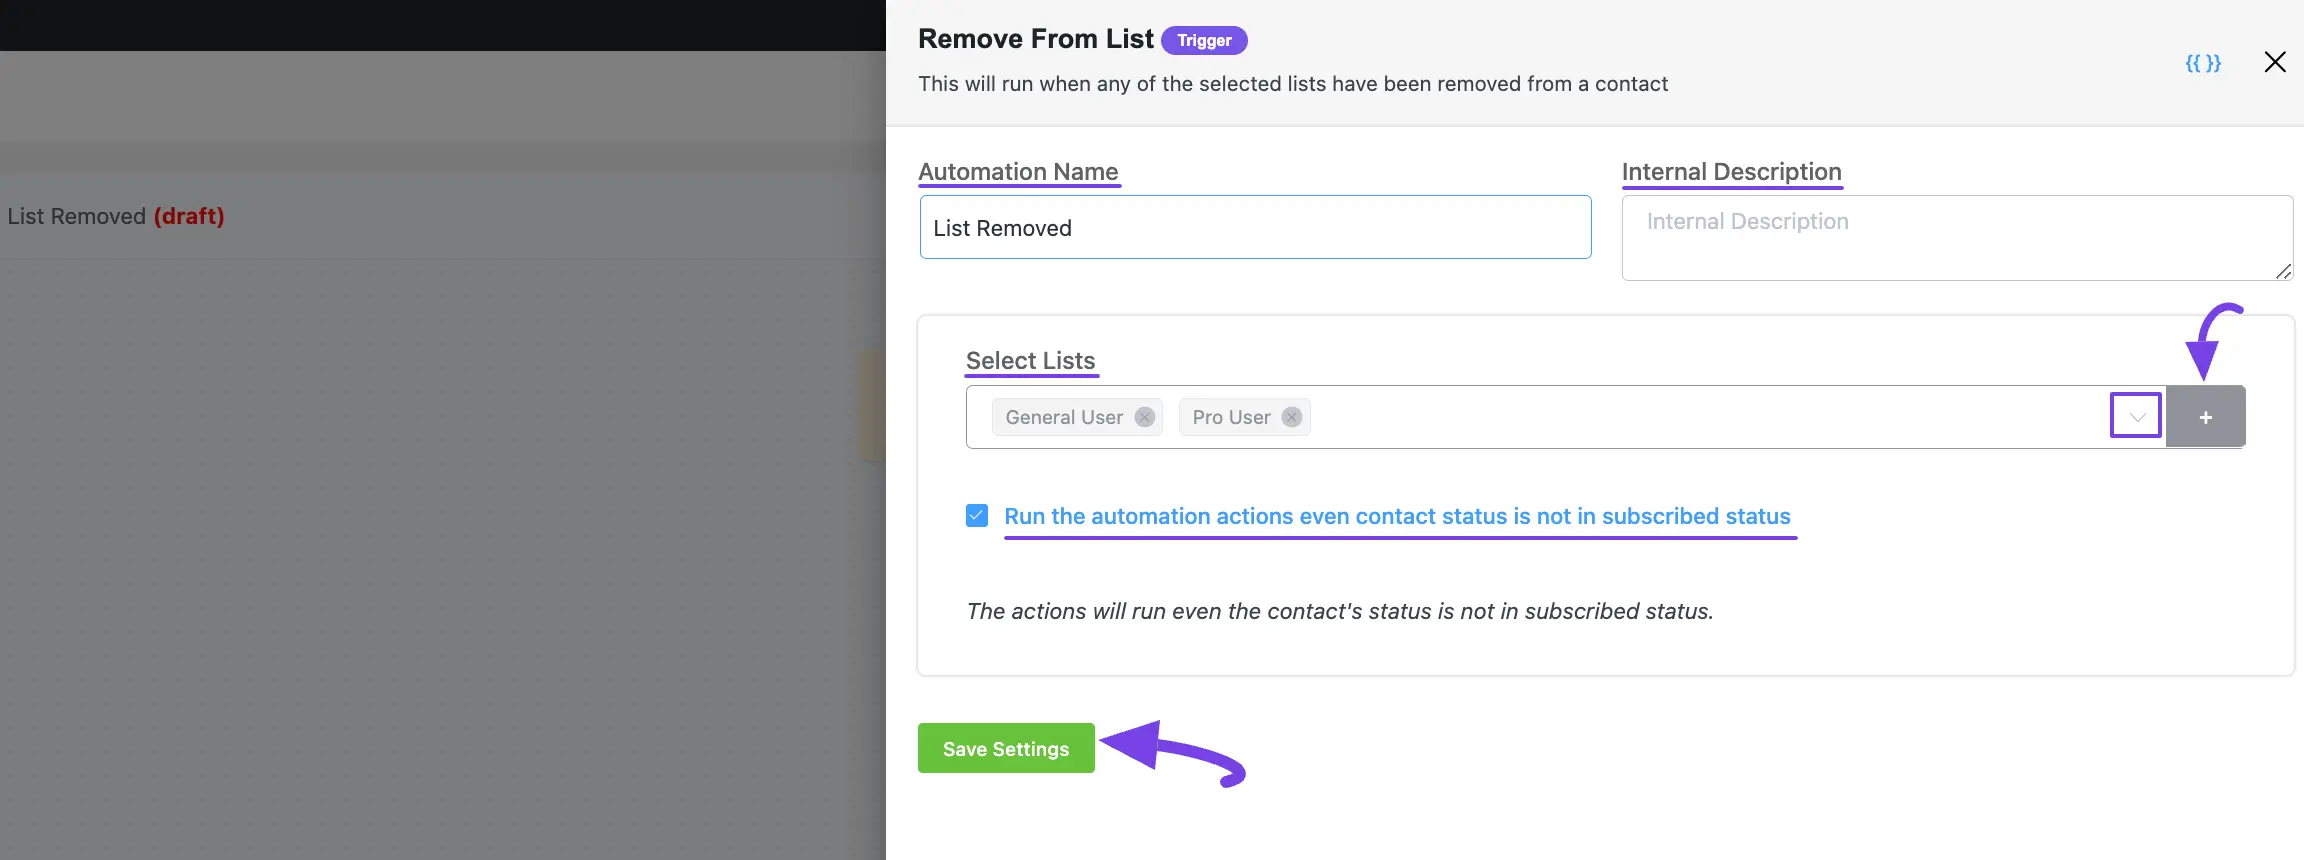
Tag Applied #
This automation funnel will start once the selected tags have been applied to a contact.
Once you select this trigger, a tab will appear on the right-hand side with options to set your trigger.
Here, are the Settings of Tag Applied Trigger
- Select Tags: Select the Tags (single or multiple) using the dropdown arrow for which you want to trigger this automation funnel. If you do not have any existing Tags in your FluentCRM, you can directly create one from here by clicking the Plus icon.
To learn the use of all the settings mentioned in the screenshot below, read this Section.
Once you are done, click the Save Settings button to save all your changes.
Tag Removed #
This automation funnel will start once the selected Tags have been removed from a contact.
Once you select this trigger, a tab will appear on the right-hand side with options to set your trigger.
To learn the use of all the settings mentioned in the screenshot below, read this Section.
Once you are done, click the Save Settings button to save all your changes.
Contact’s Birthday #
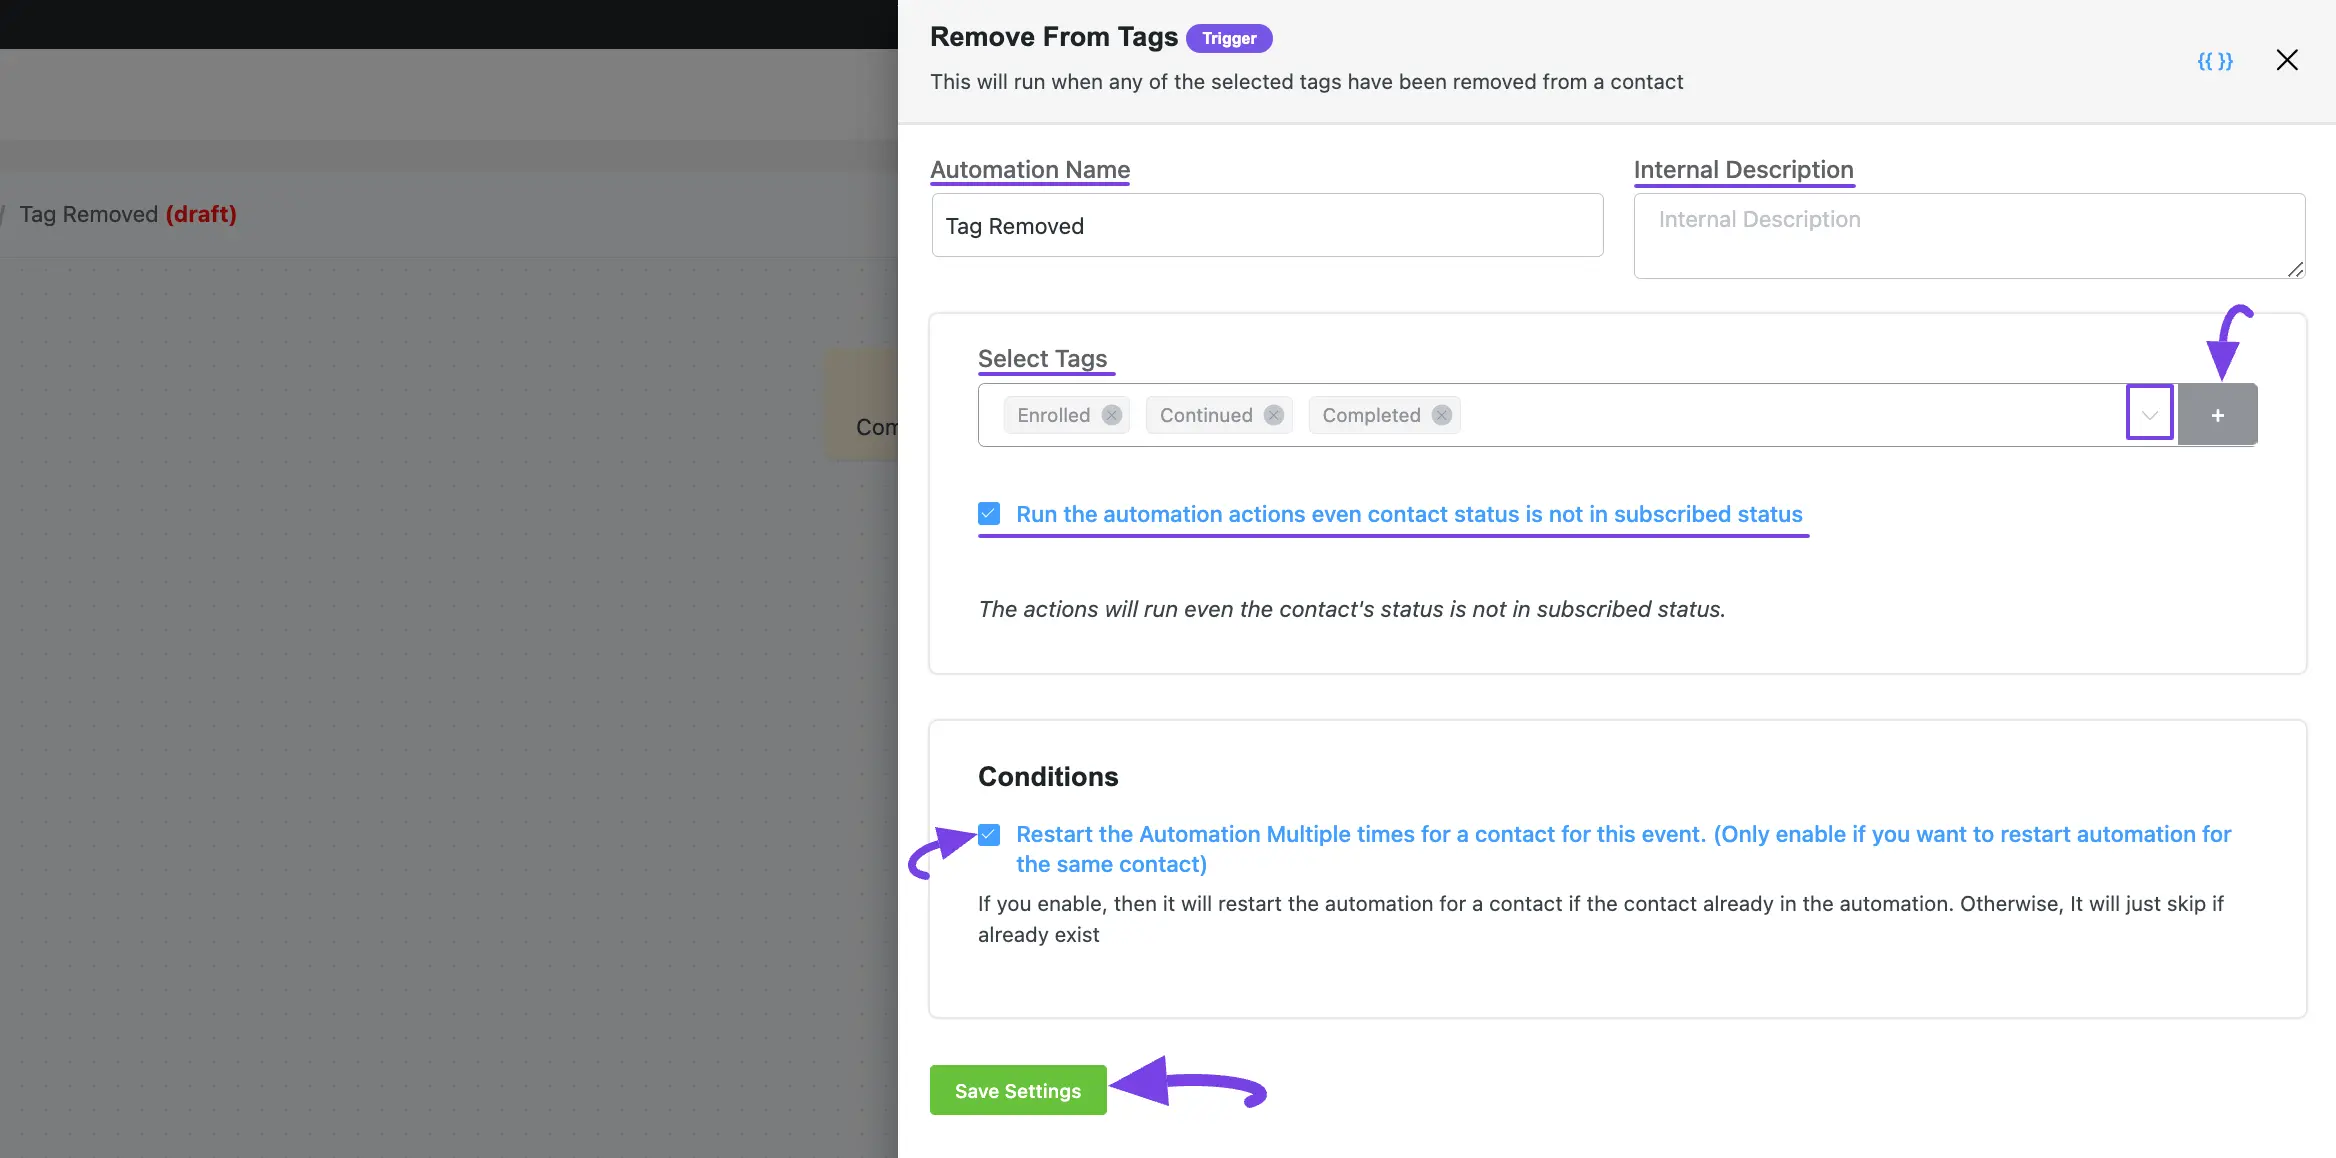
This automation funnel will be initiated on the day of the contact’s birthday. With this funnel, you can send each of your subscribed contacts a custom birthday email or promotional offer on their birthday. Additionally, birthday marketing is a powerful technique to enhance customer experience and increase revenue.
Once you select this trigger, a tab will appear on the right-hand side with options to set your trigger.
To learn the use of all the settings mentioned in the screenshot below, read this Section.
Once you are done, click the Save Settings button to save all your changes.
Contact Created #
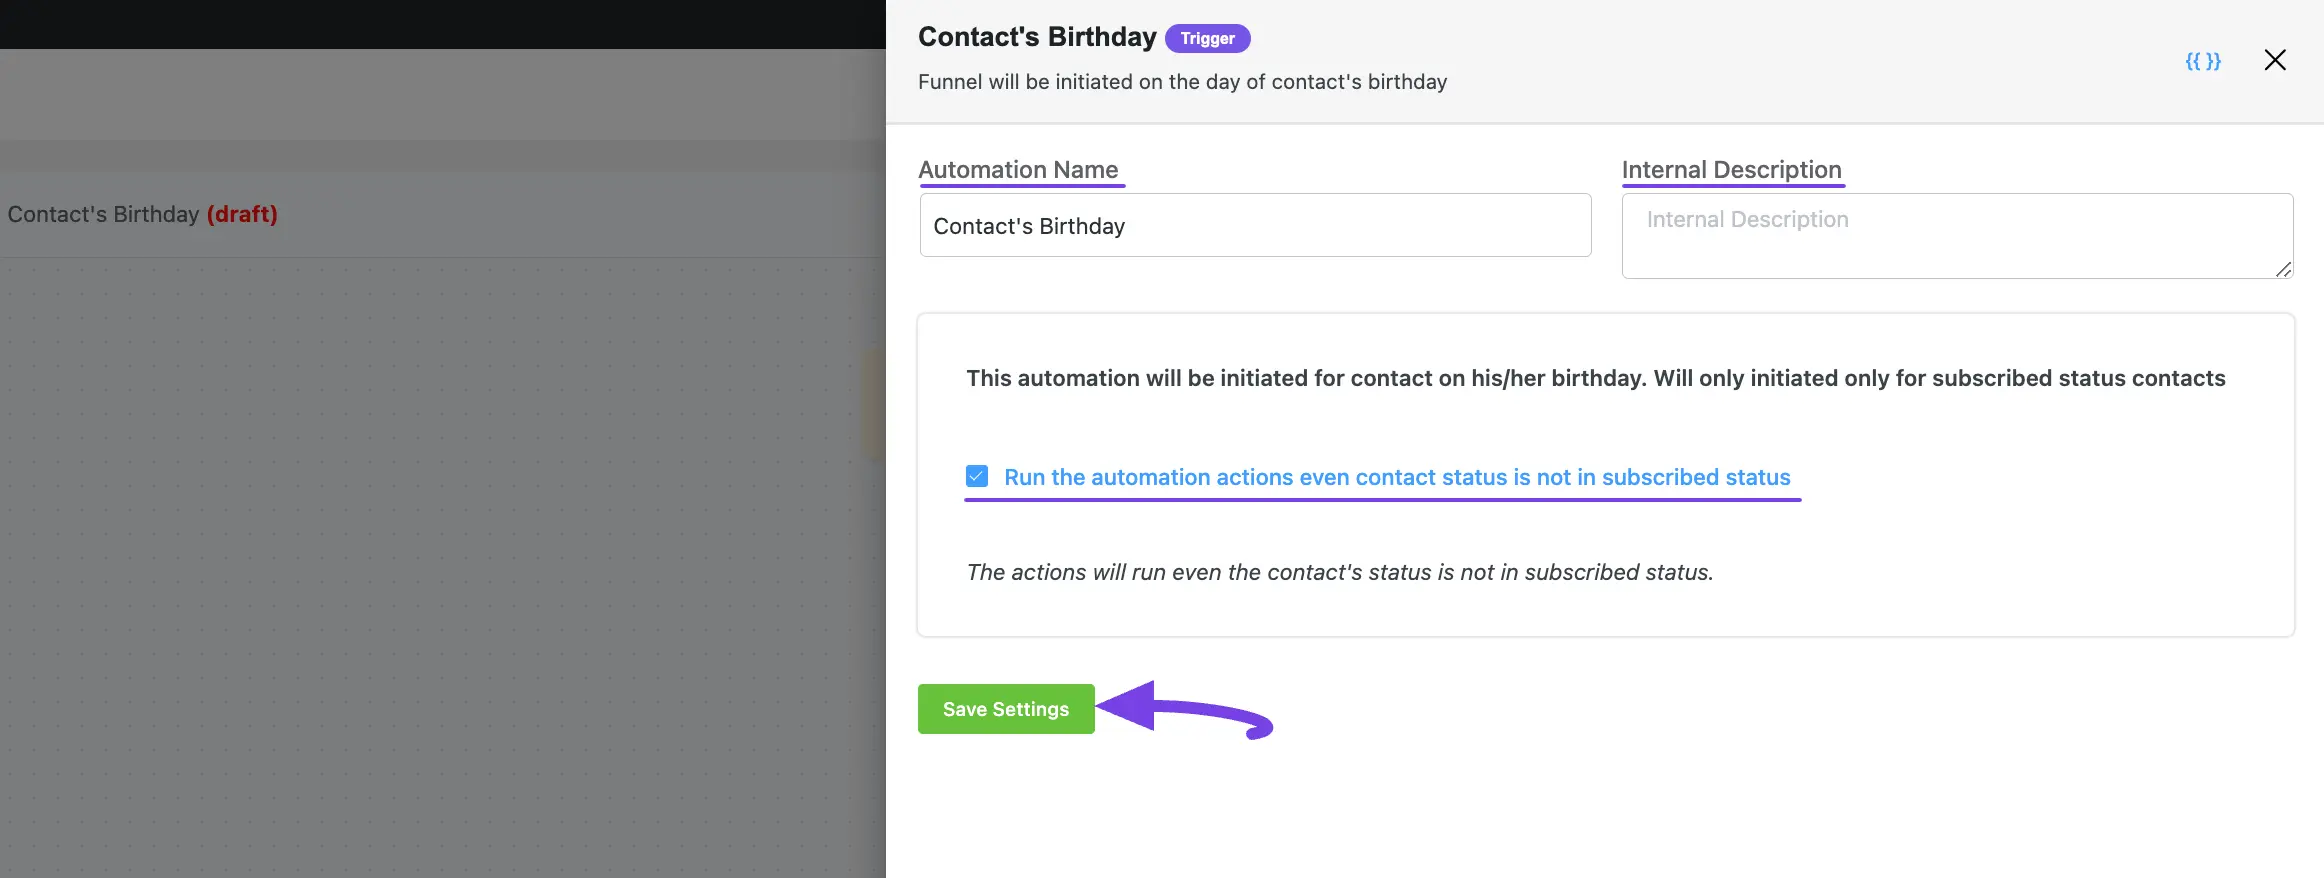
This automation funnel will start once a new contact will be added. To learn the detailed process of adding contacts, read this Documentation.
Once you select this trigger, a tab will appear on the right-hand side with options to set your trigger.
To learn the use of all the settings mentioned in the screenshot below, read this Section.
Once you are done, click the Save Settings button to save all your changes.
New Form Submission (Fluent Forms) #
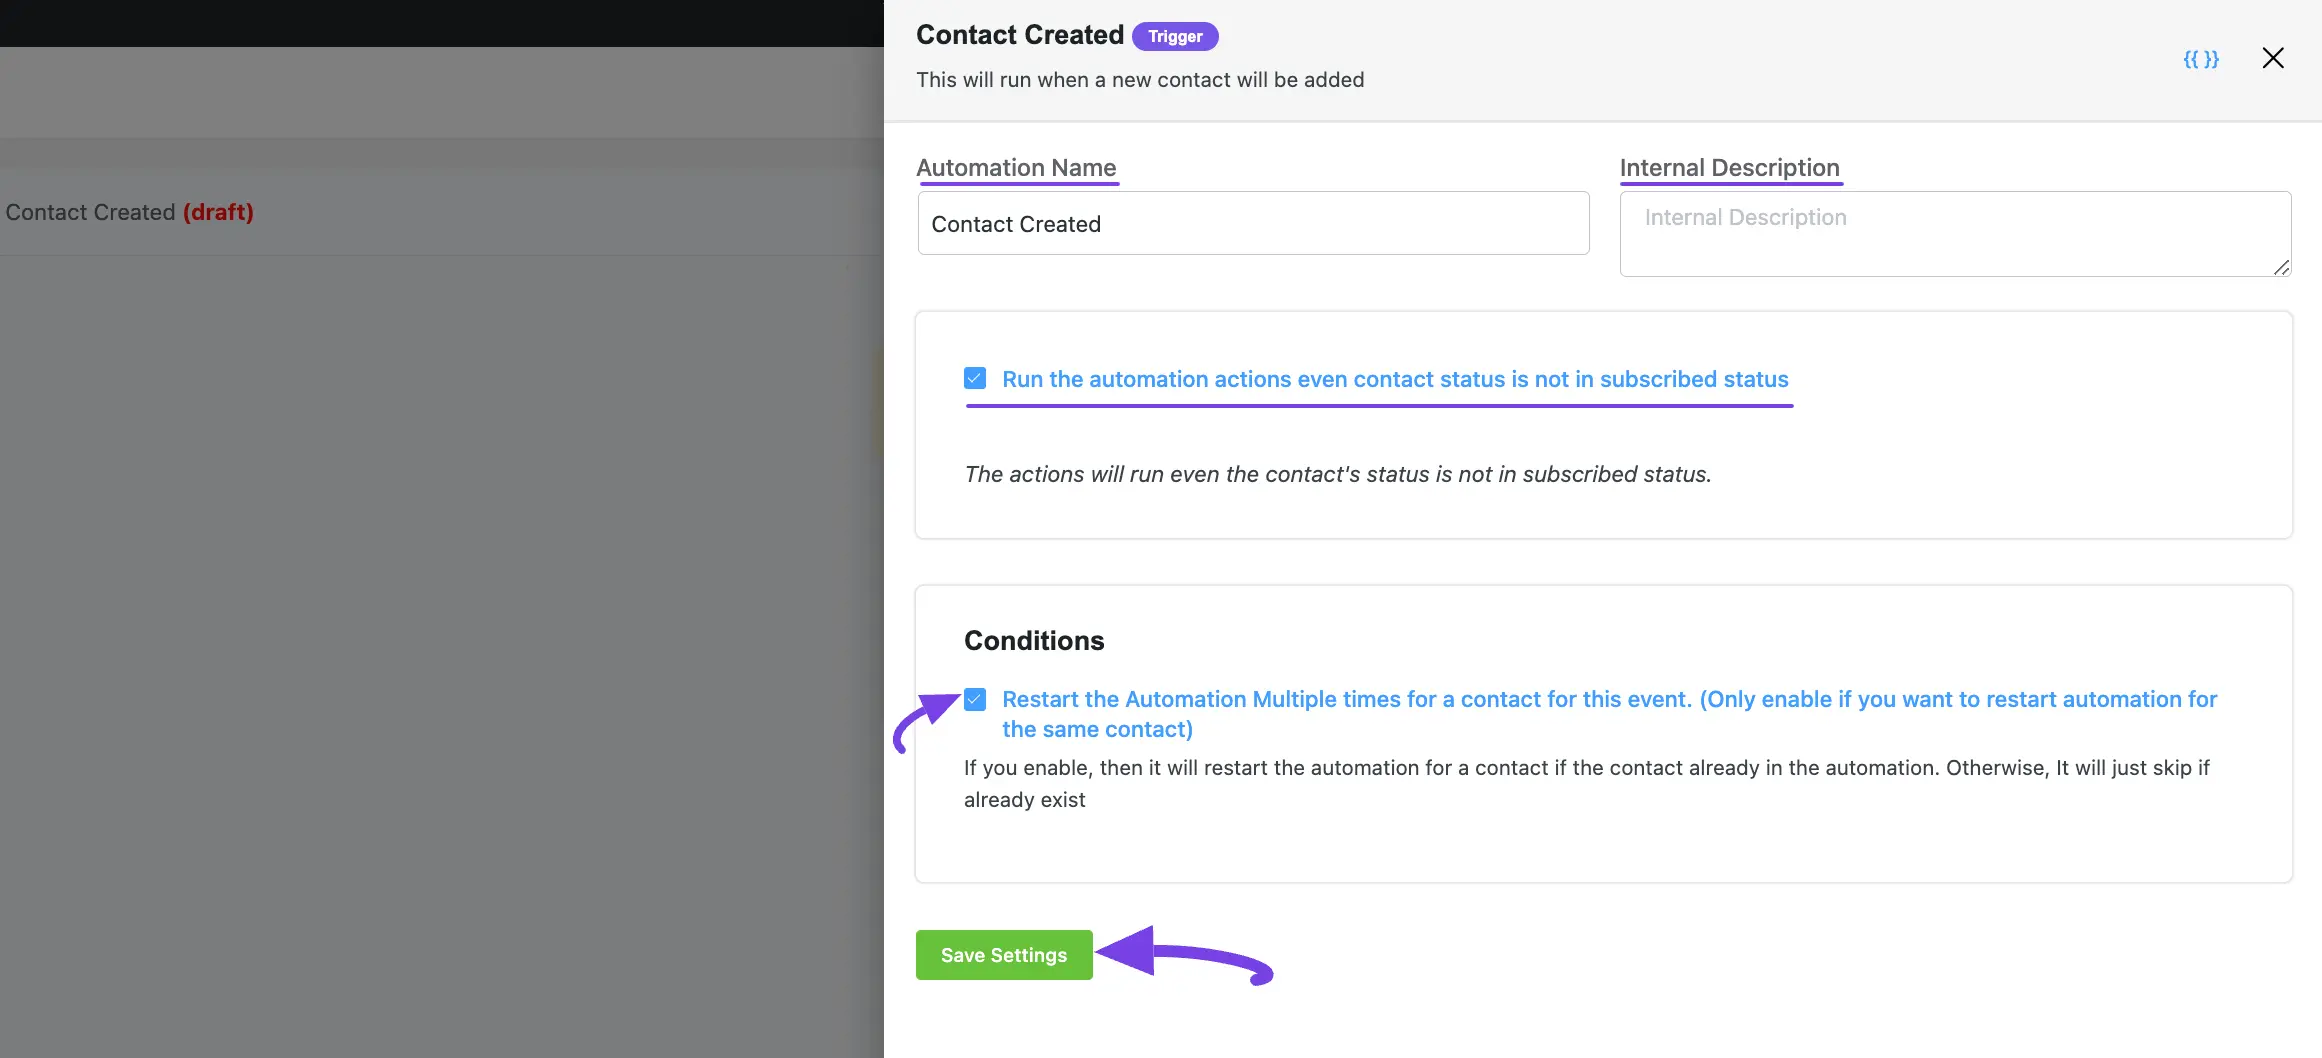
This automation funnel will start once a new form is submitted in Fluent Forms.
Once you select this trigger, a tab will appear on the right-hand side with options to set your trigger.
Remember, to use this trigger you must install and activate the FluentForms plugin in your website. Plus, if you want to learn how to integrate FluentForms with FluentCRM, read this Documentation.
Here are the Settings of the New Form Submission trigger
- Automation Name: Provide a Name for the Automation so that you may find it later easily.
- Internal Description: Write a description that will be used as a Subtitle in the Block Diagram in the Automation Editor.
- Select your Form: Select the desired Form using the dropdown arrow for which you want to trigger this automation funnel.
- Map Primary Data: The field will be available for mapping with the Form’s corresponding field. The left-hand side is FluentCRM fields and the right-hand side is user-submitted data from the selected Fluent Form. Click the Dropdown Arrow to see all the mappable field items.
- Map Other Data: Use this option if you want to add your FluentCRM fields beside the primary fields. Here, you can also select the Value according to the FluentCRM fields using the Dropdown arrow. Add as many Other Fields as you need by clicking the +Add More button and delete any field by clicking the Trash Icon.
- Subscription Status: Change the subscription status using the dropdown list for the contact that submits the form according to FluentCRM Contacts Status.
- Run the automation actions even contact status is not in subscribed status: Check this option if you want to run the automation even when the contact’s status is not in subscribed status.
- Conditions: Specify what will happen if the subscriber already exists in the database or submitted the form before. Checking this option means that the contact’s form submission will not trigger the automation if he/ she already submitted the form before triggering this automation.
Once you are done, click the Save Settings button to save all your changes.
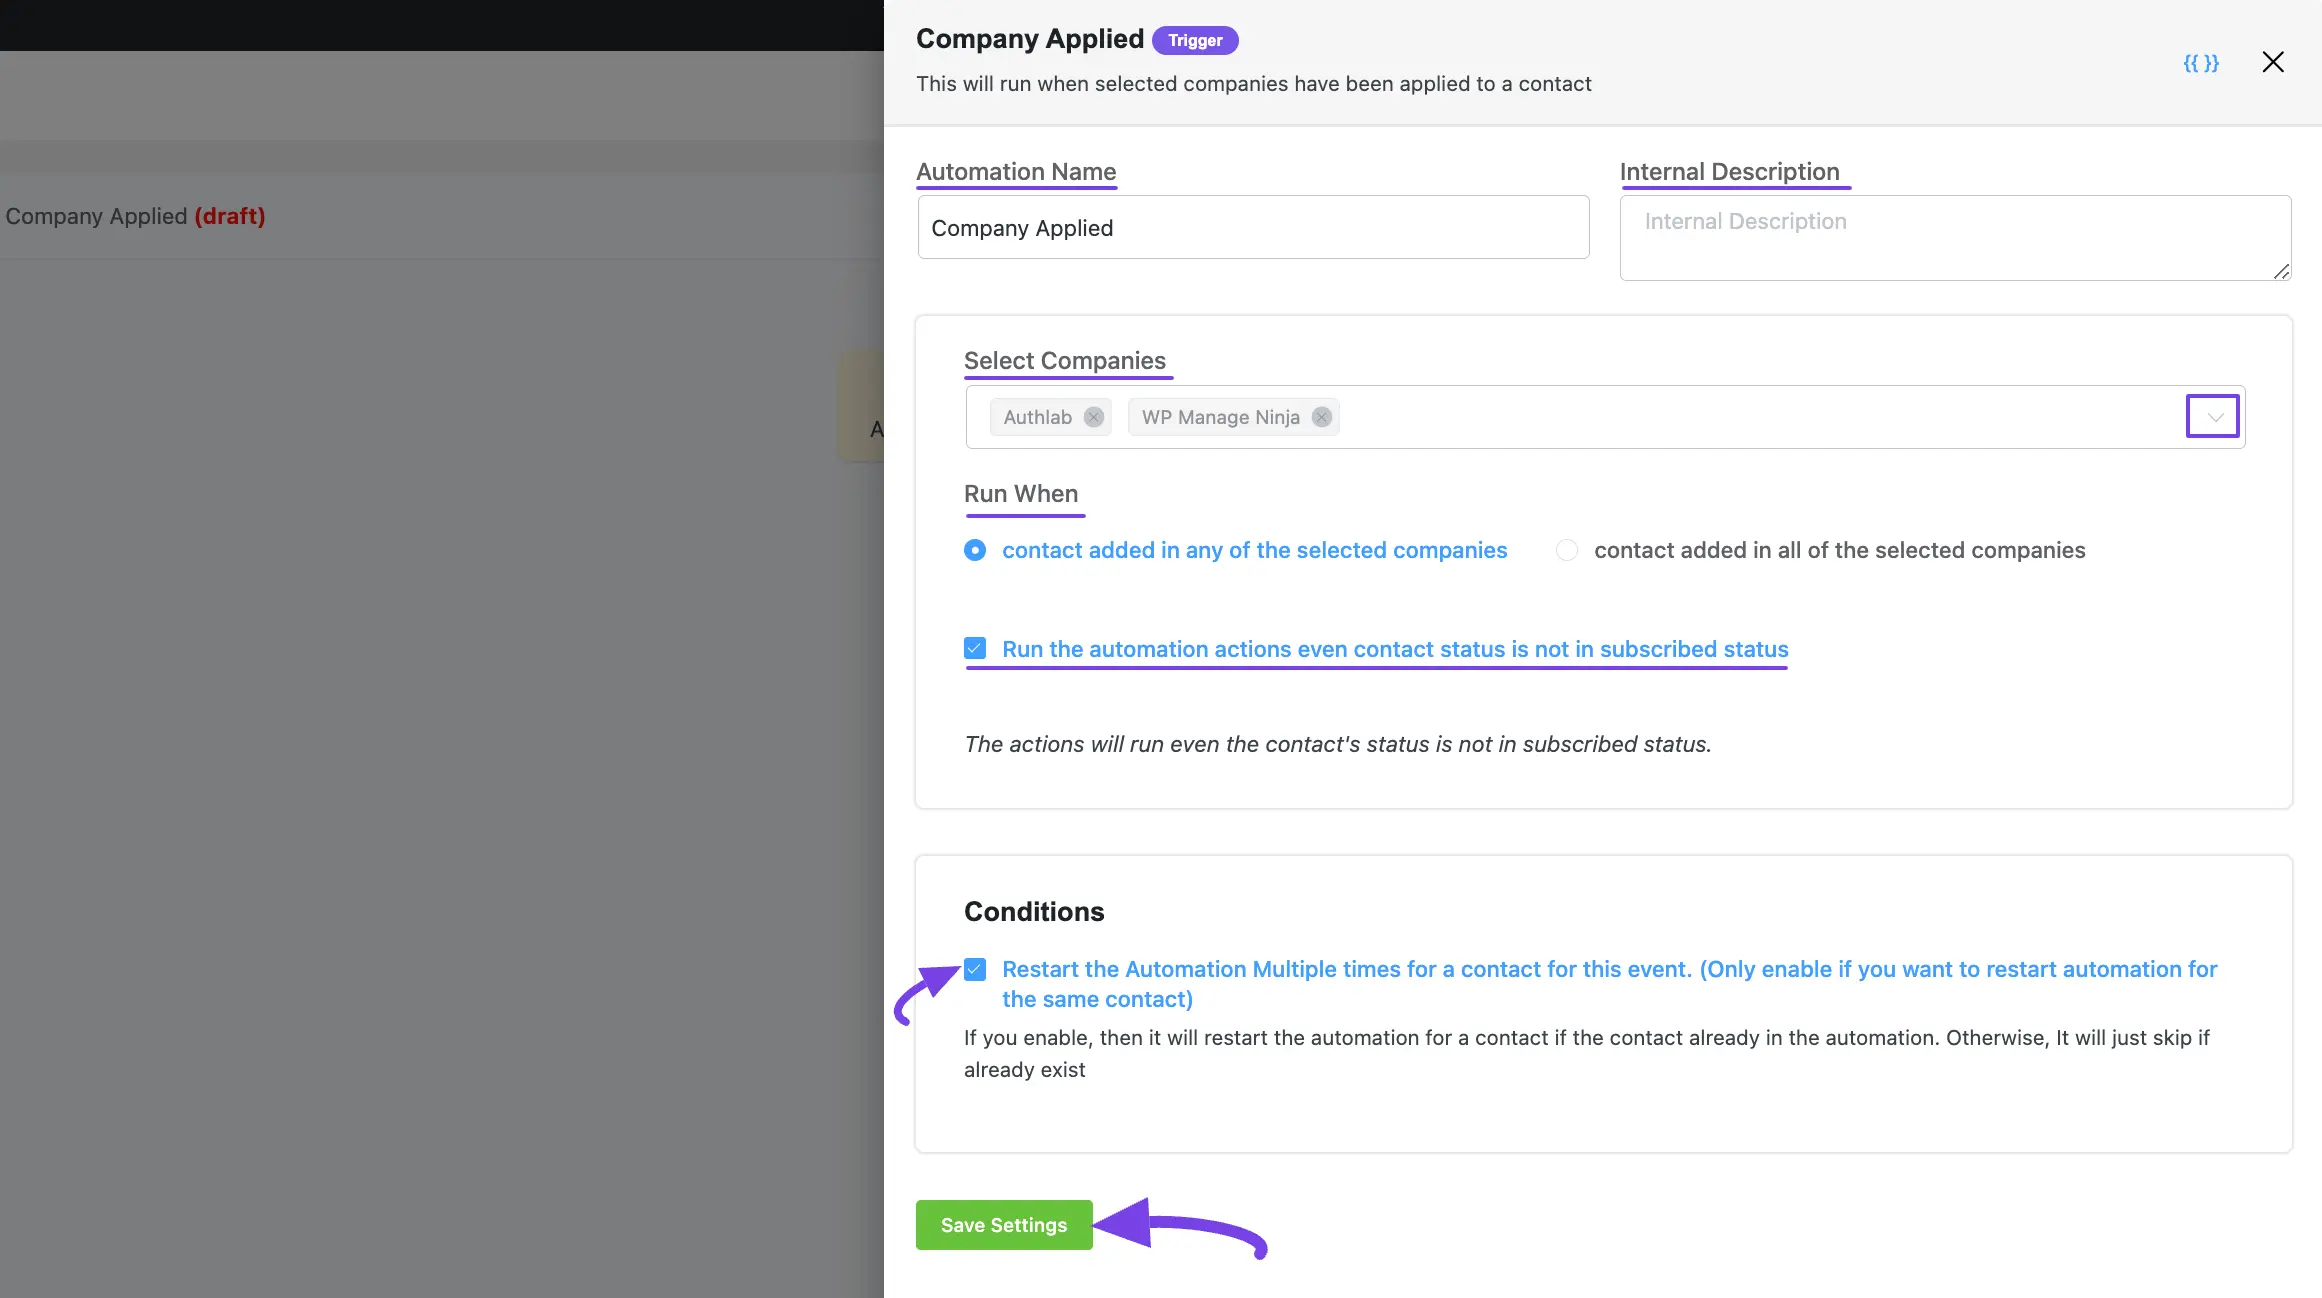
Company Applied #
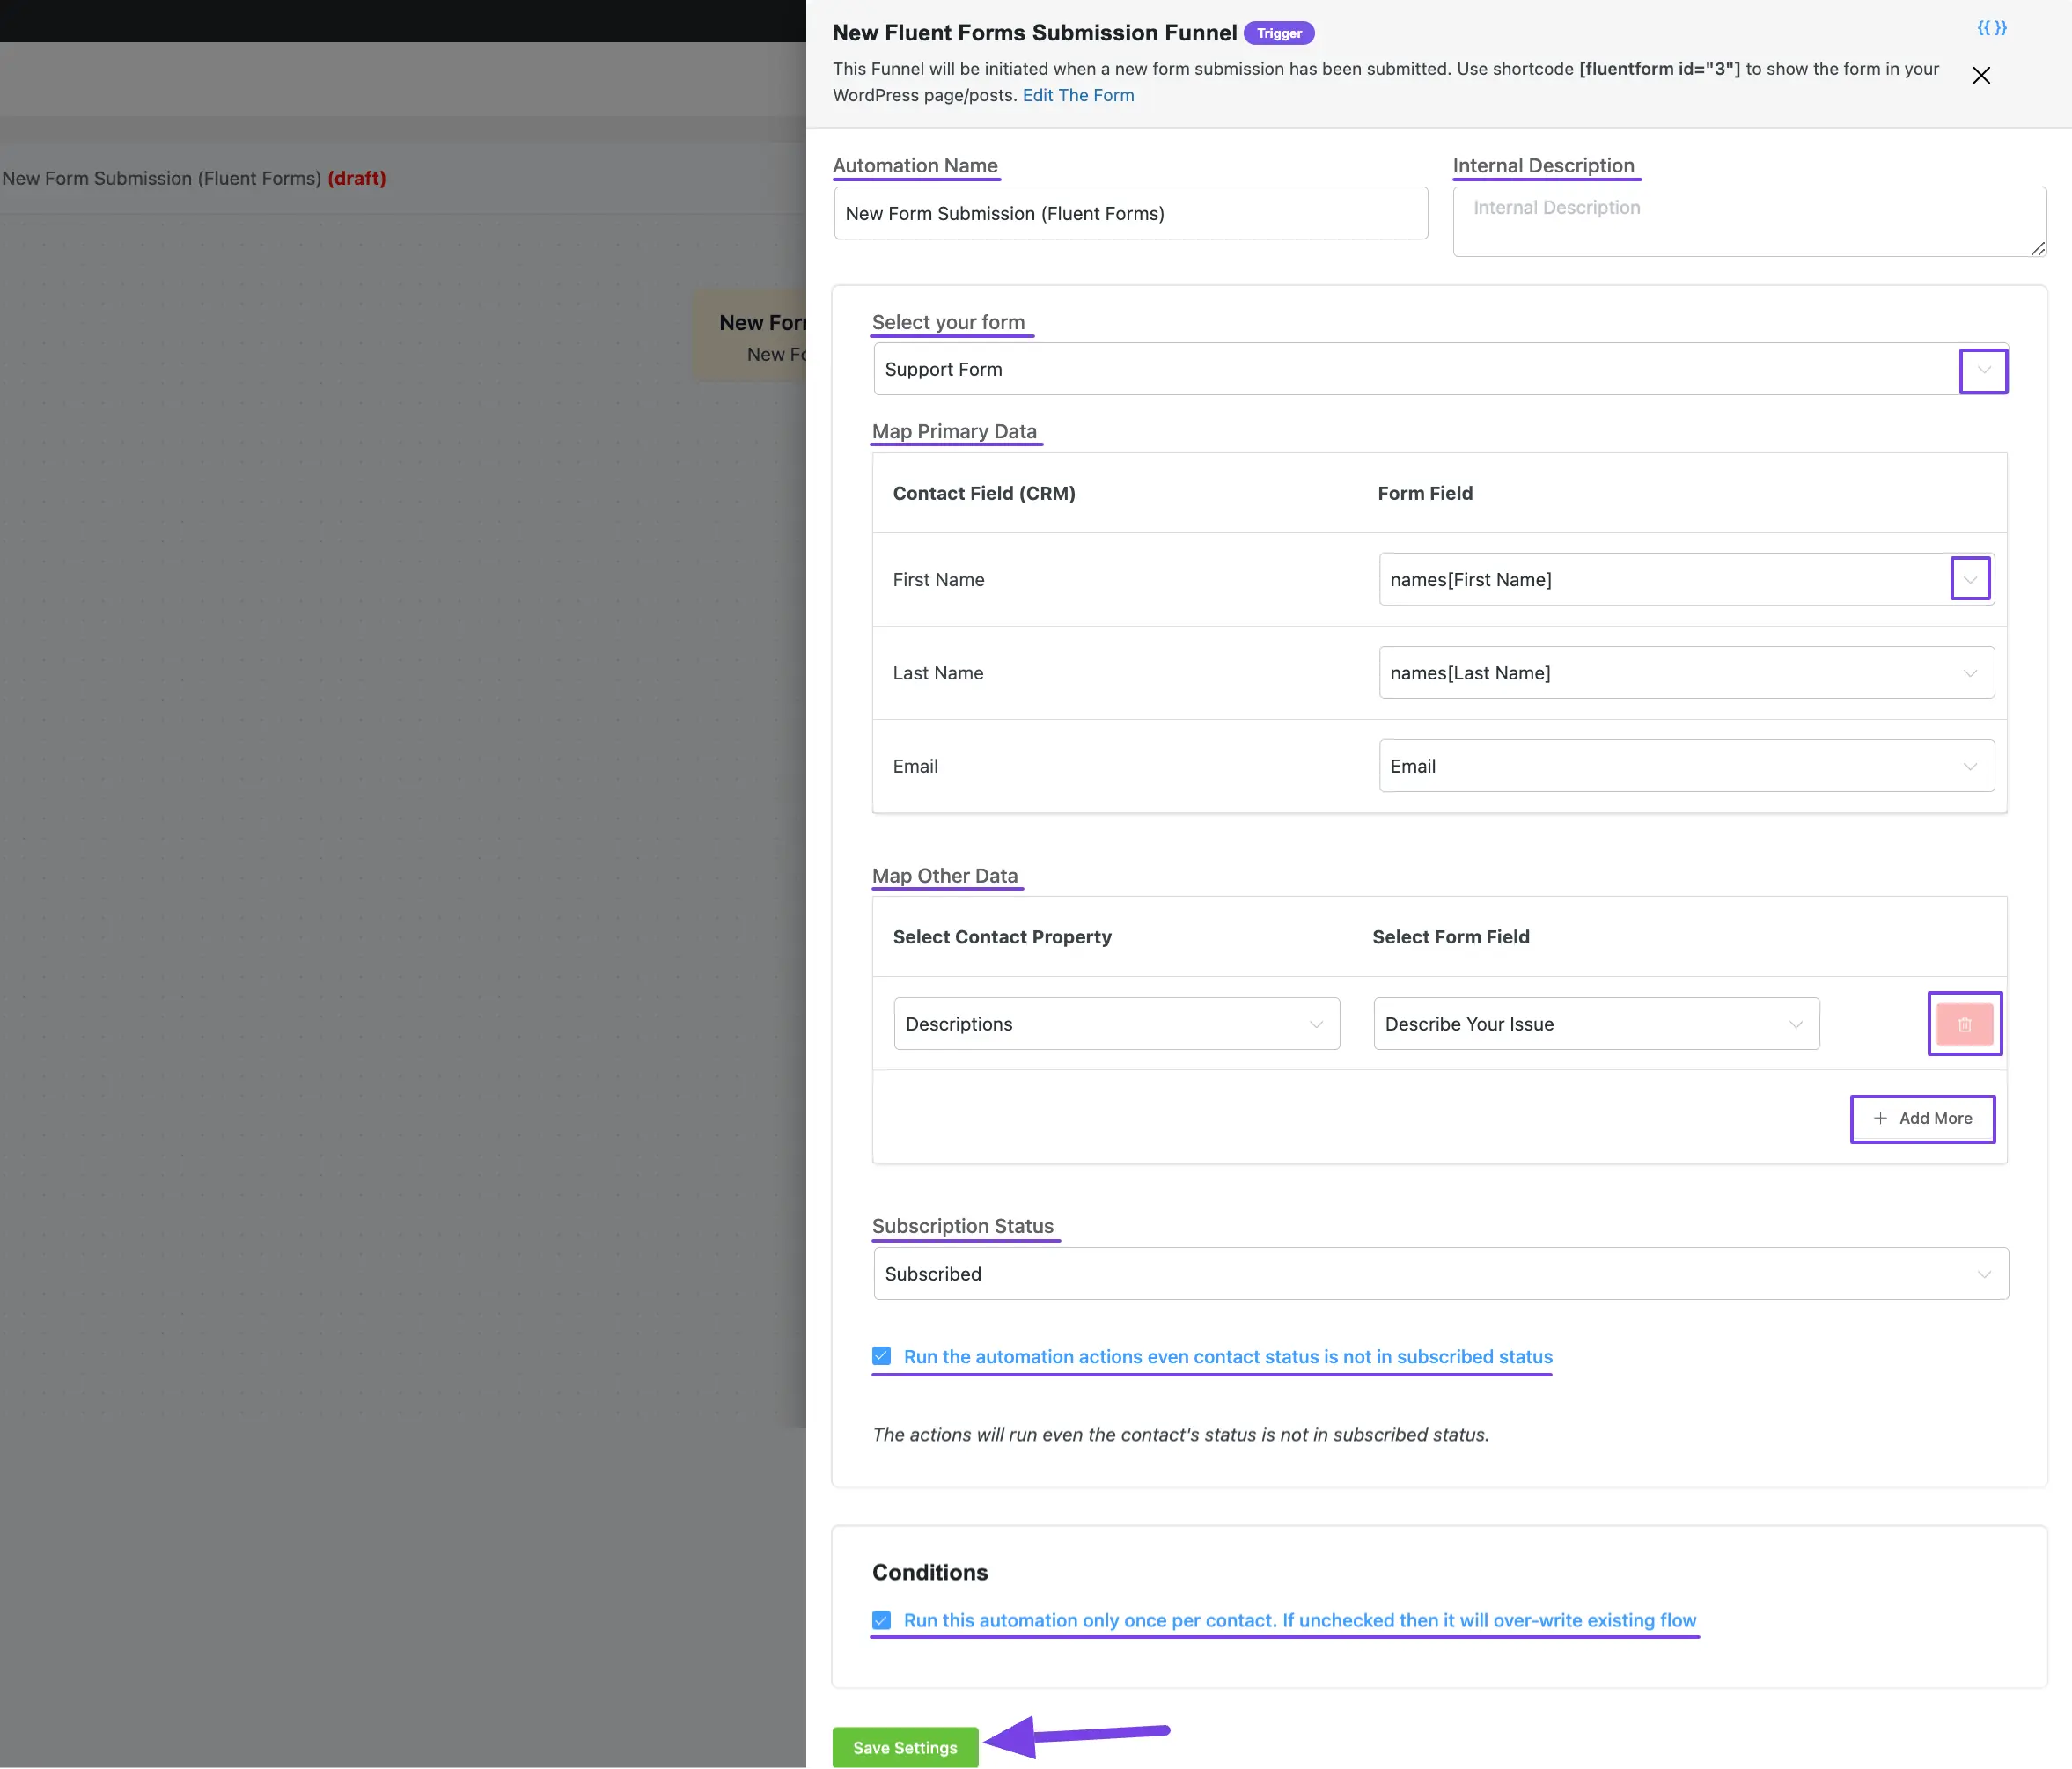
This automation funnel will start once the selected companies have been applied to a contact.
Once you select this trigger, a tab will appear on the right-hand side with options to set your trigger.
Here, are the Settings of the Company Applied Trigger
- Select Companies: Select the Company (single or multiple) using the dropdown arrow for which you want to trigger this automation funnel. If you do not have any existing Company in your FluentCRM, read this Documentation to create one.
- Run When: Select whether the contact needs to belong to one Company or all of the Companies you’ve selected.
To learn the use of all the settings mentioned in the screenshot below, read this Section.
Once you are done, click the Save Settings button to save all your changes.
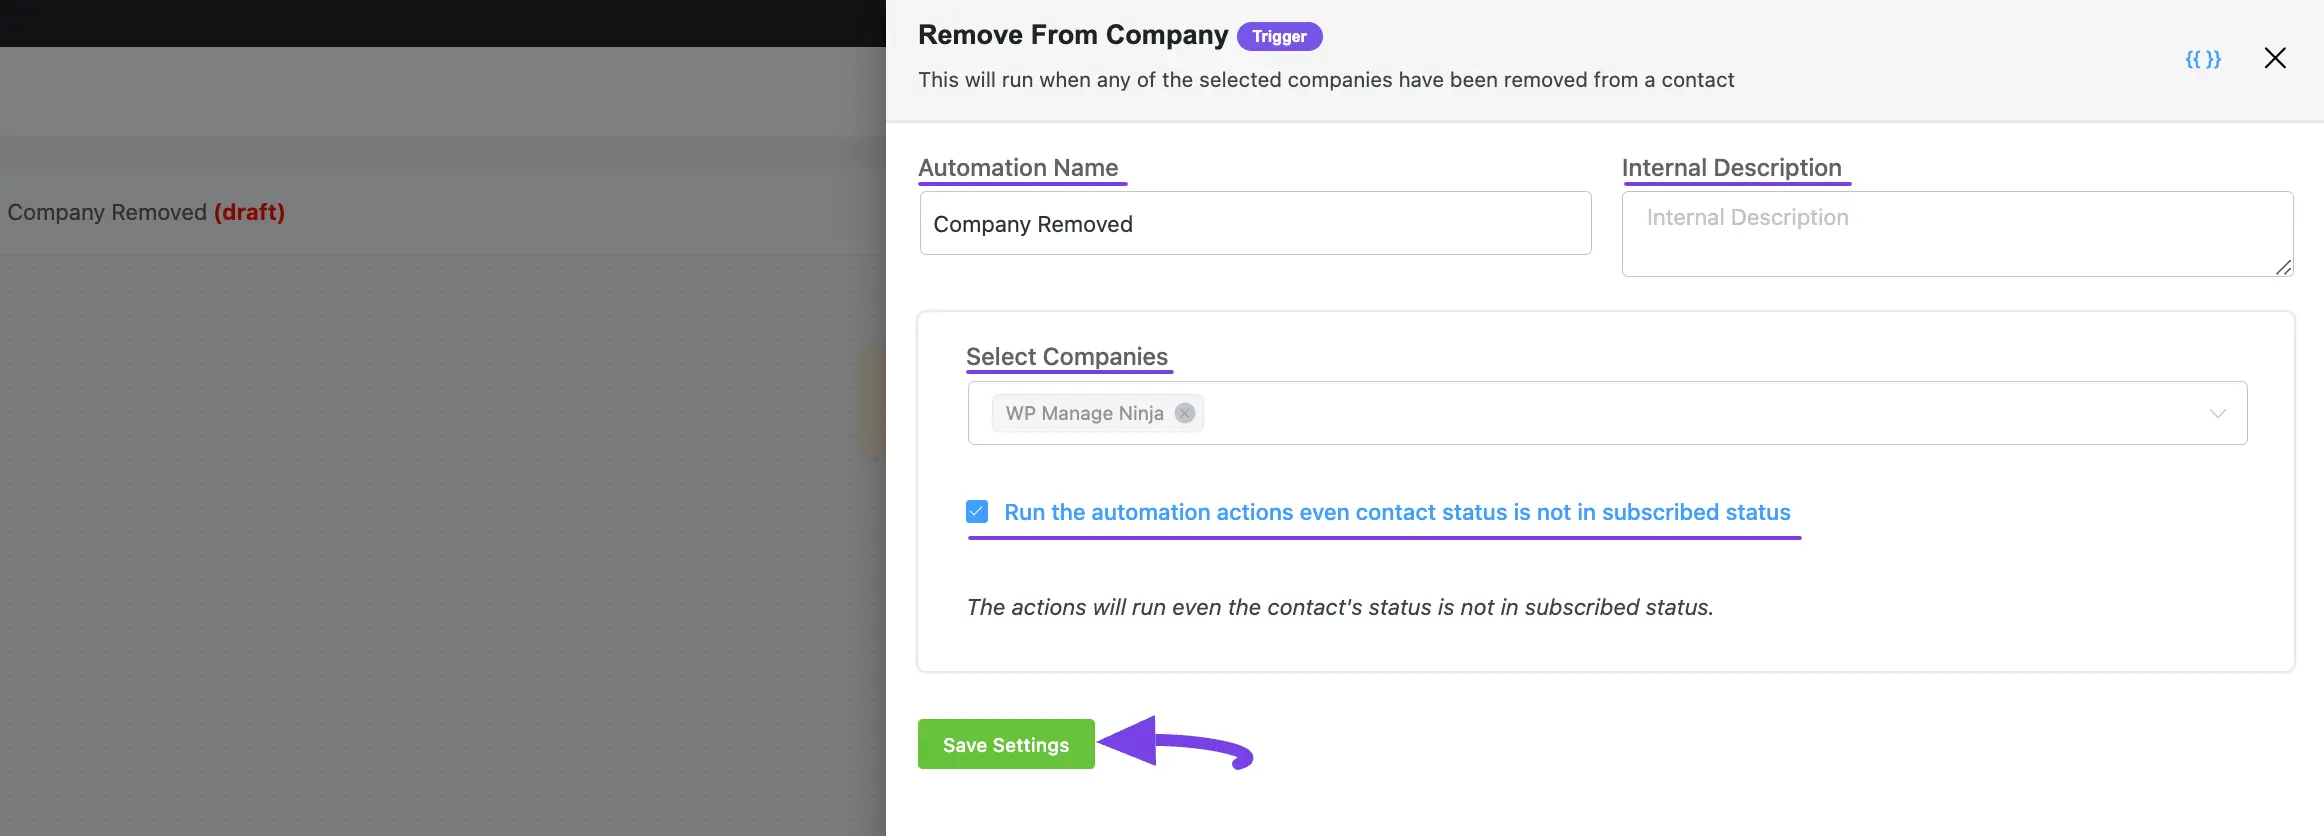
Company Removed #
This automation funnel will start once the selected companies have been removed from a contact
Once you select this trigger, a tab will appear on the right-hand side with options to set your trigger.
To learn the use of all the settings mentioned in the screenshot below, read this Section.
Once you are done, click the Save Settings button to save all your changes.
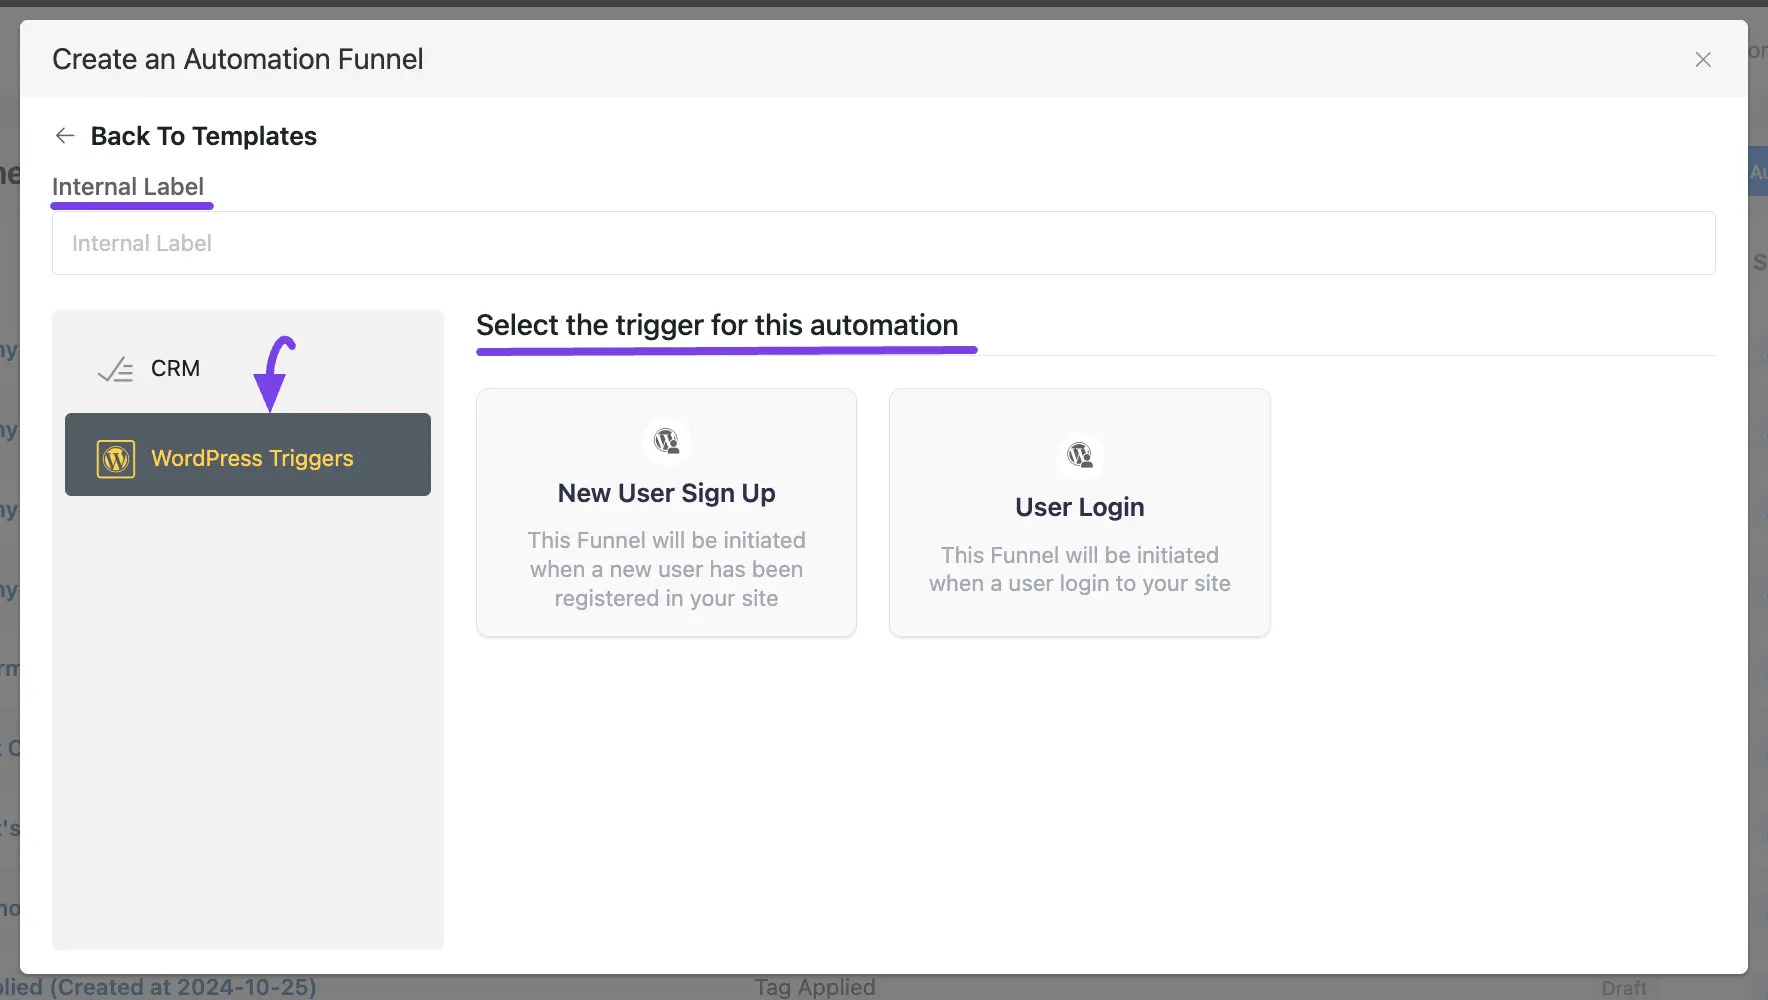
2. WordPress Trigger #
There are also a few primary Triggers for creating an Automation Funnel that appear under the WordPress Triggers options from the left sidebar. These are:
- New User Sign Up
- User Login
Once you select your desired Trigger, click the Continue button, and put a Title under the Internal Label field for this automation funnel so that you can easily find it later.
If you leave it blank, it will automatically titled according to its trigger’s name.
A detailed explanation of the WordPress Triggers mentioned above is given below –
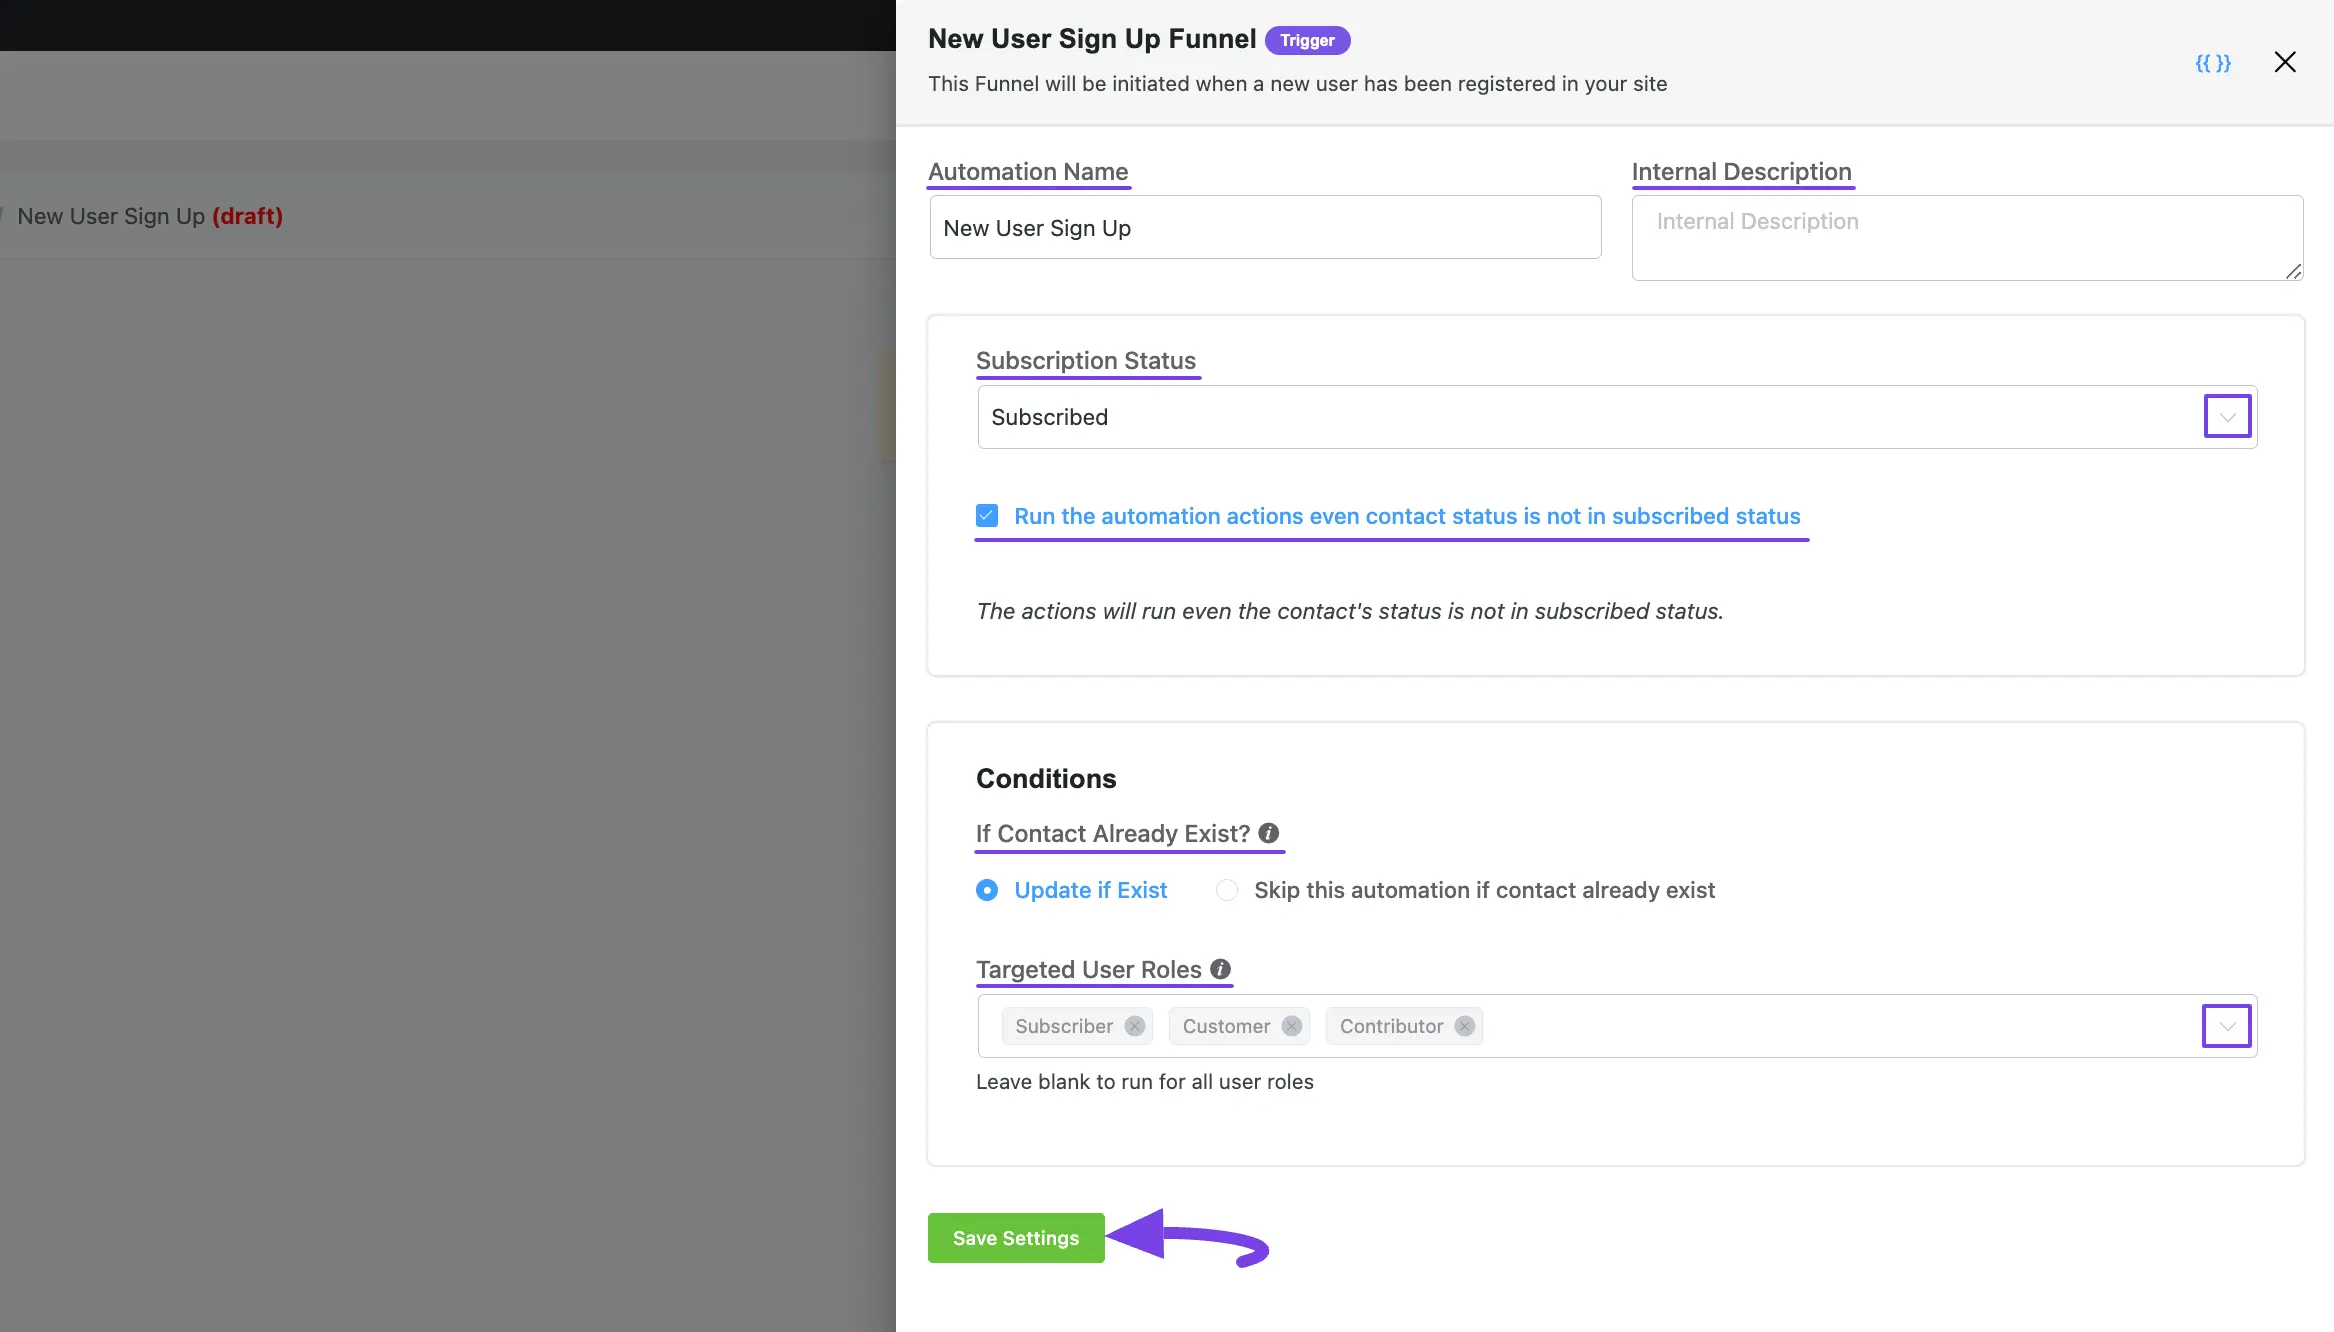
New User Sign-Up #
This automation funnel will start once a new user signs up for your WordPress Site.
Once you select this trigger, a tab will appear on the right-hand side with options to set your trigger.
Here, are the Settings of the New User Sign-Up Trigger
- Subscription Status: Change the subscription status using the dropdown list for the contact that submits the form according to FluentCRM Contacts Status.
- If Contact Already Exist?: Specify what will happen if the subscriber already exists in the database. You can either update if the contact is already present in the FluentCRM Contacts which means recurring triggering for the automation or Skip the automation for this contact.
- Targeted User Roles: Select which user roles registration will trigger this automation Funnel. Leave blank to run for all user roles.
To learn the use of all the settings mentioned in the screenshot below, read this Section.
Once you are done, click the Save Settings button to save all your changes.
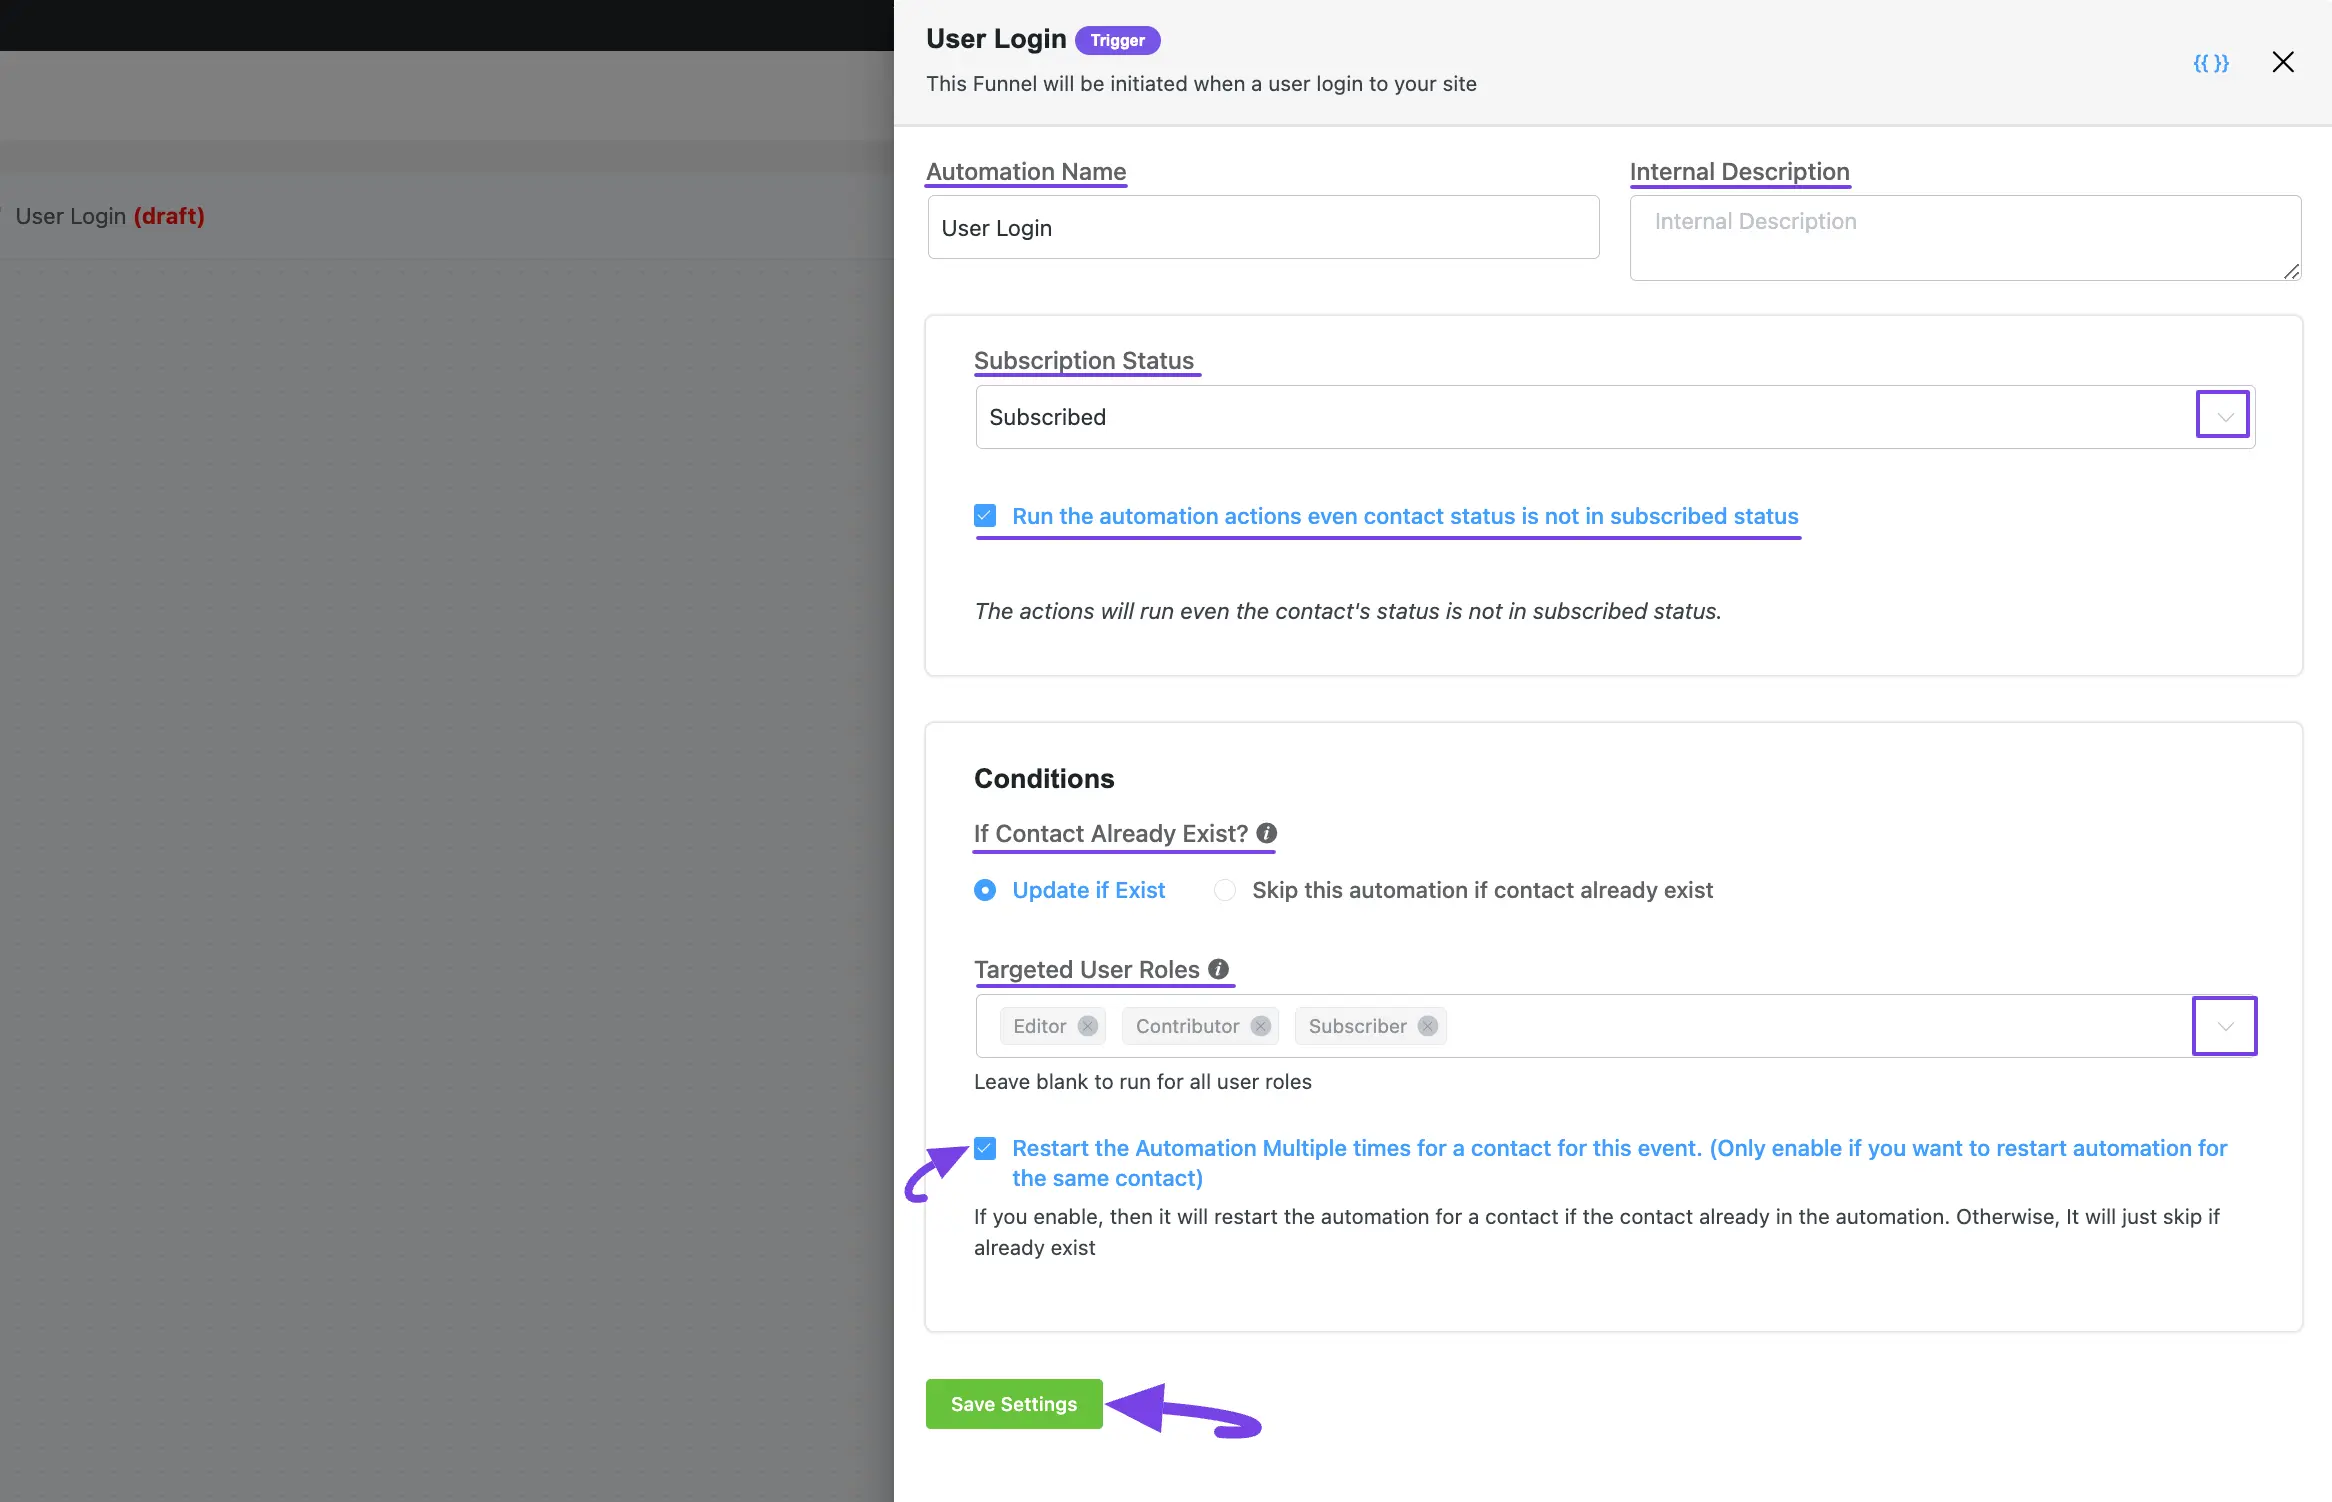
User Login #
This automation funnel will start once a user logs into your WordPress Site.
Once you select this trigger, a tab will appear on the right-hand side with options to set your trigger.
To learn the use of all the settings mentioned in the screenshot below, read this Section.
Once you are done, click the Save Settings button to save all your changes.
If you have any further questions, concerns, or suggestions, please do not hesitate to contact our @support team. Thank you.


One question, if I need to send an email asking a contact to update their registration details, such as date of birth, and/or city and state. How do I send and update the email?
Our community might be able to help figure this out: https://community.wpmanageninja.com/portal/space/fluent-crm/home
A trigger for when a new custom post type is added/updated would be fantastic. That would open up all kinds of possible automations.
This is work in progress. Coming soon!
Is there a release date for this feature?
Hi Joe, we had to abandon the feature after some R&D. Maybe in the future, no plans for this at the moment.
Hello Fluent CRM team, is there a possibility to make a coupon applied to a WooCommerce order (WooCommerce Smart Coupons Version 8.20.0 by StoreApps) a trigger for a FCRM Automation? It would be awesome if that’d be possible. TIA, Han.
Hi Han, we are checking this from our side. You may also ask the other team to explore an integration with us. Here’s the link to our developer doc: https://developers.fluentcrm.com/
Is it possible to have a trigger based upon email open and/or clicked?
Hi Renato, Email open isn’t a good metric anymore and that’s why there’s no such trigger for this in FluentCRM. You can create link click automation using smartlink/link click goal benchmark.
Hi Nazir, this looks like clear excuse from FCRM team. For me, this is the only reason, why i am using Funnelkit. For marketer this is must to feature which is absolutely basic in all emailmarketing softwares for years. So instead of making in click and define condition you are recomending to use this super difficult combination of functions to reach teh same goal. Liitle funny. Maysbe faster to develop it as your product is great, just this most basic feature missing. Thanks
Hi David, we actually have open rate tracking so it wouldn’t be difficult to add the feature. In fact, you can develop it by following our developer docs if you were a developer. The open rate is usually calculated based on pixel tracking, so there’s always a chance of misinterpretation. This is why our R&D decided not to develop this as a core feature. Hope you understand.
Is it possible to create automation for new post in the blog? Whenever there’s a new post an email is sent to all subscribers letting them know that a new post is published?
Hello Fluent-CRM-Team,
I am looking for a trigger to initiate a welcome e-mail (possibly a series) once a new contact has confirmed the doube-opt-in (and its contact status has changed from “pending” to “subscribed”). Did I miss something? If this (for EU-companies vital) trigger does not exist, how can I make a work around to email contacts only if they have confirmed double-opt-in?
Thank you so much in advance.
Hi Jan, That will automatically happen for you if you have double opt-in enabled. So nothing to be worried about!
Hi Jan, how do you set a condition to send a Welcome Email when a user changes its status from Pending to Subscribed? Thank you
Hi Fabio, you don’t need to set anything for that. Just turn on the DOI from setting and then, FluentCRM will automatically send the welcome email after a user status changes from pending to subscribed.
In my from I have 4 radio buttons. I want to implement an automation taking into account which radio button was selected. I can’t find how to do that.
Hey Serge, This might be what you’re looking for: https://fluentcrm.com/segment-fluentcrm-contacts-using-dynamic-tags/
Can Fluent CRM be set up to send automated emails on people’s birthday or other anniversaries?
Yes, we have already added birthday automation on our end. Next version releasing in a few days.
How would I set up an automated response when someone clicks a link in an email? I’d like to add a tag, and I found where to do that after the fact, but I’d like to set it up so it happens automatically without manual intervention.
Hey Alan, you can set up a temporary/permanent smart link to do this.
Hello, is there a Trigger where if the user answers the first mail, it takes him to a mail sequence?
Hi Lenin, FluentCRM can’t detect replied emails. So we don’t have any trigger for that.
Hi,
Is it possible to automatically send a goodbye email to a contact after they have unsubscribed?
Many thanks for your help.
Hey Rainhold,
Not really, the trigger isn’t available at this moment.
I’m looking for a way to trigger a different action when someone unsubscribes (cancel a WishList Member free membership). Please implement status changes as triggers.
Hello my good friend, I hope you are well
Please enable image (photo) background for emails in the fluentcrm plugin
I think it makes me attractive
Is there a way to do send abandonded cart emails with a link to finish the purchase? If not, will this feature be coming?
Two popular integrations are (1) Zapier, and (2) DAP (DigitalAccessPass.com), the best high-end Membership plugin for WordPress. Will these two be supported?
Hello there. We have rolled out Zapier integration in the latest update.