FluentCRM offers several Primary Conditionals that allow users to create conditional checks and take alternative Actions based on those set conditions. This enhances the automation funnel, enabling various possibilities. With Multi-Path conditional automation, you can create multiple branches, providing flexibility to customize your workflows.
This article will provide detailed information about all Primary Conditional Actions of FluentCRM Automation.
Remember, to use all the Conditionals, you need to have FluentCRM Pro Plugin installed and activated in your WordPress Site.
All Primary Conditionals #
To learn how you can use all the Primary Conditionals in your FluentCRM, follow the steps with screenshots below –
First, go to the Automation section from the FluentCRM Navbar, and open your desired Automation by clicking on its title. Or, create a new one by clicking the + New Automation.
To learn the process of creating a new automation funnel, read this Documentation.
For example, I opened the List Applied automation funnel to explain all the Primary Conditionals
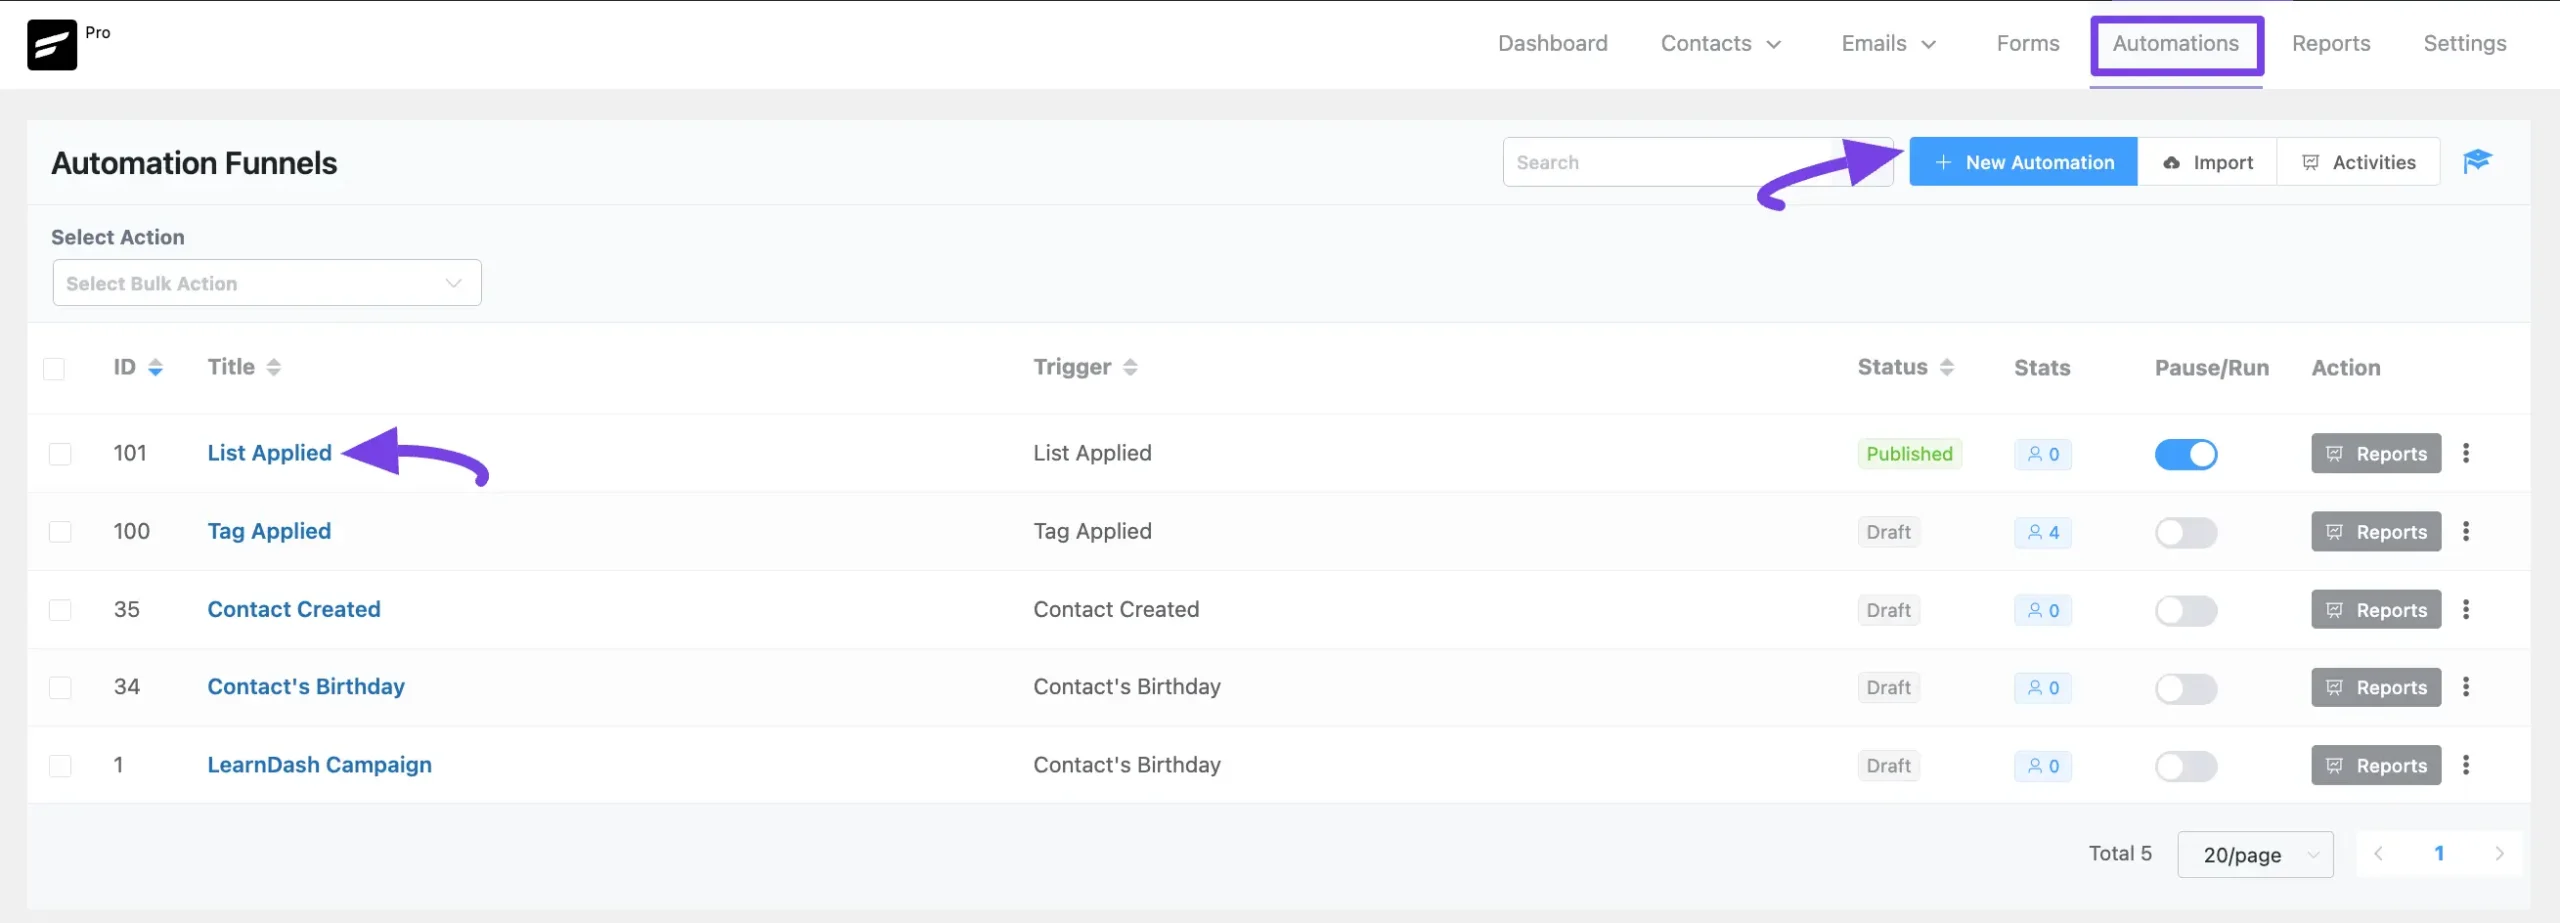
Now, click the Plus Icon or hover over it and click the Conditional Action option to view all the Primary Conditionals.

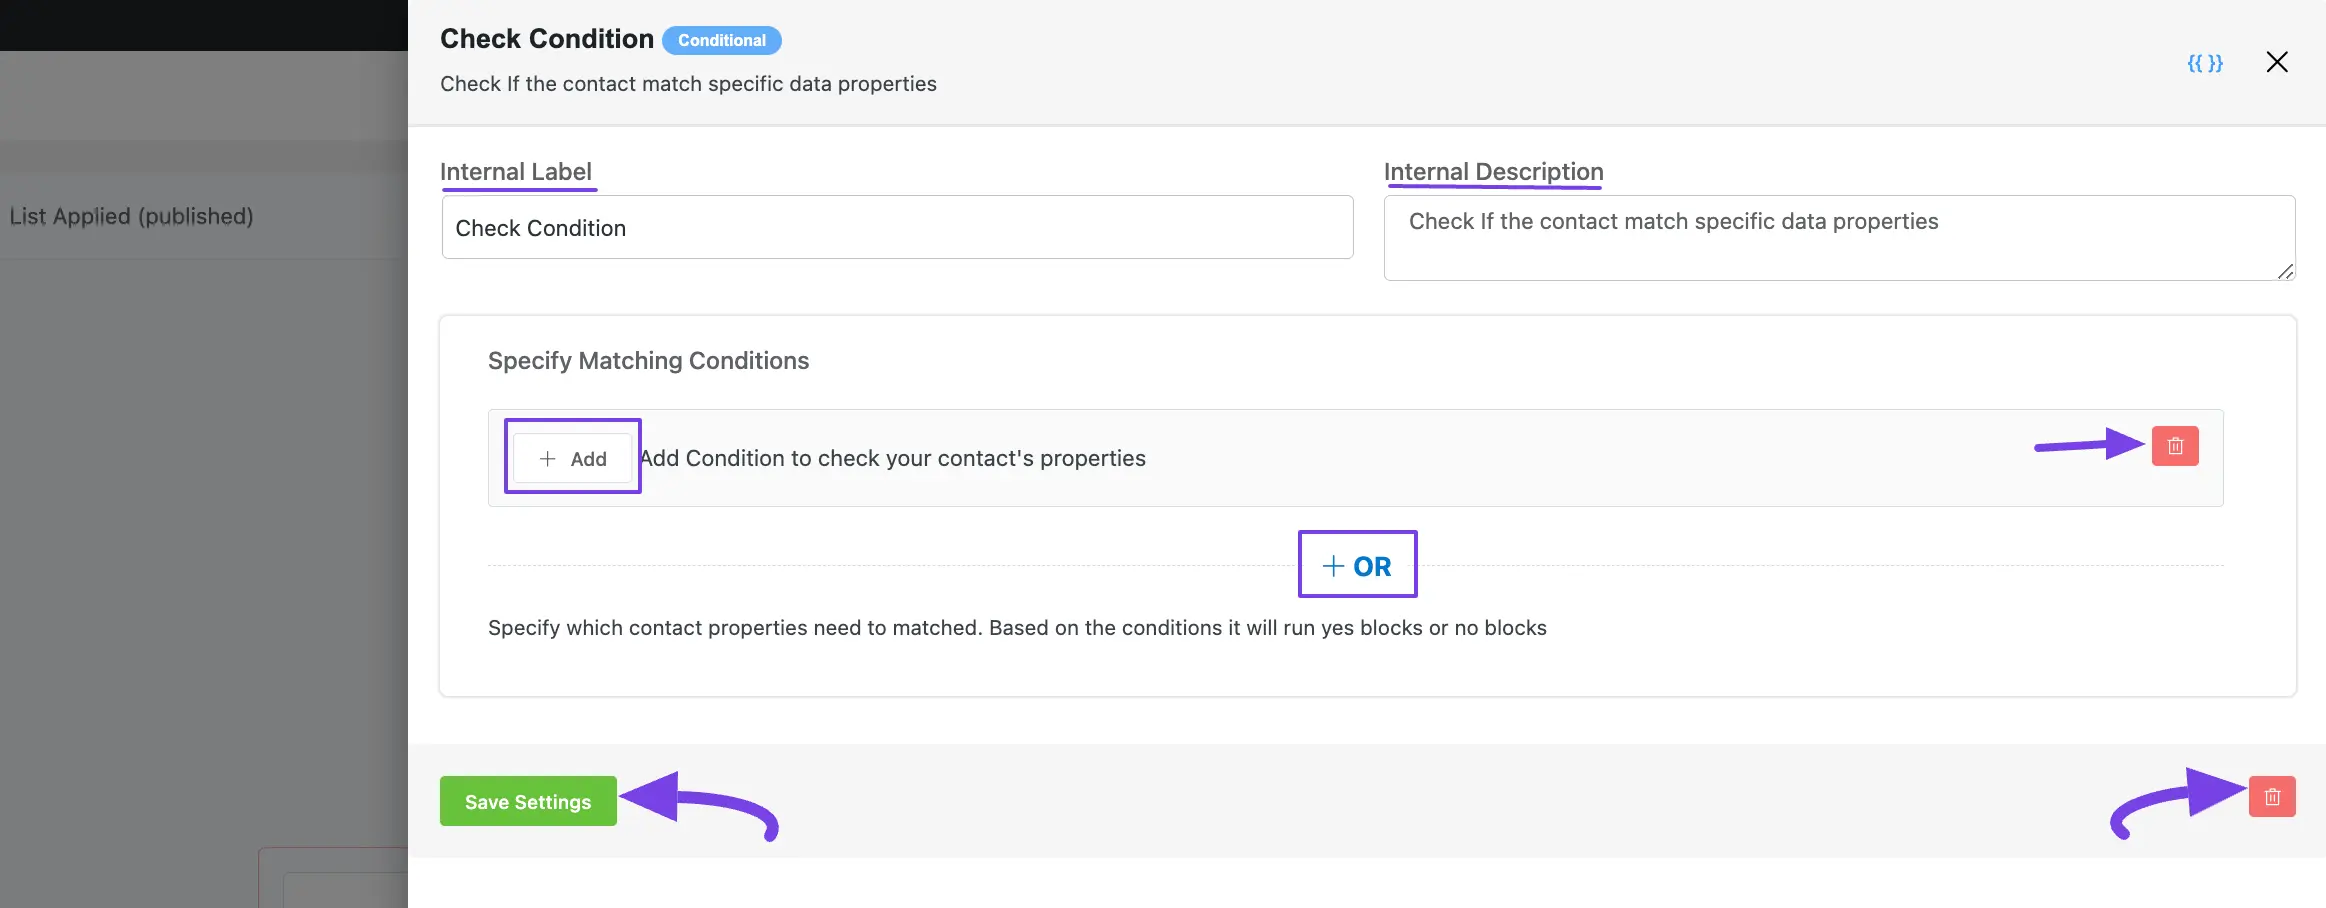
Then, a Check Condition page will appear in the left Sidebar for adding conditions.
The explanation of the following settings is given below:
- Interval Label: Here, a Name for the Action will be automatically added so you can easily find it later. You can change it that suit your needs.
- Internal Description: A description of the action will also be automatically added as a Subtitle. You can also change it suit to your needs.
- + Add Button: To add a new condition/s, always click this + Add button. And, to delete any existing condition, always click the Trash Icon.
- + OR Button: To add condition/s against any existing condition/s, always click the + OR button. Then, the process of adding conditions here is also the same.
Once you are done, click the Save Settings button to save all your changes.
You can also Delete the action by clicking the Trash Icon if needed.
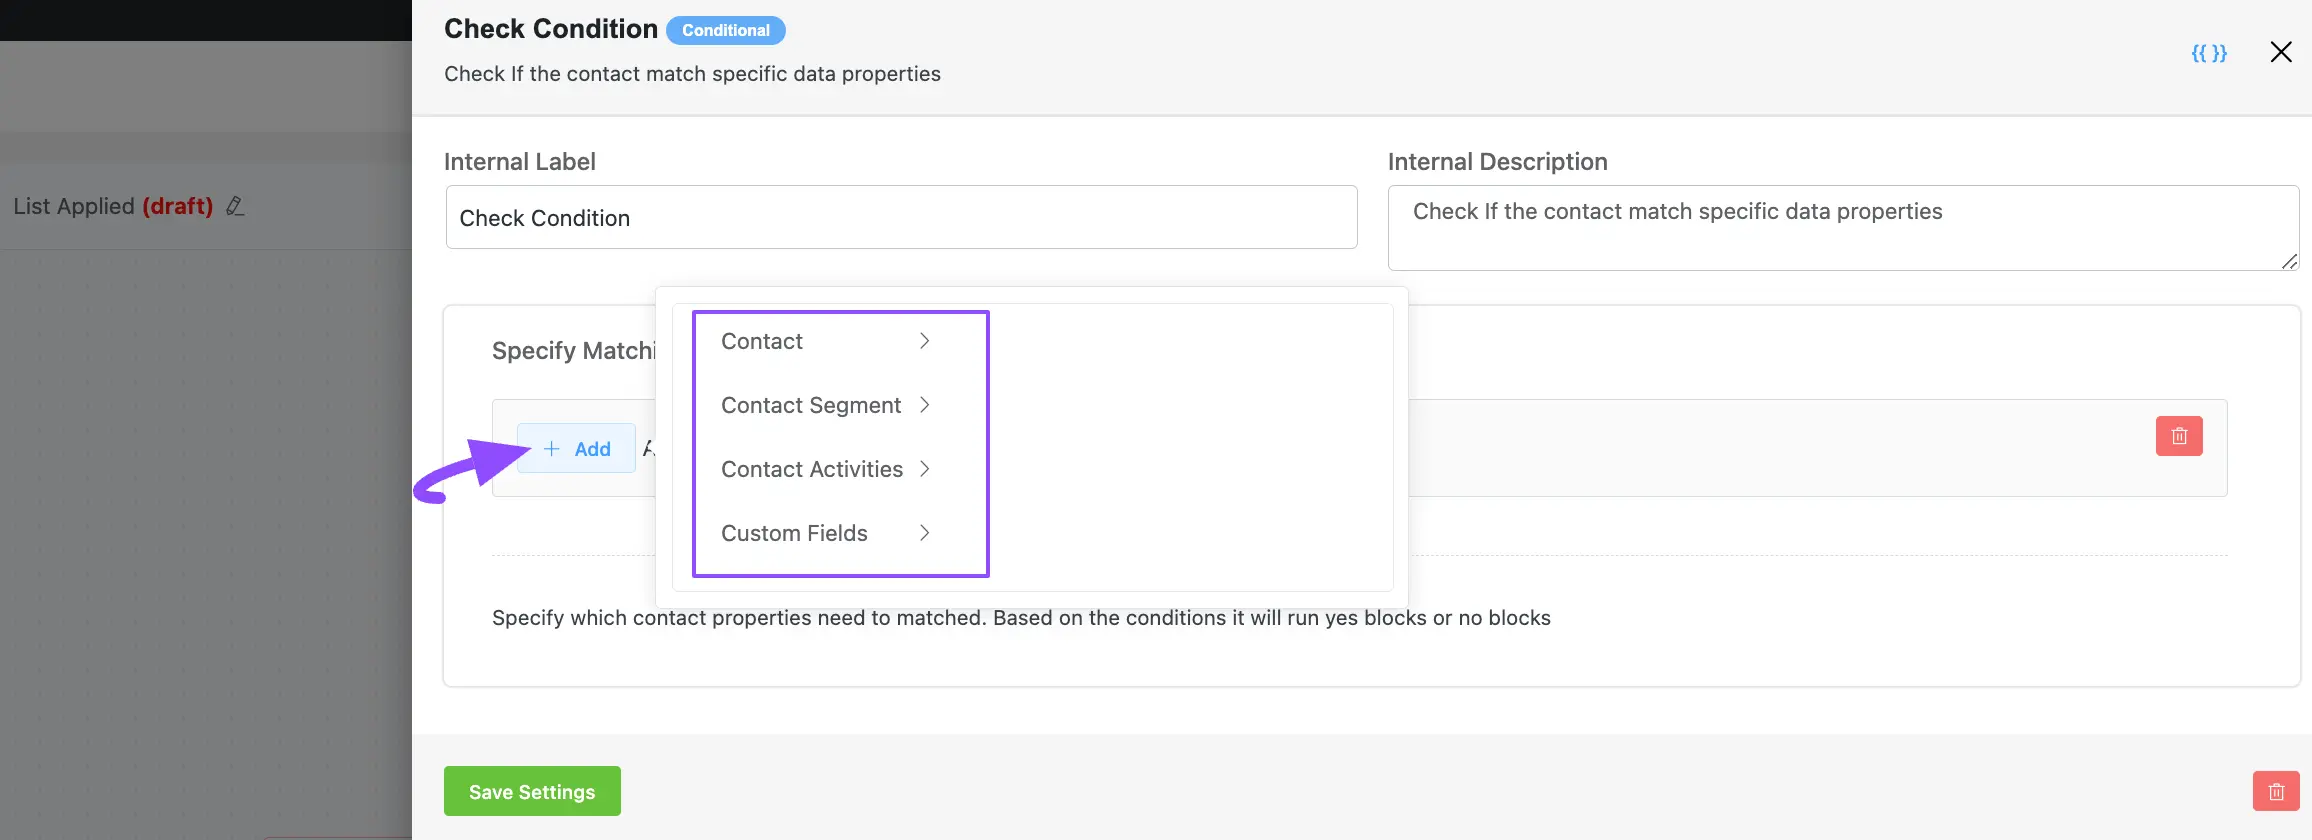
Once you click the + Add button, you will get Four Types of Primary Properties to set the Parameter based on the selected property. These are:
- Contact
- Contact Segment
- Contact Activities
- Custom Fields
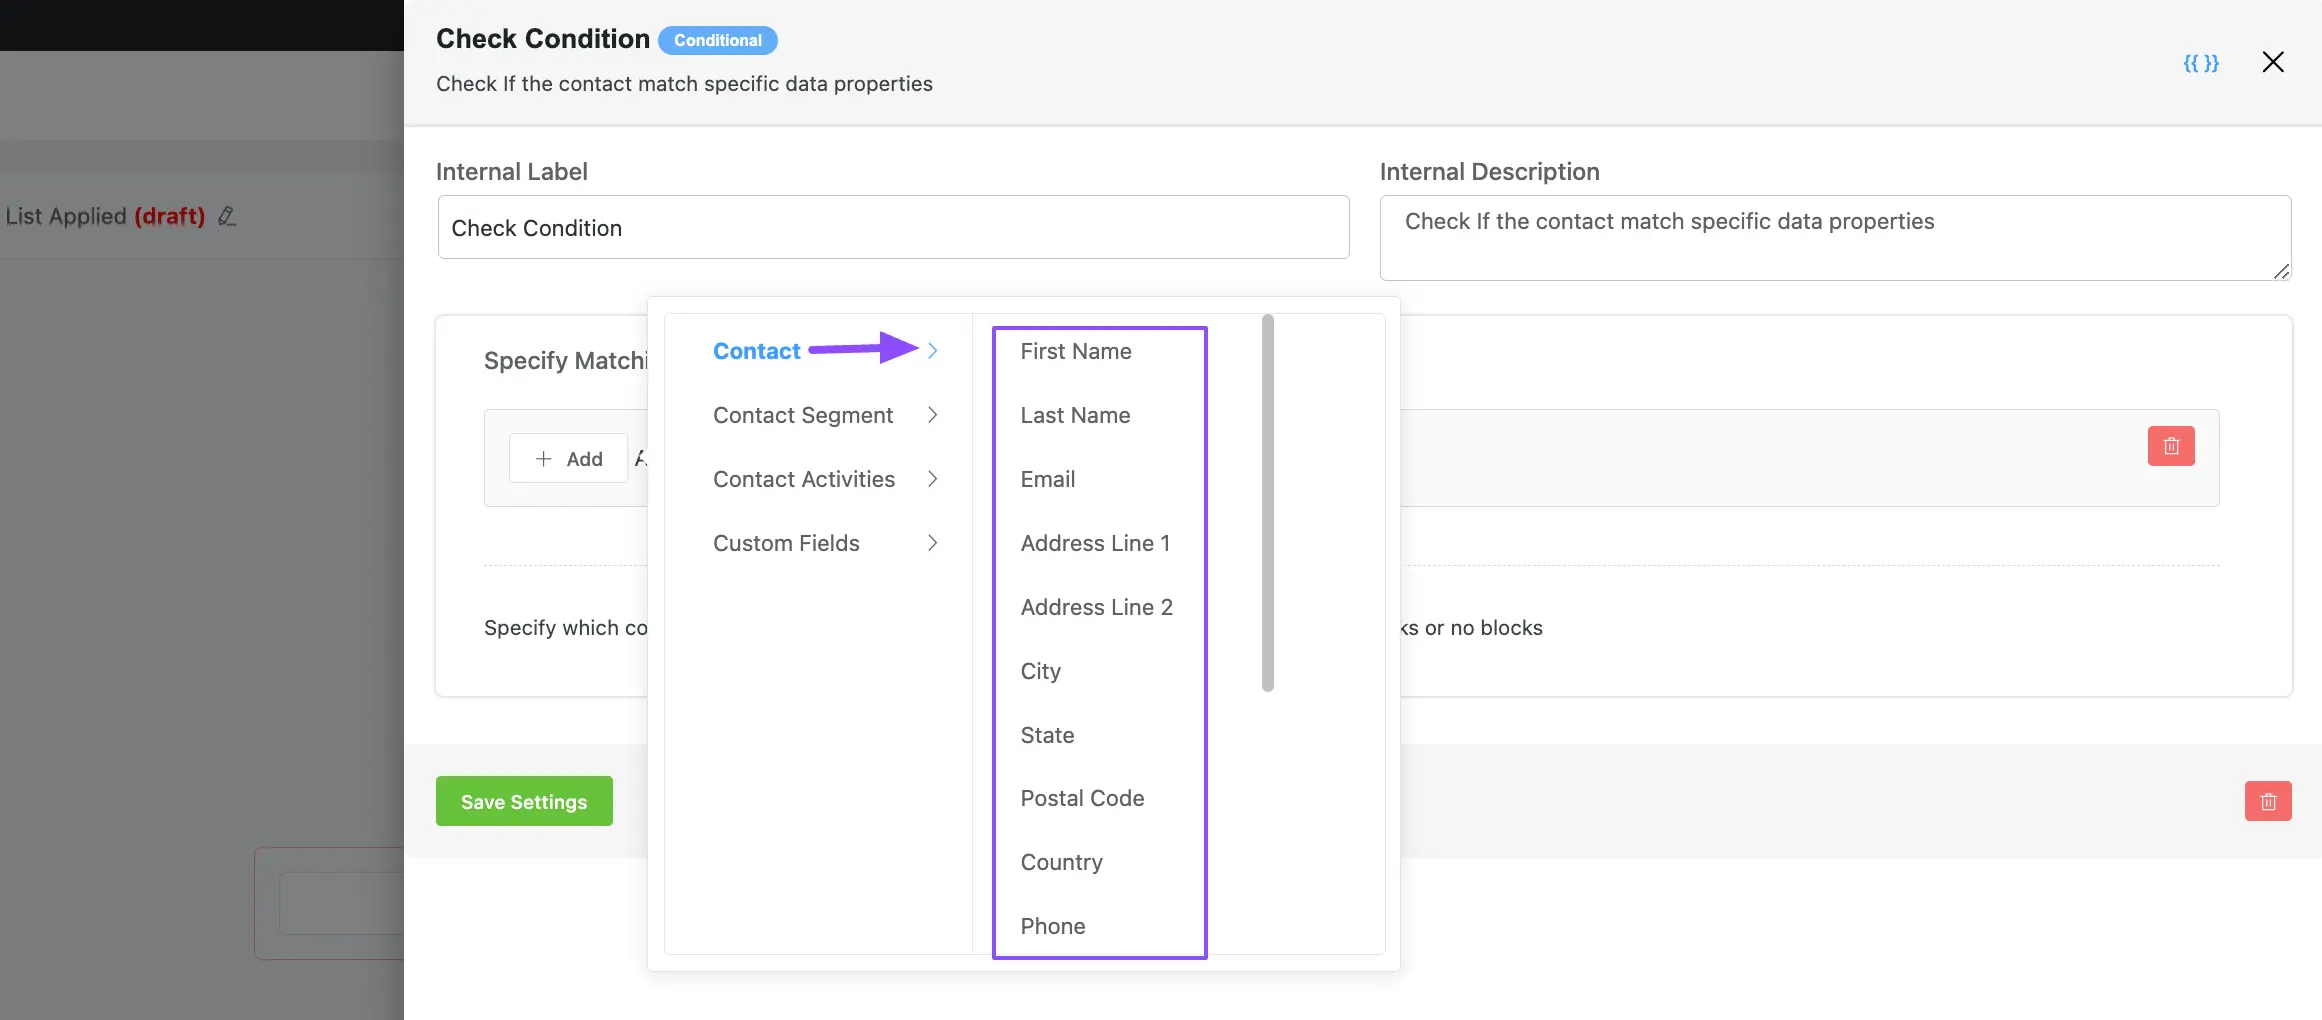
A detailed explanation of the Properties mentioned above is given below –
1. Contact #
Here you will get a wide range of Options based on the Contact property to set the desired Parameter for your condition. These are:
- First Name
- Last Name
- Address Line 1
- Address Line 2
- City
- State
- Postal Code
- Country
- Phone
- WP User ID
- Type
- Name Prefix (Title)
- Date of Birth
- Last Activity
- Created At
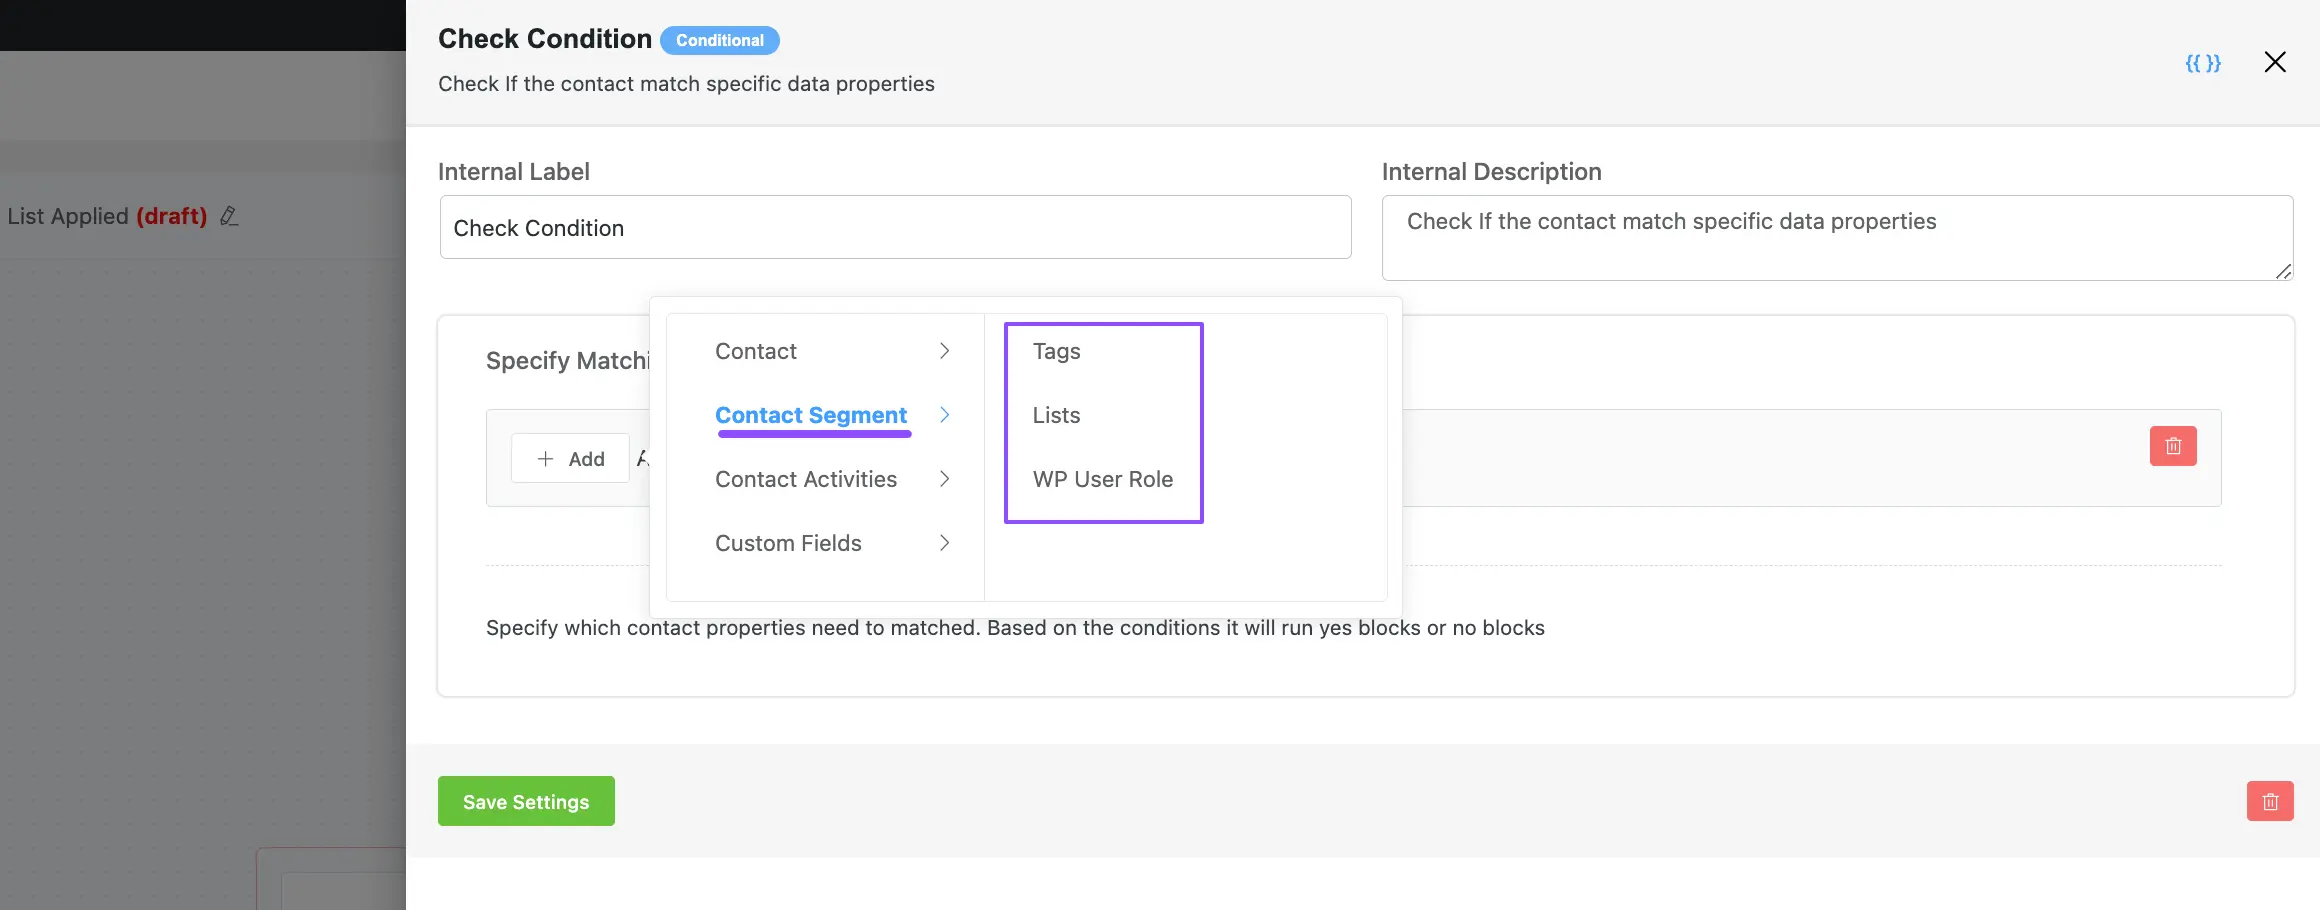
2. Contact Segment #
Here you will get the Options based on the Contact Segment property to set the desired Parameter for your condition. These are
- Tags
- Lists
- WP User Role
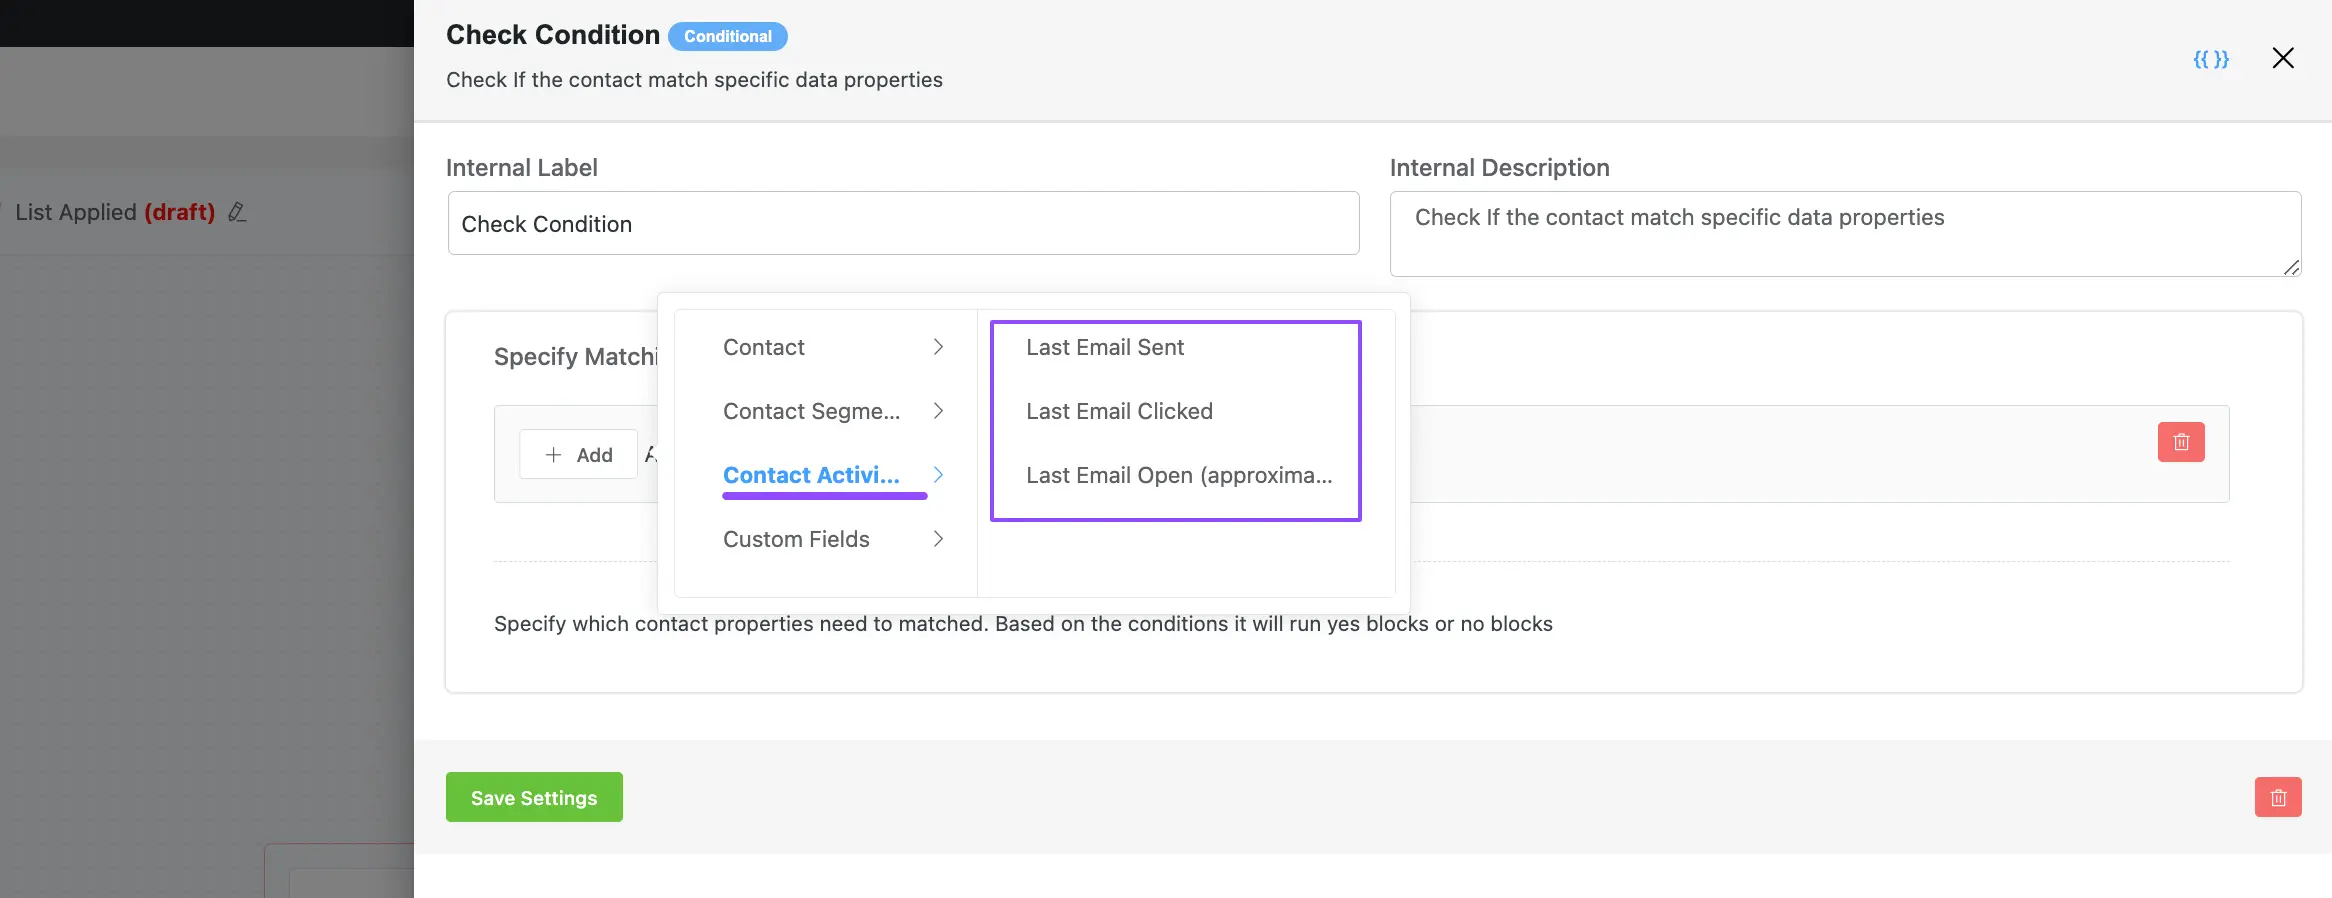
3. Contact Activities #
Here you will get the Options based on the Contact Activities property to set the desired Parameter for your condition. These are
- Last Email Sent
- Last Email Clicked
- Last Email Open (approximately)
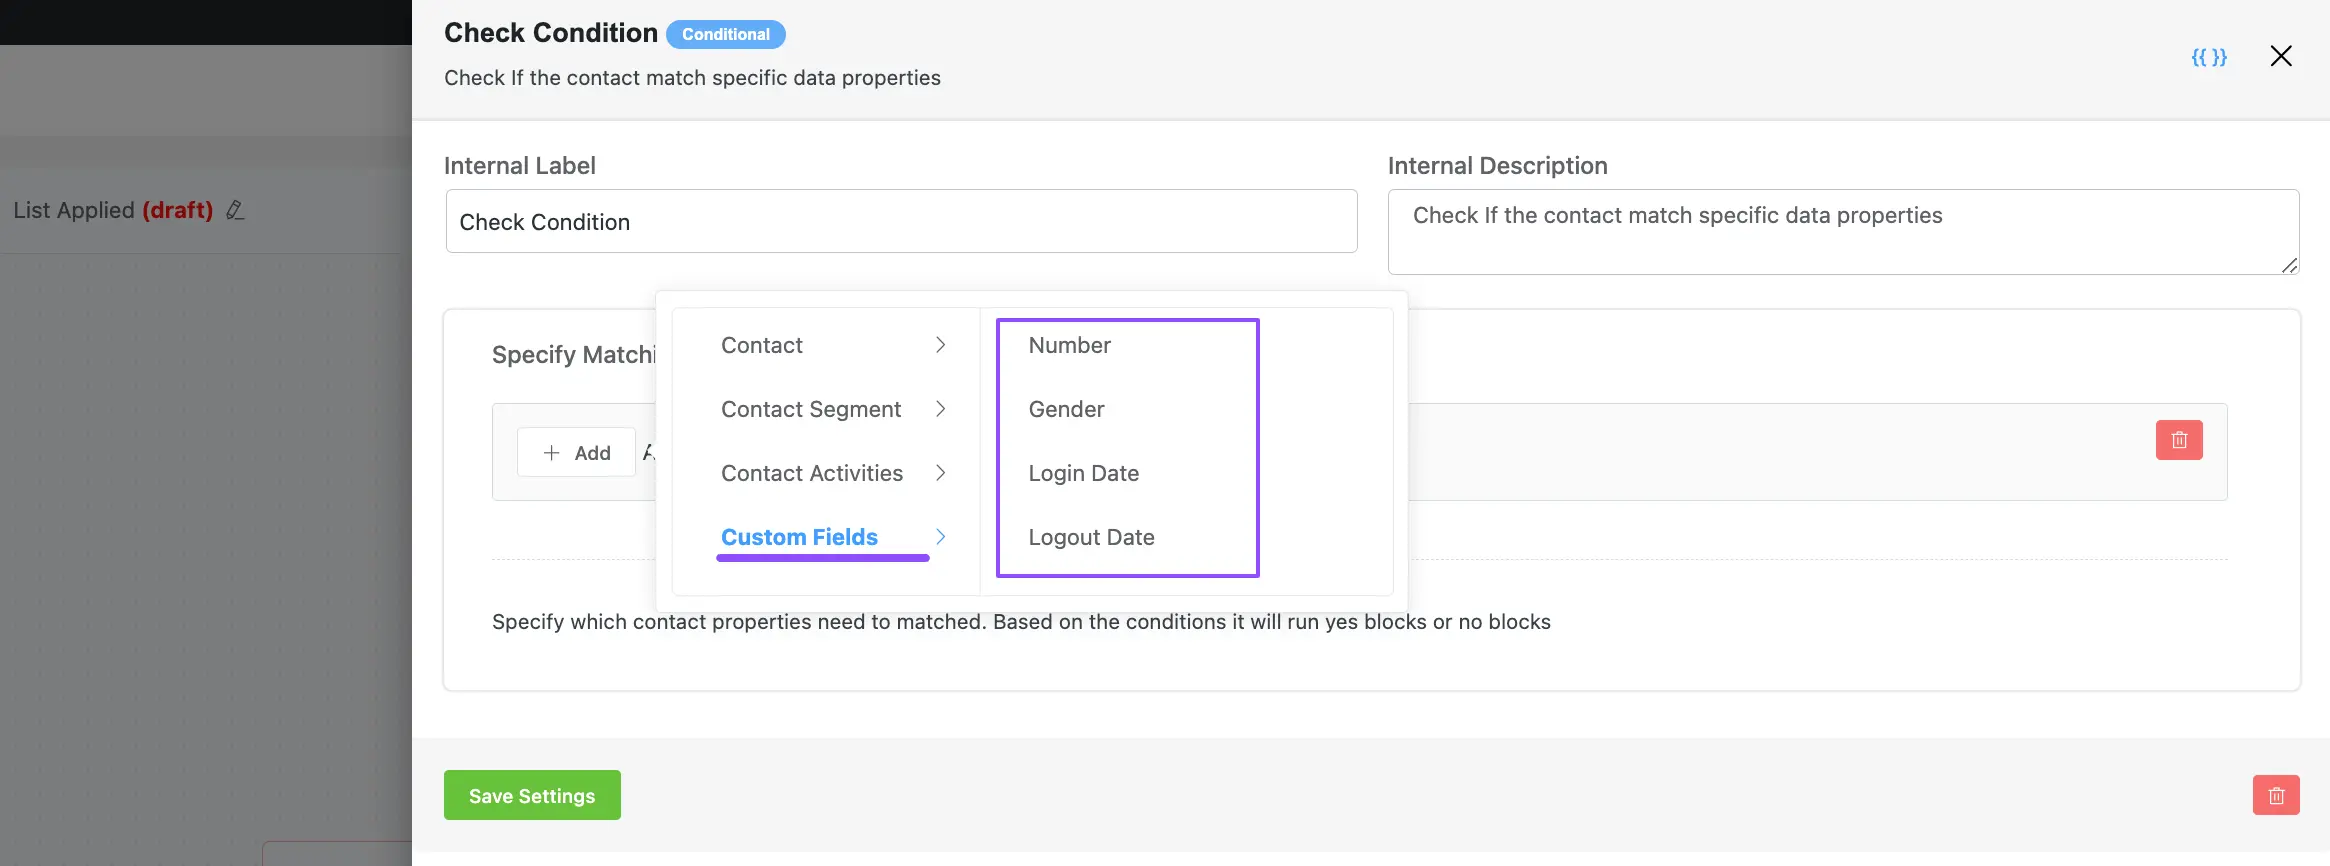
4. Custom Fields #
Here you will get the Options based on all the Custom Fields you have in your FluentCRM to set the desired Parameter for your condition. These are
To learn how to add custom fields in FluentCRM Contacts, read this Documentation.
Such as I had the following custom fields added to my FluentCRM:
- Number
- Gender
- Login Date
- Logout Date
Setting Condition/s #
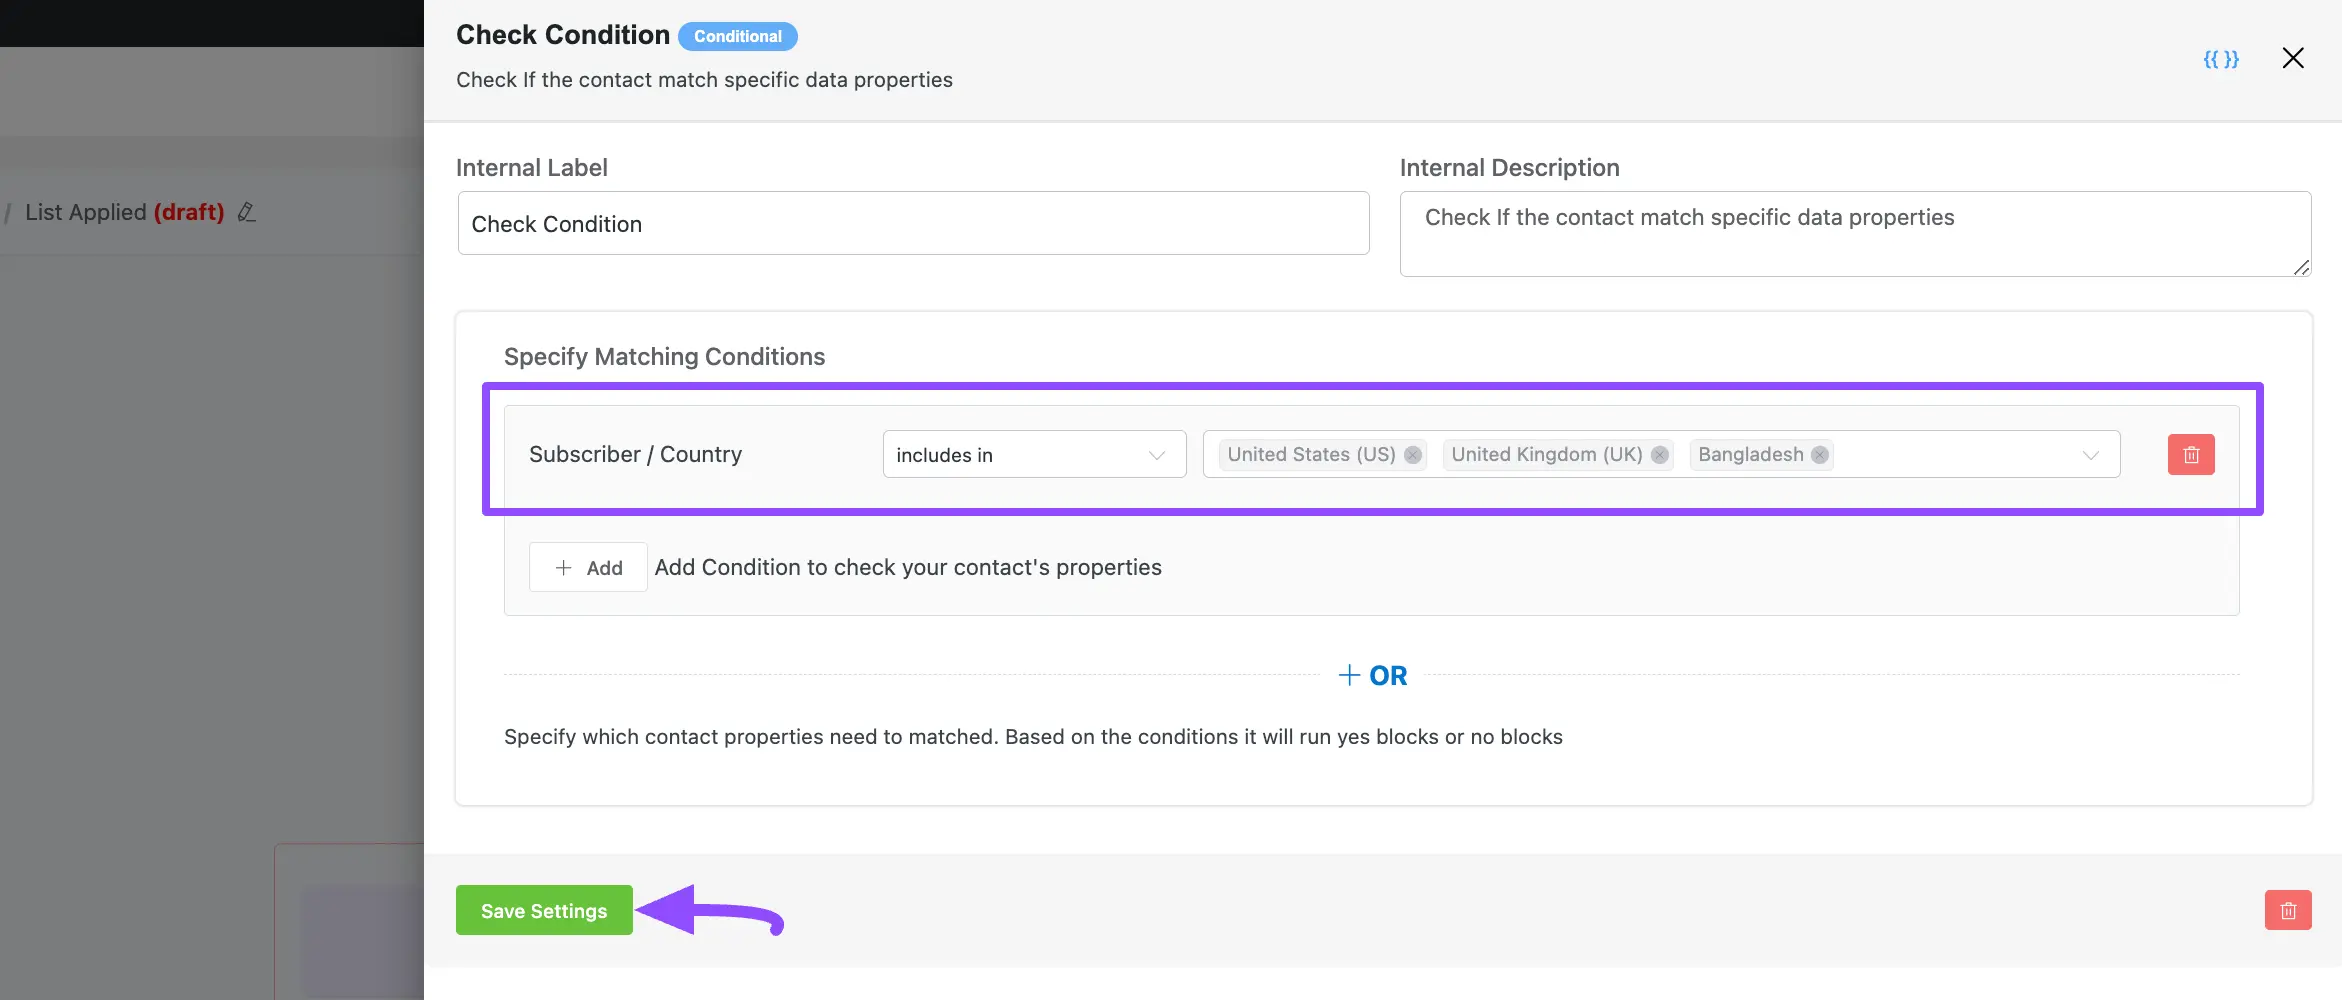
Once you select your desired Parameter (First Field), you will get the Options to select the Operator (Middle Field) and Value/s (Last Field) based on the selected Parameter.
Remember, the selected parameter will trigger the action only if the condition is met.
For example, I chose “Country” from the Contact property as a Parameter, the “includes in” as an Operator, and entered the “US”, “UK”, and “Bangladesh” as the respective Values. As a result, only subscribers from the US, UK, or Bangladesh will trigger the conditional actions.
Do not forget to click the Save Settings button after setting the Condtiion/s.
Setting Conditional Actions #
Once you set the desired condion/s, it is time to set Actions under that condition.
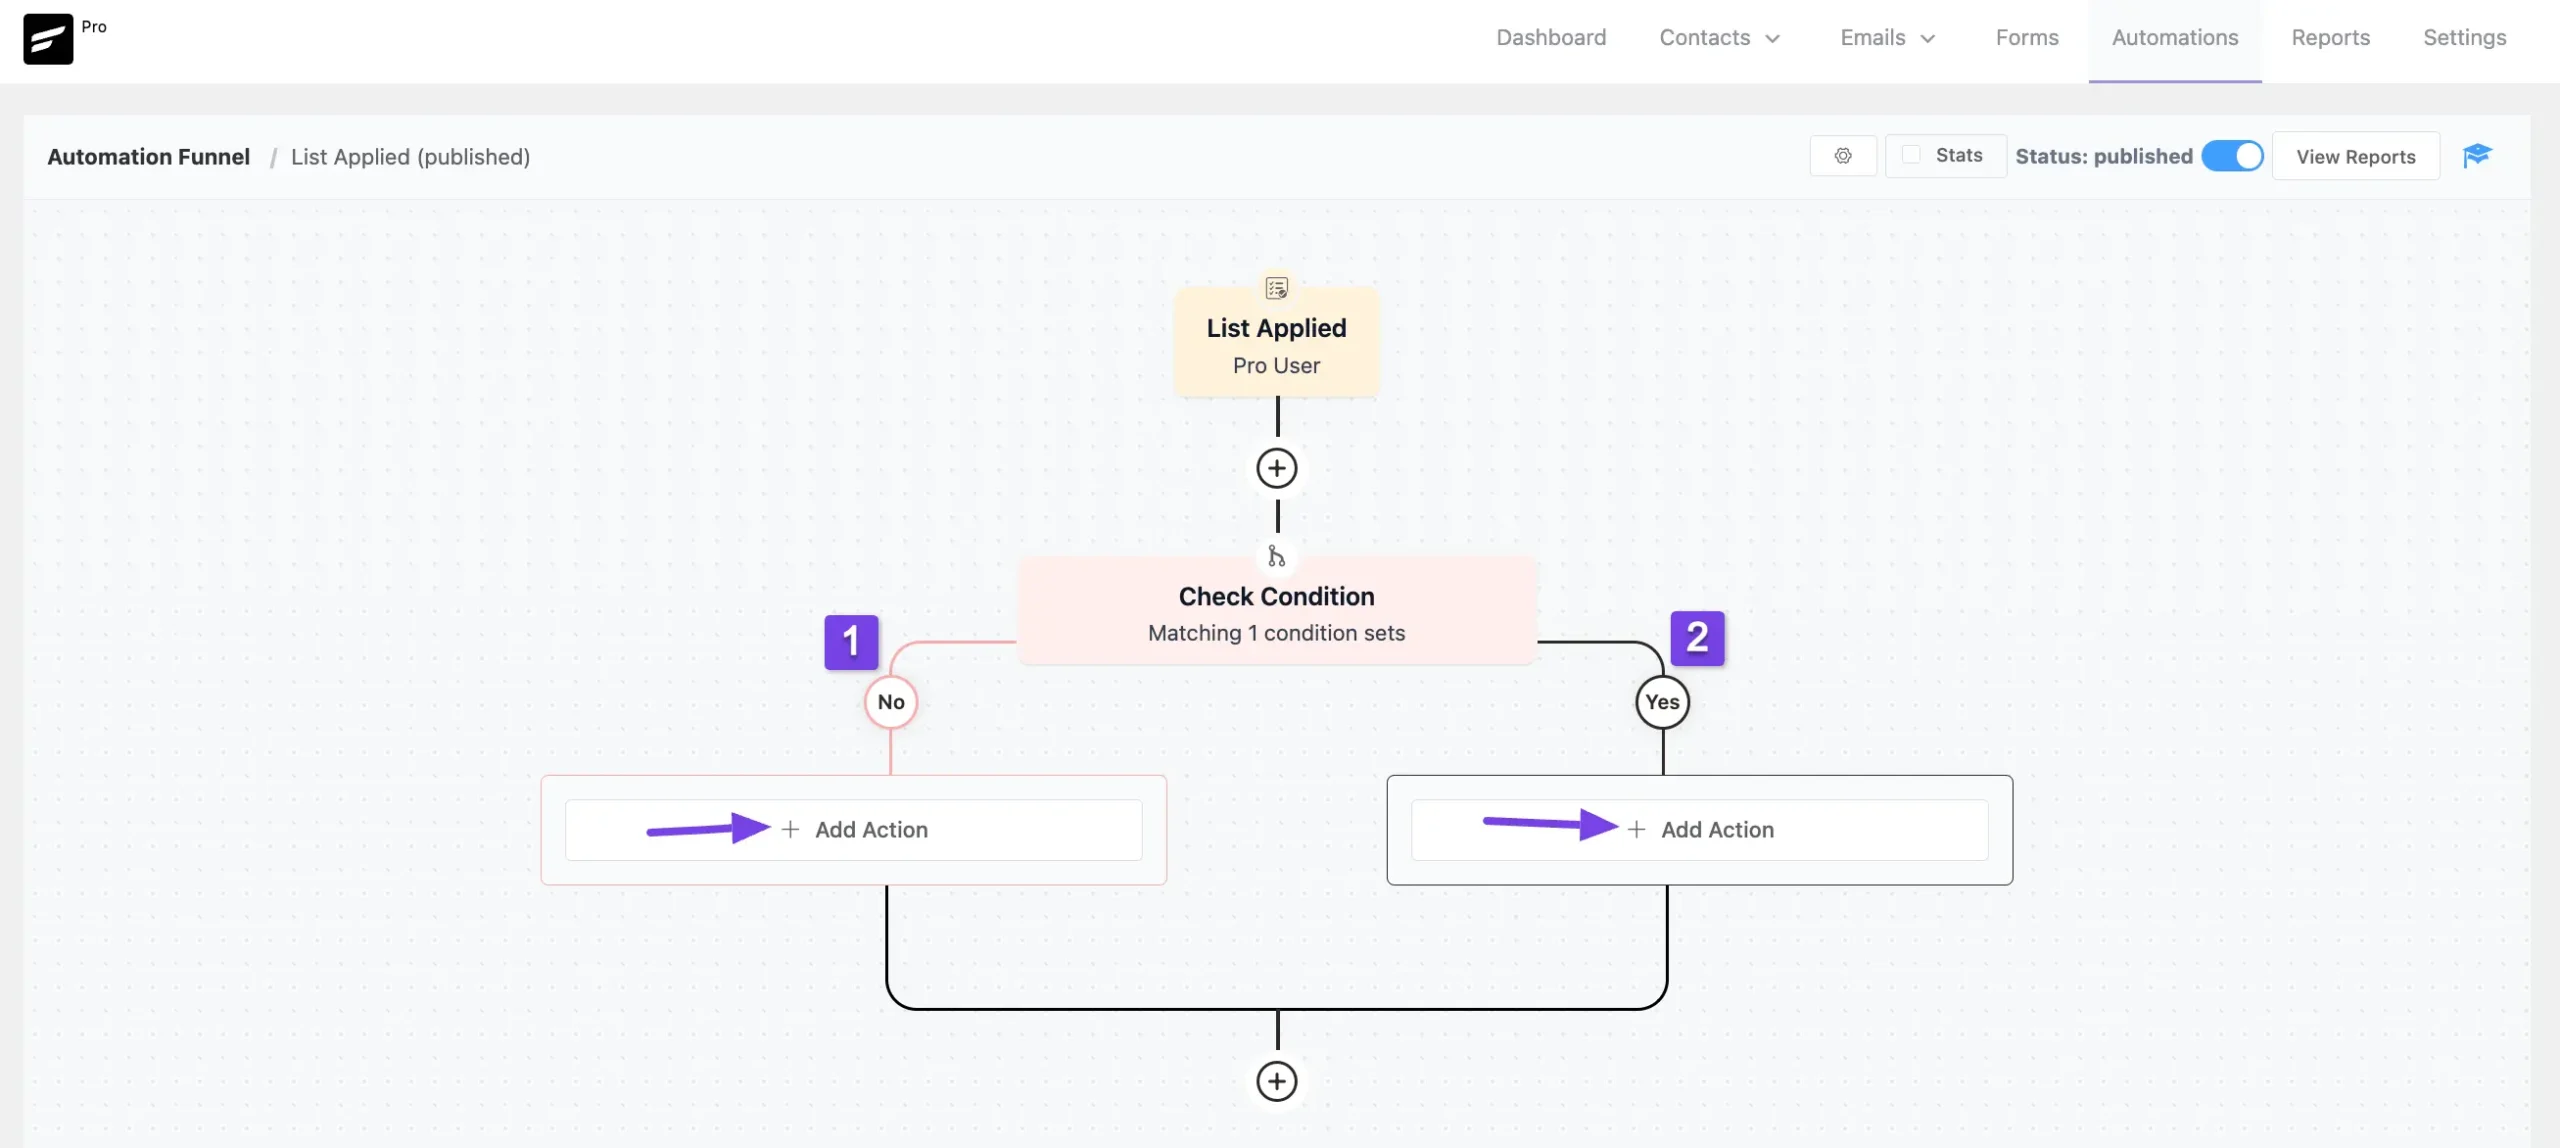
You can see, in the automation funnel, there are two paths for setting actions. These are:
- No: The action you will add under this path will run when the contacts do not meet the condition/s.
- Yes: The action you will add under this path will run when the contacts meet the condition/s.
In a condition, you can add as many actions as you need by clicking the + Add Action button.
Read this documentation to learn how to add Primary, Email, Goals/Benchmark, WordPress, LMS, WooCommerce, Abandoned Cart, and Miscellaneous actions. Additionally, read this Documentation to learn more about triggers
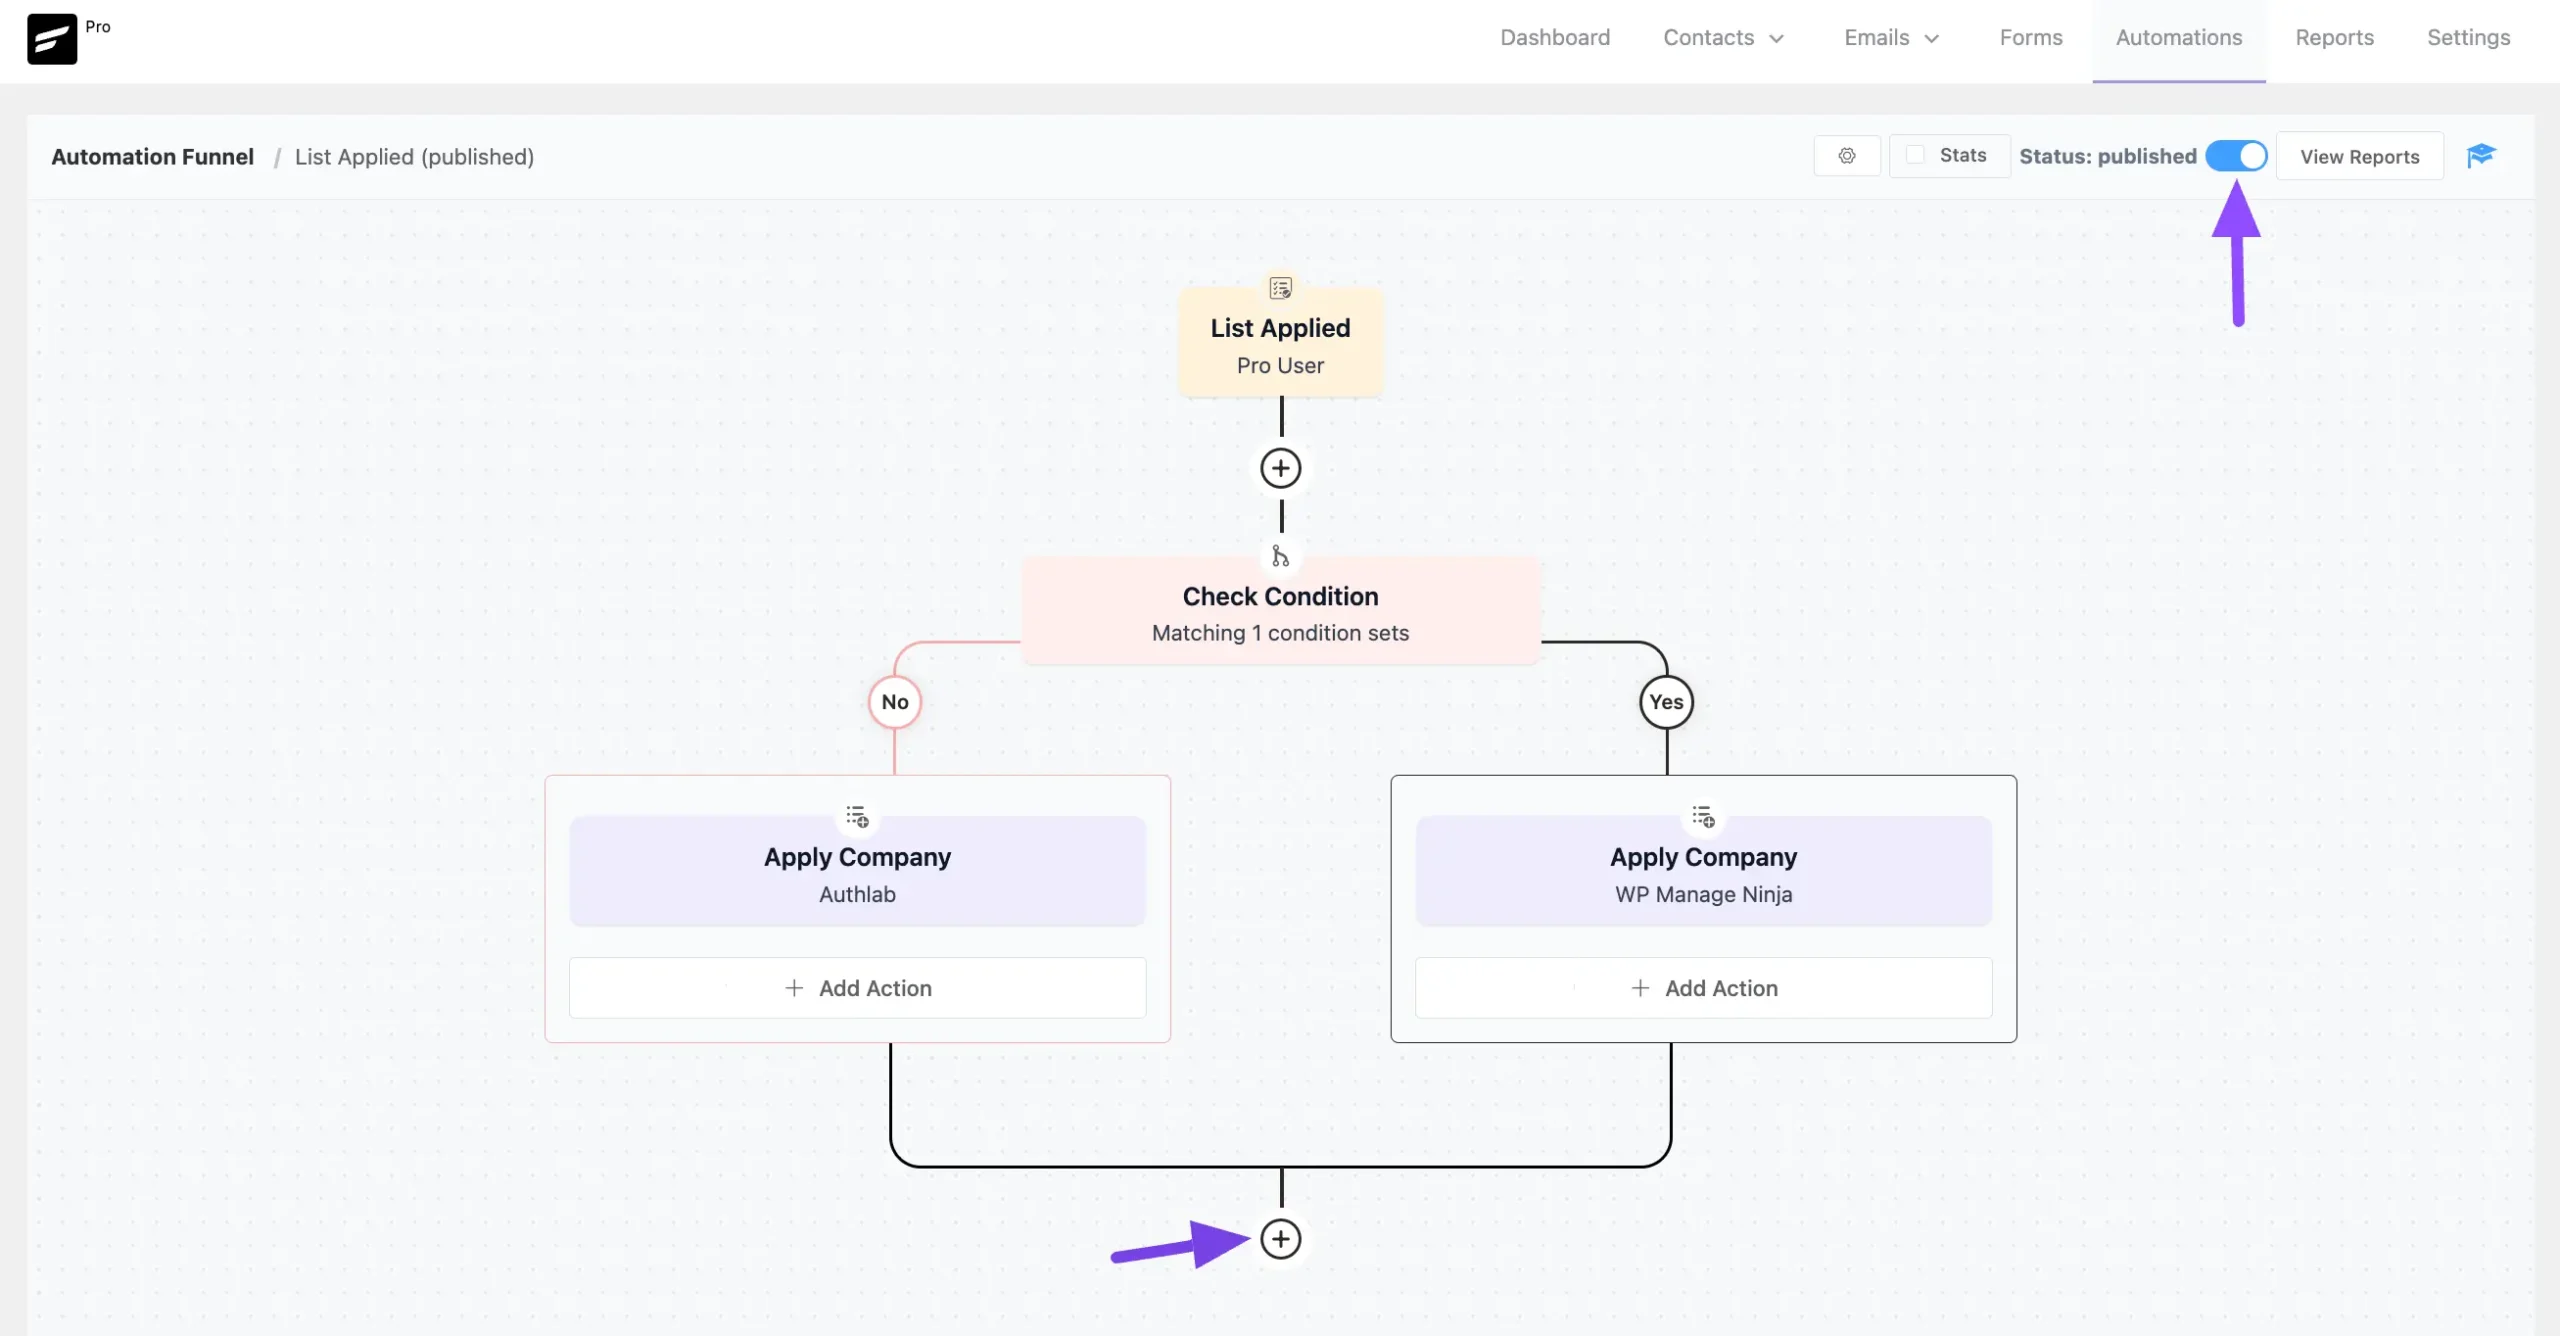
Finally, when you are done, enable the Publish toggle to make the full automation funnel functional. Otherwise, it will remain as a draft.
Also, to add more conditions or actions, always click the Plus icon.
If you have any further questions, concerns, or suggestions, please do not hesitate to contact our @support team. Thank you.


Hi! Is it possible in the conditional block, to leave one of the branches empty?
For example: if it’s true, do something, and if it’s false, do nothing. And in both cases, continue with the funnel after the conditional block… is it possible?
Thanks!
It’s possible. If false the contact still proceeds to the next stage of the funnel. You have to add an end funnel action to stop automations.
Hi FluentCRM!
Sorry if I missed this in the docs.
How do you “tag” a contact if they fill out a specific field in a form?
For example, if you have a form with a field called “Question A”. If the customer submits the form with “Question A” filled in, the automation tags that contact with the “questiona” tag.
That way I can segment my contacts based on whether they had a “Question A” or not.
Hi Mark, this is called Dynamic tags. Here’s the article link: https://fluentcrm.com/segment-fluentcrm-contacts-using-dynamic-tags/
Hi, how can I wait for 1 day before a custom field date added to the contact?
Example 1: I want to send an email 1 day before the guest do the check-in at the hotel.
Example 2: Send an email 1 day after check-out custom field.
I tried using “before days” for example 1. But how to stay in loop until the date comes in? Something like wait 1 day until it is 1 day before check-in.
Example if the guest made the reservation 5 days before check-in. Then wait 4 days until condition matches 1 day before check-in.
Hi SMSM, what you’re looking for is a reminder. This is best done with the booking tool you’re using. Please check if they have this feature.
I’m moving from other email platforms to FluentCRM, one thing that confusing me here is
“Conditions” in the automation
here snapshot
https://snipboard.io/zQjCUJ.jpg
after I set the condition, I see both branches of the “condition” connected below to same line, as if regardless the result of “condition” both will reach to same point here.
Could you please shed some light on that?
*** my use case here:
if customer have specific tag >> stop the funnel here
if not have that tag >> send below emails and continue the funnel
Hi Taher, I understand your concern and look like we made an UI mistake here. When you add an “End this Funnel” action, the automation stops for those who progressed to that block unless you have a benchmark trigger which takes them to that stage. Hope you understand.
Hi, I have a question about conditionals. Is it possible to send emails at a specific time in automations?
Yes, our wait action have this feature.
Tengo una duda y creo que lo estoy haciendo bien en el tema automatizaciones. Tengo varias automatizaciones para asignar un agente de ventas a X persona con la condicional del día creado. He puesto que tal día creado se me asigne a un agente determinado. Así he hecho con los tres agentes en diferentes días del 2024. El problema viene que se lanzan las 3 automatizaciones y todas se asignan al mismo Agente (que coincide con la ultima automatización) sin importar la fecha de la condición que he puesto. Algo hago mal? Te agradezco la solución porque me estoy volviendo loco. Muchas gracias. 🙂
Hola, no entiendo tu pregunta. ¿Podrías compartir esto en inglés? Alternativamente, puedes publicar en nuestro grupo.
Hello,
I have the Fluent CRM Pro and I am looking to implement the following workflow for a free course in Learndash. The course is free but the learner can order a certificate (paid) which expires in 2 years. The automation should work this way:
1. If the learner has enrolled in the free course (a tag is applied)
1a. If the learner has enrolled but not completed the course within 10 days, a reminder should go via email to complete the course and ask if any help is needed.
2. If the learner has completed the free course (a tag is applied) then after 2 days, an email should go to the learner with an offer to order the certificate.
3. Meanwhile if the learner has already ordered a certificate immediately, I will manually add a tag “ordered” or something similar so that he does not get the email in Step 2 (that is why the 2 day delay).
4. When learner orders certificate, a tag is added “ordered” and after 2 years, an email goes out offering to renew the certificate.
5. Repeat the steps for 3 and 4.
Can you please guide the best way to achieve this. Currently I am not using Woocommerce and no integration with ordering system is needed. Ordering is via a different service external to Learndash.
Hi, how can I wait for 1 day before a custom field date added to the contact?
Example 1: I want to send an email 1 day before the guest do the check-in at the hotel.
Example 2: Send an email 1 day after check-out custom field.
I tried using “before days” for example 1. But how to stay in loop until the date comes in? Something like wait 1 day until it is 1 day before check-in.
Example if the guest made the reservation 5 days before check-in. Then wait 4 days until condition matches 1 day before check-in.
hi my friend , you got answer for this?
Hi:
In the Condition “Check if the contact purchased a specific product”, the “Target Products” column could be kept blank to run as any product purchase ?
No, if you keep it blank, the automation won’t check the condition. All contacts will be directed to the ‘No’ side of the automation.
Hi,
Do you have a Gutenberg block “Conditional Section”? I see such a blog with your logo among other blog (see the attachment).
I am not sure if it’s your block, or it relates to WP Fusion plugin, because I have installed both Fluent CRM and WP Fusion. I am deciding now if I need WP Fusion. Probably not, if Fluent CRM has the same functionality.
Can you tell me if you have such a block?
Here is the description of the block’s functionality:
Add a conditional section that separates content, and put any other block into it. Show/hide this section based on visitors login state or available tags
Hi Александр,
Yes, that’s a FluentCRM block. However, note that this only works for users who are already logged in on your website.
Any tutorial on how to correctly set up conditions would be great
Hi Robert,
We’ll be rolling out some free automation resources soon. For now, let us know what you’re trying to achieve here so that I can tell you how to do it.
HI Nazir,
If a customer makes a purchase in the middle of Email Sequence automation – how do we stop the email sequence from preceding? When we place WooCommerse purchase component after an email sequence, it seems to wait until sequence (10 emails) is over. We’d like to be able to interrupt it whenever a purchase is made and change some tags / lists for the user.
Thank you
Hi Zhenya, to cancal a sequence when a purchase is made, you need to add delay’s within the emails. To give you an idea of how you can properly make email sequences work, we have prepared a nice tutorial. Please check out no 3 and 4. 🙂