
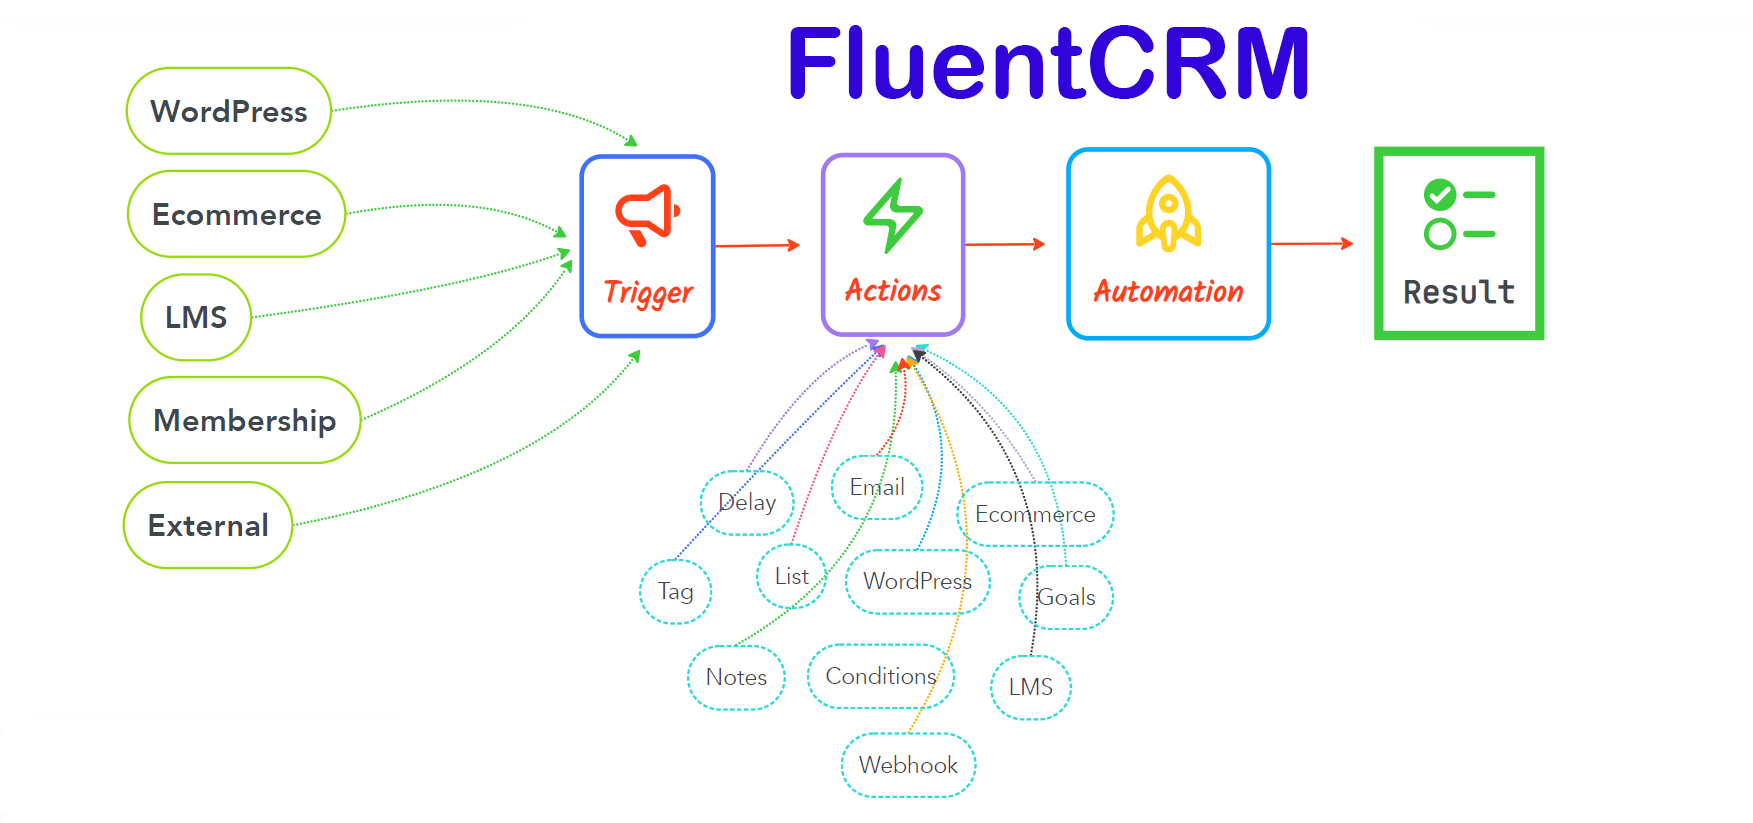
Email Marketing & Automation in WordPress is sending automated emails based on your audience’s behavior and automating various tasks inside the WordPress website that are initiated upon different activities and triggers. It lets you turn your leads into customers and customers into brand advocates who’ll rave about you whenever they can! Email Marketing Automation is a marketing cylinder or funneled workflow where your leads can get into a relationship with your business starting from different activities.
FluentCRM is a tool that automates tasks and runs emails such as Email Campaigns, Email Sequences & Custom Emails.
This article will give you a detailed walkthrough of the Marketing Automation, Sales Funnel & Email Sending based on specific activities from FluentCRM.
Glossary #
Before we dive deep into FluentCRM and Automation, Let’s learn some terms that are very important to know and frequently used.
- Automation Editor: The editor where you will be able to add, edit or modify your desired actions or activities in automation. To know more about this please visit Automation Editor.
- Triggers: Triggers are essential for initiating email marketing automation. There are a lot of triggers that can start or initiate automation in FluentCRM such as Primary Automation Triggers, Ecommerce Triggers, WooCommerce Subscription Triggers, Membership Triggers, and LMS Triggers.
- Actions: Once an Automation is initiated you can add various actions that you want to run when such activities are triggered like Primary Actions, WordPress Actions, Email Actions, Goals or BenchMark Actions, LMS Actions, Miscellaneous Actions, and Conditional Automation Actions.
- Goals: Generally FluentCRM automation starts with a single and specific trigger. What if you want to run the same automation triggering based on another trigger? This way you could also benchmark the automation. To know more about this please visit Goals or BenchMark Actions.
- Conditionals: One of the most useful features of FluentCRM is that you have advanced and more control over what you want to do or customize your target more with the flexibility of the FluentCRM data. Please visit Conditional Automation Actions to learn more about such flexibility in using data-based conditions in automation.
Dashboard Overview of Automations #
To learn all the details about the Dashboard of FluentCRM Automations, read the instructions below –
You can access the Dashboard of Automations section from both the Left Sidebar and the Navbar in the FluentCRM plugin.

Once you go to Automations, you will get all the available options for creating and managing Automation Funnels as per your needs.
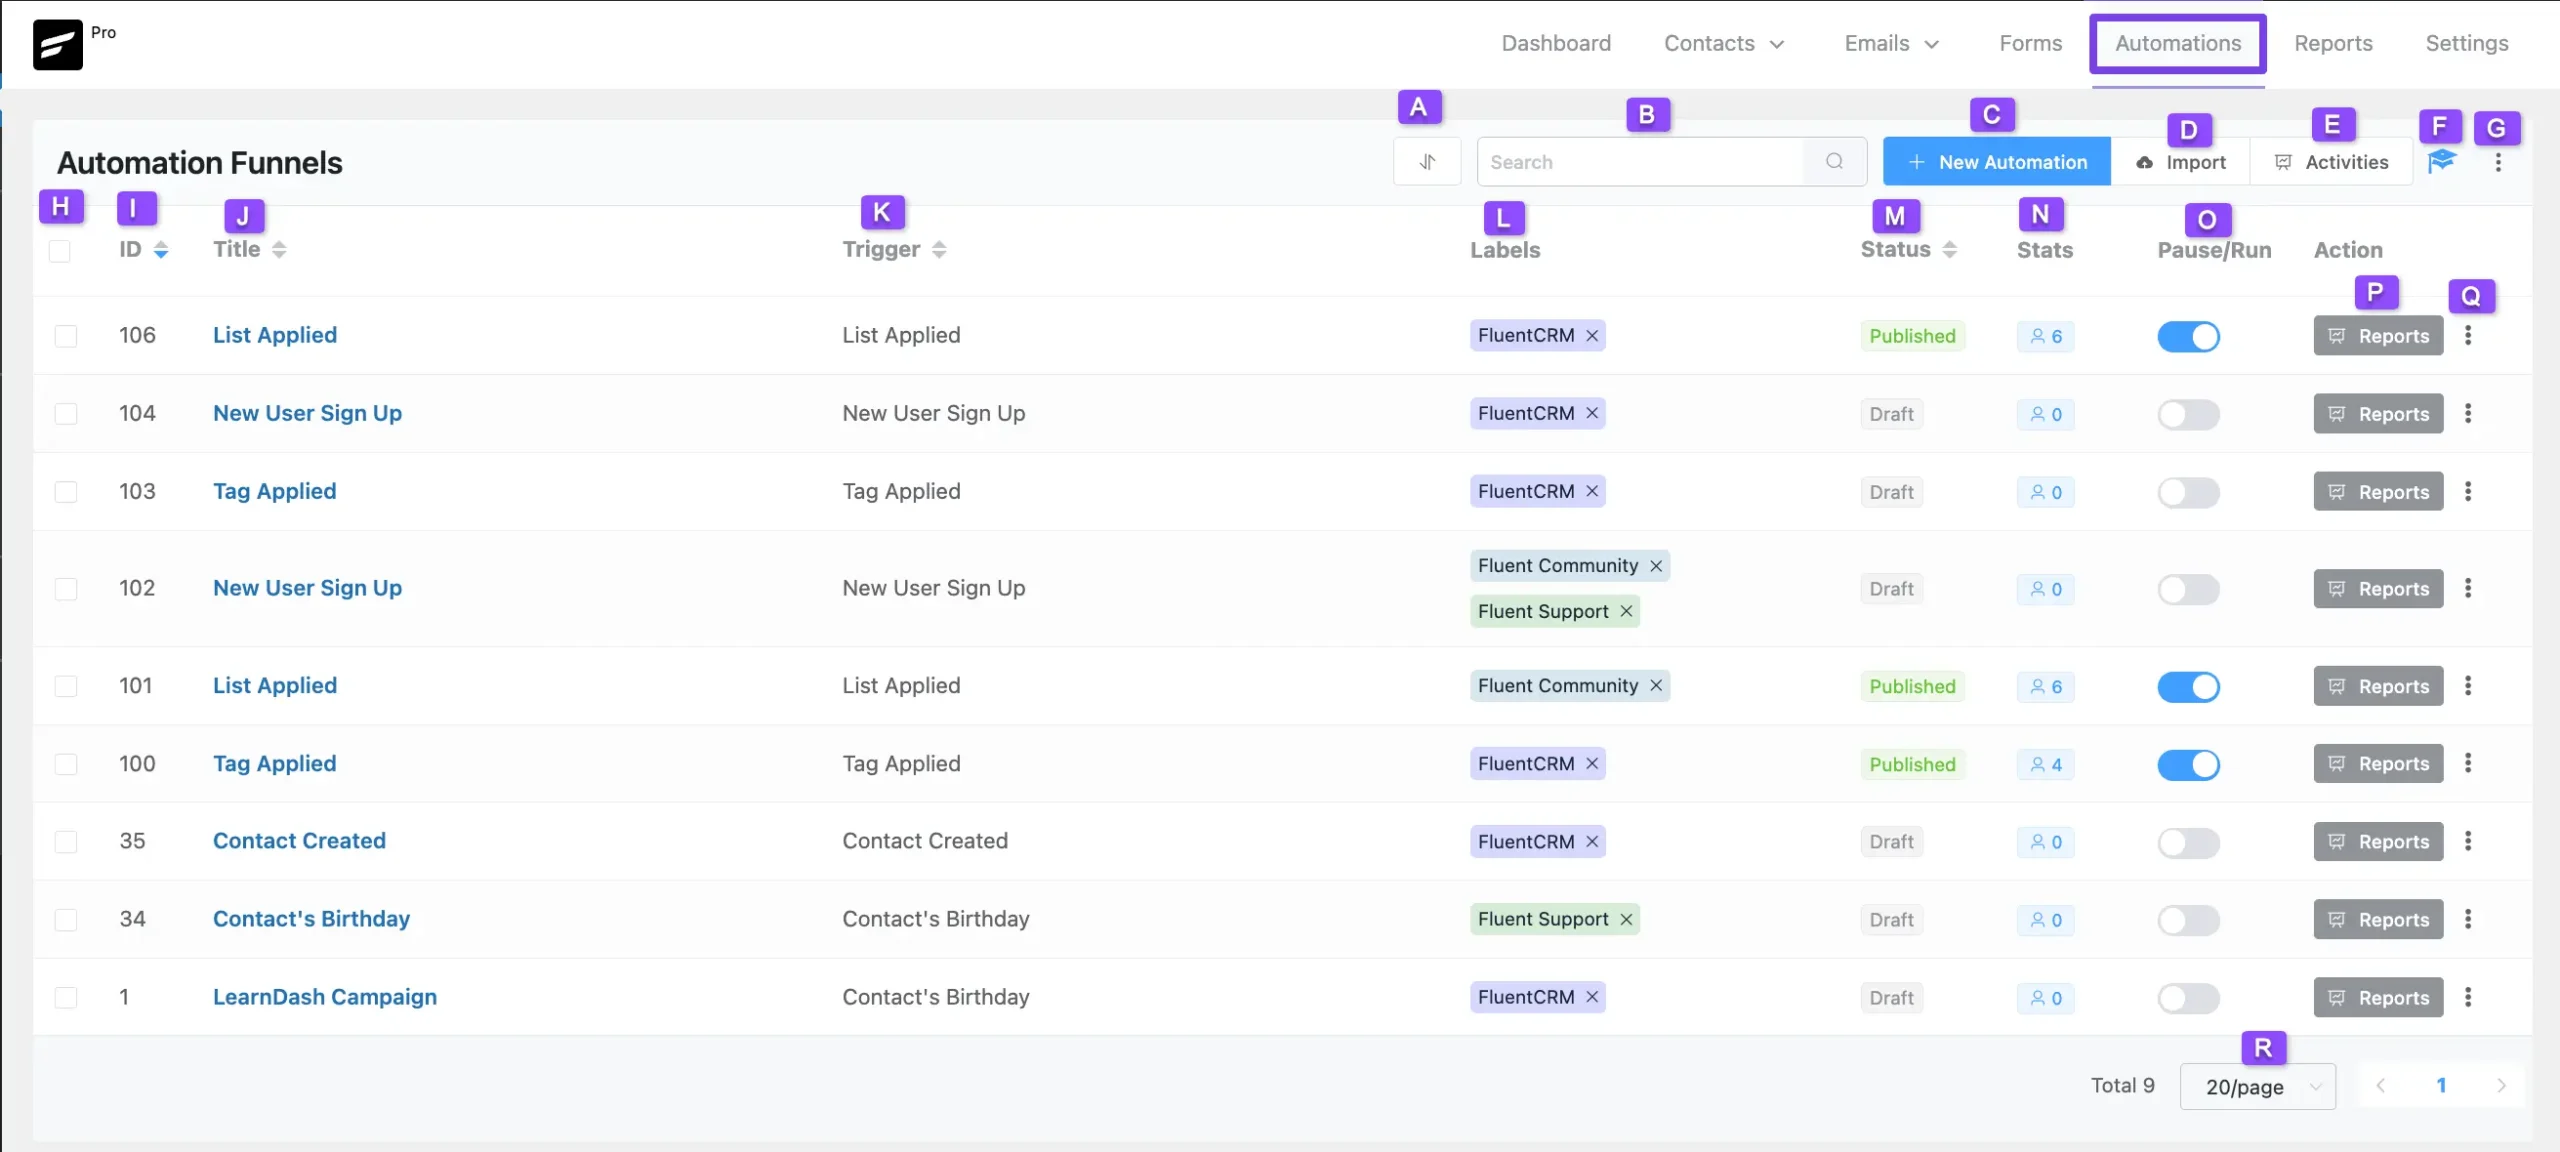
All the options mentioned above to manage the automations are explained below –
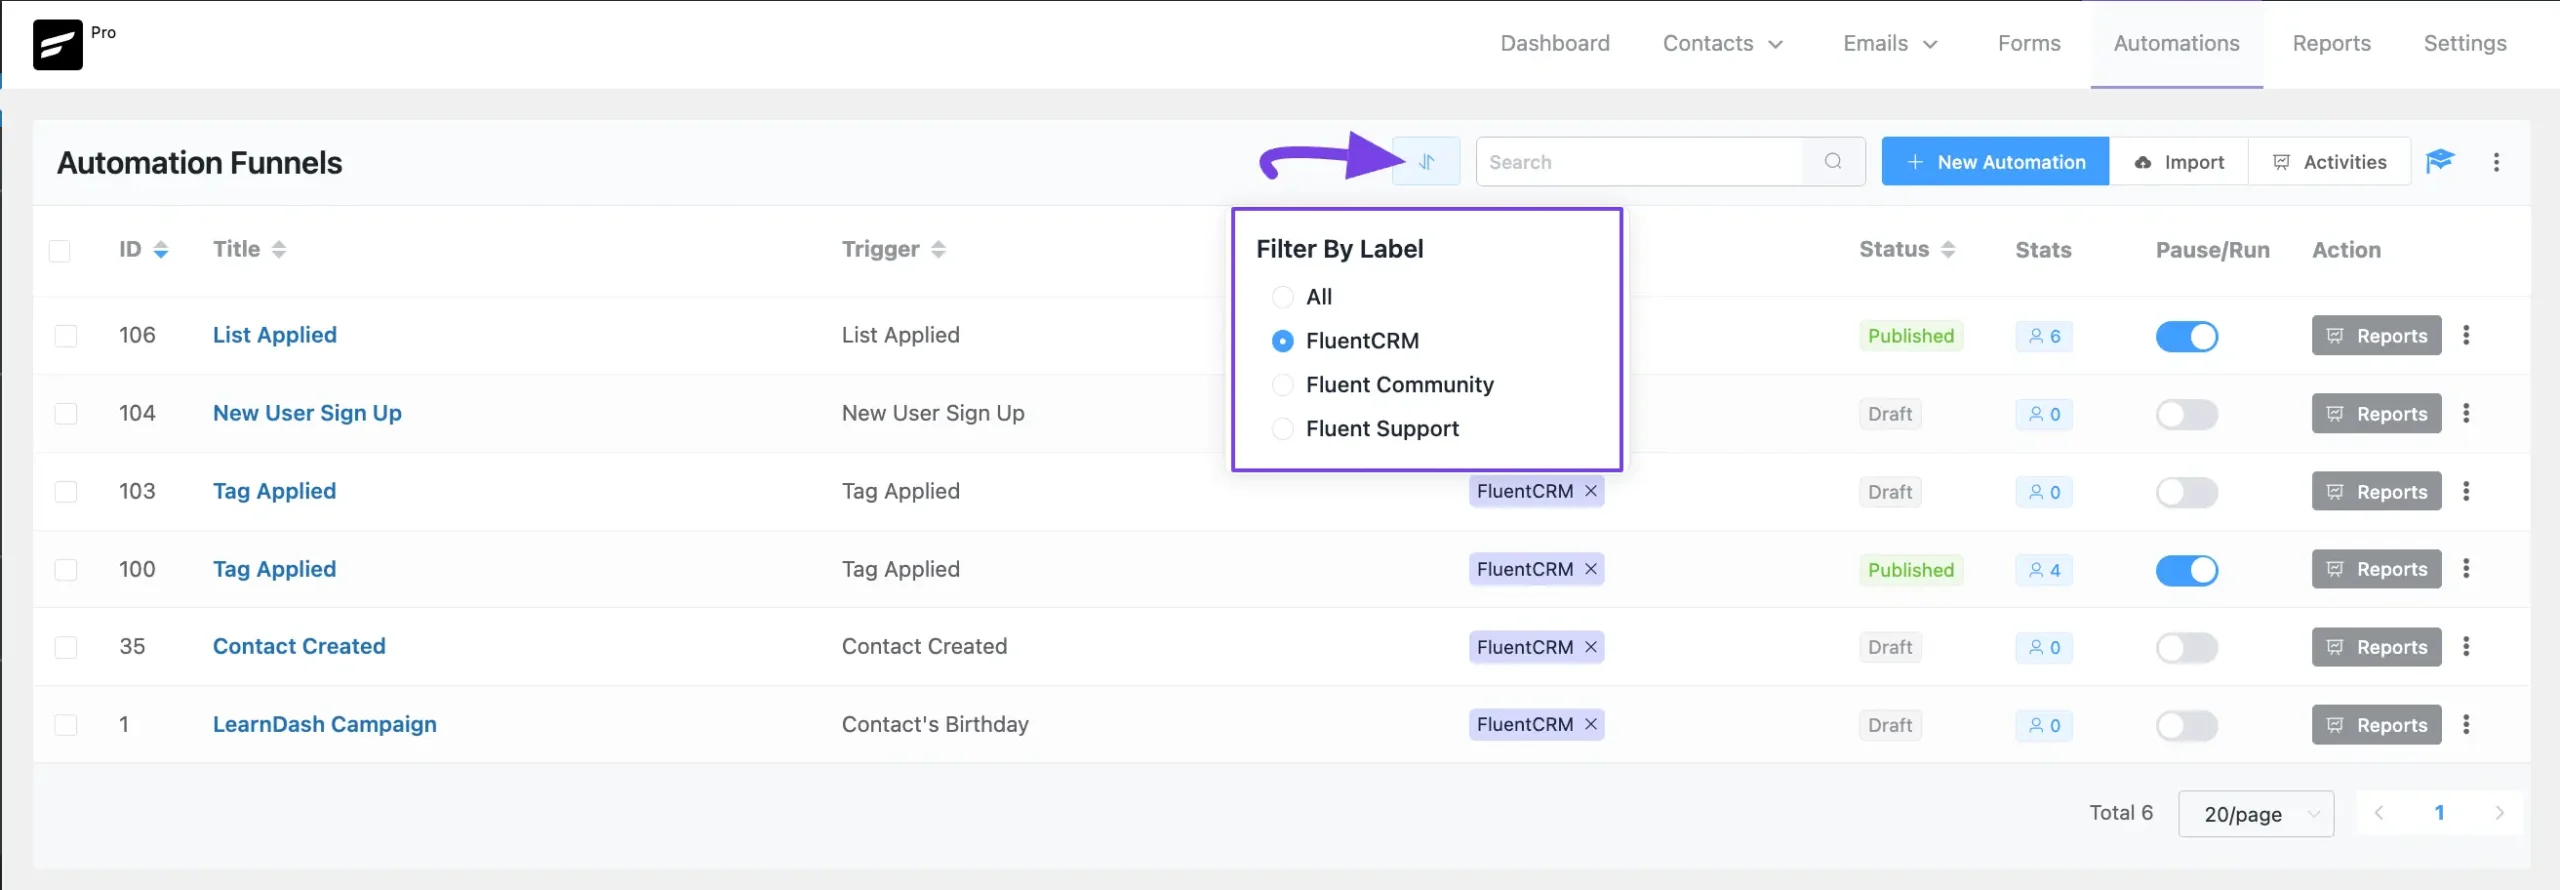
A. Filter By Label #
This option allows you to filter the list of automations by the selected label.
For instance, I selected the FluentCRM label, and all automations with that label appeared.
To learn the process of creating Labels for Automations, read this Documentation.
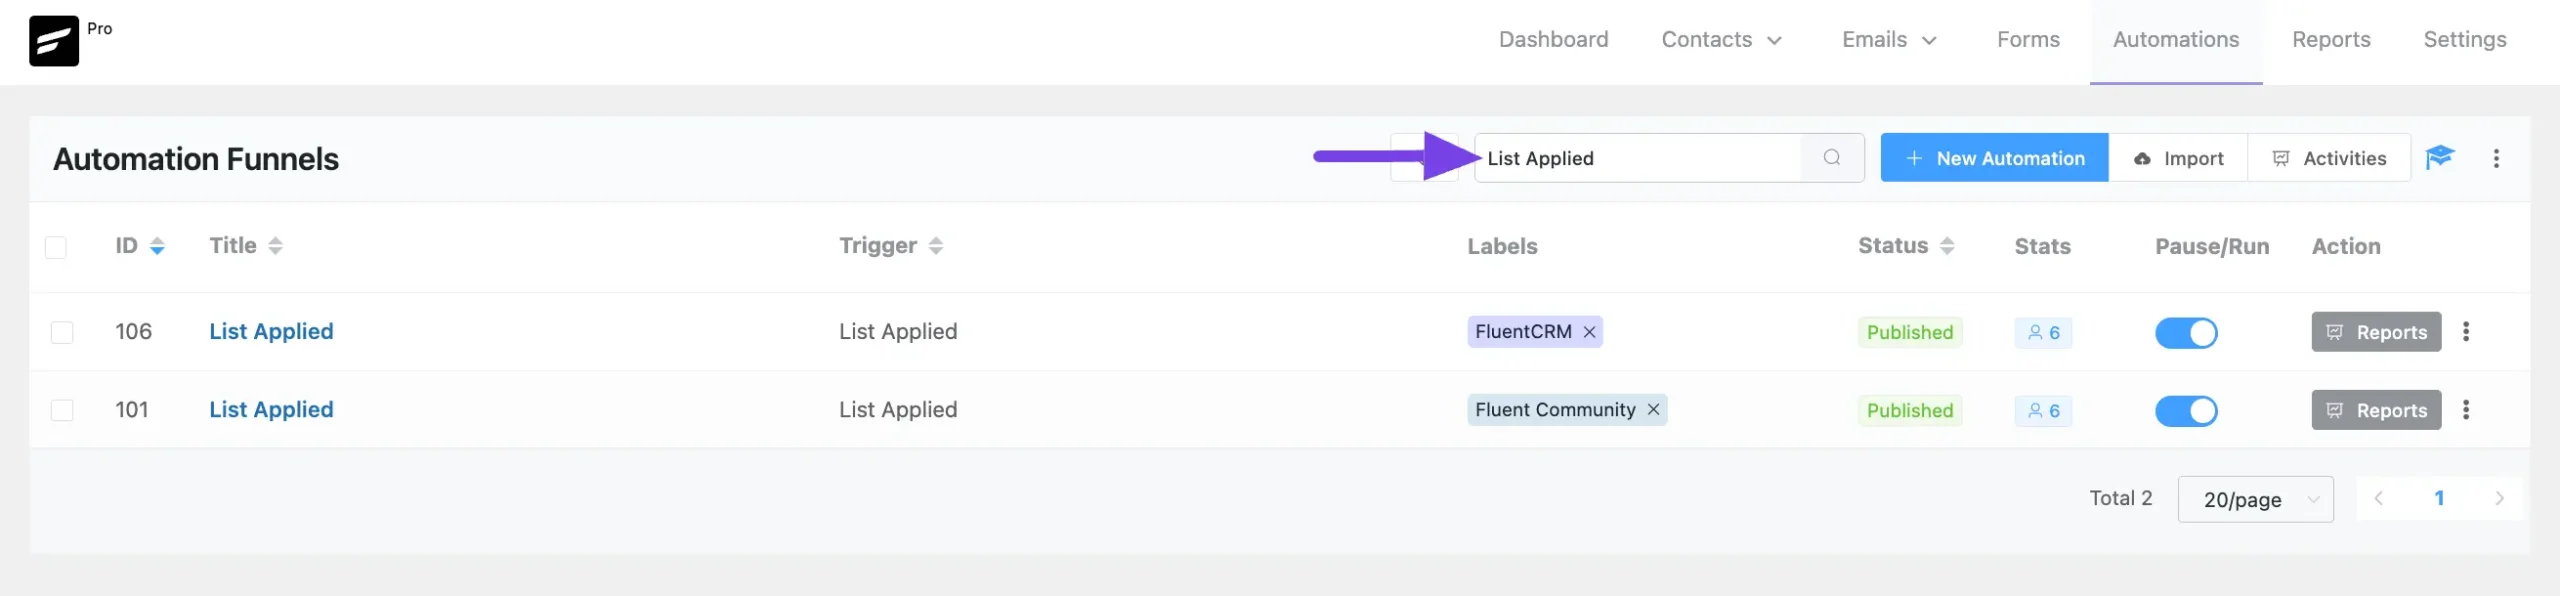
B. Search Box #
This option lets you search for specific automations by their Titles.
For example, I searched for automations using the “List Applied” title.
C. + New Automation #
By clicking this button, you can create as many new automations as you need.
To learn the process of creating new automations, read this Documentation.
D. Import #
Using this option, you can import any automation/s at any time.
To learn the process of importing automations, read this Documentation.
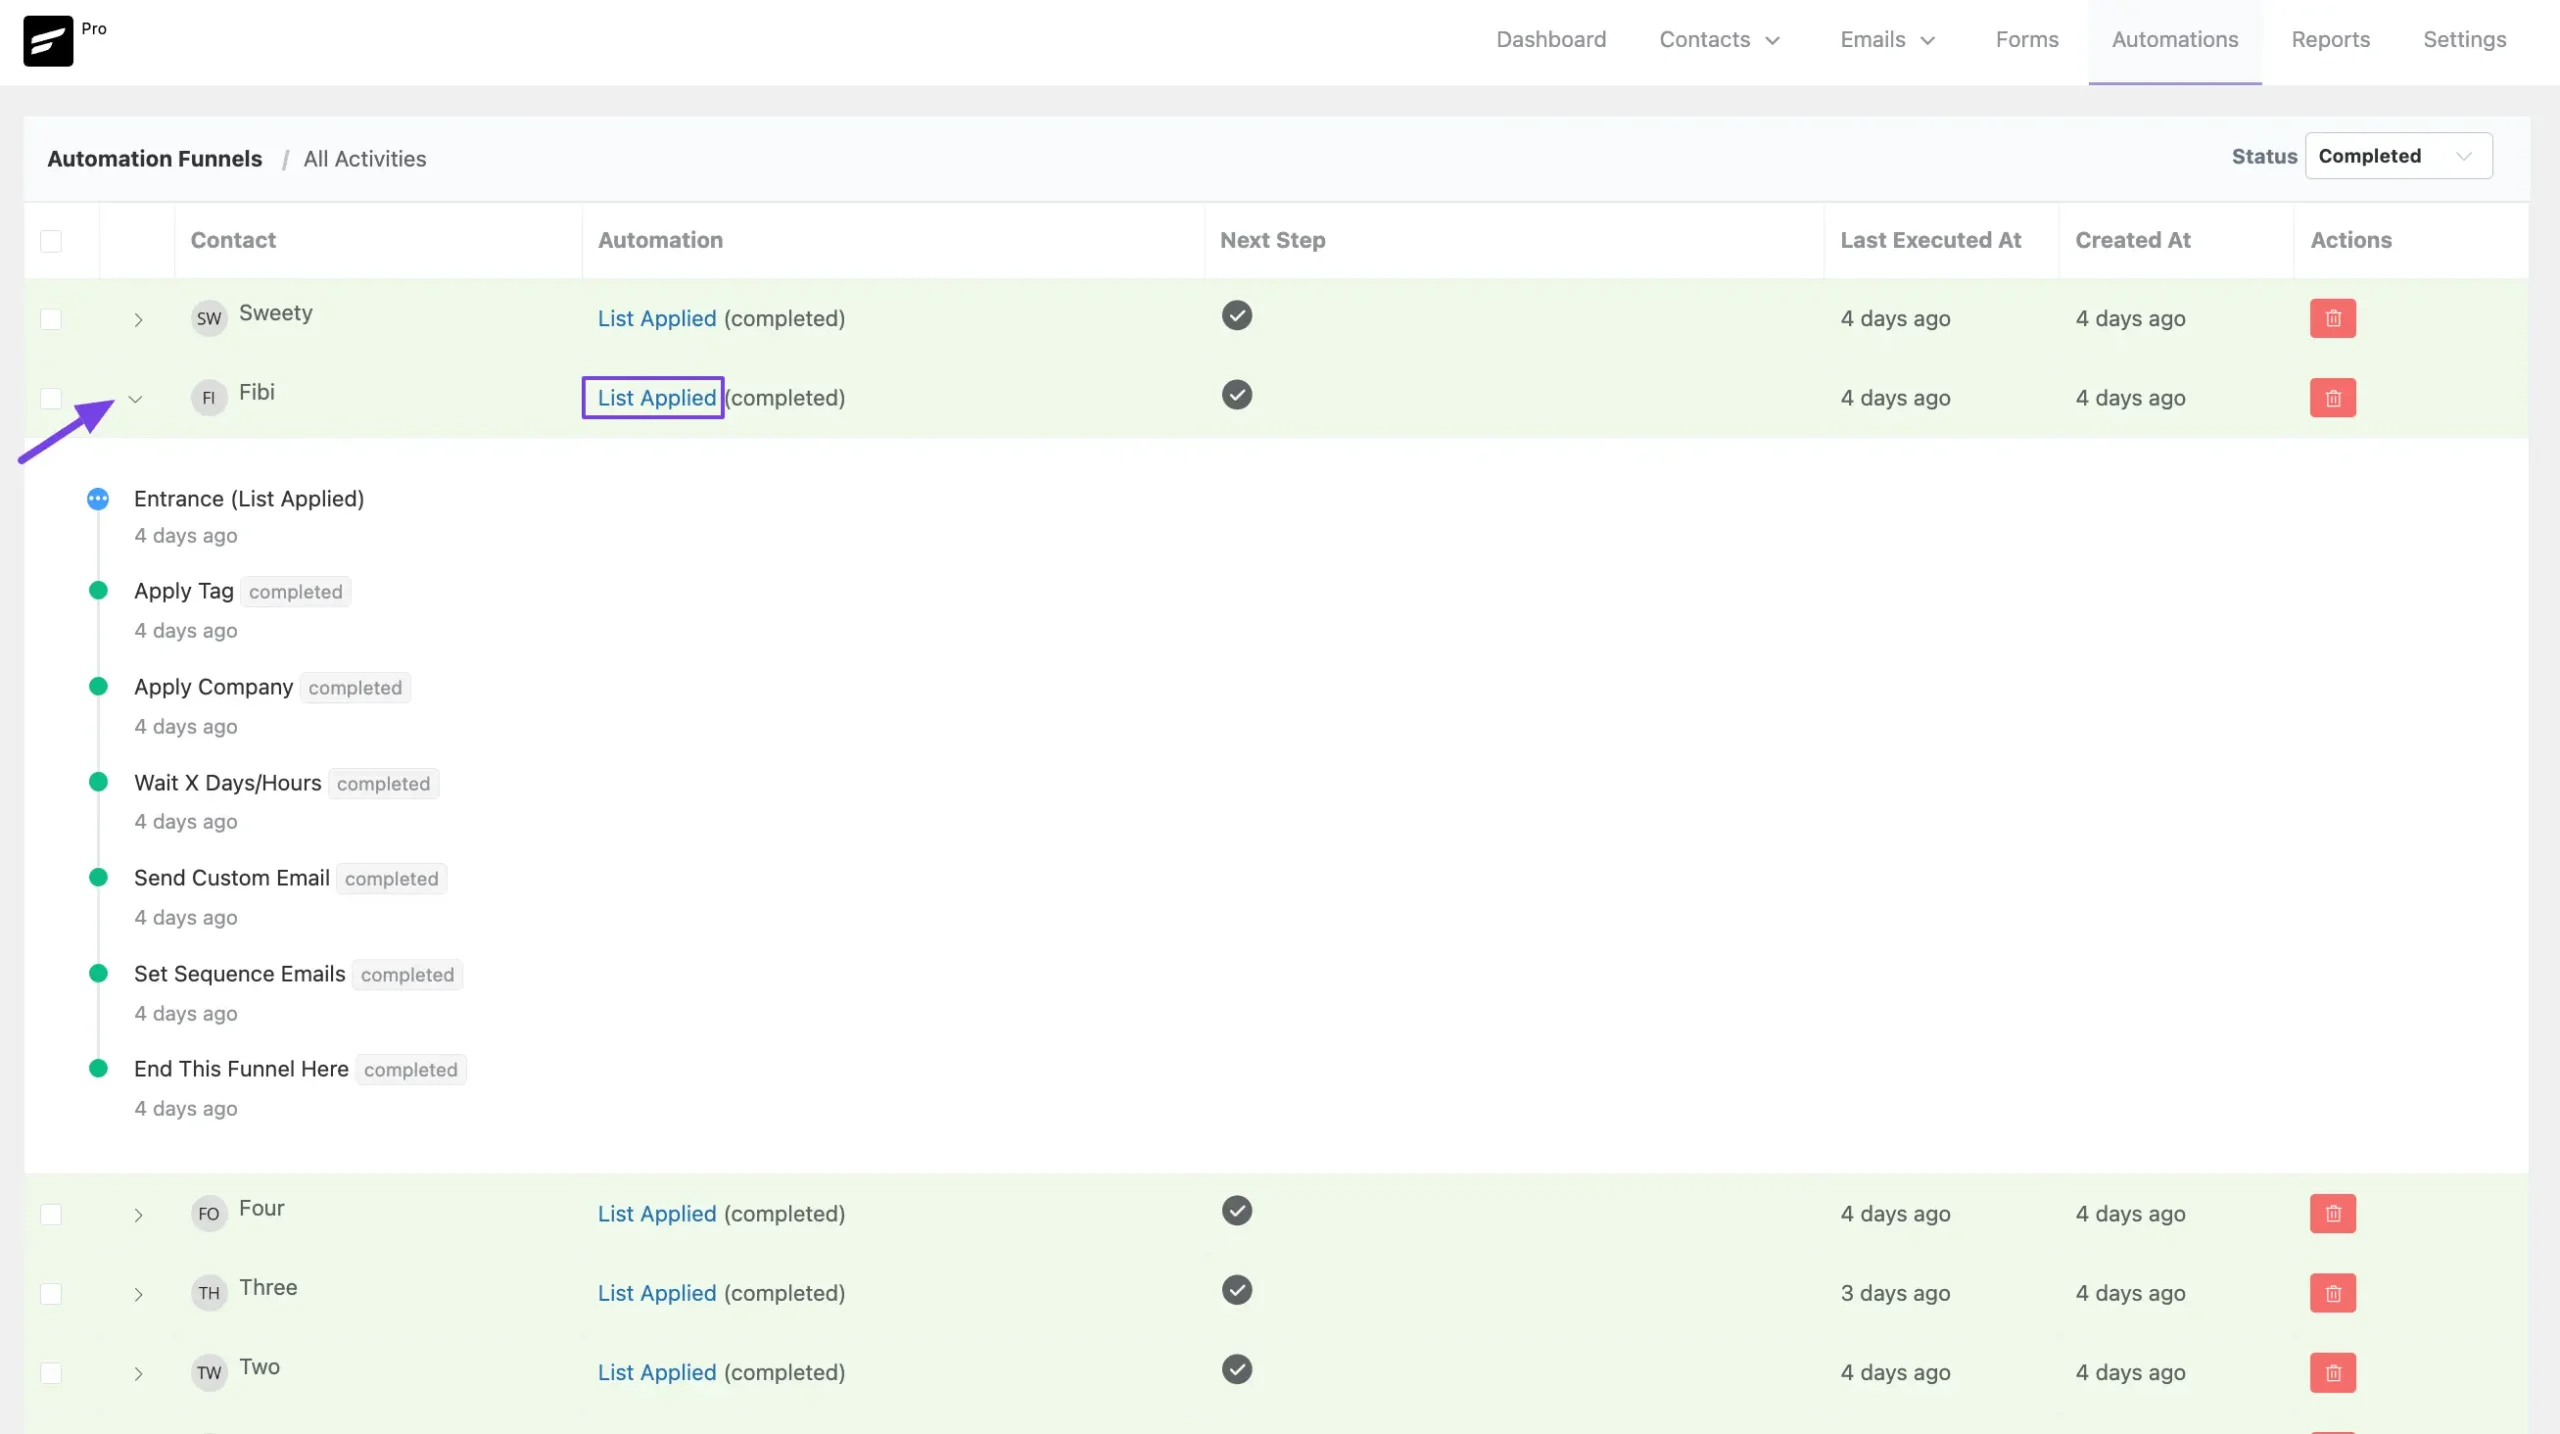
E. Activities #
This option lets you keep track of the overall activities of your all automations.
To view individual activities, click the arrow icon next to each activity. Plus, to see the complete funnel for a specific activity, click its title under the Automation column.
To learn the detail use of viewing individual activities, click here.
F. Guideline Resource #
This button will open a sidebar on the right-hand side with the documentation to introduce you to the basics of FluentCRM Automations.
G. Manage Labels #
By clicking this button, you can create as many Labels as you need to sort your automation.
To learn the process of creating Labels for Automations, read this Documentation.
H. Bulk Actions #
This option lets you apply the Bulk Actions for the selected Automation/s.
Click the Checkbox (single or multiple), to run the desired action for all of the selected automations.
Here, you will get the following three actions to perform.
- Change Funnel Status
- Apply Label
- Delete Funnels
Plus, to select all the automations at once, click the Checkbox in the top left corner beside the ID.
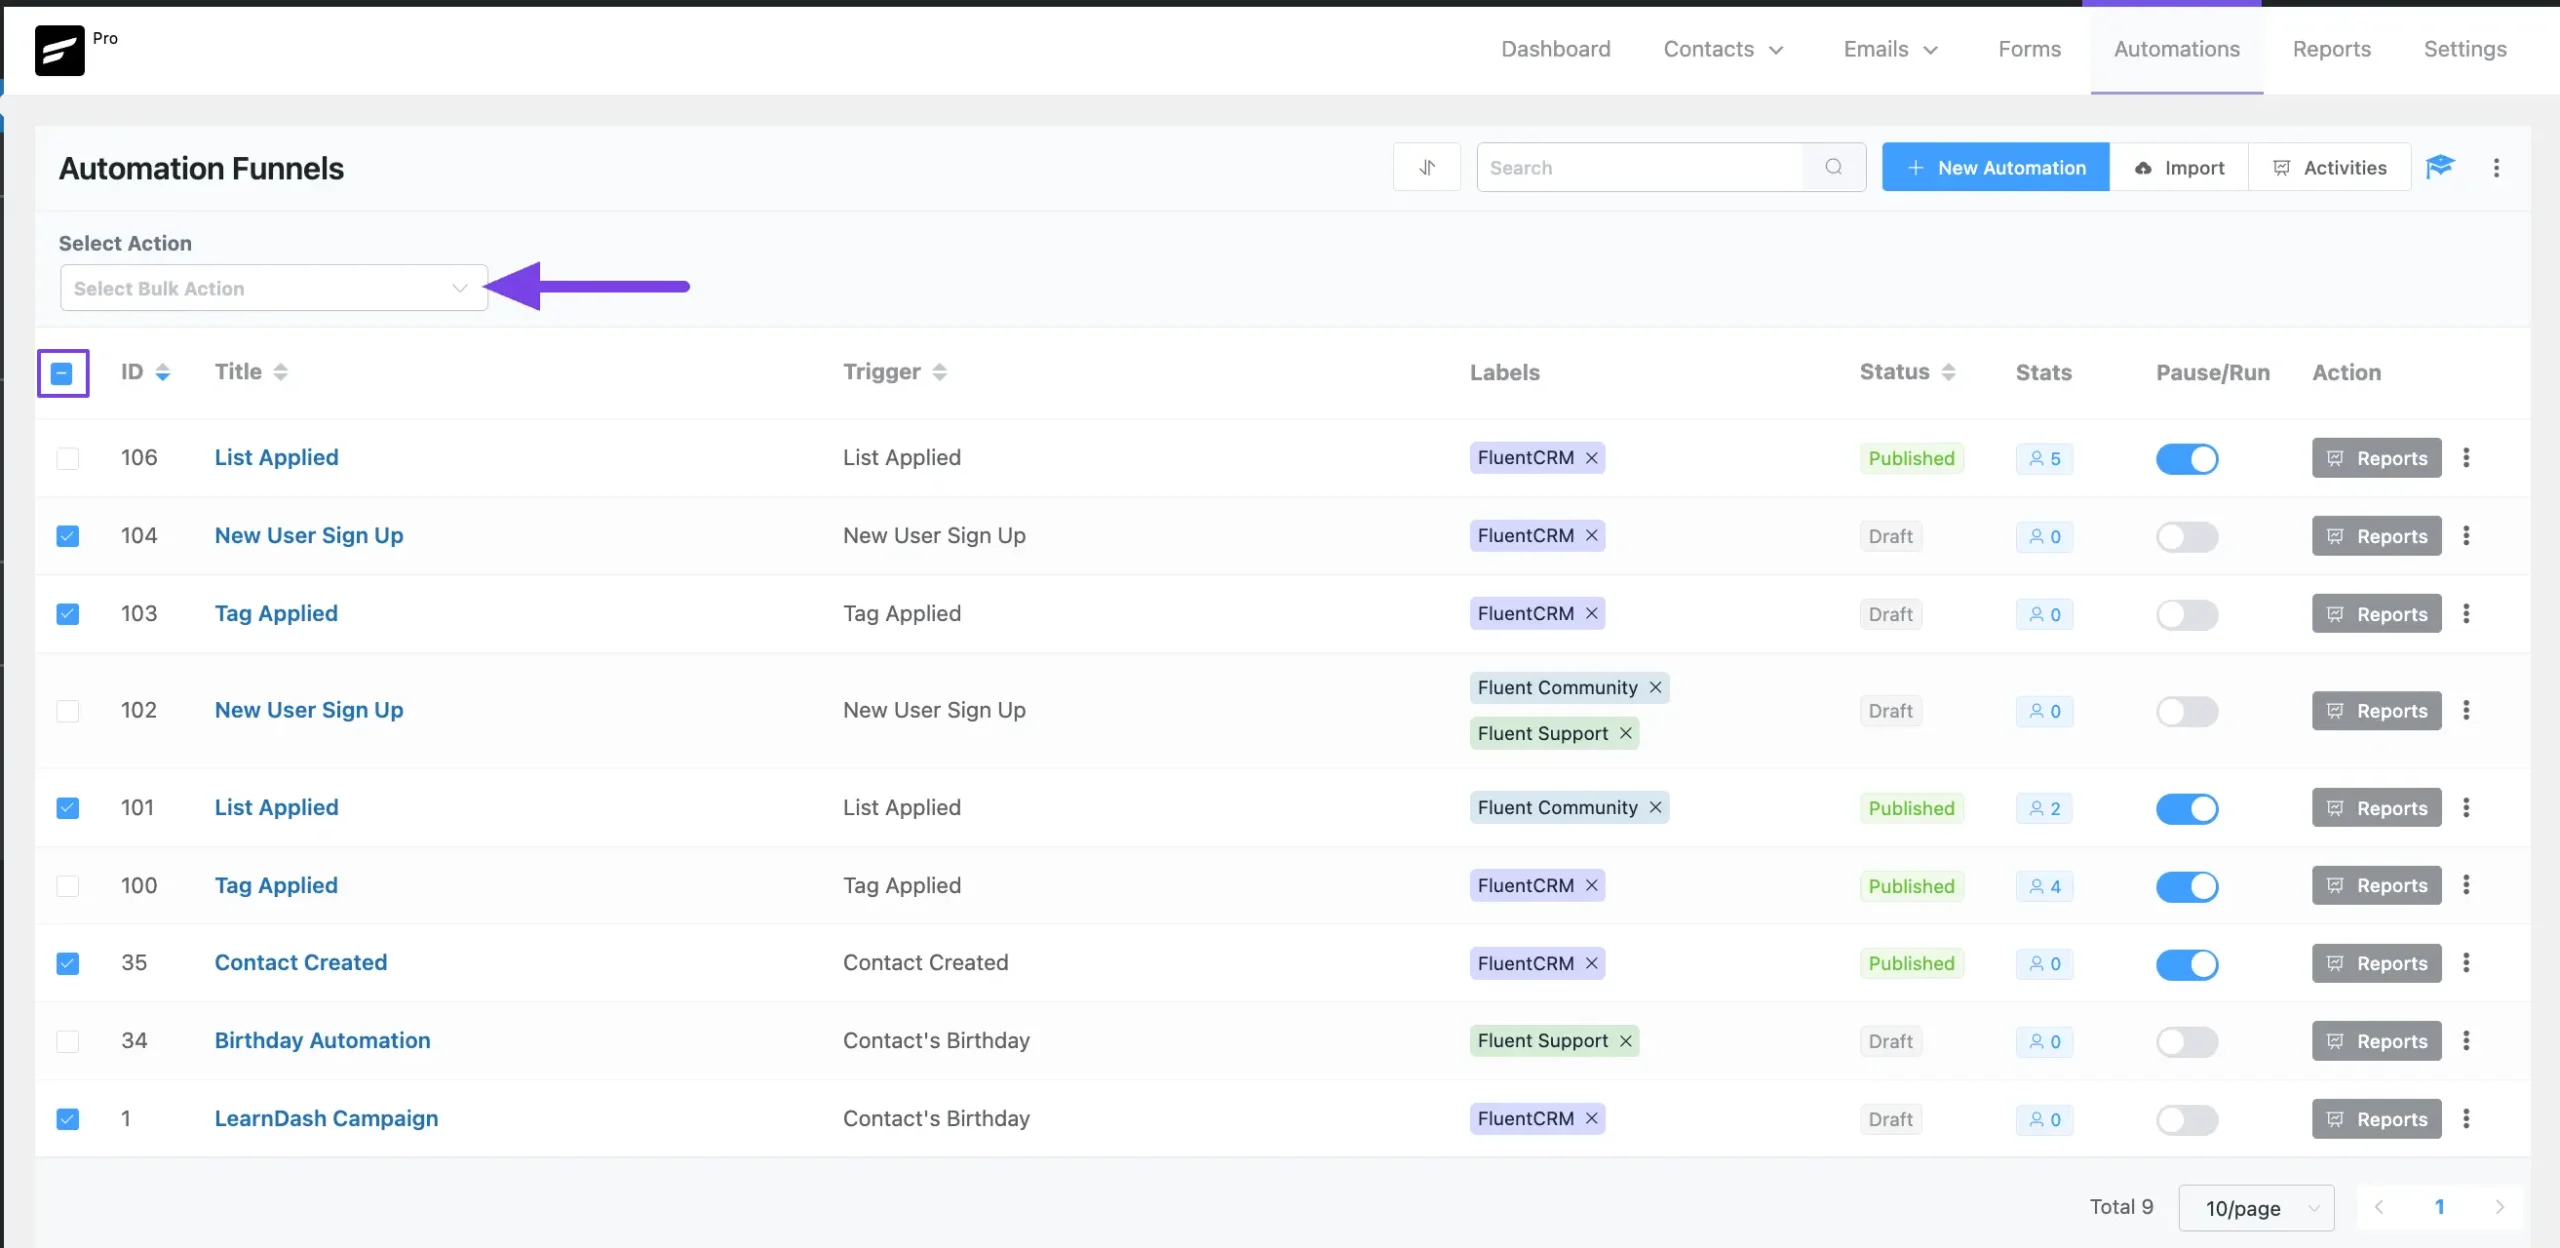
I. ID #
Under this option, you will get the unique ID number for each automations that you created.
J. Title #
Under this option, you will find the Title of all the automations you created which will help you to find your automation later easily.
K. Trigger #
Under this option, you can see the Triggers that you used for your Automations. Triggers are the initial activities that start the automation.
FluentCRM offers the following triggers for the automations:
- Primary Automation Triggers
- E-commerce Triggers
- WooCommerce Subscription Triggers
- LMS Triggers
- Membership Triggers
L. Labels #
Under this option, you can see the Labels that you applied for your Automations.
To learn the process of creating Labels for Automations, read this Documentation.
M. Status #
Under this option, you can see the Status of all the automations (i.e., whether the automation is Published or Draft).
N. Stats #
Under this option, you can see all the Statistics of all automations (i.e., how many Users/Contacts entered into this automation).
O. Pause/Run #
Enable this toggle, to publish and run your automation. Otherwise, your automation will be saved as a draft only.
P. Reports #
By clicking this button, you can check overall Reports for the Automations.
To learn more details about viewing reports, read this Documentation.
Q. Three-dot-icon #
Once you click this icon, you will get another three more options. These are:
- Duplicate: By clicking this button, you can duplicate any existing automation.
- Export: Using this option, you can export any target automation.
- Delete Automation: You can delete any existing automation by clicking this trash icon. Plus, to delete all reports at once, click the Checkbox in the top left corner and press the Delete Selected Contacts button.
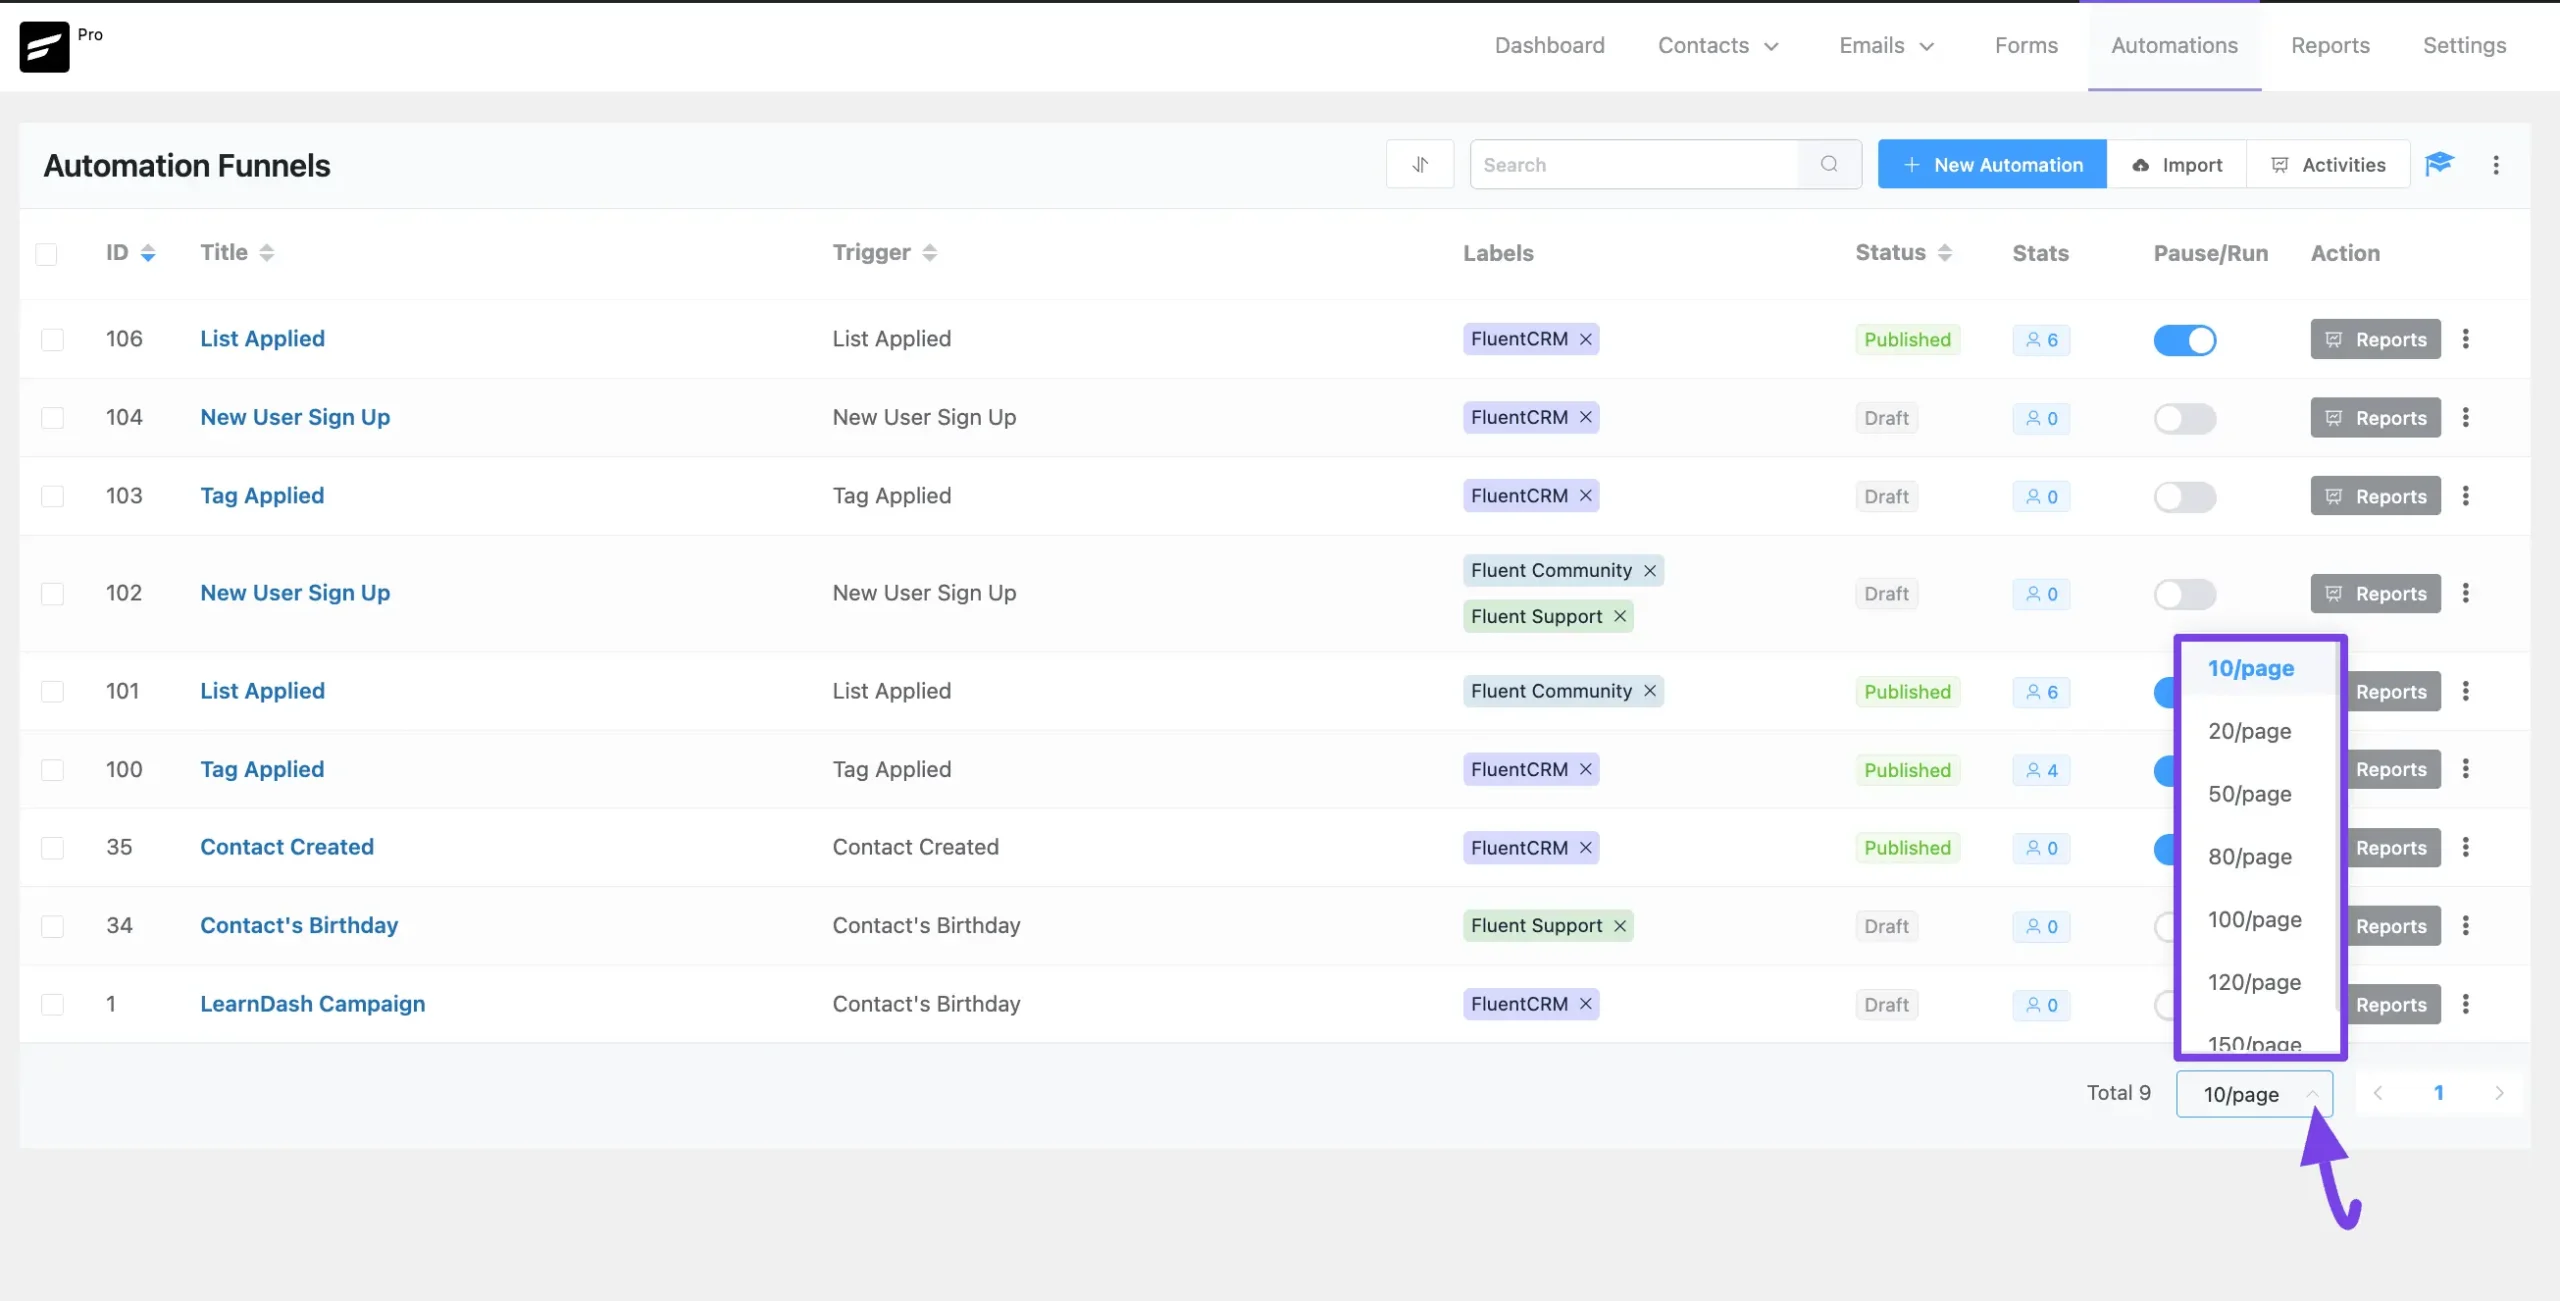
R. Pagination #
Using this dropdown option, you can set how many automations you want to display per page.
Few Useful Guidelines #
Our team prepared a few videos showcasing how automations work inside FluentCRM. You can watch them to get a clearer understanding of FluentCRM automations.
That’s all as an introduction or overview of FluentCRM automation. Please review the relevant elements to learn and start working with FluentCRM automation to build your own funnel in the WordPress website.
If you have any further questions, concerns, or suggestions, please do not hesitate to contact our @support team. Thank you.


Your CRM doesn’t work. Every time I try to save, I get an error “No route was found matching the URL and request method.”
I get the same issue when I try to create an email sequence: “No route was found matching the URL and request method.”
Do you have a solution for this?
Hi Tom, please submit a support ticket as this looks like a user specific issue: https://wpmanageninja.com/support
Hi Nazir,
Thank you for your reply. How do I contact your support team please?
Hey Sumit, Please contact our support here: https://wpmanageninja.com/support
Are you not updating this plugin? Has FluentCRM been discontinued?
Hey Sumit, We have been updating FluentCRM almost every month. You can check out our release notes here: https://fluentcrm.com/category/release-note/
Hello Nazir!
It seems my automation is not getting saved after the data for “Send Custom Email” has been entered. Is there something I may be missing.
Need your assistance please.
Many thanks,
SM
Hey Sumit, Looks like an API issue. Please contact our support.
Can I create a monthly newsletter?
That automatically send a newsletter to certain segments with the latest CPT updates on the site?
Hola, me pueden ayudar
Hice una automatización para una landing page donde se suscriben y les llega un enlace para que puedan descargar el archivo, hice una prueba y el que “El contacto ha sido creado con exito” pero no me llega el correo con la información del enlace para la descarga.
Hola, esto no debería pasar. Creo que algo más salió mal. Póngase en contacto con nuestro personal de soporte para que puedan analizar el problema en un nivel más profundo.
I don’t see that we can send birthday emails using automation as birthday field seems not to be available. is this correct?
Hello, can I add a condition in automation if the user opened the email, if so, send email A if not send email B? Thanks
Hi Flavio, Email open isn’t a good metric. So we don’t have any plan for this feature. Sorry!
In one of the post above, the question of tracking “Email OPENS” got a response from FluentCRM that “email opens are not tracked”. It that true?
Can I track email opens? Every other emailing platform I’ve used tracks email opens. It is crucial to my automations to track: (a) Email Opens, (b) Clicks in an email. How can this be done?
FluentCRM can track email opens. However, this isn’t a good metric to consider because of how email opens are counted. If you didn’t know it yet, most tools track email opens by pixels. So when you simply log into your Gmail account, an email is recorded as “opened”. If you mean link clicks by “Clicks”, yes, you can track link clicks by using the goal benchmark or by simply using a SmartLink(Settings>SmartLinks).
No, unfortunately FluentCRM has no Trigger for Datefields.
This would be a huge step for FluentCRM but at the Moment… no chance.
Stay tuned – I am looking forward to get this soon. They just released a great update an w went PRO