WooCommerce is an open-source e-commerce plugin for WordPress. With FluentCRM‘s WooCommerce integration, you will gain more leverage over your customer relationships & discover new insights that weren’t used before.
FluentCRM automatically integrates with WooCommerce and lets you automate various tasks including contact creation, segmentation, and marketing automation. Just follow this simple guide to learn how to automate these tasks with FluentCRM!
*Tutorial: Beginners Guide to WooCommerce Email Marketing Automation
WooCommerce Opt-In Checkbox #
Whenever a user places an order from WooCommerce, they can be imported automatically as a subscriber in FluentCRM. But in order to remain compliant with email marketing rules and regulations, you might want to get consent from your users. For that, you can add WooCommerce Checkout Subscription Field to the WooCommerce checkout form.
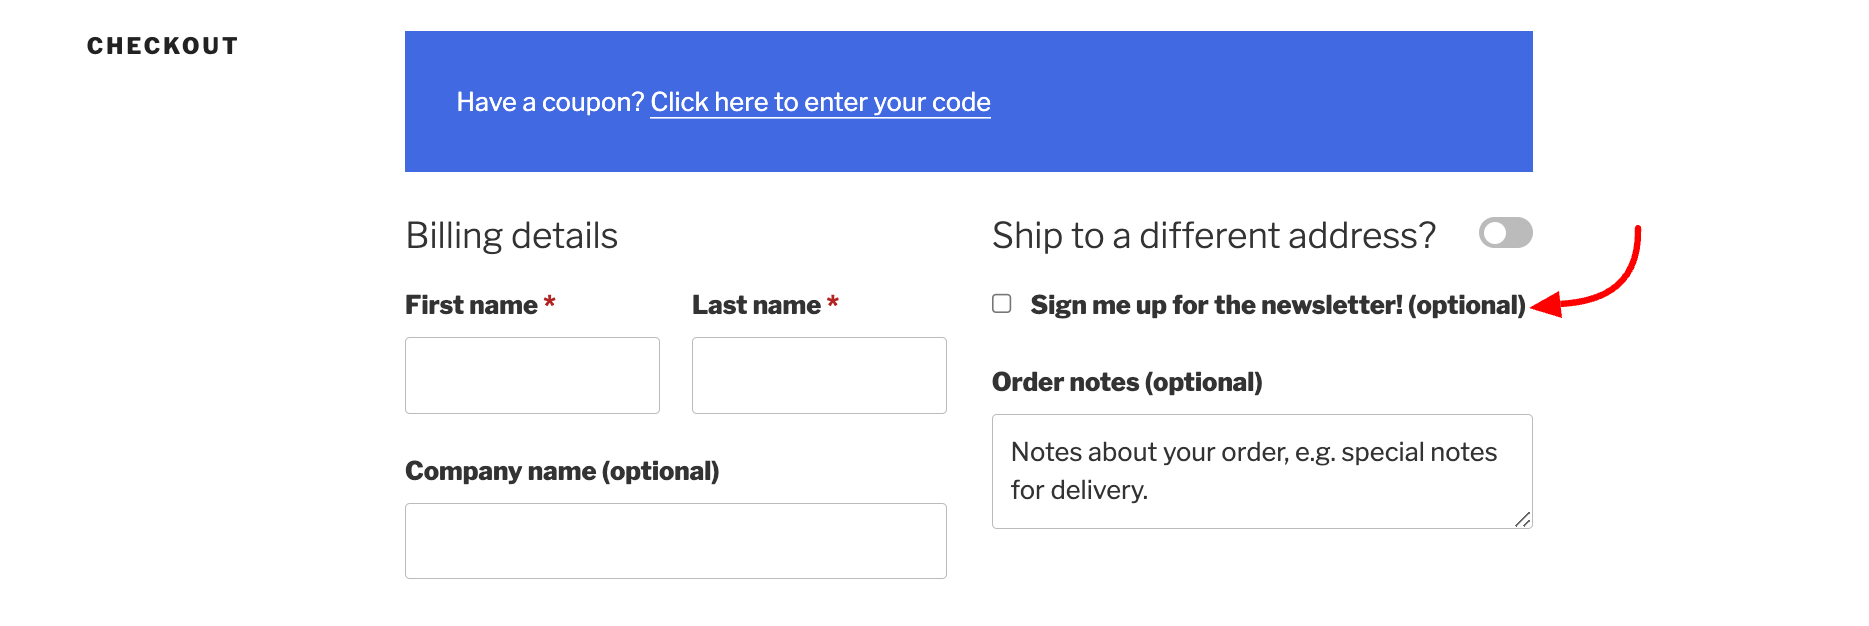
To add WooCommerce checkout subscription field, go to Settings>General Settings and choose to Enable Subscriber Checkout to WooCommerce Checkout Page.
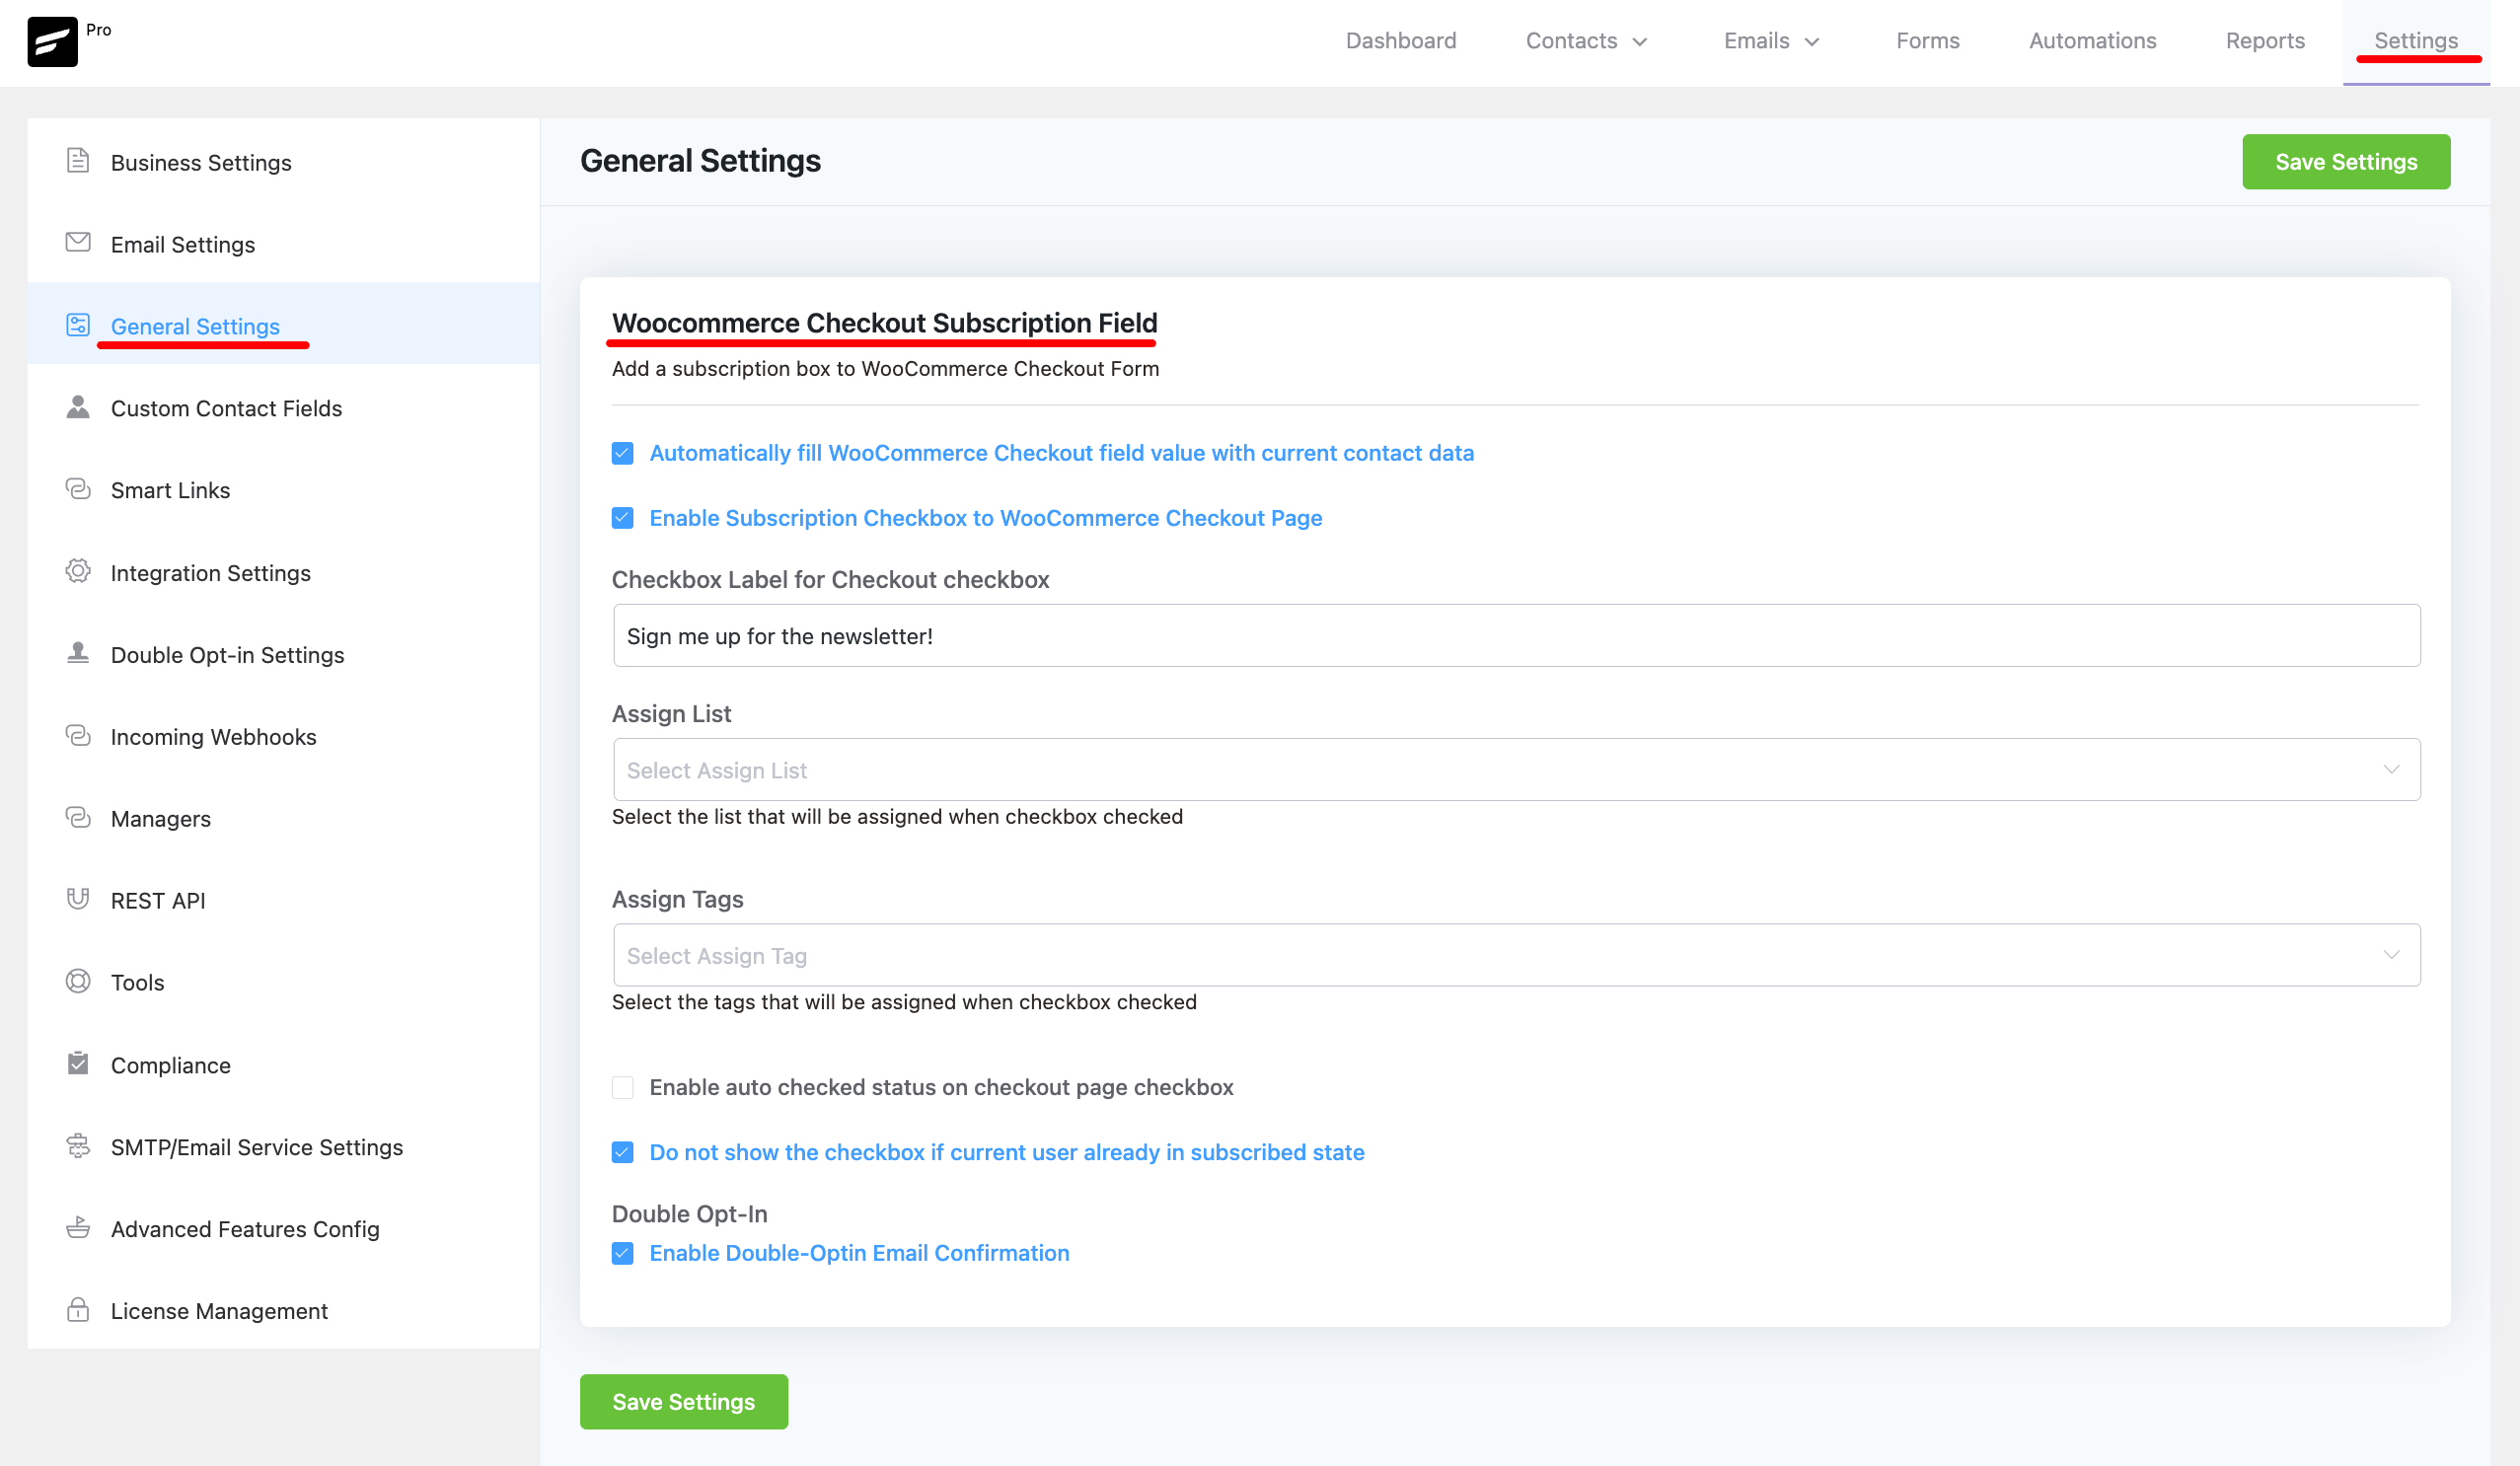
Here are the details for the other settings:
- Checkout Label: Give a label for the checkbox.
- Assign List: Assign the contacts to your particular contact List.
- Assign Tags: Assign the contacts to your particular contact Tags.
- Auto Checked: Enable the checkbox automatically for the customer.
- Do not show Checkbox: Hide the checkbox for the customer if he is already added in the FluentCRM subscription list.
- Double Opt-in: Enable double Opt-in email from the contacts.
Contact Segmentation #
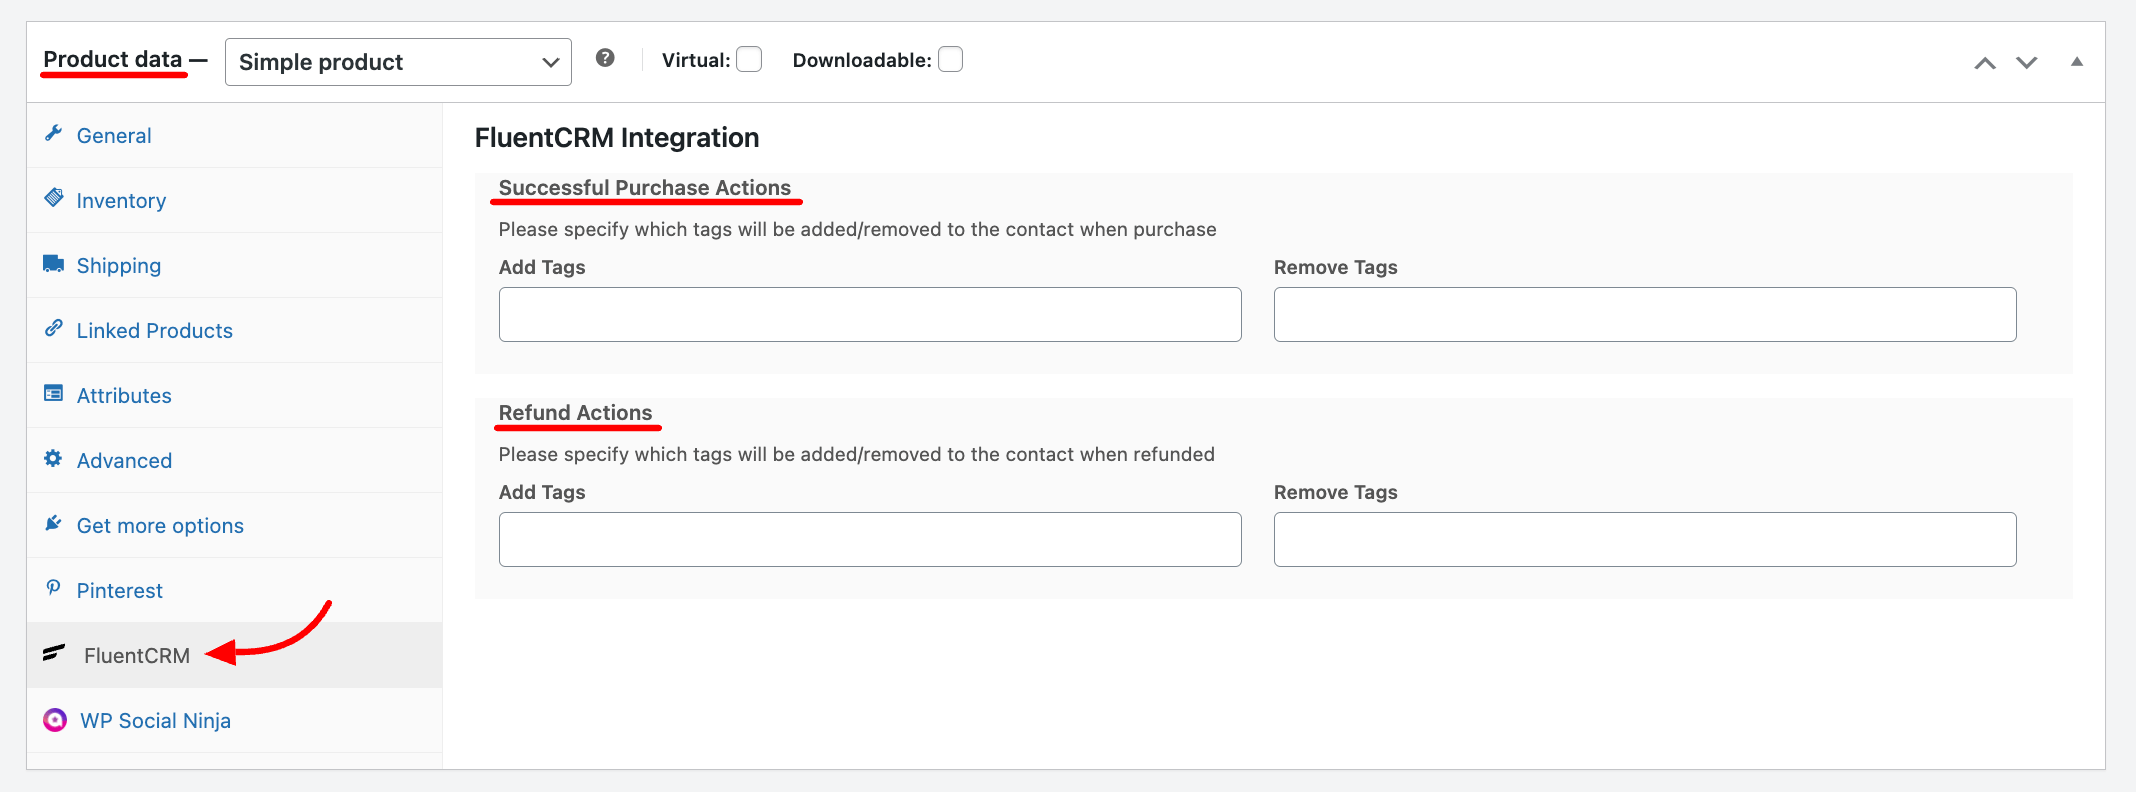
FluentCRM also lets you add or remove tags to contacts based on Product Purchases and Refund Requests.
In order to apply tags to contacts, open WooCommerce product editor and click FluentCRM from the product data section. Next, select which tags you want to add or remove when someone purchases your product. You can also do the same when refunds actions happen for the same contact.
WooCommerce Marketing Automation #
FluentCRM also allows you to automate a wide range of tasks such as sending behavioral emails, email sequences, and many more.
FluentCRM’s email marketing automation includes four major elements. These are:
- Triggers: Triggers are essential for initiating email marketing automation. They can be behavior-based, or time-based. Learn more about FluentCRM’s Triggers.
- Action Blocks: The actions that will be done throughout the funnel for example sending an email, adding the user to a list, etc. Learn everything about FluentCRM Action Blocks
- Benchmarks: Benchmarking the behavior of the users for example whether they purchased a product, clicked into a link, etc. Learn everything about FluentCRM Benchmark Blocks
- Conditionals: Conditionals will let you set multiple paths based on if/else conditions. Learn more about FluentCRM Conditionals
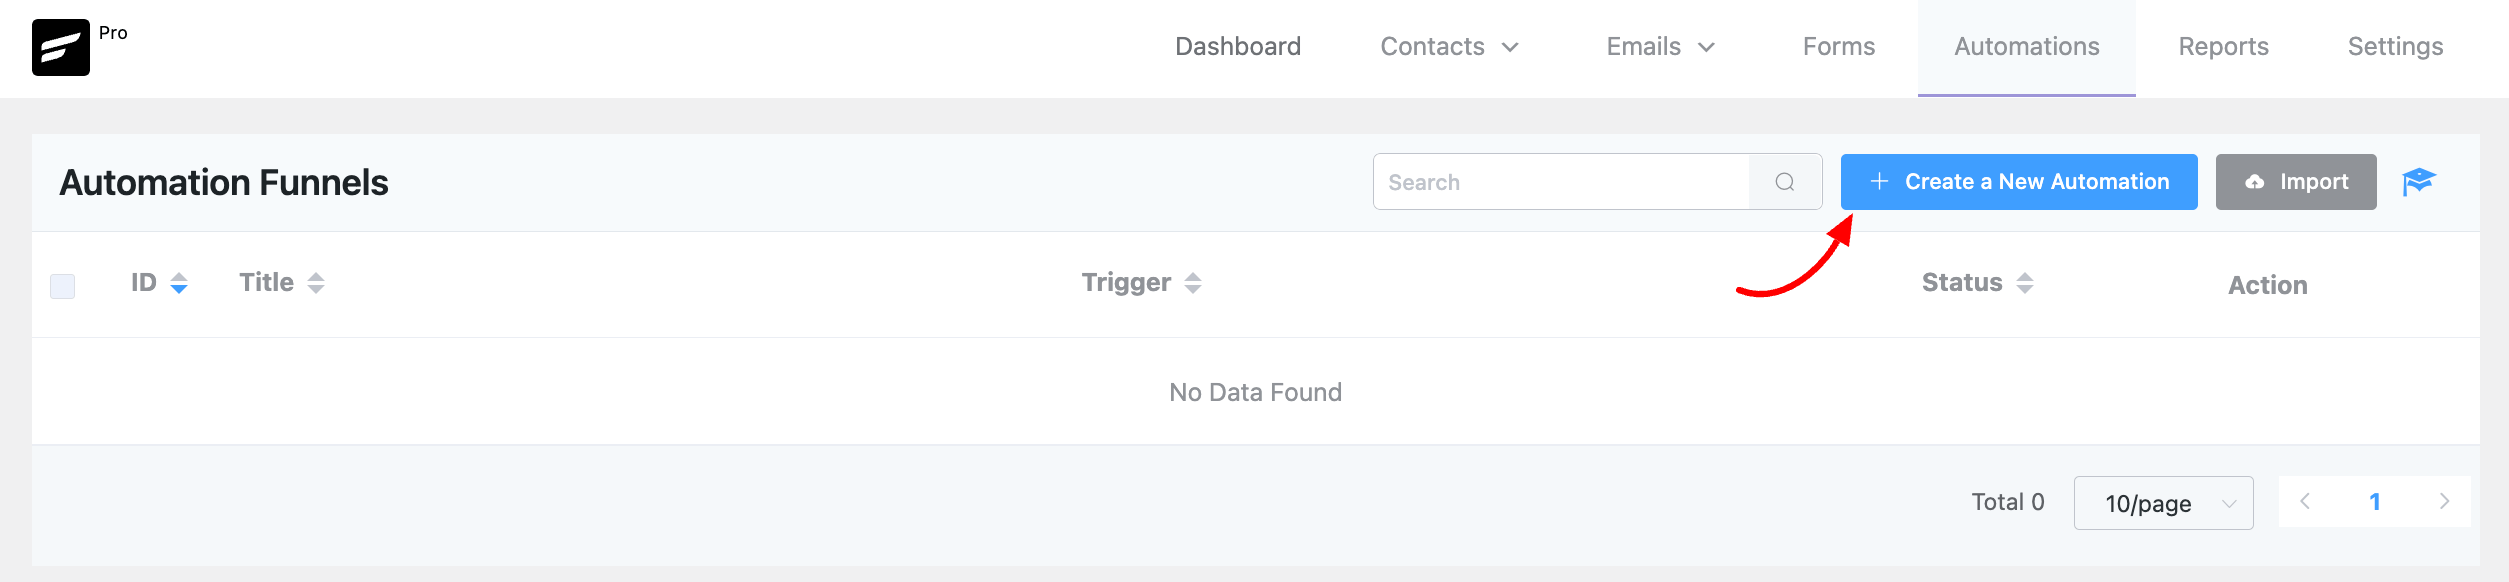
At first, from your FluentCRM dashboard & go to the Automations option. Then click on the Create a New Automation button to add an automation funnel.
You will notice a pop-up window appear, where you have to add a suitable Internal Label. And then select WooCommerce from the Category option.
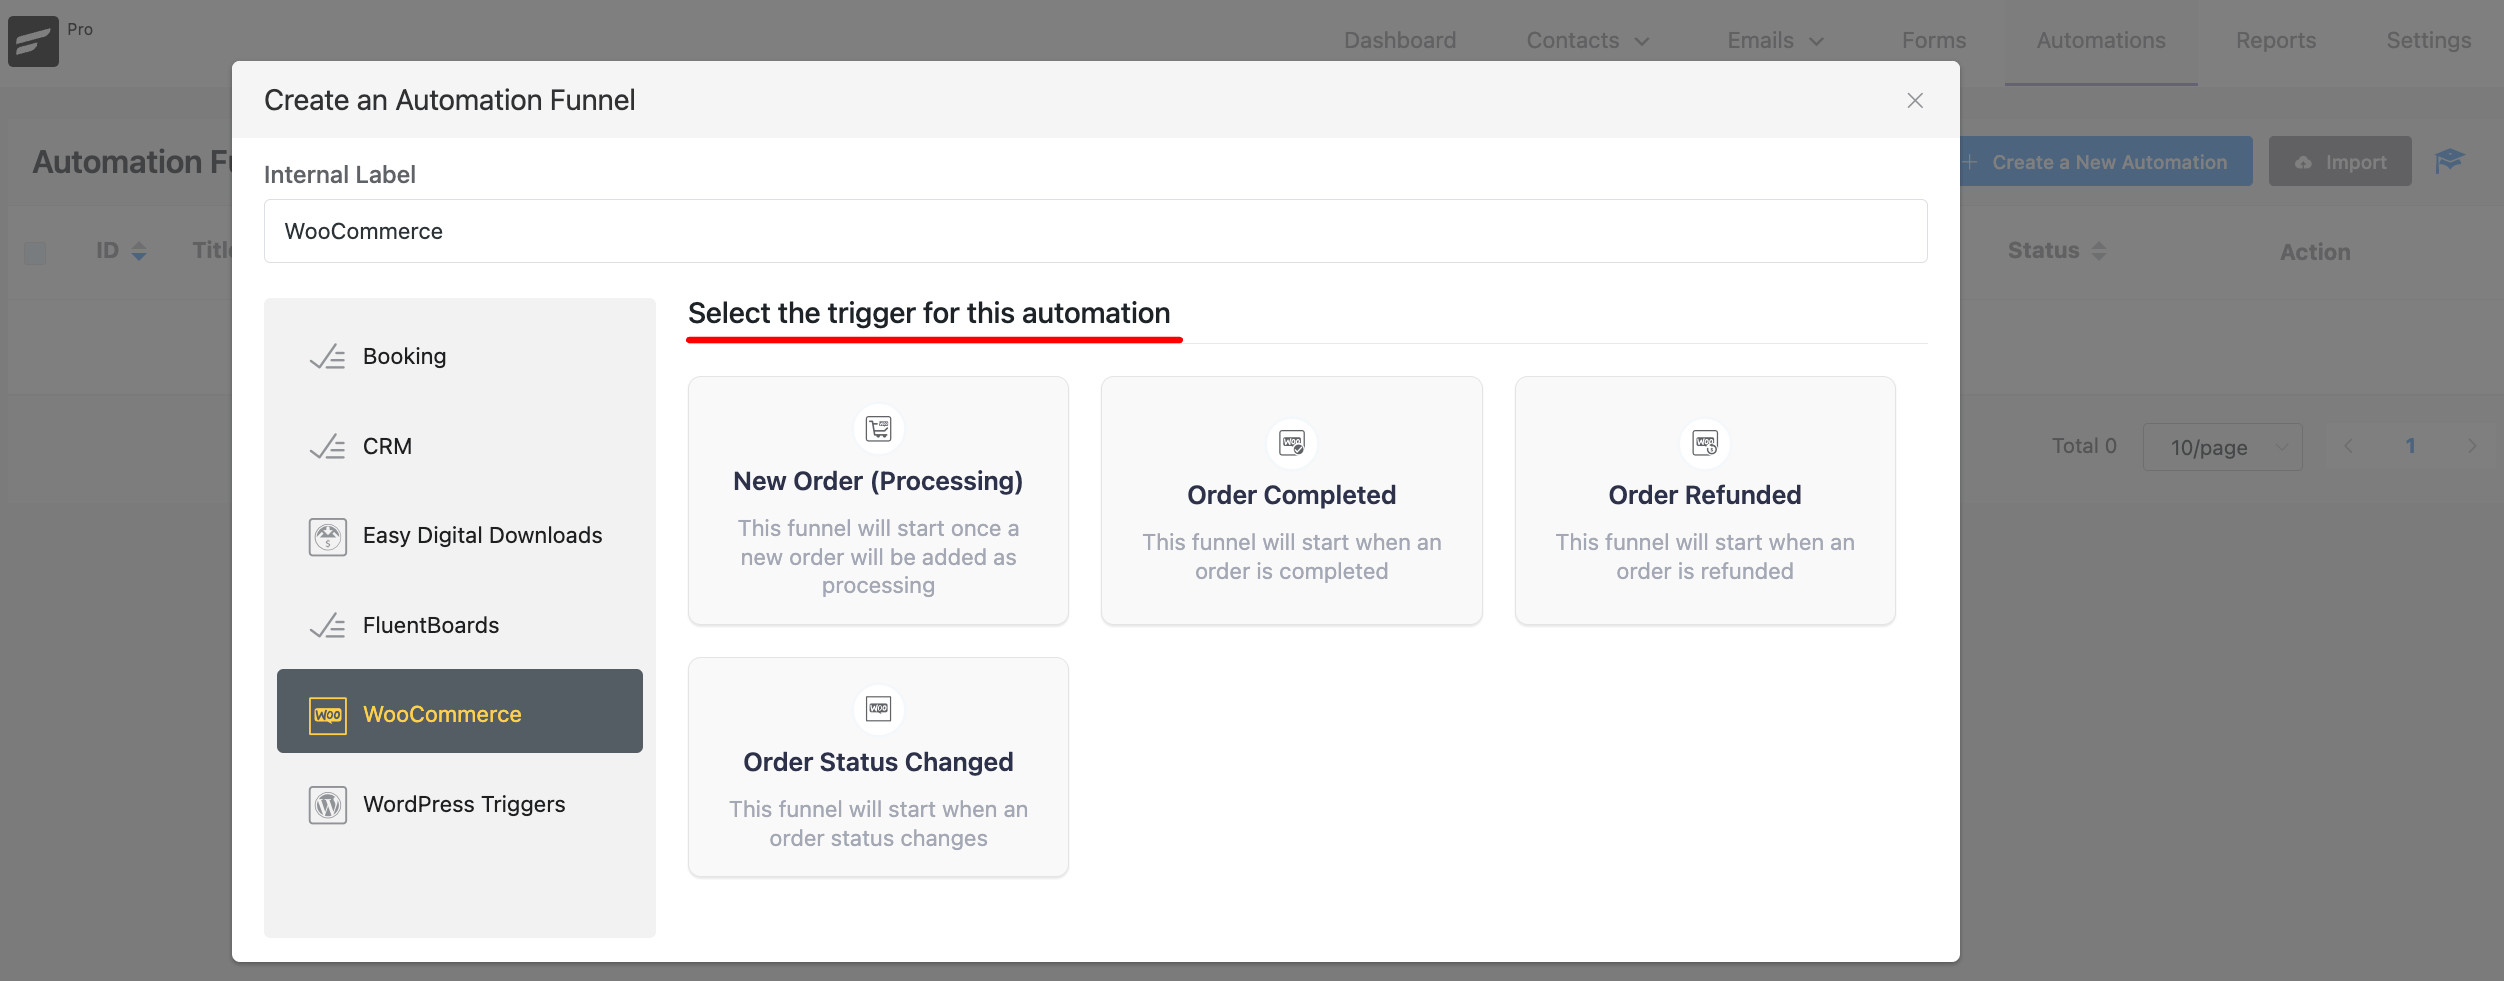
From here, you can select one of four available triggers. Currently, available WooCommmerce Triggers are
- New Order(Processing) – This will trigger the automation funnel once a new order is placed on WooCommerce for the targetted products, product category or all products.
- Order Completed – This will trigger the automation funnel once an order has been marked as completed in your WooCommerce store for the targetted products, product category or all products.
- Order Refunded: This will trigger an automation funnel once an order gets refunded for the targetted products, product category or all products.
- Order Status Changed: This will trigger an automation funnel when an Order status changes.
For demonstration purposes, we are using the New Order(Processing) trigger. So, this funnel will start once a new order is added as processing. Click on the Continue button.

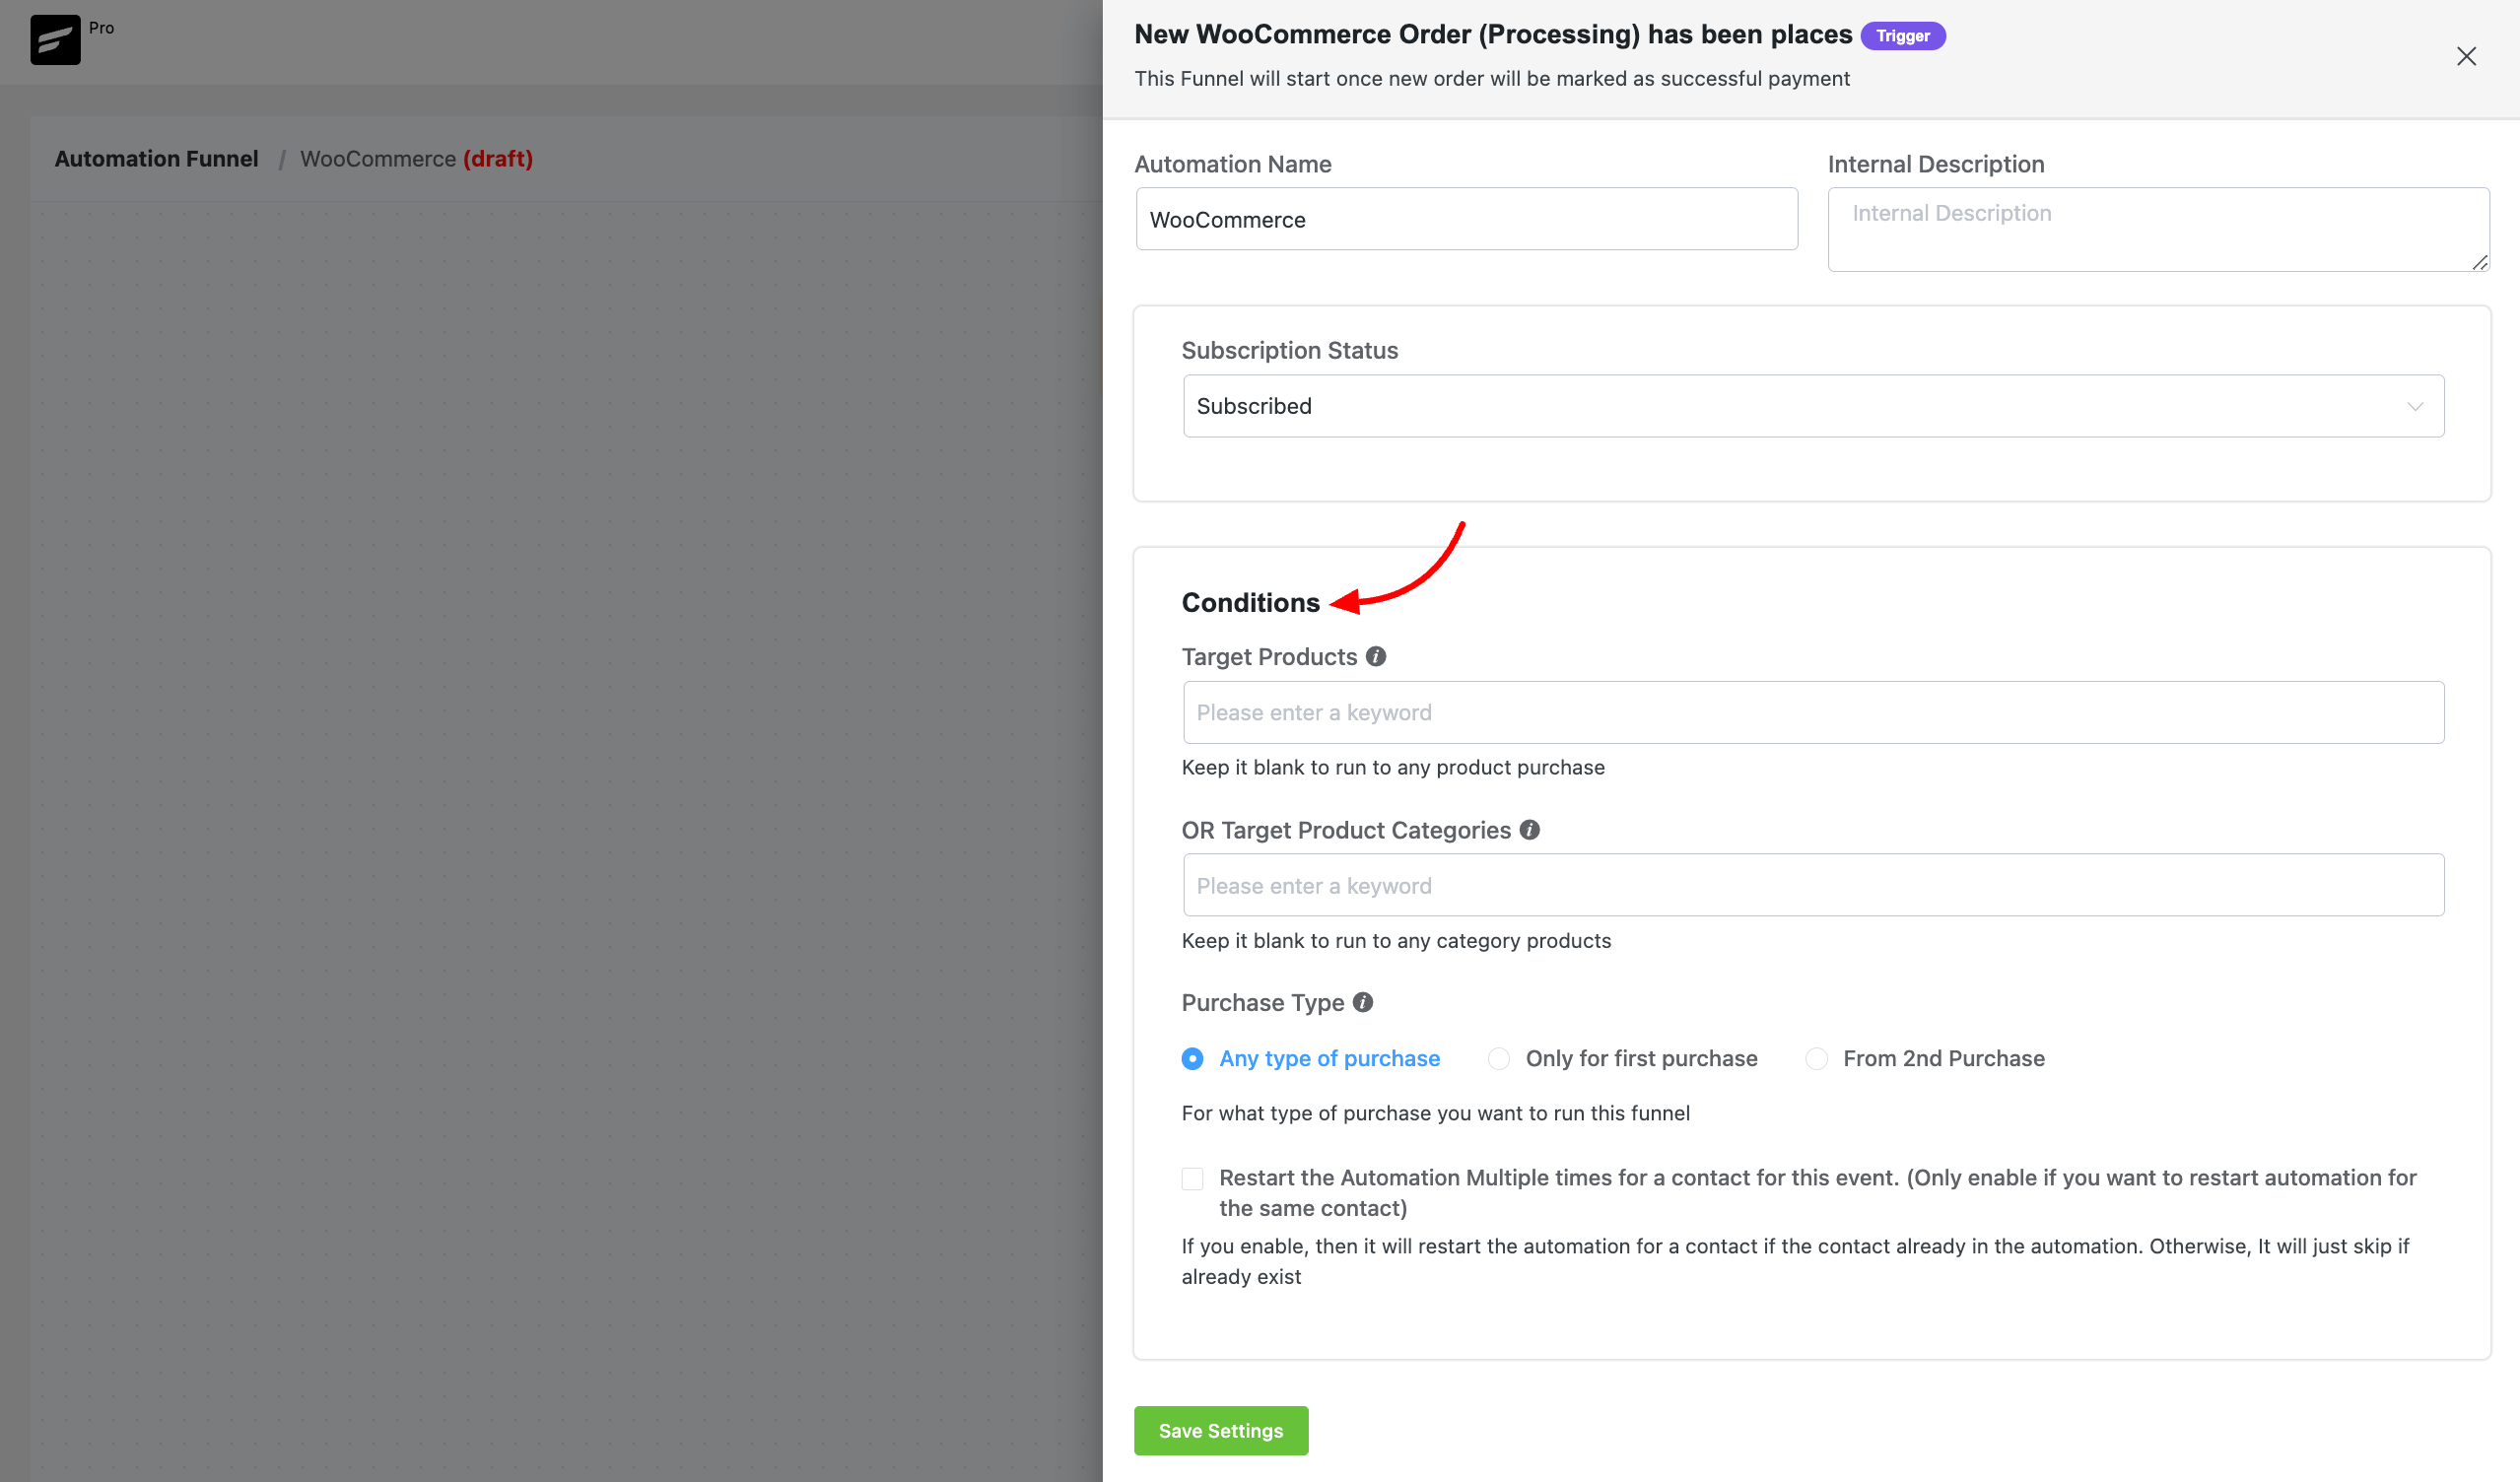
Next, a pop-up box will appear with some options to set up the funnel automation. Add a Funnel Name & choose the Subscription Status, you can choose from Subscribed, Pending & Unsubscribed. If you choose the Pending option, the contacts will join as pending contacts and FluentCRM will automatically send an opt-in email.
In the Conditions section, choose for which products this automation will run using the Target Products option. You can also keep it blank to run to any product purchase. With Target Product Categories, you can select from which product category the automation will run.
Choose the Purchase Type for what type of purchase you want to run this funnel. There are three options; Any type of purchase, Only for first purchase & From 2nd Purchase. Click the Save Settings button when you’re satisfied with the trigger configuration.
Action Block
Actions blocks are tasks that you wish to trigger from your side. Click on the plus icon on the Automation Funnel page. Then you will notice a pop-up appear with a set of action blocks to choose from.
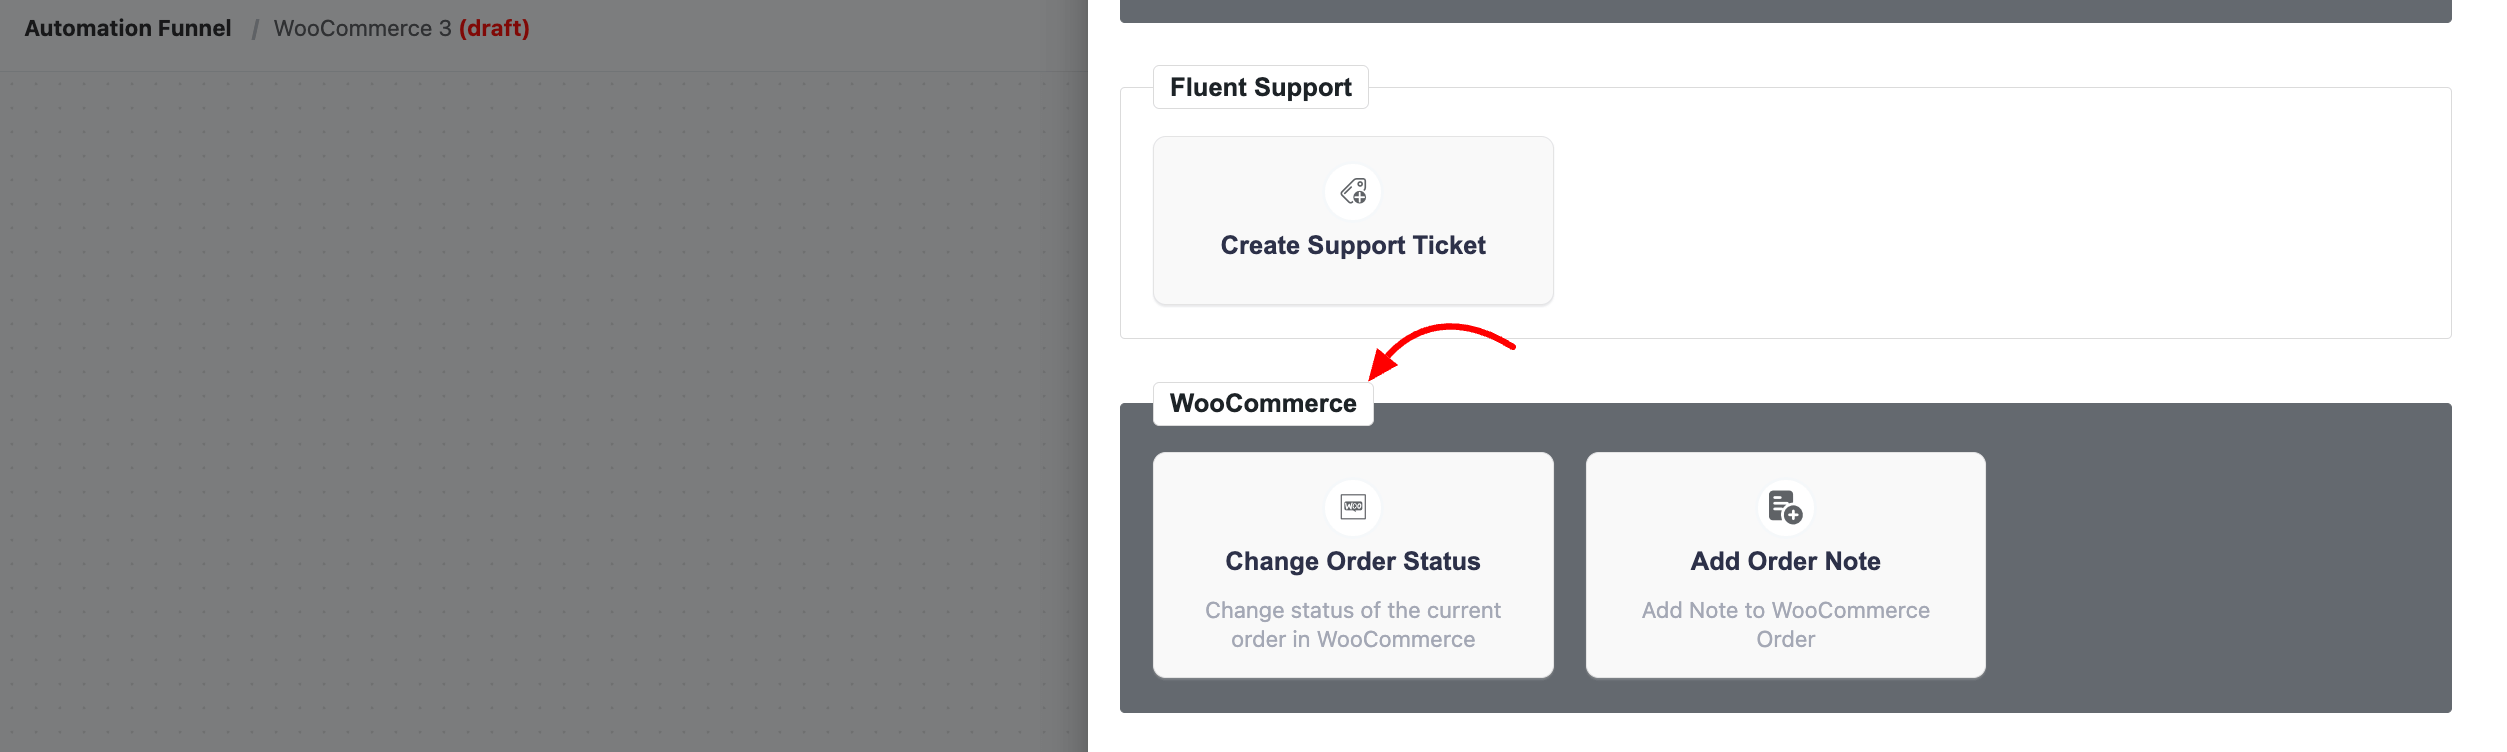
From here, you can choose any type of action block. FluentCRM offers 15 action blocks and two specific action Blocks for WooCommerce marketing automation.
The specific action blocks for WooCommerce include:
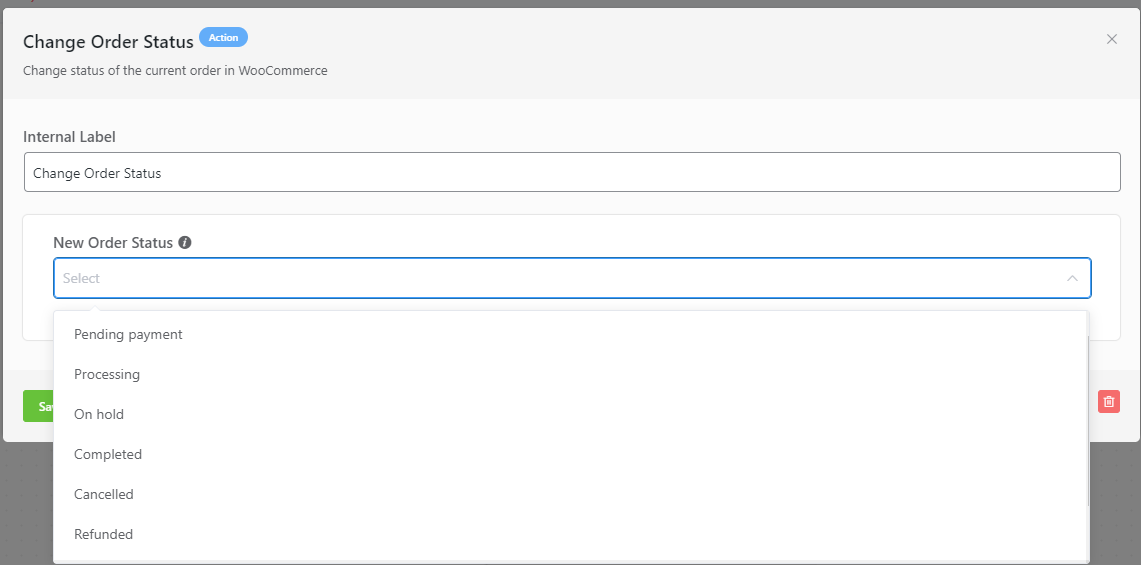
Change Order Status(WooCommmerce Only): This action lets you change the order status in WooCommerce for the contacts within the automation funnel.
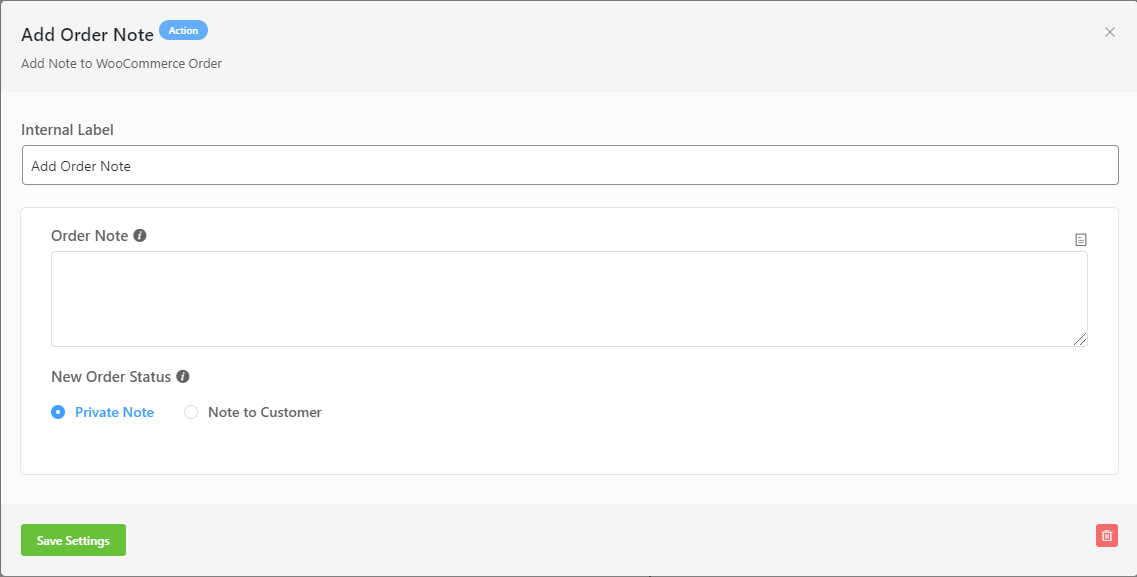
Add Order Note(WooCommmerce Only): This action lets you add a Private Note or Notes to Customer in WooCommerce for the contacts within the automation funnel.
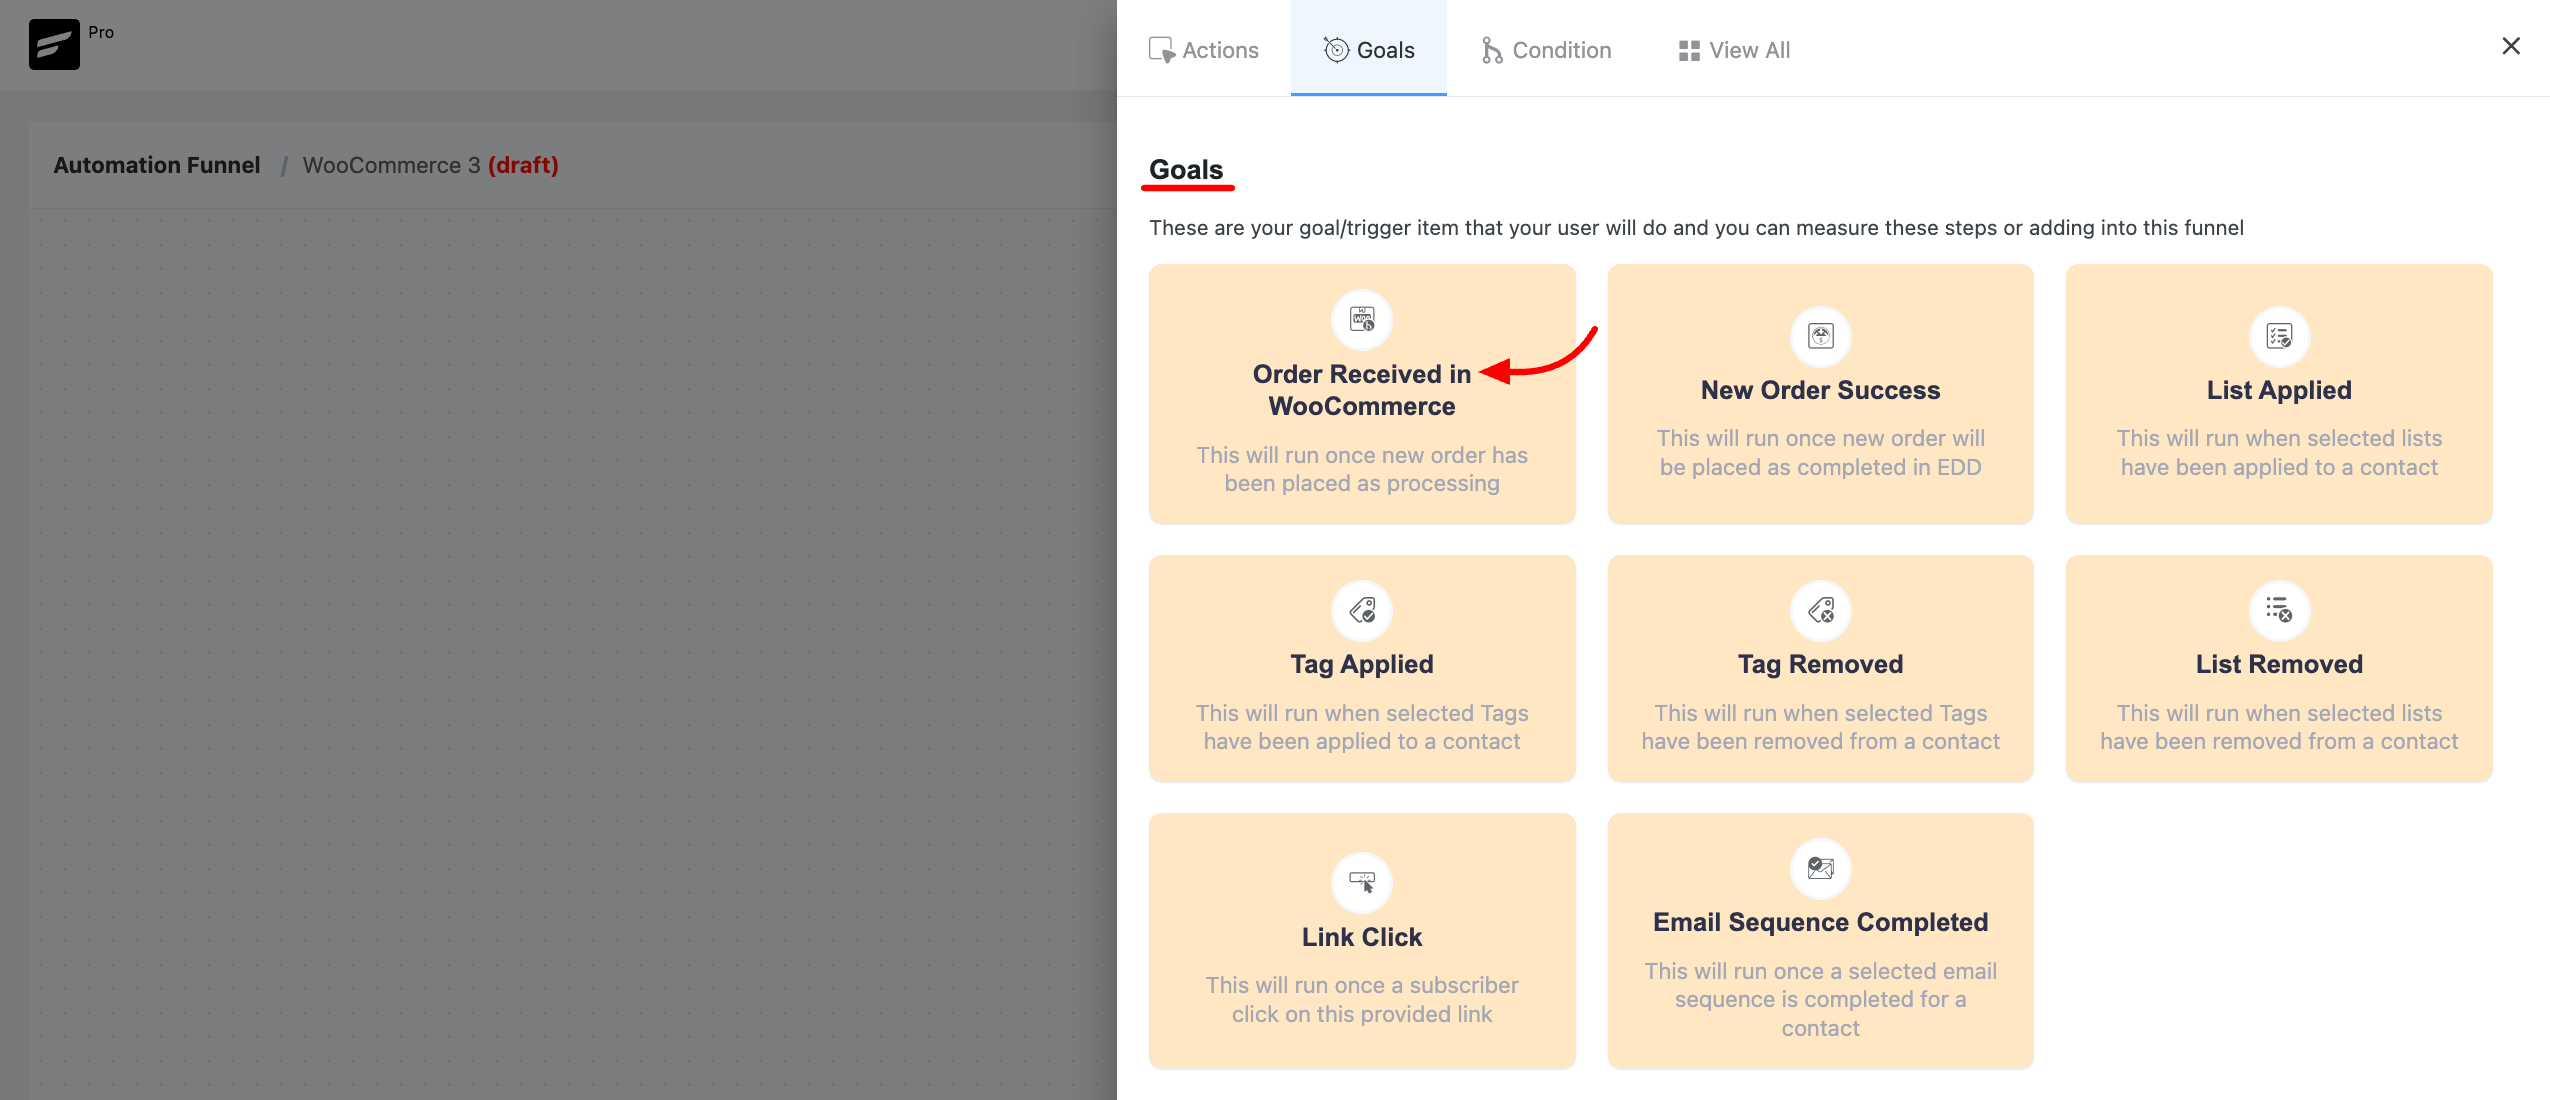
Goals/Trigger Block(Benchmark)
Goals/Trigger blocks are goal or trigger items that your user might do. They let you measure these steps and automate the funnel based on goal completion.
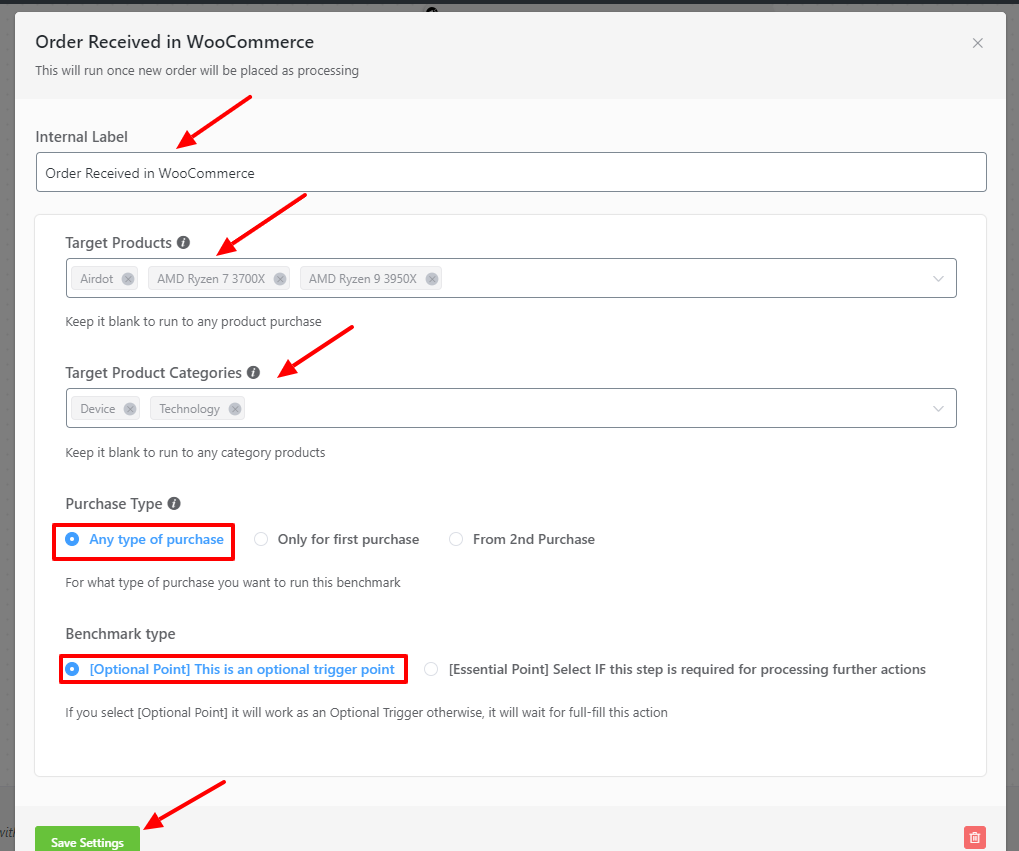
Click on the plus icon(+) to open the pop-up for selecting the Goals. For WooCommerce, you can choose Order Received in WooCommerce goal. This trigger block will run once a new order is placed as processing.
In this block, you can add an internal label, choose target products, target product categories & Benchmark Type.
Please check our documentation if you want to use other goals or benchmarks.
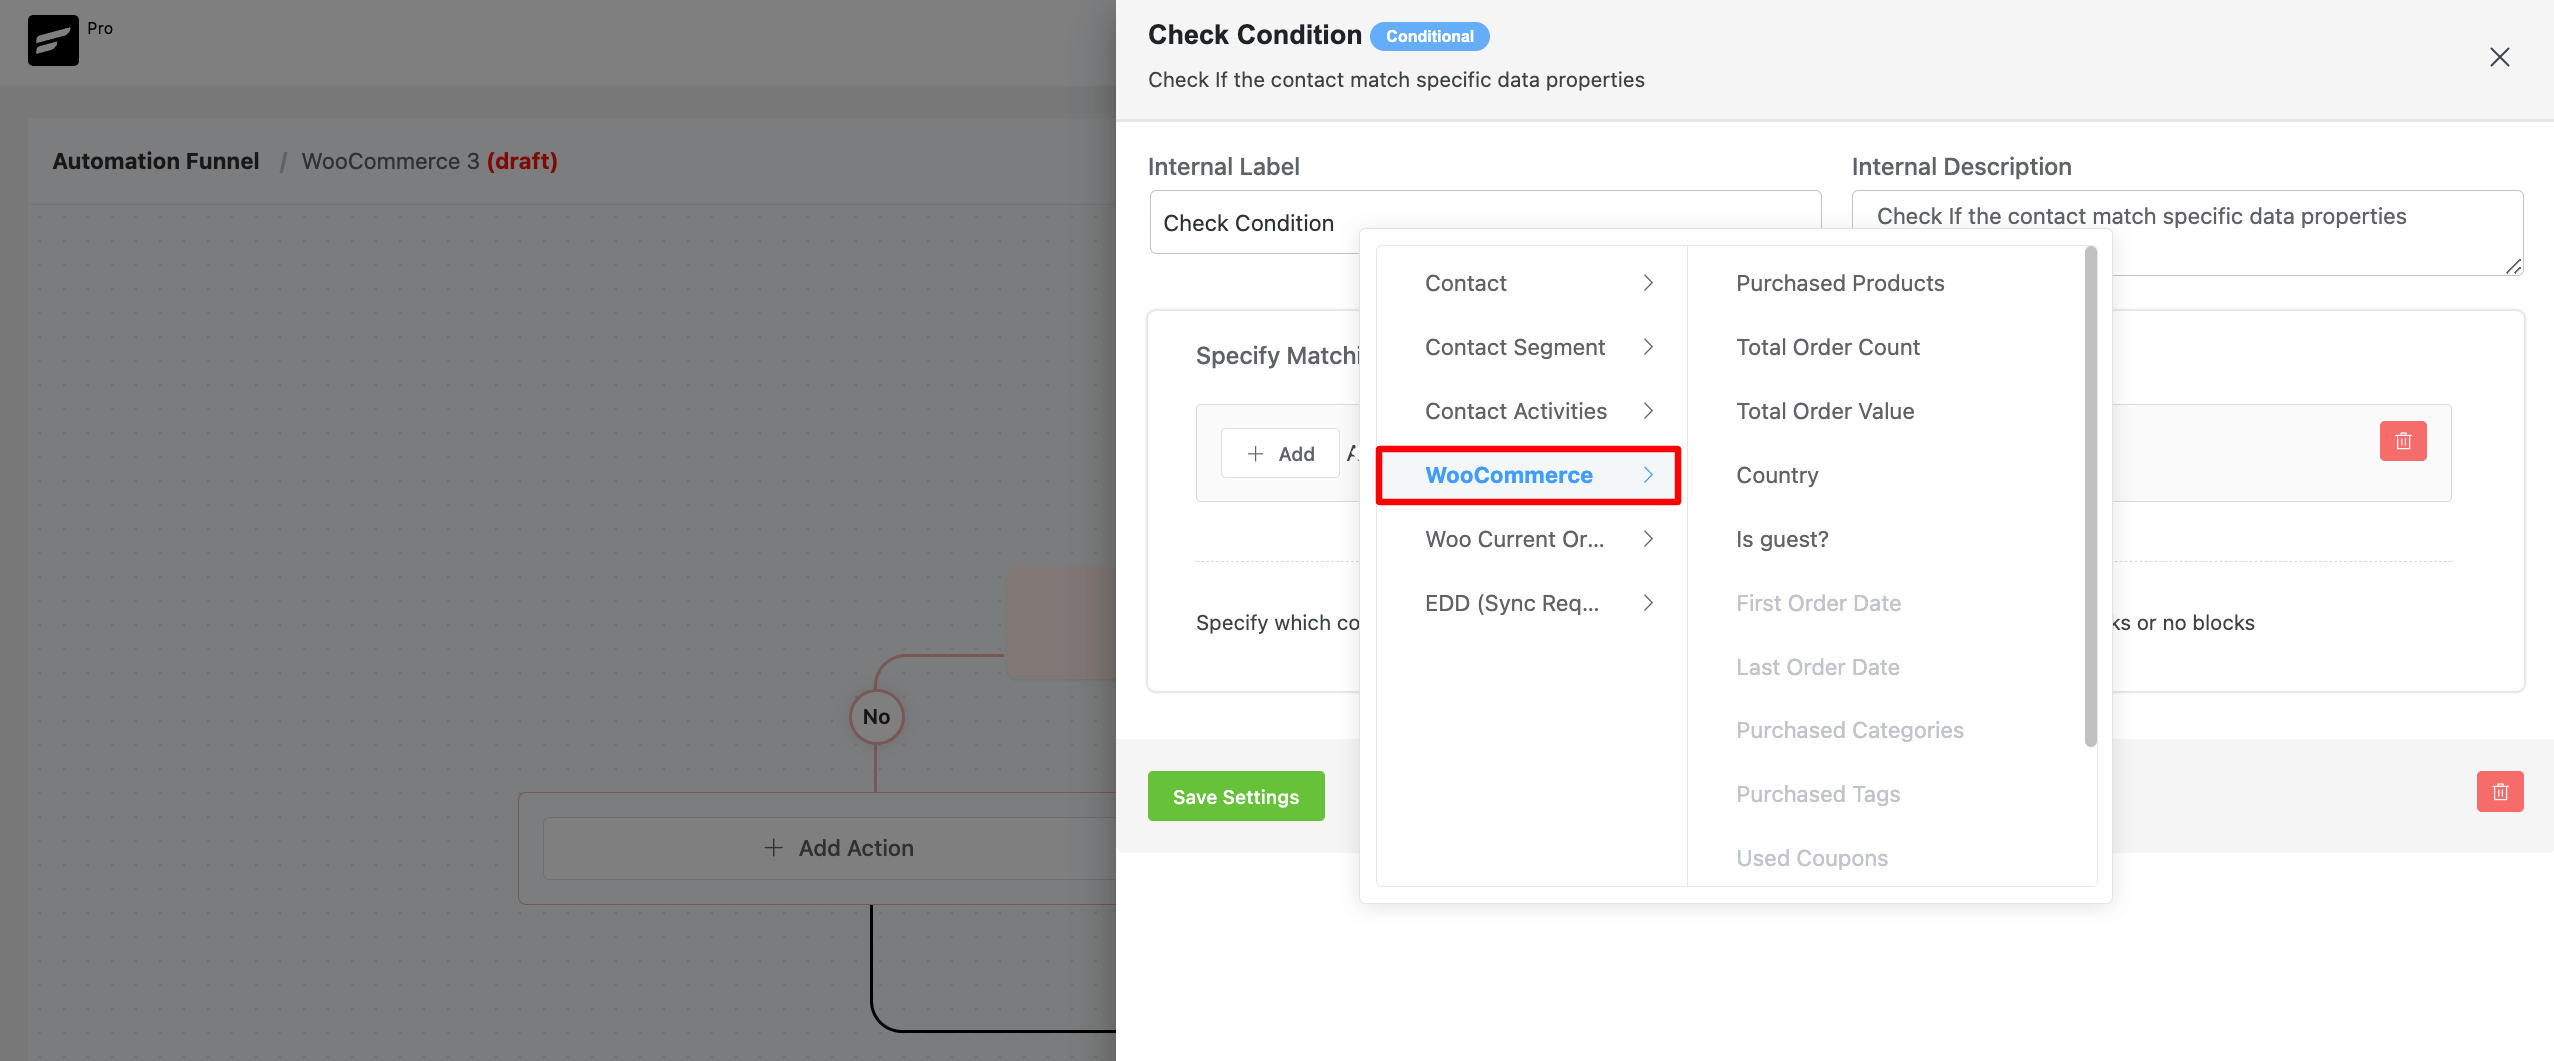
Conditions
If you want to automate different activities based on If/Else conditions, you can choose a condition. For WooCommerce, FluentCRM allows you to automate different activities based on Conditions.
If you want to use other conditionals please check out this documentation.
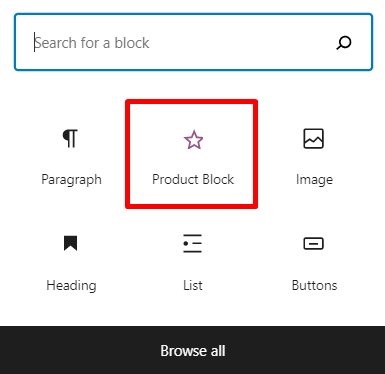
Product Block(for Email Templates)
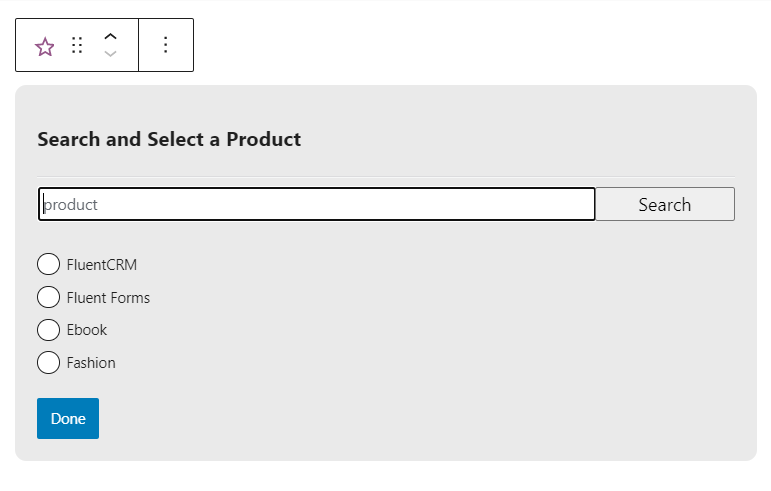
FluentCRM also allows you to add products to your email templates with ease. If you’re using WooCommerce, you’ll notice a Product Block. This block lets you automatically fetch WooCommerce products within your email template with a purchase button.
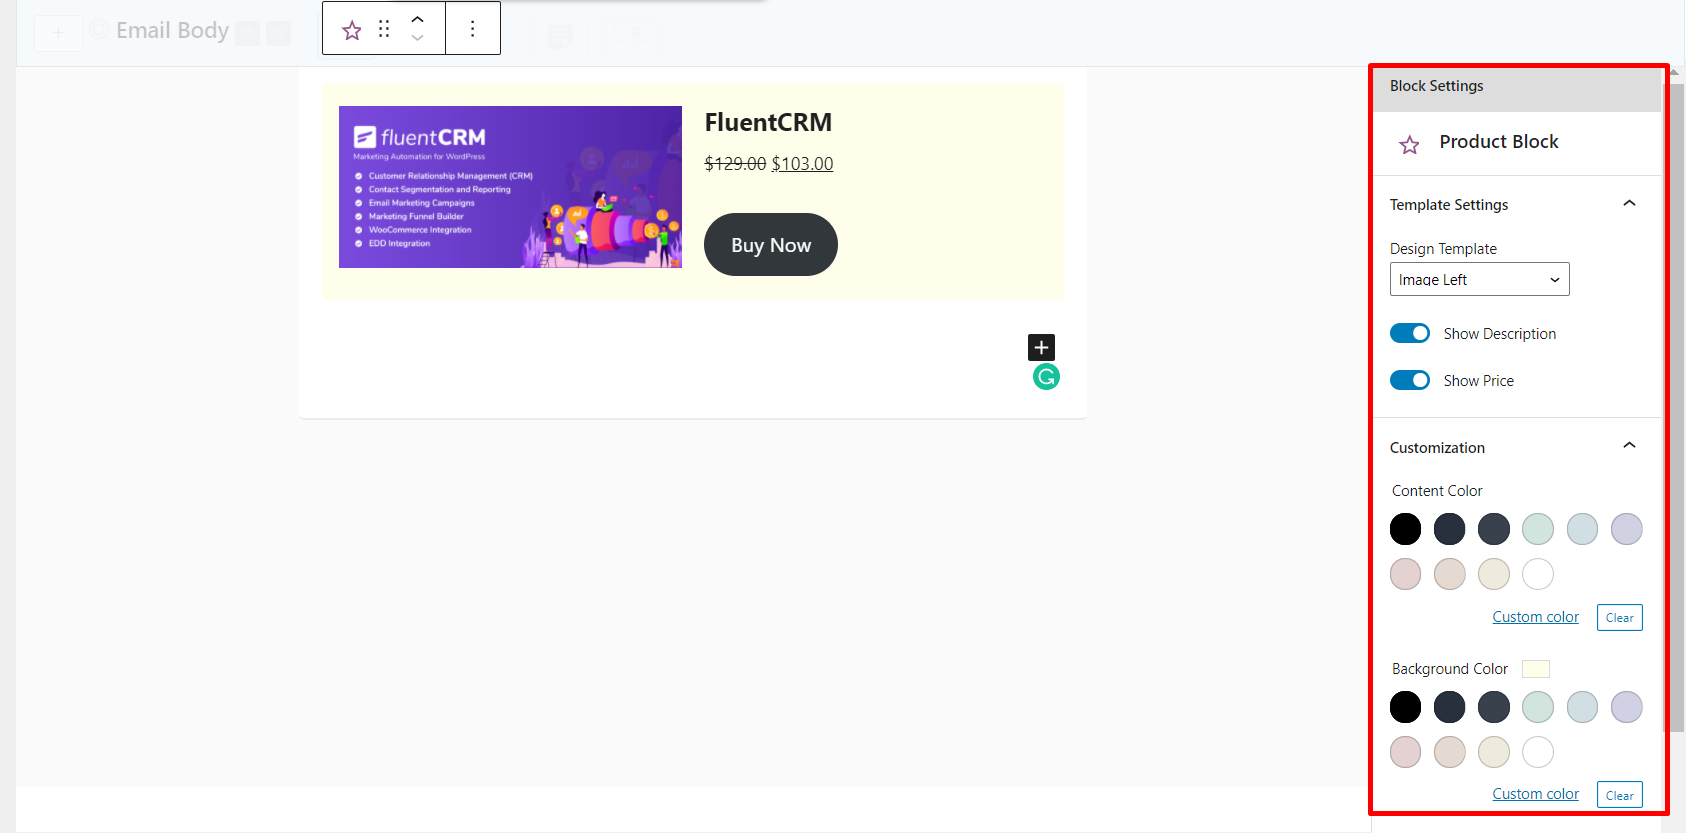
To add a product block for selling your products on WooCommerce, select the Product Block. Next, you’ll be asked to select your product. Choose the product you want to add and hit Done.
Once you have added the product, you can show or hide the product description, price, and colors of your content, content background, etc.
So that’s it for WooCommerce Marketing automation. If you want to get started right away, don’t forget to check out our WooCommerce tutorial below:
*Tutorial: Beginners Guide to WooCommerce Email Marketing Automation


Is it possible to select product variations instead of the parent products?
Yes, you can select product variations instead of parent products
Hi, it’s 2024 already, and reminder 6 months to 2025.
Any news about the cart abandoned feature request?
As an E-commerce Platform, It should provide the cart abandoned feature
We will be adding it to our product soon. Wait for our next product update.
Hey Dana,
Good News. Abandoned Cart is here! Check the link below:
FluentCRM — Abandoned Cart
Hi, it’s 2023 already.
Any news about the cart abandoned feature request?
Regards
Dear Niko,
We have just brought Abandoned Cart feature in FluentCRM. Check the link below:
FluentCRM — Abandoned Cart
Hi.
1. Is the cart abandonment email available yet?
2. Can we send transactional emails for Woocommerce using Fluent CRM? If yes, is there any template for the transactional emails?
Hello, can you create a reminder to customers to leave a review after purchasing a product?
hi team, since 2 years, yes since 2 full years i hear every few month that abandond cart trigger is coming in a few weeks. i feel completely screwed. don’t get me wrong, i’m happy with your products, but this way of dealing with promises is shameful.
I m waiting for the abandonned cart automation for woocommerce since 1 year to purchase your plugin but still no solution. Desperate…
Hi, is there any estimation when the abandoned cart trigger will arrive?
abandon cart please
Hi, does Fluent CRM integrate with Woocommerce Memberships Plugin?
Hi Manju, WooCommerce memberships integration isn’t available yet. We have a plan to integrate.
Hi! Is there any update on this? Waiting for this addition! Thanks 🙂
I mean the Abandon cart trigger ? Where can i found it?
Any Update? Where can i found it?
Can it replace the default Woocommerce order notification emails? It should have the order information and shipping.
Can I segment users who are already on the system (pre fluent CRM) according to previous purchases. E.g. everyone who purchased product X can be added to segment X
Hi Lal Krishna, Not yet. But we are working on an importer that would allow you to do so and even more.
Hello,
Is there an automation to recover the abandoned carts and to be able to send an email if the person has already indicated an email during the order step.
Thanks in advance,
Any update on the abandoned cart trigger?
Dear Rainer,
Good News! We have just brought Abandoned Cart feature in FluentCRM. And, Cart Abandonment trigger will be found in Automation section.
Check the link below for detail update:
FluentCRM — Abandoned Cart
Dear Richard,
Good News! You can recover your abandoned carts with FluentCRM. It’s here. And, you will get custom automation templates in Automation panel as well.
Check the link below for detail update:
FluentCRM 2.9.2
Hi Nazir,
Is this feature only available in the paid version of Fluent CRM?
Hi Ana, WooCommerce integration is only available in FluentCRM’s Pro version.
Does FluentCRM have to be on the same site/domain as WooCommerce or can it be in a separate install?
Yes, FluentCRM has to be on the same site as WooCommerce. Alternatively, you can use automator plugins to send data to FluentCRM.
Hello Nazir … I think the ideal would be to have FluentCRM running on an external server, like running your own privately owned ActiveCampaign or Drip.
Towards that end, I’m hoping for your feedback about this:
WP Fusion has a REST API connection with FCRM. (I’m sure you are aware of this already.)
Does this WP Fusion REST API connection provide the same deep integration with woocommerce as if both tools were running on the same site?
In this article, you outline a very deep integration with woocommerce, including things like behavioral triggers. I’m assuming that behavioral triggers cannot be configured via the WP Fusion API connection, and that FCRM is required to be installed on the same site in order to use these, correct?
Thank you for your time!
Hi there,
When i go to select a product in the conditions it says no data found. So i can’t create an automation for the specific products that I want. Can you please help resolve this?
Hi Anthea, looks like you need assistance from our support: https://wpmanageninja.com/support
Does FluentCRM have to be on the same site/domain as WooCommerce or can it be in a separate install?
Does FluentCRM have abandoned cart yet?
Yes it’s available now. Check the link: FluentCRM — Abandoned Cart
Hi, I have an eCommerce funnel in Cratflows which uses Woocommerce to process orders. I want to have buyers sent to Fluent CRM. I have tried all that is described above Woocommerce checkout subscription field has been enabled, but unfortunately, it does not appear on the checkout. However, as I understand, this step is not mandatory to have buyers subscribed to your list in Fluent CRM. This can be handled by automation > New purchase sign up – New order (Processing) > Apply list.
Orders appear in Woocommerce orders tab with a status processing, but the contact is not pushed into Fluent CRM. I am setting that up on a Fluent CRM pro.
Hi Gregor,
Maybe there’s a plugin conflict issue or something else. Could you please submit a support ticket?
Hi, i have the same issue and opened a support ticket, the reply was that FluentCRM is not yet integrated with CartFlows and the woocommerce optin does not show there yet. Any idea when this integration will be added?
Hi Zeidan, There’s a conflict at this moment. We’re working with them to fix the issue.
Hi, To welkom my new customers I like to send an order confirmation, currently by Woocommerce, but would like to have all emails going via the SMTP provider and FLUENT SMTP.
How can I dynamically list the purchased products in an email?
Is Fluent integrated with Woocommerce?
Thansk Christiaan
Hi Christian, I’m not sure about your query. but from my understanding, you want to send WooCommerce order confirmations via your email SMTP service. in that case, you need to configure WooCommerce email sender by replacing your admin email with the SMTP email on the FROM field. Dynamic WooCommerce segmentation isn’t available yet. but if you want to simply tag, just select a new order trigger and apply a tag.
FluentCRM looks very interesting but are these scenarios possible:
1. I have customers who didn’t create an account during the checkout therefore FluentCRM is not able to grab them during Import of a “WordPress Users”. Is there any way using for example import of a CSV file to grab these customers along with their orders?
2. If I create an automation based on a new order from WooCommerce and define in this automation to subscribe customer is this customer will have his order visible in “Purchase history” tab?
As you can see my goal is to subscribe users ALONG WITH THEIR ORDERS based on the customers who didn’t create an account.
1. Simply enable the WooCommerce subscription checkbox. FluentCRM will capture the contacts.
2. Yes, FluentCRM automatically store’s all purchase history. There’s no relation between automation and purchase history.
Hello, is it possible to have an email sequence for a product in transit, or once the product has been delivered?
You’ll need to think critically about a product in transit automation. So unless you share the details I really can’t tell if it’s possible or not. However, the only issue I guess would be canceling an email sequence once it’s triggered. This is possible if you can time a “cancel sequence” block in FluentCRM’s automation.
After delivery automation is possible!
Is it possible to set a tag for FluentCRM inside WooCommerce so that when someone purchases a product it will automatically assign that tag to that person? I see in automation I can set tags, but having to go through each product manually is tedious.
Hi Brad, simply leave the product field empty and your automation will run for every WooCommerce purchase.
Hello. How can you create a sequence when a customer leaves the shopping cart and does not finish it?
No, we don’t have the abandoned cart feature yet.
Any update?
Hi, still can’t find any options for cart abd in Fleunt CRM, is already available? If yes, please send me a link with instactions 😉 thanks!
Sorry, it’s still in development!
Is the abandoned cart trigger already there?
Dear Karin,
Good News! We have just brought Abandoned Cart feature in FluentCRM. And, Cart Abandonment trigger will be found in Automation section.
Check the link below for detail update:
FluentCRM — Abandoned Cart
A work around (have not tested as I only just purchased Fluent CRM) might be to youse CartFlows Abandoned Cart plugin (free) and it can trigger a webhook. Then get the Webhook to trigger your FCRM automation.
Can FluentCRM integrate with WooCommerce Subscriptions and automate the lists of active subscribers?
Thus, when a new post is made, it sends a notification to all ‘active subscribers’ that an update has been published or even email them the update.
Hello,
in your example – the customer is being sent an email asking them to subscribe. but they are already a buyer – so how do I disable the double opt in requirement so I don’t annoy my customers with the extra email asking them to subscribe?
Hi Larry, we haven’t updated the doc since our last update. Sorry for that. Coming back to your question, here’s how you can disable the double opt-in email for WooCommerce customers: Settings> General Settings> Tick the Enable Subscription Checkbox to WooCommerce Checkout Page > untick Enable Double-Optin Email Confirmation
So do you follow gdpr and set opt out links in every email and also is abandoned carts working
Hi Chris, yes but the abandoned cart feature isn’t available yet.
Keep in mind that buyer != subscriber. Just because someone bought from you does NOT mean or even IMPLY that you have the right to “bombard” them with emails – with the exception of those related to the purchase itself. So even IF they are buyers, they should be explicitly asked if they want to “subscribe”.
Does FluentCRM have to be on the same site/domain as WooCommerce or can it be in a separate install?
Is there a way of having “all products” in the Target Product Field? If you had 1000s of products it would take quite some time to choose all those for an automation you wanted for all products.
If you keep your target product field blank, the automation will run for every product.
Hi, how can users opt-out of emails from FluentCRM. GDPR requires this. And generally, they need to OPT-IN to receive marketing automations (I have asked about this feature 6 months ago and Shahjahn said it would come in the next update. Obviosuly not). It is so important for your EU customers to allow a “opt-in” checkbox in Woocommerce. It can’t be that complex to implement, no?
Hi Shayne,
Pardon us for not updating our documentation. We made the feature available in the latest update. To enable WooCommerce opt-in checkbox, go to FluentCRM>Settings>General Settings and enable the checkbox under Woocommerce Checkout Subscription Field.
Hi,
How do i make the buyer automatically becomes a subscriber after the purchase. Or if FluentCRM could not do that, how do i make sure that they will become a subscriber during checkout?
Thank you
Hi Ibrahim, it’s pretty easy to create a subscriber when someone bought a product. Just go to automation and select a WooCommerce New Order trigger and select Subscribe status. Then you can run the entire automation based on that trigger.